🧢 Beautiful ✨ Detailed πŸ’ Adorable

Christmas in the Sand Blanket Pattern

Christmas in the Sand Blanket Pattern
4.6β˜… Rating
25-30 Hours Time Needed
2.5K Made This
βœ‚οΈ

Intermediate Level

Ideal for those with basic knitting experience, featuring slightly more advanced stitches and techniques to expand your skills.

⏱️

Slow & Steady

A 10-12 hour projectβ€”great for savoring the process over several sessions.

🏑

Cozy Accent

A warm touch for your space that transforms ordinary corners into inviting nooks filled with handmade charm.

About This Christmas in the Sand Blanket Pattern

This Christmas in the Sand blanket pattern features 35 unique starburst granny squares arranged in a stunning 7x5 layout. Each square combines three vibrant colors in rounds to create eye-catching motifs that come together using the continuous join-as-you-go technique. The blanket is finished with a beautiful border featuring three rounds of half double crochet in coordinating colors and adorned with playful tassels at each corner.

Christmas in the Sand Blanket Pattern crochet pattern - detailed view of completed project

The pattern includes detailed color charts for each of the 35 squares, video tutorial links for the starburst motif and CJAYG assembly method, and helpful tips for customizing your blanket with alternative yarn weights or different color combinations.

Why You'll Love This Christmas in the Sand Blanket Pattern

I absolutely love this pattern because it's like creating a rainbow of happiness stitch by stitch! The color combinations are so fun to play with, and watching those starburst motifs come together is incredibly satisfying. I appreciate how the CJAYG method eliminates all that tedious sewing at the end, making assembly almost as enjoyable as crocheting the squares themselves. The finished blanket is not only gorgeous but also wonderfully cozy and substantial thanks to the super bulky yarn. Plus, there's something magical about working on a project that looks complex but breaks down into simple, repetitive rounds that let your hands work while your mind relaxes.

Christmas in the Sand Blanket Pattern step 1 - construction progress Christmas in the Sand Blanket Pattern step 2 - assembly progress Christmas in the Sand Blanket Pattern step 3 - details and accessories Christmas in the Sand Blanket Pattern step 4 - final assembly and finishing

Switch Things Up

I love how versatile this Christmas in the Sand blanket pattern really is! While the original uses those gorgeous tropical-inspired colors, you can completely transform the mood by switching up your palette. Imagine working this same pattern in icy blues and silvers for a winter wonderland vibe, or soft pastels for a nursery blanket that's both modern and sweet.

One of my favorite modifications is playing with the border rounds. The pattern uses three HDC rounds, but you could easily add textured stitches like popcorns or bobbles for extra dimension. I've also experimented with adding more border rounds in graduating colors to create an ombre effect that draws the eye outward.

For yarn substitutions, I've successfully used three strands of worsted weight held together, which is perfect for stash-busting! Just keep that gauge swatch handy because consistency is key when you're making 35 squares. You could even make each square from completely different yarn combinations if you're going for a scrappy, eclectic look.

If you want to speed up the project, consider making larger squares by adding additional rounds to each starburst. You'd need fewer total squares but more yarn per square. Alternatively, make mini versions with just Rounds 1 and 2 for a delicate baby blanket or cozy lap throw.

The CJAYG method is wonderful, but I've also made versions where I deliberately used contrasting yarn for visible seams, turning the joins into a design feature. Don't be afraid to make this pattern your own!

Common Mistakes & How to Fix Them

βœ— Not checking gauge before starting which can result in squares that don't match the 8-inch size and require significantly more yarn than estimated βœ— Forgetting to fasten off between color changes in the starburst rounds leading to color bleeding and messy transitions between rounds βœ— Attempting to join squares without watching the CJAYG tutorial first resulting in incorrect joins and gaps between motifs that weaken the blanket structure βœ— Running out of white yarn during assembly because not accounting for the CJAYG method which uses more background color than traditional joining βœ— Skipping the blocking step which leaves squares uneven and the blanket looking unprofessional with wavy edges and inconsistent sizing βœ— Not using stitch markers at corners during border rounds causing misaligned corners and an uneven border that doesn't lay flat

Christmas in the Sand Blanket Pattern

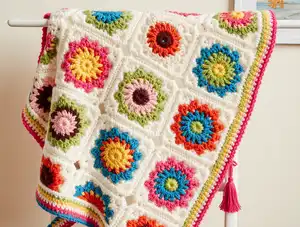
Create a stunning vibrant blanket that brings tropical holiday vibes to your home with this colorful granny square design. This Christmas in the Sand blanket combines cheerful starburst motifs in shades of mint, chartreuse, cactus blossom, and more to create a cozy 44x60 inch masterpiece. Perfect for adding a pop of color to your living space or gifting to someone special, this pattern uses the continuous join-as-you-go method for seamless assembly. Whether you're looking to use up your yarn stash or create a statement piece, this blanket will become a treasured heirloom that brings warmth and joy year after year.

Intermediate 25-30 Hours

Materials Needed for Christmas in the Sand Blanket Pattern

β€” Main Fabric

  • 01
    WeCrochet Tuff Puff Super Bulky yarn (44 yds/100g) in White - 660 yds/1500g (15 skeins)
  • 02
    WeCrochet Tuff Puff Super Bulky in Flamingo - 41 yds/94g (1 skein)
  • 03
    WeCrochet Tuff Puff Super Bulky in Pucker - 116 yds/263g (3 skeins)
  • 04
    WeCrochet Tuff Puff Super Bulky in Cactus Blossom - 180 yds/410g (5 skeins)
  • 05
    WeCrochet Tuff Puff Super Bulky in Canary - 30 yds/69g (1 skein)
  • 06
    WeCrochet Tuff Puff Super Bulky in Chartreuse - 179 yds/407g (5 skeins)
  • 07
    WeCrochet Tuff Puff Super Bulky in Pear - 70 yds/158g (2 skeins)
  • 08
    WeCrochet Tuff Puff Super Bulky in Mint - 186 yds/423g (5 skeins)
  • 09
    WeCrochet Tuff Puff Super Bulky in Marina - 80 yds/181g (2 skeins)
  • 10
    WeCrochet Tuff Puff Super Bulky in Jelly - 42 yds/95g (1 skein)
  • 11
    WeCrochet Tuff Puff Super Bulky in Fairy Tale - 44 yds/100g (1 skein)
  • 12
    Alternative: 3 strands of worsted weight yarn held together to achieve super bulky weight

β€” Tools Required

  • 01
    US 9.00 mm (M/N) crochet hook
  • 02
    Tapestry needle for weaving in ends
  • 03
    Scissors
  • 04
    Stitch markers
  • 05
    4-inch book or tassel maker for creating tassels
  • 06
    Blocking mats and pins (optional but recommended)

Progress Tracker

0% Complete

β€” Granny Square (Classic Starburst)

Round 1

Step 1:

Using first colour, Ch 4

Step 2:

Sl st into 4th ch from hook to create centre ring

Step 3:

Ch 2, work 11 DC into centre ring (12 DC total)

Step 4:

Join with sl st to the top of the first official DC st (not the ch-2), Fasten off

Round 2

Step 1:

Join new colour between any of the DC sts from rnd 1 and ch 2

Step 2:

Work 1 DC into the same sp

Step 3:

Work 2 DC sts into the sps between each DC st of rnd 1 (24 DC sts total)

Step 4:

Sl st into the top of the first official DC st (not the ch-2), Fasten off

Round 3

Step 1:

Join new colour between any of the DC shells from rnd 2 and ch 2

Step 2:

Work 2 DC into the same sp

Step 3:

Work 3 DC sts (shell) into each of the sps between DC shells of the previous rnd (36 DC sts total)

Step 4:

Join with a sl st to the top of the first official DC (not the ch-2), Fasten off

Info:

Video tutorial available at https://youtu.be/BbNzMPBpNKw

Note:

Make 35 starburst squares total following the color chart provided

β€” Assembling Blanket CJAYG

Step 1:

With RS of starbursts face up, lay out all motifs in the arrangement from the colour graph (7 rows x 5 squares)

Step 2:

Using background colour (White), start in top right-hand corner to join squares across the rows

Step 3:

First row will be joined from square number 5 across to square number 1

Step 4:

Second row will start with square number 10 and be worked across to square number 6

Step 5:

Following along with the video tutorial, crochet starbursts together until blanket is complete, then fasten off

Info:

Video tutorial for CJAYG method available at https://youtu.be/9c-nszJMJbg

β€” Border

Round 1

Step 1:

Join White (or main background colour) in any corner and ch 2

Step 2:

Work [2 DC, ch 2, 3 DC] into corner

Step 3:

Work 3 DC sts into each sp around blanket (work regular granny square stitch around blanket)

Step 4:

When working the corner joins of two squares, put 2 DC on either side of join

Step 5:

Work [3 DC, ch 2, 3 DC] into corners

Step 6:

Repeat this all the way around the blanket and join with a sl st to the first DC (not the ch-2), fasten off

Round 2

Step 1:

Join new colour (Cactus Blossom) and Ch 1

Step 2:

Work a HDC into each st around, make sure to put 3 HDC into each corner (use stitch marker to indicate middle st)

Step 3:

Join with a sl st to the first HDC (not the ch-1), fasten off

Round 3

Step 1:

Join new colour (Chartreuse) and Ch 1

Step 2:

Work a HDC into every st around, make sure to put 3 HDC into the middle stitch of each corner (the middle HDC in the corner from the previous rnd)

Step 3:

Join with a sl st to the first HDC (not the ch-1), fasten off

Round 4

Step 1:

Join new colour (Mint) and Ch 1

Step 2:

Work a HDC into every st around, make sure to put 3 HDC into the middle stitch of each corner (the middle HDC in the corner from the previous rnd)

Step 3:

Join with a sl st to the first HDC (not the ch-1), fasten off

β€” Tassels

Step 1:

Using the colour Pucker, create 4 tassels for the corners of the blanket

Step 2:

Using a 4 inch book (or tassel maker), wrap yarn 20 times to achieve appropriately sized tassel

Step 3:

Trim ends and attach to blanket corners

Pro-tip:

Tie tassels onto the blanket with a little bow so you can easily remove them when washing the blanket

Info:

Tassel tutorial available at https://youtu.be/6VDCJJOcYt0

Assembly Instructions

  • Lay out all 35 completed starburst squares right side up according to the color chart in a 7x5 arrangement before beginning assembly.
  • Begin joining in the top right corner using the CJAYG method with white yarn, working from square 5 to square 1 for the first row.
  • Continue joining squares row by row, always starting from the right side and working left (square 10 to 6, then 15 to 11, etc).
  • Join each subsequent row to the previous row as you work, following the CJAYG video tutorial for proper technique.
  • After all squares are joined, work Round 1 of the border in white, placing 3 DC in each space and special corner increases.
  • Add three HDC border rounds in Cactus Blossom, Chartreuse, and Mint, ensuring 3 HDC in each corner's middle stitch.
  • Create four tassels using Pucker yarn wrapped 20 times around a 4-inch form, then attach to each corner with removable bows.

Important Notes

  • πŸ’‘Ch 2 counts as DC throughout the pattern and ch 3 counts as tr throughout
  • πŸ’‘White yarn quantity is very tight with only a 6-inch tail remaining, order extra if concerned or if gauge is looser
  • πŸ’‘Fairy Tale color also has minimal excess, consider ordering an additional skein for peace of mind
  • πŸ’‘Gauge directly affects yarn quantities - if squares measure larger than 8 inches you will need more yarn
  • πŸ’‘Adjust hook size as needed to achieve proper gauge before starting the project
  • πŸ’‘CJAYG method uses more yarn than traditional joining, so quantities account for this technique
  • πŸ’‘Read pattern entirely before starting and watch all video tutorials for best results
  • πŸ’‘Each round of starburst requires specific yardage: Round 1=3yds, Round 2=7yds, Round 3=8.8yds
  • πŸ’‘Block finished blanket to 44x60 inches for professional appearance and even edges

This vibrant Christmas in the Sand blanket pattern brings together the joy of colorful granny squares with the efficiency of continuous joining! Designed for crocheters who love bold colors and satisfying projects, this pattern breaks down a large blanket into manageable starburst motifs that join seamlessly as you go. With detailed color charts for all 35 unique squares, helpful video tutorials, and customization options, you'll create a stunning heirloom piece that's perfect for cozy evenings or as a showstopping gift. The combination of tropical-inspired colors creates a fresh take on classic granny square design that works year-round! 🧢✨🌈

You ask,

we answer.

FAQs

Can I use different yarn than WeCrochet Tuff Puff Super Bulky?

Yes! You can substitute any super bulky weight yarn or hold 3 strands of worsted weight yarn together. Just make sure to check your gauge carefully - your squares should measure 8 inches after Round 3 to match the pattern's yarn quantities and finished dimensions.

What is the CJAYG method and do I have to use it?

CJAYG stands for Continuous Join As You Go, which means you join squares together as you crochet them rather than sewing them together later. The pattern includes video tutorials for this method. You can use traditional sewing to join squares instead, but you'll need extra white yarn if you do.

How do I follow the color chart for each square?

Each square number corresponds to three colors listed in order from Round 1 to Round 3. For example, Square 1 uses Chartreuse for Round 1, Marina for Round 2, and Cactus Blossom for Round 3. The chart on page 3 shows the layout and all color combinations.

Can I make the blanket larger or smaller?

Absolutely! To make it larger, add more squares to your layout (the pattern uses 7x5=35 squares). To make it smaller, reduce the number of squares. Remember to recalculate yarn quantities based on the per-round yardage provided in the pattern notes.

Why is blocking important for this blanket?

Blocking helps even out all 35 squares so they're uniform in size, creates crisp corners, and ensures the blanket lays flat. Since you're joining many individual pieces, blocking makes the finished blanket look professional and cohesive.

Can I skip Round 4 of the starburst squares?

Yes! Round 4 is only included for those who want to make traditional squares and sew them together. If you're using the CJAYG method as the pattern recommends, you skip Round 4 entirely and join the squares after Round 3.