🧶 Beautiful ✨ Detailed 💝 Adorable

Sweet Ice Cream Crochet Blanket Pattern

Sweet Ice Cream Crochet Blanket Pattern
4.1★ Rating
15-25 Hours Time Needed
3.6K Made This
✂️

Intermediate Level

Ideal for those with basic knitting experience, featuring slightly more advanced stitches and techniques to expand your skills.

⏱️

Slow & Steady

A 10-12 hour project—great for savoring the process over several sessions.

🏡

Cozy Accent

A warm touch for your space that transforms ordinary corners into inviting nooks filled with handmade charm.

About This Sweet Ice Cream Crochet Blanket Pattern

This delightful ice cream blanket pattern combines practical warmth with whimsical design, featuring repeating ice cream cone motifs worked in multiple colors. The pattern uses bobble stitches to create textured ice cream scoops and incorporates clever colorwork techniques to form the waffle cones. With four size options ranging from baby blankets to small throws, you can customize this project to fit your needs perfectly.

Sweet Ice Cream Crochet Blanket Pattern crochet pattern - detailed view of completed project

The blanket is worked in rows with strategic color changes, creating a checkerboard pattern of sweet ice cream treats. A beautiful picot edge finish adds the perfect decorative touch to complete this charming design.

Why You'll Love This Sweet Ice Cream Crochet Blanket Pattern

I absolutely love how this pattern transforms simple stitches into something so delightfully cheerful and fun! The bobble stitch ice cream scoops add wonderful texture that makes the blanket feel extra special, and I find the color-changing technique really satisfying to master. What I enjoy most is how versatile it is - you can make it in any size and customize the ice cream flavors to match your décor or personal preferences. The repeating pattern becomes meditative once you get into the rhythm, and watching those cute little ice cream cones appear row by row is genuinely exciting. Plus, the finished blanket always gets compliments and brings such a playful, happy vibe to any room!

Sweet Ice Cream Crochet Blanket Pattern step 1 - construction progress Sweet Ice Cream Crochet Blanket Pattern step 2 - assembly progress Sweet Ice Cream Crochet Blanket Pattern step 3 - details and accessories Sweet Ice Cream Crochet Blanket Pattern step 4 - final assembly and finishing

Switch Things Up

I love experimenting with different color combinations for this ice cream blanket! Instead of the traditional vanilla, strawberry, and pistachio, I've tried making chocolate, mint chocolate chip, and butter pecan versions using brown, green with white flecks, and caramel tones. You could even create a rainbow sherbet version with multiple bright colors.

For a more sophisticated look, I've worked this pattern in neutral tones - cream cones with soft gray, beige, and white ice cream scoops make it perfect for modern nurseries. The background color is another fantastic place to play around; I've done navy blue for a bold contrast and soft mint green for a vintage ice cream parlor vibe.

If you want to make it extra special, consider adding small details like French knots for sprinkles on top of the ice cream scoops, or use variegated yarn for a fun confetti effect. I've also experimented with changing the size of individual ice cream sections by working only certain repeats, creating larger statement cones mixed with smaller ones.

For advanced crocheters, try incorporating different bobble sizes or even popcorn stitches for varied texture. You could also add a cherry on top of select ice cream cones using small red bobbles worked separately and sewn on. The possibilities are truly endless, and each variation brings its own sweet charm to this delightful pattern!

Common Mistakes & How to Fix Them

✗ Forgetting to push bobble stitches to the correct side - remember to push them forward on right side rows and backward on wrong side rows for proper texture ✗ Losing track of the color change pattern between checkerboard repeats - use stitch markers at the beginning of each ice cream cone section to stay organized ✗ Pulling the carried yarn too tightly along the wrong side which causes puckering - leave slight slack when carrying non-working colors across the back ✗ Missing the strategic extra single crochet stitches before corners in the edging round which throws off the picot placement and corner symmetry ✗ Not counting stitches regularly during the foundation chain setup which results in uneven ice cream cone spacing throughout the entire blanket

Sweet Ice Cream Crochet Blanket Pattern

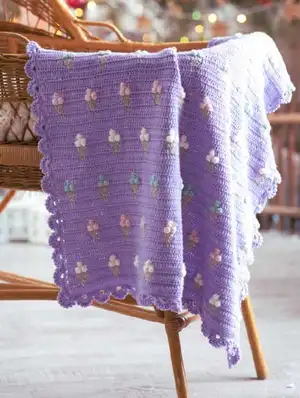
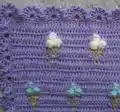
Create a delightful ice cream-themed blanket that's perfect for baby nurseries or as a cozy throw! This charming pattern features adorable ice cream cones arranged in a cheerful design, complete with vanilla, strawberry, and pistachio colored scoops. The blanket is worked flat in one piece with a decorative outer edging, making it a fun project that combines colorwork techniques with easy-to-follow instructions. Available in four versatile sizes from baby blankets to small throws, this sweet design will bring smiles and warmth to any space.

Intermediate 15-25 Hours

Materials Needed for Sweet Ice Cream Crochet Blanket Pattern

— Main Fabric

  • 01
    DK (8 ply) yarn approximately 50g (1.75oz)/115m (125yds) per ball
  • 02
    Background color A (light purple or color of choice): 500-1300gr depending on size
  • 03
    Color B beige for ice cream cones: 50-130gr depending on size
  • 04
    Color C yarns for ice cream flavors - white for vanilla, pink for strawberry, light turquoise for pistachio: 30-80gr each color depending on size
  • 05
    Drops Merino Extra Fine 50g/105m suggested in colors: 22 Helllila, 08 Hellbeige, 01 Natur, 40 Puderrosa, 15 Hell Graugrün
  • 06
    Alternative yarn options: Debbie Bliss Rialto 100% Merino, Drops Cotton Merino, or Sublime Baby Cashmere Merino Silk

— Tools Required

  • 01
    Crochet hook 2.75mm (C/2) or size needed to obtain gauge
  • 02
    Scissors
  • 03
    Yarn needle for weaving in ends
  • 04
    Stitch markers (recommended for tracking pattern repeats)
  • 05
    Measuring tape

Progress Tracker

0% Complete

— Foundation Chain:

Size 1:

Make 141 Ch

Size 2:

Make 155 Ch

Size 3:

Make 183 Ch

Size 4:

Make 211 Ch

— Main Blanket Body:

Set up Row (WS):

Starting from the 4th chain from the hook make: 138 (152, 180, 208) DC = 139 (153, 181, 209) DC including 3Ch at the beginning. Use Background Color A

Row 1 (RS):

3Ch, 5DC, *with Color B: 1DC, with Color A: 13DC* Repeat from * to * At the end of the row: 6DC with Color A

Row 2 (WS):

3Ch, 3DC, *2DCtog, with Color B: 3DC in 1st, with Color A: 2DCtog, 9DC* Repeat from * to * At the end of the row: 4DC with Color A

Row 3 (RS):

3Ch, 2DC, *2DCtog, with Color B: 2DC in 1st, 1DC, 2DC in 1st, with Color A: 2DCtog, 7DC* Repeat from * to * At the end of the row: 3DC with Color A. Cut Color B yarn

Row 4 (WS):

3Ch, 4DC, *with Color C make a Bobble (push it backwards), 1SC, Bobble (push it backwards), with Color A: 11DC* Repeat from * to * At the end of the row: 5DC with Color A

Row 5 (RS):

3Ch, 5DC, *with Color C make a Bobble (push it forward), with Color A: 13DC* Repeat from * to * At the end of the row: 6DC. Cut Color C yarn

Rows 6-8:

With Color A work 3Ch, 138 (152, 180, 208) DC

Row 9 (RS):

3Ch, 12DC, *with Color B: 1DC, with Color A: 13DC* Repeat from * to * At the end of the row: 13DC with Color A

Row 10 (WS):

3Ch, 10DC, *2DCtog, with Color B: 3DC in 1st, with Color A: 2DCtog, 9DC* Repeat from * to * At the end of the row: 11DC with Color A

Row 11 (RS):

3Ch, 9DC, *2DCtog, with Color B: 2DC in 1st, 1DC, 2DC in 1st, with Color A: 2DCtog, 7DC* Repeat from * to * At the end of the row: 10DC with Color A. Cut Color B yarn

Row 12 (WS):

3Ch, 11DC, *with Color C make a Bobble (push it backwards), 1SC, Bobble (push it backwards), with Color A: 11DC* Repeat from * to * At the end of the row: 12DC with Color A

Row 13 (RS):

3Ch, 12DC, *with Color C make a Bobble (push it forward), with Color A: 13DC* Repeat from * to * At the end of the row: 13DC with Color A. Cut Color C yarn

Rows 14-16:

With Color A work 3Ch, 138 (152, 180, 208) DC

Info:

Continue working rows 1-16 for the following number of repeats depending on size

Size 1:

Repeat 3 more times plus 15 rows = 80 rows from beginning (including set up row) = 10 ice cream lines

Size 2:

Repeat 4 more times plus 15 rows = 96 rows from beginning (including set up row) = 12 ice cream lines

Size 3:

Repeat 6 more times plus 15 rows = 128 rows from beginning (including set up row) = 16 ice cream lines

Size 4:

Repeat 7 more times plus 15 rows = 144 rows from beginning (including set up row) = 18 ice cream lines

Info:

Finish after the WS row. Do not cut the yarn, continue with outer edging

— Outer Edging:

Round 1:

RS is facing you. Do not turn, work in round. 1Ch, 3SC in top of DC. On the top and at the bottom of the blanket make 1SC in each DC st. Work 2 SC in each perpendicular DC. In each corner make 3SC. At the end: Sl st in top of the 1st SC

Round 2:

1Ch, 1SC in the same st, *5Ch, skip 1st, 6SC*, Repeat from * to *. Make sure you have 5Ch right on top of each corner, in order to do it, at the end of the long side add 2 extra SC before 5Ch at the corner. At the end: Sl st in top of the 1st SC

Round 3:

Sl st in 5Ch loop, 3Ch, (Picot, 1DC) x 7 times, *skip 2SC from the previous round, 1SC in each of the next 2st, skip 2SC, in 5Ch loop: (1DC, Picot) x 6 times, 1DC* Repeat from * to *. In the corner 5Ch space add extra: (1DC, Picot) x twice. At the end of the round, in the first corner 5Ch space, make: 1DC, Picot, Sl st in top of 3Ch

Info:

Picot stitch: Make 3Ch, Sl st in the first Ch

Info:

Bobble stitch: Yarn over, insert the hook into the stitch and pull yarn through, pull yarn through 2 loops. Repeat 4 more times, you will end up with 6 loops on your hook. Pull yarn through all of the loops on the hook

— Finishing:

Final Step:

Weave in the ends, wash by hand or in washing machine at 30C on a delicate cycle. Dry flat and enjoy

Assembly Instructions

  • Weave in all yarn ends securely on the wrong side of the blanket, especially at color change points
  • Block the blanket gently by washing in cool water (30°C/86°F) on a delicate cycle or by hand
  • Lay the blanket flat on a clean towel or blocking mat to dry, gently shaping it to the correct dimensions
  • Steam block lightly if needed to even out stitches and help the picot edging lay flat
  • Ensure all bobble stitches are pushed to the correct side for proper texture before final blocking

Important Notes

  • 💡Gauge is critical for this pattern - make a test swatch to ensure your blanket will be the correct size
  • 💡Keep track of which row you're on, as the ice cream pattern alternates between straight and checkerboard placement
  • 💡When carrying yarn across the back, maintain even tension to avoid puckering or loose loops
  • 💡The bobble stitches should be pushed to the right side on RS rows and wrong side on WS rows for proper dimensional effect
  • 💡Consider using stitch markers to mark the beginning of each 14-stitch repeat for easier pattern tracking
  • 💡Have extra yarn on hand, especially of the background color, as consumption can vary based on tension

This sweet ice cream blanket pattern brings together playful design and practical comfort in one delightful project! Perfect for nurseries, children's rooms, or anyone who loves whimsical home décor, this blanket features adorable ice cream cones worked in cheerful colors with textured bobble stitch scoops. The pattern includes detailed instructions for four sizes and helpful techniques for managing multiple colors. Whether you're making it as a special baby gift or treating yourself to something fun, this charming blanket will bring smiles for years to come! 🍦🧶✨

You ask,

we answer.

FAQs

Can I use different yarn weights for this pattern?

While the pattern is designed for DK weight yarn, you can adapt it to other weights by adjusting your hook size and recalculating the foundation chain. Keep in mind that changing yarn weight will affect the final dimensions and yarn consumption significantly.

How do I keep my bobble stitches uniform?

Maintain consistent tension when creating each bobble, and always push them to the correct side immediately after completion. Using the same number of yarn overs and loops for each bobble will ensure they look uniform throughout your blanket.

Can I make just one ice cream flavor instead of three?

Absolutely! You can use a single color for all the ice cream scoops if you prefer a simpler look, or create your own custom flavor combinations using any colors you love.

What's the best way to manage multiple yarn colors?

The pattern includes detailed instructions for carrying yarn along the wrong side of the work. You can either carry the beige cone color throughout or cut and rejoin as instructed. For the ice cream colors, cutting after each use keeps the back neater.

How do I adjust the blanket size beyond the four options given?

Add or subtract multiples of 14 stitches to the foundation chain for width adjustments, and add or subtract multiples of 16 rows for length changes. Remember to recalculate your yarn requirements when making size modifications.