🧢 Beautiful ✨ Detailed πŸ’ Adorable

Strawberry Tote Bag and Drawstring Pouch Pattern

Strawberry Tote Bag and Drawstring Pouch Pattern
4.4β˜… Rating
15-20 Hours Time Needed
1.7K Made This
βœ‚οΈ

Intermediate Level

Ideal for those with basic knitting experience, featuring slightly more advanced stitches and techniques to expand your skills.

⏱️

All-Day Adventure

Requires 8-10 hours, ideal for a full day of immersive knitting.

🎁

Cozy Accent

A warm touch for your space that transforms ordinary corners into inviting nooks filled with handmade charm.

About This Strawberry Tote Bag and Drawstring Pouch Pattern

This beautiful strawberry-themed set combines classic granny square construction with adorable applique work to create both a functional tote bag and a matching drawstring pouch. The pattern features detailed instructions for creating strawberry motifs complete with embroidered seeds and leafy stems, all worked in cheerful shades of pink, white, and red. Perfect for the Stroll in the Garden series, this intermediate-level project teaches you multiple assembly techniques including both standard and flat-seam joins.

Strawberry Tote Bag and Drawstring Pouch Pattern crochet pattern - detailed view of completed project

The pattern includes comprehensive photo tutorials and step-by-step instructions for assembling granny squares, creating strawberry appliques, and attaching handles. You'll learn techniques for sewing pieces together, creating structured bag edging, and finishing with professional-looking details.

Why You'll Love This Strawberry Tote Bag and Drawstring Pouch Pattern

I absolutely love this pattern because it combines practicality with pure charm! The strawberry motifs are irresistibly cute, and I enjoy how the pattern offers flexibility in assembly methods so you can choose what works best for your skill level. The matching set concept means you get two completed projects that coordinate beautifully, and the granny square construction makes it portable and perfect for working on while watching TV or traveling. Plus, there's something so satisfying about watching those little strawberries come to life with each stitch!

Strawberry Tote Bag and Drawstring Pouch Pattern step 1 - construction progress Strawberry Tote Bag and Drawstring Pouch Pattern step 2 - assembly progress Strawberry Tote Bag and Drawstring Pouch Pattern step 3 - details and accessories Strawberry Tote Bag and Drawstring Pouch Pattern step 4 - final assembly and finishing

Switch Things Up

I absolutely love how customizable this pattern is! While the strawberry theme is adorable, I've experimented with so many variations that make this pattern work for different seasons and styles.

For a spring version, I replaced the strawberries with small flower appliques in pastel colors - think daisies, tulips, or cherry blossoms. The same construction method works beautifully!

During fall, I made a version using autumn-colored granny squares (burnt orange, deep burgundy, and cream) with small pumpkin or leaf appliques instead of strawberries. It made the perfect harvest market bag.

For winter holidays, I switched to red and green granny squares with little Christmas tree or snowflake motifs. The drawstring pouch became an adorable gift bag!

You can also skip the appliques entirely and work with variegated or ombre yarn for the granny squares to create a completely different aesthetic - more modern and minimalist.

I've made child-sized versions using fewer granny squares (2x2 instead of 3x3) and shorter handles, perfect for little ones who want their own special bag.

For a more sophisticated look, I tried monochromatic color schemes - all shades of blue, or cream and tan - with metallic thread accents instead of appliques.

The drawstring pouch scales up beautifully too - I've made larger versions using 6-round granny squares for cosmetic bags or small project pouches.

Don't be afraid to mix different granny square patterns instead of all solids - try some with flowers or different motifs in the center for visual interest.

The handle length is also easily adjustable - make them shorter for a handheld style or longer to wear as a shoulder bag by adding more chains to the foundation!

Common Mistakes & How to Fix Them

βœ— Twisting the bag handles when attaching them - always lay them flat and pin carefully before sewing to ensure they hang properly without twists βœ— Forgetting to stuff the strawberry appliques before completing them, making it impossible to add seeds - pause and add embroidery details at the right stage βœ— Not maintaining consistent tension in granny squares leading to uneven panel sizes - use stitch markers and count stitches regularly to keep squares uniform βœ— Sewing granny squares with wrong sides facing instead of right sides when using flat seam method - double check orientation before beginning to sew panels together

Strawberry Tote Bag and Drawstring Pouch Pattern

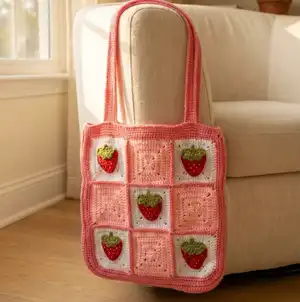
Create a charming strawberry-themed tote bag and matching drawstring pouch with this delightful granny square pattern. This versatile set features adorable strawberry appliques on a pink and white color scheme, perfect for summer outings or as a thoughtful handmade gift. The tote bag measures approximately 14 inches square while the pouch is a convenient 6x5 inches, both featuring sweet strawberry motifs with embroidered seeds and leafy green tops.

Intermediate 15-20 Hours

Materials Needed for Strawberry Tote Bag and Drawstring Pouch Pattern

β€” Main Fabric

  • 01
    Red Heart Super Saver in Cherry Red (#0319) for strawberries - 7oz/198g, medium weight
  • 02
    Red Heart Super Saver in Tea Leaf (#0624) for strawberry leaves - 7oz/198g, medium weight
  • 03
    Red Heart Super Saver in Baby Pink (#4602) for light pink granny squares - 7oz/198g, medium weight
  • 04
    Red Heart Super Saver in Perfect Pink (#0706) for dark pink granny squares - 7oz/198g, medium weight
  • 05
    Artiste Cotton Crochet Thread in Lemon (#145) for strawberry seeds - size 10 lace weight, 400 yards
  • 06
    Crafter's Secret Big Idea in White (#01) for white granny squares - 16oz/454g, medium weight

β€” Tools Required

  • 01
    4.00mm (G-6) crochet hook
  • 02
    Yarn needle (curved tip preferred)
  • 03
    Scissors
  • 04
    Stitch markers
  • 05
    Sewing pins (optional)
  • 06
    Beads for drawstring ends (optional)

Progress Tracker

0% Complete

β€” Drawstring Pouch Granny Square :

Round 1 :

Make MR, CH 3, DC 3, CH 2, DC 4, CH 2, DC 4, CH 2, DC 4, CH 2, SC in original CH 3 space (16 stitches and 4 CH 2 spaces)

Round 2 :

CH 2, DC in CH 3 space, DC in SC stitch, DC 3, DC 2 in CH 2 space, CH 2, DC 2 in CH 2 space, DC 4, DC 2 in CH 2 space, CH 2, DC 2 in CH 2 space, DC 4, DC 2 in CH 2 space, CH 2, DC 2 in CH 2 space, DC 4, DC 2 in CH 2 space, CH 2, SC in original CH 2 space (32 stitches and 4 CH 2 spaces)

Round 3 :

CH 2, DC in CH 2 space, DC in SC stitch, DC 7, DC 2 in CH 2 space, CH 2, DC 2 in CH 2 space, DC 8, DC 2 in CH 2 space, CH 2, DC 2 in CH 2 space, DC 8, DC 2 in CH 2 space, CH 2, DC 2 in CH 2 space, DC 8, DC 2 in CH 2 space, CH 2, SC in original CH 2 space (48 stitches and 4 CH 2 spaces)

Round 4 :

CH 2, DC in CH 2 space, DC in SC stitch, DC 11, DC 2 in CH 2 space, CH 2, DC 2 in CH 2 space, DC 12, DC 2 in CH 2 space, CH 2, DC 2 in CH 2 space, DC 12, DC 2 in CH 2 space, CH 2, DC 2 in CH 2 space, DC 12, DC 2 in CH 2 space, CH 2, SLST in original CH 2 space (64 stitches and 4 CH 2 spaces)

Info :

Fasten off leaving 5-10 inch tail. Hide tails. Repeat to create second granny square for back of pouch.
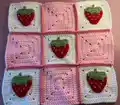
β€” Strawberry Base :

Row 1 :

With red yarn, CH 9

Row 2 :

Starting from second CH from hook, SC in each of 8 CHs (8 SC)

Row 3 :

CH 1 and turn, SC in each of 8 stitches (8 SC)

Row 4 :

CH 1 and turn, DEC using first 2 stitches, SC in next 4 stitches, DEC using last 2 stitches (6 SC)

Row 5 :

CH 1 and turn, SC in each of 6 stitches (6 SC)

Row 6 :

CH 1 and turn, DEC using first 2 stitches, SC in next 2 stitches, DEC using last 2 stitches (4 SC)

Row 7 :

CH 1 and turn, SC in each of 4 stitches (4 SC)

Row 8 :

CH 1 and turn, DEC using first 2 stitches, DEC using last 2 stitches (2 SC)

Row 9 :

CH 1 and turn, DEC using next 2 stitches (1 SC)

Info :

SC border around entire strawberry, SC twice in each edge stitch. Fasten off leaving 5-10 inch tail.

Infos :

Optional: Add seeds by cutting 20 inch piece of yellow yarn (double strand if using lace weight). Sew lines in pattern around strawberry starting from row 4.

β€” Strawberry Stem :

Row 1 :

With green yarn, CH 9

Row 2 :

Starting from third CH from hook, work pattern: DC, TR, and DC all in same CH, SC in next. Repeat pattern until end of row, ending on leaf instead of SC (4 leaves and 3 SC)

Info :

Turn piece to work on underside of foundation chain. SC in next 4 CHs, CH 4, starting from second CH SLST 3, SC in remaining 4 CHs, end with SLST (8 SC)

Infos :

Fasten off leaving 15-20 inch tail. Use tail to sew stem to strawberry, centering it carefully. Hide remaining tails.

β€” Pouch Assembly :

Step 1 :

Place two granny squares on top of each other with wrong sides facing. Make slip knot with same color yarn and pull through upper left corner CH 2 space of both squares.

Step 2 :

SC around both squares together, going into both stitches. SC twice in two bottom CH 2 spaces only. Stop SCing when reaching upper right corner CH 2 space.

Step 3 :

CH 2, DC into upper right corner CH 2 space of front square only. DC one stitch into each top edge stitch of both squares separately, working in round. DC once in each of remaining 3 CH 2 spaces. SLST to end round (34 stitches)

Step 4 :

CH 2, HDC into same stitch as SLST. CH 2, skip 1 stitch, HDC into next. Repeat pattern until reaching original CH 2 space. SLST to end round (18 stitches and 17 CH 2 spaces)

Step 5 :

CH 2, DC into same stitch as SLST. DC one stitch into each HDC stitch and each CH 2 space. SLST to finish (35 stitches). Fasten off leaving 5-10 inch tail and hide remaining tails.

β€” Drawstrings :

Step 1 :

Make slip knot with drawstring color. CH 80 and fasten off leaving 5-10 inch tail. Repeat to make second string (total 2 strings).

Step 2 :

Pull first string through first space on left side of pouch, leaving half dangling. Weave through front 9 spaces.

Step 3 :

Using dangling half, weave through back 8 spaces until reaching right side again.

Step 4 :

Repeat process from right side with second string, weaving through same 10 spaces in front, then 8 spaces in back.

Step 5 :

Tie knots at ends of strings or add beads. Hide remaining tails.

Assembly Instructions

  • Sew strawberry appliques to center of 5 white granny squares using matching red and green yarn, ensuring appliques are centered and right side up
  • Join 18 granny squares (9 dark pink for back, 4 light pink and 5 white with appliques for front) following diagram pattern using single crochet join method
  • Create border around both completed panels by single crocheting around all four sides, working twice into corner chain spaces and adding extra rows at top edge
  • Construct bag bottom and side edging by chaining 169 and working 7 rows of single crochet to create long strip measuring approximately 168 stitches
  • Pin and sew edging strip to bottom and sides of front panel using back loops only, then attach back panel to edging using front loops only with wrong sides together
  • Turn bag right side out and single crochet 3 rounds around top opening working through both panels and edging (122 stitches per round) to create finished edge
  • Make two handles by chaining 121 and working rounds of single crochet with increases at ends, then sew securely to top edge of bag, ensuring handles don't twist

Important Notes

  • πŸ’‘Leave long tails when fastening off pieces to make assembly easier and reduce number of yarn ends to weave in later
  • πŸ’‘Use sewing pins to position appliques and handles before sewing to ensure proper placement and prevent shifting during assembly
  • πŸ’‘Count stitches regularly when making granny squares to ensure all squares are uniform size for easier assembly and professional appearance
  • πŸ’‘Work strawberry seed embroidery before sewing stem to strawberry base as the stem will cover upper portion of strawberry
  • πŸ’‘When using flat seam join method for back panel, always go through front loop only on front square and back loop only on back square to create clean seam
  • πŸ’‘Ensure bag handles lay flat without twisting before sewing - this cannot be corrected later once handles are attached securely

This charming Strawberry Tote Bag and Drawstring Pouch set from the Stroll in the Garden series brings sweet summer vibes to your handmade accessory collection! The combination of classic granny squares with adorable strawberry appliques creates pieces that are both functional and absolutely delightful. Perfect for farmers market trips, beach days, or as a thoughtful gift for the strawberry lover in your life. The detailed instructions and photo tutorials make this intermediate pattern approachable and rewarding. Happy stitching! πŸ“πŸ§Άβœ¨

You ask,

we answer.

FAQs

Can I substitute different yarn weights for this pattern?

While the pattern is written for medium weight (size 4) yarn, you can substitute different weights but the finished size will vary. If using lighter weight yarn, go down a hook size; for heavier yarn, go up a hook size. Make a gauge swatch first to check your granny square size and adjust as needed.

Do I need to make the strawberry appliques or can I skip them?

The strawberry appliques are optional decorative elements. You can absolutely make plain granny square bags without them, or substitute different appliques of your choice. The structural construction remains the same regardless of decoration.

What's the difference between the join methods used for front and back panels?

The front panel uses a single crochet join that creates a visible decorative seam on the right side. The back panel uses a flat seam (invisible) join where you sew through specific loops only, creating a seamless appearance. You can use either method for both panels based on your preference.

How do I make the bag handles more sturdy?

For extra sturdy handles, you can work an additional round of single crochet, double the yarn strand, or insert a cotton cord or ribbon through the center of the handle before sewing it to the bag. Also ensure you sew through multiple rows of the bag border (4-5 rows recommended) for secure attachment.

Can I make the tote bag larger or smaller?

Yes! To adjust size, simply change the number of granny squares used (the pattern uses a 3x3 grid). For a larger bag, make a 4x4 or 5x5 grid. For smaller, use 2x2. Remember to adjust the bottom edging strip length accordingly by measuring the perimeter of your panel and adjusting the foundation chain.