🧢 Beautiful ✨ Detailed πŸ’ Adorable

Straight Bunny 2-in-1 Amigurumi Pattern

Straight Bunny 2-in-1 Amigurumi Pattern
4.6β˜… Rating
4-6 Hours Time Needed
2.9K Made This
βœ‚οΈ

Beginner Friendly Level

Perfect for those just starting their sewing journey, with clear instructions and simple techniques

⏱️

Weekend Treat

Takes 5-7 hours, making it an enjoyable project to finish over a couple of days.

🧸

Cute Companion

An adorable friend to cherish, handcrafted with love to bring comfort and joy for years to come.

About This Straight Bunny 2-in-1 Amigurumi Pattern

This charming Straight Bunny pattern offers crafters a delightful 2-in-1 design that's both beginner-friendly and incredibly rewarding. The pattern features detailed instructions for creating two different sized bunnies, making it perfect whether you want a pocket-sized pal or a larger cuddle buddy. With straightforward techniques like magic rings, single crochet, and invisible decreases, you'll master essential amigurumi skills while creating an adorable companion with sweet embroidered features and floppy ears that add personality to each bunny.

Straight Bunny 2-in-1 Amigurumi Pattern crochet pattern - detailed view of completed project

Both versions include complete instructions for legs, body, head, arms, ears, tail, and a cozy scarf accessory. The pattern uses Paintbox Simply Aran yarn in Paper White and Washed Teal colors, creating a classic and timeless look that works beautifully for gifts or personal collections.

Why You'll Love This Straight Bunny 2-in-1 Amigurumi Pattern

I absolutely love this Straight Bunny pattern because it gives you two adorable sizes in one comprehensive guide! The versatility means I can create matching bunny families or choose the perfect size for different occasions. I appreciate how the pattern breaks down each step with clear photos and helpful tips, making even tricky techniques like invisible decreases easy to master. The embroidered facial features give each bunny so much personality, and I love that the pattern includes guidance for creating those sweet expressions. The addition of the cute teal scarf adds a finishing touch that makes these bunnies feel extra special and gift-ready.

Straight Bunny 2-in-1 Amigurumi Pattern step 1 - construction progress Straight Bunny 2-in-1 Amigurumi Pattern step 2 - assembly progress Straight Bunny 2-in-1 Amigurumi Pattern step 3 - details and accessories Straight Bunny 2-in-1 Amigurumi Pattern step 4 - final assembly and finishing

Switch Things Up

I love experimenting with different color combinations for these adorable bunnies! While the pattern uses classic Paper White, I've created versions in soft pastels like baby pink, lavender, and mint green that look absolutely precious. For a more rustic look, I've tried natural beige and cream tones that give the bunny a vintage charm.

The scarf is another fantastic place to get creative - I've used variegated yarns that create beautiful color gradients, added stripes by changing colors every few rows, or even crocheted tiny flowers to embellish plain scarves. Some of my favorite variations include making seasonal bunnies with festive colored scarves for holidays.

I've also played with the facial expressions by adjusting the embroidery placement slightly. Moving the eyes closer or further apart, changing the nose shape, or adding rosy cheeks with a bit of pink embroidery thread gives each bunny its own unique personality. For children's gifts, I sometimes use larger safety eyes (within safe limits) to create a more cartoonish, playful look.

Size-wise, I've made entire bunny families by adjusting hook sizes while keeping the same pattern - using a 2.5mm hook with DK yarn creates an even tinier pocket bunny, while a 4.5mm hook with chunky yarn makes a super cuddly oversized version. The pattern is wonderfully versatile and really rewards creative experimentation!

Common Mistakes & How to Fix Them

βœ— Not stuffing the legs firmly enough before joining them together, which can cause the bunny to be unstable and wobbly when standing upright βœ— Forgetting to place stitch markers when joining the two legs, making it difficult to track where rounds begin and end throughout the body βœ— Inserting safety eyes too late in the process, which makes it challenging to position them correctly and secure the backing washer properly βœ— Over-stuffing the ears when they should remain flat and floppy, which changes the characteristic look of the straight bunny design βœ— Not counting stitches carefully during increase and decrease rounds, leading to uneven shaping in the head and body sections

Straight Bunny 2-in-1 Amigurumi Pattern

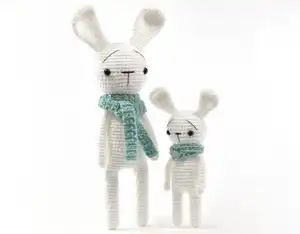
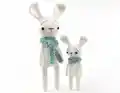
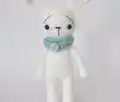
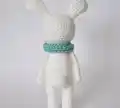
Create your own adorable straight bunny companion with this versatile 2-in-1 crochet pattern! Perfect for crafters of all skill levels, this pattern includes instructions for both a small 9-inch bunny and a large 15-inch version. Each bunny features charming details like embroidered facial features, floppy ears, and a cute little tail. The pattern uses simple stitches and provides clear, step-by-step guidance to help you craft these delightful paper white bunnies complete with cozy teal scarves. Whether you're making a gift or adding to your handmade collection, these straight bunnies will bring joy and comfort to anyone who receives them.

Beginner Friendly 4-6 Hours

Materials Needed for Straight Bunny 2-in-1 Amigurumi Pattern

β€” Main Fabric

  • 01
    Paintbox Simply Aran yarn in Paper White color for body, head, arms, legs, ears, and tail
  • 02
    Paintbox Simply Aran yarn in Washed Teal color for scarf accessory
  • 03
    DMC cotton perle embroidery thread in black (shade 310, thickness 3) for facial features

β€” Tools Required

  • 01
    3.00mm or 3.50mm crochet hook for main body parts
  • 02
    4.50mm crochet hook for crocheting the scarves
  • 03
    Yarn needle for sewing and weaving in ends
  • 04
    Trimming scissors for cutting yarn
  • 05
    Stitch markers to mark beginning of rounds
  • 06
    Pins for holding parts in place while assembling
  • 07
    Polyester fibrefill stuffing for filling body parts
  • 08
    One pair of 10mm black safety eyes for small bunny
  • 09
    One pair of 12mm black safety eyes for large bunny
  • 10
    Embroidery needle for facial details

Progress Tracker

0% Complete

β€” Small Bunny - Legs & Body (Step One) :

Round 1 :

Magic ring & 5 sc into the ring [5 sts]

Round 2 :

Increase 5 times [10 sts]

Round 3-12 :

Sc around (10 rounds in total) [10 sts]

Info :

Cut a couple of inches / 5 cm long yarn tail to fasten off first leg and set aside. Crochet second leg and do NOT cut yarn after round 12.

Round 13 :

Chain 3, take first leg & crochet 10 sc around it (place stitch marker in first stitch), crochet 3 sc (one sc into every chain stitch), crochet around second leg 10 sc, working on other side of chain crochet 3 sc [26 sts]

Info :

Fill both legs with fibrefill now and carry on adding more stuffing inside body as you crochet other rounds.

Round 14-21 :

Sc around (8 rounds in total) [26 sts]

Round 22 :

5 sc, inv dec, 11 sc, inv dec, 6 sc [24 sts]

Round 23 :

Sc around [24 sts]

Round 24 :

*inv dec, 6 sc* rep 3 times [21 sts]

Round 25 :

Sc around [21 sts]

Round 26 :

*5 sc, inv dec* rep 3 times [18 sts]

Round 27 :

Sc around [18 sts]

Round 28 :

*inv dec, 4 sc* rep 3 times [15 sts] slip stitch to finish

Info :

Cut long enough yarn tail to sew head & body together. Thread yarn tail onto yarn needle & bring it out from next stitch.

β€” Small Bunny - Head (Step Two) :

Round 1 :

Magic ring & 6 sc into it [6 sts]

Round 2 :

*inc* rep 6 times [12 sts]

Round 3 :

*sc, inc* rep 6 times [18 sts]

Round 4 :

*2 sc, inc* rep 6 times [24 sts]

Round 5 :

*3 sc, inc* rep 6 times [30 sts]

Round 6 :

*4 sc, inc* rep 6 times [36 sts]

Round 7-12 :

Sc around (6 rounds in total) [36 sts]

Info :

Time to embroider bunny's facial parts (mouth & eye lashes). Use 50 cm / 20 inches long embroidery thread.

Round 13 :

*4 sc, inv dec* rep 6 times [30 sts]

Info :

Insert 10mm eyes in between 10th & 11th rounds. Leave 7 holes between the 2 eyes.

Round 14 :

*3 sc, inv dec* rep 6 times [24 sts]

Round 15 :

*2 sc, inv dec* rep 6 times [18 sts]

Info :

Fill the head with fibrefill.

Round 16 :

*4 sc, inv dec* rep 3 times [15 sts] sl st

Info :

Cut small yarn tail to fasten off.

β€” Small Bunny - Ears (Step Three) :

Info :

Make Two. Sew ears in between 3rd & 7th rounds counting from top.

Round 1 :

Magic ring & 5 sc into it [5 sts]

Round 2 :

*inc* rep 5 times [10 sts]

Round 3 :

*sc, inc* rep 5 times [15 sts]

Round 4-7 :

Sc around (4 rounds in total) [15 sts]

Round 8 :

*3 sc, inv dec* rep 3 times [12 sts]

Round 9 :

Sc around [12 sts]

Round 10 :

*inv dec, 4 sc* rep twice [10 sts]

Round 11 :

Sc around [10 sts]

Round 12 :

*inv dec, 3 sc* rep twice [8 sts]

Round 13 :

Sc around [8 sts]

Info :

Flatten ear and crochet one slip stitch. Cut long yarn tail for sewing. Thread yarn onto needle and bring out from next hole. No stuffing needed.

β€” Small Bunny - Arms (Step Four) :

Info :

Make Two. No fibrefill needed.

Round 1 :

Magic ring & 6 sc into it [6 sts]

Round 2-16 :

Sc around (15 rounds in total) [6 sts]

Round 17 :

Flatten arm by pushing top flat. Crochet 3 sc over both sides of flattened piece [3 sts]

Info :

Cut long yarn tail for sewing. Sew arms in between last two rounds of body using 4 holes for each arm.

β€” Small Bunny - Tail (Step Five) :

Round 1 :

Magic ring & 6 sc into it [6 sts]

Round 2 :

*inc* rep 6 times [12 sts]

Round 3 :

*3 sc, inc* rep 3 times [15 sts]

Round 4 :

Sc around [15 sts]

Round 5 :

*sc, inv dec* rep 5 times [10 sts] sl st

Info :

Cut long yarn tail for sewing. Put tiny bit of stuffing inside tail. Bring yarn tail out from next stitch.
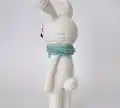
β€” Small Bunny - Scarf (Step Six) :

Info :

Use 4.50mm hook and Washed Teal color.

Instructions :

Make slip knot & crochet 50 chain stitches. Turn to back side of chain where horizontal stitches are visible. Half double crochet into 4th horizontal stitch to create button hole. Carry on crocheting half double crochet until end of chain.

Info :

Cut tiny yarn tail to sew 1.50 cm button on edge of scarf. Wrap scarf twice around bunny's neck and button up.

β€” Large Bunny - Legs & Body (Step One) :

Round 1 :

Magic ring and 6 sc into it [6 sts]

Round 2 :

*inc* rep 6 times [12 sts]

Round 3-20 :

Sc around (18 rounds in total) [12 sts]

Info :

After round 10, stop & put fibrefill into leg. Crochet next 8 rounds and add more fibrefill. Cut small yarn tail to fasten off first leg and set aside. Make second leg.

Round 21 :

Chain 6, crochet 12 sc around first leg (place stitch marker in first sc), 6 sc (sc into every chain), 12 sc around second leg, 6 sc (sc into every chain) [36 sts total]

Info :

Weave tiny yarn tail from first leg inside stitches & drop into second leg.

Round 22-35 :

Sc around (14 rounds in total) [36 sts]

Info :

Start filling body and keep adding stuffing as you crochet.

Round 36 :

*10 sc, inv dec* rep 3 times [33 sts]

Round 37 :

Sc around [33 sts]

Round 38 :

*9 sc, inv dec* rep 3 times [30 sts]

Round 39 :

Sc around [30 sts]

Round 40 :

*8 sc, inv dec* rep 3 times [27 sts]

Round 41 :

Sc around [27 sts]

Round 42 :

*7 sc, inv dec* rep 3 times [24 sts]

Round 43 :

Sc around [24 sts]

Round 44 :

*6 sc, inv dec* rep 3 times [21 sts]

Round 45 :

*5 sc, inv dec* rep 3 times [18 sts] sl st

Info :

Cut long yarn tail for sewing head & body together. Bring yarn tail out from next stitch.

β€” Large Bunny - Head (Step Two) :

Round 1 :

Magic ring & 6 sc into it [6 sts]

Round 2 :

*inc* rep 6 times [12 sts]

Round 3 :

*sc, inc* rep 6 times [18 sts]

Round 4 :

*2 sc, inc* rep 6 times [24 sts]

Round 5 :

*3 sc, inc* rep 6 times [30 sts]

Round 6 :

*4 sc, inc* rep 6 times [36 sts]

Round 7 :

*5 sc, inc* rep 6 times [42 sts]

Round 8 :

*6 sc, inc* rep 6 times [48 sts]

Round 9-18 :

Sc around (10 rounds in total) [48 sts]

Info :

Insert 12mm eyes in between 14th & 15th rounds counting from top. Leave 11 holes between two eyes. Embroider facial features using 5 holes for nose, come down into 4th hole for mouth. Eyebrows embroidered in between 7th & 12th rounds, leave 3 holes between two eyebrows.

Round 19 :

*6 sc, inv dec* rep 6 times [42 sts]

Round 20 :

*5 sc, inv dec* rep 6 times [36 sts]

Round 21 :

*4 sc, inv dec* rep 6 times [30 sts]

Info :

Start filling head with fibrefill.

Round 22 :

*3 sc, inv dec* rep 6 times [24 sts]

Round 23 :

*2 sc, inv dec* rep 6 times [18 sts]

Info :

Sl st, cut little yarn tail to fasten off. Add bit more stuffing.

β€” Large Bunny - Arms (Step Three) :

Info :

Make Two.

Round 1 :

Magic ring & 8 sc into it [8 sts]

Round 2-23 :

Sc around (22 rounds in total) [8 sts]

Info :

After 10th round, put little bit of stuffing into tip of arm/hand. No more stuffing needed after that.

Round 24 :

Push open end together and crochet 4 sc over both sides [4 sts]

Info :

Cut long yarn tail for sewing.

β€” Large Bunny - Tail (Step Four) :

Round 1 :

Magic ring & 6 sc into it [6 sts]

Round 2 :

*inc* rep 6 times [12 sts]

Round 3 :

*sc, inc* rep 6 times [18 sts]

Round 4 :

*2 sc, inc* rep 6 times [24 sts]

Round 5-6 :

Sc around (2 rounds in total) [24 sts]

Round 7 :

*inv dec* rep 12 times [12 sts] sl st

Info :

Put some stuffing into tail. Cut long yarn tail for sewing.

β€” Large Bunny - Ears (Step Five) :

Info :

Make Two.

Round 1 :

Magic ring & 6 sc into it [6 sts]

Round 2 :

*inc* rep 6 times [12 sts]

Round 3 :

*sc, inc* rep 6 times [18 sts]

Round 4 :

*2 sc, inc* rep 6 times [24 sts]

Round 5-9 :

Sc around (5 rounds in total) [24 sts]

Round 10 :

*6 sc, inv dec* rep 3 times [21 sts]

Round 11 :

Sc around [21 sts]

Round 12 :

*5 sc, inv dec* rep 3 times [18 sts]

Round 13 :

Sc around [18 sts]

Round 14 :

*4 sc, inv dec* rep 3 times [15 sts]

Round 15-16 :

Sc around (2 rounds in total) [15 sts]

Round 17 :

*3 sc, inv dec* rep 3 times [12 sts]

Round 18-19 :

Sc around (2 rounds in total) [12 sts]

Info :

Cut long yarn tail for sewing.

β€” Large Bunny - Scarf (Step Six) :

Info :

Use Washed Teal color with 4.50mm hook.

Instructions :

Chain 4, turn back and crochet 3 sc, turn back again 3 sc. Carry on like this until scarf is 25 inches / 64 cm long. Wrap around bunny's neck twice and tie on front.

Assembly Instructions

  • For Small Bunny: Sew head and body together, adding extra stuffing before closing completely to prevent wobbling.
  • Attach ears to head between 3rd and 7th rounds counting from the top magic ring.
  • Sew arms to body between last two rounds using 4 holes for each arm placement.
  • Attach tail to bottom back of body in the best position for balance.
  • Wrap scarf twice around neck and secure button through buttonhole created in pattern.
  • For Large Bunny: Sew head to body first, then attach ears between 3rd and 9th rounds.
  • Attach large bunny arms between last two body rounds using 5 holes for secure placement, then add tail and wrap scarf twice around neck.

Important Notes

  • πŸ’‘Use stitch markers consistently when joining legs and throughout body rounds to maintain correct stitch count
  • πŸ’‘Test both 3.00mm and 3.50mm hooks with your yarn to find which creates the tightest, neatest stitches
  • πŸ’‘Insert safety eyes before stuffing and closing the head as they cannot be added later
  • πŸ’‘Do not stuff the ears or arms with fibrefill to maintain their characteristic floppy appearance
  • πŸ’‘Pin all body parts in place before sewing to ensure proper positioning and symmetry
  • πŸ’‘Leave yarn tails long enough for sewing (at least 12 inches) to make assembly easier
  • πŸ’‘Weave in the small yarn tail from first leg into second leg after joining to keep interior neat

This delightful Straight Bunny pattern brings together classic amigurumi techniques with charming design details to create two adorable sizes of cuddly companions. Whether you're crafting the petite 9-inch version or the huggable 15-inch bunny, you'll love how the straightforward construction and sweet embroidered features come together to form personalities that shine. The included scarf accessory adds that perfect finishing touch, making these bunnies wonderful gifts for loved ones or treasured additions to your own handmade collection. Perfect for beginners ready to explore amigurumi and experienced crocheters looking for a quick, satisfying project! 🐰🧢✨

You ask,

we answer.

FAQs

Can I use a different yarn weight for this pattern?

While the pattern is designed for aran/worsted weight yarn, you can use different weights with corresponding hook size adjustments. Just remember to use a hook at least one size smaller than the yarn label suggests to create tight stitches that hide the stuffing. Your finished bunny will be smaller or larger depending on your yarn choice.

Do I need to know how to do invisible decreases before starting?

The pattern includes detailed instructions for invisible decreases with step-by-step guidance. This technique creates a neater finish than regular decreases, and the pattern explains exactly how to insert your hook into front loops and complete the stitch. It's a great skill to learn through this project!

How do I embroider the facial features if I've never done embroidery before?

The pattern provides detailed photos showing exactly where to insert your needle for each facial feature, with specific hole numbers marked. You'll use about 50cm of embroidery thread and follow the step-by-step images to create the nose, mouth, and eye details. The instructions show you how to secure everything neatly.

Can I make the bunny without the scarf accessory?

Absolutely! The scarf is an optional accessory that adds a cute finishing touch, but your bunny will be complete without it. You could also substitute a ribbon bow or create a different accessory if you prefer.

Why shouldn't I stuff the ears and arms?

The Straight Bunny design features characteristic floppy ears and flexible arms that give it a distinctive relaxed posture. Stuffing these parts would make them stiff and change the bunny's classic appearance. The pattern specifically notes to keep them unstuffed for the proper look.

What's the best way to join the two legs without gaps?

The pattern includes detailed photos showing the chain connection between legs and exactly where to place your stitchmarker. The key is to crochet tightly around both legs and the chains, then weave in the small yarn tail from the first leg through the stitches into the second leg to close any small gaps.