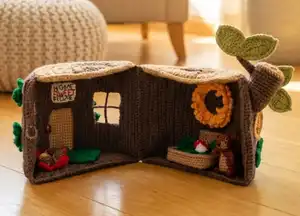
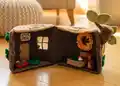
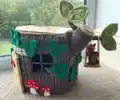
Welcome to one of the most magical crochet projects you'll ever take on — a fully detailed Squirrel & Hollow Log House that opens up to reveal a cozy little world inside! This pattern walks you through building every single piece, from the sturdy log house structure with its textured wood-grain walls, beige roof panels, and working front door, to the charming swing hanging off a branch outside. You'll craft a tiny squirrel complete with fluffy tail, adorable ears, and embroidered facial details, along with all the interior furnishings — a bed, sunflower wall hanging, flower basket, leaf rug, acorn decorations, toadstool pillow, and personalized signs. The exterior comes alive with ivy leaves climbing the walls, miniature toadstools by the door, and a name sign you can customize yourself. This is the kind of project that becomes a family heirloom — something you'll be proud to display and that children will treasure for years to come. Get ready to fall in love with every tiny stitch! 🌿🐿️
Progress Tracker
0% Complete
— Log House Back Wall :
Infos :
In dark brown, make 2 pieces then join them together into 1 panel. Work in rows.
Row 1 :
In dark brown, ch 32. Work back down the ch that you just made, starting in the 3rd st from the hook with: hdc 30, turn. [30]
Row 2 :
Ch 2, BLO hdc 30, turn. [30]
Row 3 :
Ch 2, FLO hdc 30, turn. [30]
Row 4 :
Ch 2, BLO hdc 30, turn. [30]
Row 5 :
Ch 2, FLO hdc 30, turn. [30]
Row 6 :
Ch 2, BLO hdc 30, turn. [30]
Row 7 :
Ch 2, FLO hdc 30, turn. [30]
Row 8 :
Ch 2, BLO hdc 30, turn. [30]
Row 9 :
Ch 2, FLO hdc 30, turn. [30]
Row 10 :
Ch 2, BLO hdc 30, turn. [30]
Row 11 :
Ch 2, FLO hdc 30, turn. [30]
Row 12 :
Ch 2, BLO hdc 30, turn. [30]
Row 13 :
Ch 2, FLO hdc 30, turn. [30]
Row 14 :
Ch 2, BLO hdc 30, turn. [30]
Row 15 :
Ch 2, FLO hdc 30, turn. [30]
Row 16 :
Ch 2, BLO hdc 30, turn. [30]
Row 17 :
Ch 2, FLO hdc 30, turn. [30]
Row 18 :
Ch 2, BLO hdc 30, turn. [30]
Row 19 :
Ch 2, FLO hdc 30, turn. [30]
Row 20 :
Ch 2, BLO hdc 30, turn. [30]
Row 21 :
Ch 2, FLO hdc 30, turn. [30]
Row 22 :
Ch 2, BLO hdc 30, turn. [30]
Row 23 :
Ch 2, FLO hdc 30, turn. [30]
Row 24 :
Ch 2, BLO hdc 30, turn. [30]
Row 25 :
Ch 2, FLO hdc 30, turn. [30]
Row 26 :
Ch 2, BLO hdc 30, turn. [30]
Row 27 :
Ch 2, FLO hdc 30, turn. [30]
Row 28 :
Ch 2, BLO hdc 30, turn. [30]
Row 29 :
Ch 2, FLO hdc 30, turn. [30]
Row 30 :
Ch 2, BLO hdc 30, turn. [30]
Row 31 :
Ch 2, FLO hdc 30, turn. [30]
Row 32 :
Ch 2, BLO hdc 30, turn. [30]
Row 33 :
Ch 2, FLO hdc 30. [30]
Info :
If you are making the 1st piece, FO and weave in the ends, then repeat the same process to make a 2nd piece. If you are making the 2nd piece, do not FO here — the instructions continue.
— Assembling the Back Wall :
Info :
Cut a piece of plastic canvas slightly smaller than the crocheted piece. Put the 2 back wall pieces together ensuring the leftover front and back loops face outwards on both pieces. Switch to working in a joined round around the edge to join the two pieces together. Turn, ch 1, then inserting the hook through both layers, continue as follows:
Edge :
Work across the last row with: inc, sc 28, inc. Continue working along the ends of the rows with: sc 50 (to get 50 stitches across this edge, into every 2 hdc rows you will need to make 3 stitches). At this stage, insert the piece of plastic canvas between the 2 crochet layers. Work along the short edge with: inc, sc 28, inc. Work along the remaining side with: sc 50, then sl st into the 1st sc to join the round. [164]
Info :
FO and weave in the end. Set the back wall aside for later assembly.
— Log House Front Wall :
Infos :
In dark brown, make 2 pieces then join them together into 1 panel. Work in rows.
Row 1 :
In dark brown, ch 32. Work back down the ch that you just made, starting in the 3rd st from the hook with: hdc 30, turn. [30]
Row 2 :
Ch 2, BLO hdc 30, turn. [30]
Row 3 :
Ch 2, FLO hdc 30, turn. [30]
Row 4 :
Ch 2, BLO hdc 30, turn. Place a marker into the 10th st after making it. [30]
Row 5 :
Ch 2, FLO hdc 8, turn. Leave the rest of the stitches un-worked. [8]
Row 6 :
Ch 2, BLO hdc 8, turn. [8]
Row 7 :
Ch 2, FLO hdc 8, turn. [8]
Row 8 :
Ch 2, BLO hdc 8, turn. [8]
Row 9 :
Ch 2, FLO hdc 8, turn. [8]
Row 10 :
Ch 2, BLO hdc 8, turn. Place markers into both the 1st and 8th stitches after making them. [8]
Info :
FO and weave in the end. Re-join your dark brown yarn in the marked stitch on row 4, then starting in the same st that you just joined into, continue as follows:
Row 5B :
Ch 2, FLO hdc 10, turn. [10]
Row 6B :
Ch 2, BLO hdc 10, turn. [10]
Row 7B :
Ch 2, FLO hdc 10, turn. [10]
Row 8B :
Ch 2, BLO hdc 10, turn. [10]
Row 9B :
Ch 2, FLO hdc 10, turn. [10]
Row 10B :
Ch 2, BLO hdc 10, ch 12, sl st into the end of row 10 on the first side (you will be joining into the 1st marked stitch). [10 + ch section]
Info :
FO and weave in the end. Re-join your dark brown yarn into the remaining marked stitch on the end of row 10, then starting in the same st that you just joined into, continue as follows:
Row 11 :
Ch 2, FLO hdc 8, work across the ch section with hdc 12, FLO hdc 10, turn. [30]
Row 12 :
Ch 2, BLO hdc 30, turn. [30]
Row 13 :
Ch 2, FLO hdc 30, turn. [30]
Row 14 :
Ch 2, BLO hdc 30, turn. [30]
Row 15 :
Ch 2, FLO hdc 13, turn. Leave the rest of the stitches un-worked. [13]
Row 16 :
Ch 2, BLO hdc 13, turn. [13]
Row 17 :
Ch 2, FLO hdc 13, turn. [13]
Row 18 :
Ch 2, BLO hdc 13, turn. [13]
Row 19 :
Ch 2, FLO hdc 13, ch 19, turn. [13 + ch section]
Row 20 :
Don't ch here. Starting in the 3rd ch from the hook: hdc 17 along the ch section, then BLO hdc 13, turn. [30]
Row 21 :
Ch 2, FLO hdc 30, turn. [30]
Row 22 :
Ch 2, BLO hdc 30, turn. [30]
Row 23 :
Ch 2, FLO hdc 30, turn. Place a marker into the 8th st after making it. [30]
Row 24 :
Ch 2, BLO hdc 10, turn. Leave the rest of the stitches un-worked. [10]
Row 25 :
Ch 2, FLO hdc 10, turn. [10]
Row 26 :
Ch 2, BLO hdc 10, turn. [10]
Row 27 :
Ch 2, FLO hdc 10, turn. [10]
Row 28 :
Ch 2, BLO hdc 10, turn. [10]
Row 29 :
Ch 2, FLO hdc 10. Place markers into both the 1st and 10th stitches after making them. [10]
Info :
FO and weave in the end. Re-join your dark brown yarn in the marked stitch on row 23, then starting in the same st that you just joined into, continue as follows:
Row 24B :
Ch 2, BLO hdc 8, turn. [8]
Row 25B :
Ch 2, FLO hdc 8, turn. [8]
Row 26B :
Ch 2, BLO hdc 8, turn. [8]
Row 27B :
Ch 2, FLO hdc 8, turn. [8]
Row 28B :
Ch 2, BLO hdc 8, turn. [8]
Row 29B :
Ch 2, FLO hdc 8, ch 12, sl st into the end of row 29 on the first side (you will be joining into the 1st marked stitch). [8 + ch section]
Info :
FO and weave in the end. Re-join your dark brown yarn into the remaining marked stitch on the end of row 29, then starting in the same st that you just joined into, continue as follows:
Row 30 :
Ch 2, BLO hdc 10, work across the ch section with hdc 12, BLO hdc 8, turn. [30]
Row 31 :
Ch 2, FLO hdc 30, turn. [30]
Row 32 :
Ch 2, BLO hdc 30, turn. [30]
Row 33 :
Ch 2, FLO hdc 30. [30]
Info :
If you are making the 1st piece, FO and weave in the ends, then repeat the same process to make a 2nd piece. If you are making the 2nd piece, do not FO here — the instructions continue.
— Assembling the Front Wall :
Info :
Cut a piece of plastic canvas slightly smaller than the crocheted piece. Put the 2 front wall pieces together ensuring the leftover front and back loops face outwards on both pieces. Switch to working in a joined round around the edge. Ch 1, then inserting the hook through both layers, continue as follows:
Edge :
Work across the last row with: inc, sc 28, inc. Continue working along the ends of the rows with: sc 50 (into every 2 hdc rows make 3 stitches). At this stage, insert the piece of plastic canvas between the 2 crochet layers. Work along the short edge with: inc, sc 28, inc. Work along the remaining side with: sc 21, FO leaving a long tail of yarn (used to sew the edges together around the doorway and windows). Then re-join your yarn on the other side of the doorway and working through both layers sc 21. FO leaving a long tail of yarn for later assembly.
— Log House Roof Panels :
Infos :
In beige, make 2 pieces then join them into a single panel. Then repeat the whole process to make a 2nd panel. Work in rows.
Row 1 :
In beige, ch 3. Working into the 3rd ch from the hook, make 4 hdc all into this stitch, turn. [4]
Row 2 :
Ch 2, hdcinc x4, turn. [8]
Row 3 :
Ch 2, (hdcinc, hdc) x4, turn. [12]
Row 4 :
Ch 2, (hdcinc, hdc 2) x4, turn. [16]
Row 5 :
Ch 2, (hdcinc, hdc 3) x4, turn. [20]
Row 6 :
Ch 2, (hdcinc, hdc 4) x4, turn. [24]
Row 7 :
Ch 2, (hdcinc, hdc 5) x4, turn. [28]
Row 8 :
Ch 2, (hdcinc, hdc 6) x4, turn. [32]
Row 9 :
Ch 2, (hdcinc, hdc 7) x4, turn. [36]
Row 10 :
Ch 2, (hdcinc, hdc 8) x4, turn. [40]
Row 11 :
Ch 2, (hdcinc, hdc 9) x4, turn. [44]
Row 12 :
Ch 2, (hdcinc, hdc 10) x4. [48]
Info :
If making the 1st piece, FO and weave in the ends, then repeat to make a 2nd piece. Cut a piece of plastic canvas slightly smaller than the piece. If making the 2nd piece, do not FO. Put the two pieces together and switch to working in a joined round around the edge. Inserting the hook through both layers, continue as follows:
Edge :
Ch 1. Work along the curved edge with: inc, sc 46, inc. At this stage, insert the piece of plastic canvas between the 2 crochet layers. Work across the straight edge with sc 30 (spread stitches out evenly). Sl st into the 1st sc to join the round. FO and weave in the end. Repeat the whole process to make a 2nd roof panel. [80]
— Log House Base Panels :
Infos :
In dark brown, make 2 pieces then join them into a single panel. Then repeat the whole process to make a 2nd panel. Work in rows.
Row 1 :
In dark brown, ch 3. Working into the 3rd ch from the hook, make 4 hdc all into this stitch, turn. [4]
Row 2 :
Ch 2, hdcinc x4, turn. [8]
Row 3 :
Ch 2, (hdcinc, hdc) x4, turn. [12]
Row 4 :
Ch 2, (hdcinc, hdc 2) x4, turn. [16]
Row 5 :
Ch 2, (hdcinc, hdc 3) x4, turn. [20]
Row 6 :
Ch 2, (hdcinc, hdc 4) x4, turn. [24]
Row 7 :
Ch 2, (hdcinc, hdc 5) x4, turn. [28]
Row 8 :
Ch 2, (hdcinc, hdc 6) x4, turn. [32]
Row 9 :
Ch 2, (hdcinc, hdc 7) x4, turn. [36]
Row 10 :
Ch 2, (hdcinc, hdc 8) x4, turn. [40]
Row 11 :
Ch 2, (hdcinc, hdc 9) x4, turn. [44]
Row 12 :
Ch 2, (hdcinc, hdc 10) x4. [48]
Info :
If making the 1st piece, FO and weave in the ends, then repeat to make a 2nd piece. Cut a piece of plastic canvas slightly smaller than the piece. If making the 2nd piece, do not FO. Put the two pieces together and switch to working in a joined round around the edge. Inserting the hook through both layers, continue as follows:
Edge :
Ch 1. Work along the curved edge with: inc, sc 46, inc. At this stage, insert the piece of plastic canvas between the 2 crochet layers. Work across the straight edge with sc 30 (spread stitches out evenly). Sl st into the 1st sc to join the round. FO leaving a long tail of yarn for later assembly. Repeat the whole process to make a 2nd base panel. [80]
— Log House Door :
Info :
In beige, make 1 piece. Work in rows.
Row 1 :
In beige, ch 21. Work back down the ch starting in the 2nd st from the hook with: sc 20, turn. [20]
Rows 2–13 :
(12 rows) Ch 1, sc 20, turn. [20]
Info :
Cut a piece of plastic canvas slightly smaller than the piece made so far.
Row 14 :
Ch 1, FLO sc 20, turn. [20]
Rows 15–26 :
(12 rows) Ch 1, sc 20, turn. [20]
Info :
Fold the piece in half ensuring that the leftover back loops from row 14 face outwards and insert the plastic between the 2 layers as you do so. Then continue as follows:
Edge / Hinge :
Ch 1, inserting your hook through both layers, sc 20. (This edge will be the hinge, attached to the house later on.) [20]
Info :
FO leaving a long tail of yarn. Use the tail to sew the open seams at the top and bottom of the door. Then (holding the door with the hinge on the right) weave the remaining tail to the position shown to make the button loop. Insert your hook around a stitch and draw up a loop, ch 14 and sl st back into the door. FO and weave in the end.
— Heart Decoration for the Door :
Info :
In red, make 1 piece.
Round 1 :
In red, make a magic ring. Into the open ring work all of the following: ch 3, dc 2, hdc, sc, ch 2, work back down the ch just made starting in the 2nd ch from the hook with sl st, then tr into the same st as the previous tr. Continue into the open magic ring with: sc, hdc, dc 2, ch 3, sl st back into the magic ring.
Info :
Close the magic ring and FO leaving a tail of yarn. Use the tail to sew the heart onto the door (ensuring the hinge is on the left as you do so).
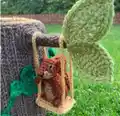
— Log House Large Branch :
Info :
Start in beige, make 1 piece. Start off working in joined rounds.
Round 1 :
In beige, ch 3, hdc 8 into 3rd chain from hook. You can use the magic ring method if you prefer. Sl st into the 1st hdc to join the round. [8]
Round 2 :
Ch 2, (starting in the same st that you just joined into) BLO hdcinc x8, join. [16]
Round 3 :
Ch 1, (BLO sc, BLO inc) x8, join. [24]
Info :
Cut a piece of plastic canvas slightly smaller than the piece made so far.
Round 4 :
Change to dark brown yarn as you ch 1, BLO sc 24, join. [24]
Rounds 5–9 :
(5 rounds) Ch 1, sc 24, join. [24]
Info :
At this point you will begin working in rows. Continue working in the same direction as follows:
Row 1 :
Ch 1, sc 20, turn (leave the rest of the stitches un-worked). [20]
Row 2 :
Ch 1, dec, sc 16, dec, turn. [18]
Row 3 :
Ch 1, dec, sc 14, dec, turn. [16]
Row 4 :
Ch 1, dec, sc 12, dec, turn. [14]
Row 5 :
Ch 1, dec, sc 10, dec, turn. [12]
Row 6 :
Ch 1, dec, sc 8, dec, turn. [10]
Row 7 :
Ch 1, dec, sc 6, dec, turn. [8]
Row 8 :
Ch 1, dec, sc 4, dec, turn. [6]
Info :
FO leaving a tail of yarn for later assembly. Insert the piece of plastic into the end of the branch and then add some stuffing.
— Log House Twig :
Info :
In dark brown, make 1 piece. Work in continuous rounds.
Round 1 :
In dark brown, ch 2, sc 4 into 2nd chain from hook. You can use the magic ring method if you prefer. [4]
Rounds 2–5 :
(4 rounds) Sc 4. [4]
Rounds 7–8 :
(2 rounds) Sc 5. [5]
Info :
FO leaving a tail of yarn. Add some stuffing and set aside for later assembly.
— Light Green Leaf :
Info :
In light green, make 4 pieces (2 for the twig and 2 for the swing branch). Work in joined rounds.
Round 1 :
In light green, ch 11. Starting in the 2nd ch from the hook, work back down the ch with: sc, hdc, dc 2, tr 2, dc 2, hdc, sc. Continue in the same direction, working down the other side of the chain with: sc, hdc, dc 2, tr 2, dc 2, hdc, sc. Sl st into the 1st sc to join the round. [20]
Round 2 :
Ch 1, (starting in the same st that you just joined into): sc 3, inc, sc 2, inc, sc 3. Now ch 2. Starting in the 2nd ch from the hook, work back down the ch with: sl st. Continue working around the leaf with: sc 3, inc, sc 2, inc, sc 3, join. [25]
Info :
FO leaving a tail of yarn. Make a total of 4 leaves. Using one of the tails of yarn, sew a pair of leaves into a V-shape and then weave in that end. Keep the remaining tail of yarn on the 2nd leaf for later assembly. Repeat this process on the remaining 2 leaves.
— Log House Small Branch for the Swing :
Info :
In dark brown, make 1 piece. Work in continuous rounds (no joining).
Round 1 :
In dark brown, ch 2, sc 6 into 2nd chain from hook. You can use the magic ring method if you prefer. [6]
Rounds 2–8 :
(7 rounds) Sc 6. [6]
Info :
At this point, cut a length of plastic canvas that can be folded in half and inserted into the crochet tube (6 squares wide, folded in half lengthways). Don't worry about the length at this stage as it can be trimmed later. Insert the plastic into your branch and then (leaving it in position and working around it), continue as follows:
Rounds 9–16 :
(8 rounds) Sc 6. [6]
Round 17 :
FLO inc x6. [12]
Round 18 :
(Inc, sc) x6. [18]
Round 19 :
(Sc, inc, sc) x6. [24]
Round 20 :
(Inc, sc 3) x6. [30]
Info :
FO leaving a tail of yarn for later assembly. Trim the plastic so it is slightly longer than the crochet section. Cut the end of the plastic into 3 strips and fold them back against the crochet section — these 3 strips will point downwards when you attach this branch to the log house to support the weight of the swing. Add a small amount of stuffing inside the branch if required, then set it aside for later assembly.
— Log House Swing :
Info :
In beige, make 1 piece. Work in rows.
Row 1 :
In beige, ch 11. Starting in the 2nd ch from the hook, work back down the ch with: sc 10, turn. [10]
Rows 2–6 :
(5 rows) Ch 1, sc 10, turn. [10]
Info :
Cut a piece of plastic canvas slightly smaller than the piece made so far.
Row 7 :
Ch 1, BLO sc 10, turn. [10]
Rows 8–12 :
(5 rows) Ch 1, sc 10, turn. [10]
Info :
FO leaving a tail of yarn. Fold the piece in half ensuring that the leftover front loops from row 7 face outwards and insert the plastic between the 2 layers. Sew around the 3 open edges and then weave in the end. To add the chains with which to hang your swing seat, re-join your beige yarn by inserting your hook around a stitch in the position indicated. Ch 51 and then join back into the seat near the opposite corner. FO and weave in the ends. Repeat this process on the other side.
— Log House Adding the Details Before Assembly :
Info :
Using one of the tails of dark brown yarn that you left on the front wall panel, sew around the edge of the door frame and both windows as shown, then weave in this end.
Info :
To mark the rings on the roof, take a roof panel and find the ring shapes caused by the hdc stitches. Take a long piece of dark brown yarn and using a tapestry needle, weave the yarn through these stitches to mark each ring. Repeat on each ring and on both roof panels, then weave in the ends. Use the same process to add small rings to the end of the branch section too.
— Log House Assembly :
Info :
Take the back wall panel and one base panel and lay them out with edges aligned. Place a stitch marker through the bottom corner of the back wall panel and then through the corner of the base panel. Repeat on the opposite corner and add more markers to hold the pieces together. Using the tail of dark brown yarn left on the base panel, sew the two pieces together and then weave in the end.
Info :
Repeat the same process to attach the roof panel on the other end of the back wall, ensuring the rings on the roof face upwards as you do so. Use a length of dark brown yarn for this and then weave in the end.
Info :
Take the front wall panel and the remaining base panel and lay them out with edges aligned. Use stitch markers to hold them together, then sew using the yarn tail left on the base panel. Weave in the end. Repeat the same process to attach the remaining roof panel on the other end, ensuring the rings face upwards.
Info :
Take the two house sections and lay them out to join them together. Use stitch markers to hold the two pieces together. Using a length of dark brown yarn, join the two sections together and weave in the end. Your house should now be able to open and close.
Info :
Find the leftover loops just to the left of the doorway. Lay the door with the hinge against these leftover loops, ensuring the bottom of the door is in line with the bottom of the house. Sew the edge of the door to the leftover loops and then weave in the end. The chain loop on the door will allow it to be fastened closed with a button sewn inside the house.
Info :
Pin the large branch to the outside of your log house, positioning it near the top and just behind the opening. When happy with its position, sew it into place and weave in the end.
Info :
Sew a pair of leaves to the end of the twig, then sew the end of the twig to the side of the large branch. Weave in the end. Ensuring the plastic strips at the end of the swing branch point downwards, sew the remaining pair of leaves to the end of the small swing branch, then sew the small swing branch to the outside of your log house at the top, just behind the large branch. Sew into place and weave in the end. The swing can be placed over the branch, or you can sew the top of the swing's chains to the underside of the branch.
Info :
To add window details, join dark brown yarn into the bottom edge of the window centrally. Ch 15 and then join into the opposite side of the window. Repeat the same process for the horizontal window bar. FO leaving a long tail of yarn. Weave the end to the position shown, then insert your hook around a stitch on the edge of your log house and draw up a loop. Ch 14 and sl st back into the edge of the log house. This makes the buttonhole. Sew a button onto the back half of your log house so that it can be fastened closed.
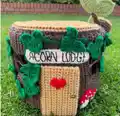
— Exterior Details – House Name Sign :
Info :
In cream, make 1 piece. Work in rows.
Row 1 :
In cream, ch 22. Work back down the ch starting in the 2nd st from the hook with: sc 21, turn. [21]
Rows 2–4 :
(3 rows) Ch 1, sc 21, turn. [21]
Info :
FO leaving a tail of yarn for later assembly. Using a piece of finer black yarn or thread, embroider your chosen house name onto the sign (e.g. ACORN LODGE or THE HOLLOW).
— Exterior Details – Ivy Leaves :
Info :
In dark green, make 16 pieces. Work in rows.
Row 1 :
In dark green, ch 2, sc 7 into 2nd chain from hook. You can use the magic ring method if you prefer. Turn your work now. [7]
Row 2 :
Ch 3, tr into the 1st st (the stitch at the base of the ch 3). Now ch 2. Starting in the 2nd ch from the hook, work back down the ch with: sl st, then tr into the same st as the previous tr. Ch 2, sc into the next st, ch 2. Starting in the 2nd ch from the hook, work back: sl st, then make 2 tr both into the next st. Ch 2, sc into the next st, ch 2. Starting in the 2nd ch from the hook, work back: sl st, then tr into the same st as the previous tr. Ch 3, sl st into the last st.
Info :
FO and weave in the ends. Make 16 leaves in the same way. In dark green, ch 200, FO leaving a long tail of yarn. This will be the stem that the leaves are attached to.
— Exterior Details – Small Toadstool :
Info :
Start in red, make 2 pieces. Work in rows.
Row 1 :
In red, ch 2, sc 4 into 2nd chain from hook. You can use the magic ring method if you prefer. Turn your work now. [4]
Row 2 :
Ch 2, hdcinc x4, ch 2, sl st into the last st once more. [8]
Info :
At this point continue working in the same direction, now working across the flat edge. Continue as follows:
Stem Row 1 :
Change to cream yarn as you ch 1. Work across the centre of the straight edge with sc 2, turn. [2]
Stem Rows 2–3 :
(2 rows) Ch 1, sc 2, turn. [2]
Stem Row 4 :
Ch 1, inc x2. [4]
Info :
FO leaving a tail of yarn in both colours. Use the tail of cream yarn to add some French knots to the red section and then keep the remaining tail of yarn for later assembly.
— Exterior Details – Large Toadstool :
Info :
Start in red, make 2 pieces. Work in rows.
Row 1 :
In red, ch 2, sc 4 into 2nd chain from hook. You can use the magic ring method if you prefer. Turn your work now. [4]
Row 2 :
Ch 2, hdcinc x4, turn. [8]
Row 3 :
Ch 2, (hdcinc, hdc) x4, ch 2, sl st into the last st once more. [12]
Info :
At this point continue working in the same direction, now working across the flat edge. Sl st once across the flat edge, then continue as follows:
Stem Row 1 :
Change to cream yarn as you ch 1. Work across the centre of the straight edge with sc 2, turn. [2]
Stem Row 2 :
Ch 1, sc, inc, turn. [3]
Stem Rows 3–4 :
(2 rows) Ch 1, sc 3, turn. [3]
Stem Row 5 :
Ch 1, inc, sc, inc. [5]
Info :
FO leaving a tail of yarn in both colours. Use the tail of cream yarn to add some French knots to the red section and then keep the remaining tail of yarn for later assembly.
— Adding the Exterior Details to the Log House :
Info :
Start by pinning the house name sign above the door, a pair of toadstools to the right of the door, and a pair of toadstools on the back of the log house (on the opposite side to the swing). When you are happy with their position, sew them into place and weave in the ends. Add a small button to the outside of the door to look like a handle.
Info :
Starting by the opening, pin on the long dark green chain so that it weaves around your log house. Avoid pinning it in straight lines — the more curves you include, the more realistic the effect will be. Ideally the chain should reach all the way around the house, with the opposite end finishing on the other side of the opening. Pin each end of the chain onto either side of the opening first, then pin the rest. When happy with its position, sew it into place, keeping any remaining yarn for the next step.
Info :
Pin the ivy leaves over the green chain, working all the way around your log house. Turn the leaves slightly so they point in different directions. Ensure you don't obstruct the house name sign. When happy with their position, using your remaining tail of dark green yarn, sew them into place (just a couple of stitches in the centre of each leaf). Weave in the end. You have now completed the exterior of your log house.
— Interior Details – Home Sweet Home Sign :
Info :
In cream, make 1 piece. Work in rows.
Row 1 :
In cream, ch 9. Work back down the ch starting in the 2nd st from the hook with: sc 8, turn. [8]
Rows 2–6 :
(5 rows) Ch 1, sc 8, turn. [8]
Info :
FO leaving a tail of yarn for later assembly. Using some finer yarn or thread, embroider 'home sweet home' onto the sign. Capital letters make this easier, but you could alternatively embroider a small flower or simple picture.
— Acorn, Nut Section :
Info :
In medium brown or beige, make 5 pieces. Work in continuous rounds (no joining).
Round 1 :
In medium brown or beige, ch 2, sc 4 into 2nd chain from hook. You can use the magic ring method if you prefer. [4]
Round 2 :
(Inc, sc) x2. [6]
Round 3 :
(Sc, inc, sc) x2. [8]
Rounds 4–5 :
(2 rounds) Sc 8. Add some stuffing now. [8]
Round 6 :
(Sc, dec, sc) x2. [6]
Info :
FO leaving a tail of yarn. Close the hole by passing the tail of yarn through just the front loop of each stitch and then pulling it tight. Weave in the end.
— Acorn, Cap Section :
Info :
In dark brown, make 5 pieces. Work in joined rounds.
Round 1 :
In dark brown, ch 2, sc 6 into 2nd chain from hook. You can use the magic ring method if you prefer. Sl st into the 1st sc to join the round. [6]
Round 2 :
Ch 1, (starting in the same st that you just joined into) (inc, sc, inc) x2, join. [10]
Round 3 :
Ch 1, sc 10, join. [10]
Info :
FO leaving a tail of yarn. Using the tail of dark brown yarn, sew the acorn nut into the cap and then weave the tail of yarn out of the centre of the cap. Add a knot to stop it from fraying and then trim it to length to form the stalk.
— Flower Basket :
Info :
Start in yellow, make 1 piece. Work in continuous rounds.
Round 1 :
In yellow, ch 2, sc 5 into 2nd chain from hook. You can use the magic ring method if you prefer. [5]
Round 3 :
(Inc, sc) x5 changing to red yarn in the last st. [15]
Round 4 :
Now working in red: (ch 6, work back down the ch starting in the 2nd ch from the hook with: inc, sc 4. Skip 1 st of round 3 and then sl st into each of the next 2 stitches) x5.
Round 5 :
(Work up the other side of the chain with: sc 5, inc 2, continue down the other side of the petal: sc 4, skip the 2 sl sts and continue on the next petal) x5.
Round 6 :
(Dec, sl st 9, dec) x5.
Info :
FO and weave in the end.
— Toadstool Pillow :
Info :
Start in red, make 2 pieces (to make 1 pillow). Work in rows. The two layers are made in the same way as the small toadstools made for the exterior, but they are then sewn together to form the pillow.
Row 1 :
In red, ch 2, sc 4 into 2nd chain from hook. You can use the magic ring method if you prefer. Turn your work now. [4]
Row 2 :
Ch 2, hdcinc x4, ch 2, sl st into the last st once more. [8]
Info :
Continue working in the same direction, now working across the flat edge. Continue as follows:
Stem Row 1 :
Change to cream yarn as you ch 1. Work across the centre of the straight edge with sc 2, turn. [2]
Stem Rows 2–3 :
(2 rows) Ch 1, sc 2, turn. [2]
Stem Row 4 :
Ch 1, inc x2. [4]
Info :
FO. On the first piece, leave a tail of yarn in both colours. On the second piece, weave in the ends. Use the tails of yarn to sew the two layers together, adding a small amount of stuffing as you do so. Add some cream French knots to the red section and weave in the ends.
— Bed :
Info :
In medium brown, make 2 pieces and join them together into a single bed. Start off working in rows.
Row 1 :
In medium brown, ch 16. Work back down the ch starting in the 2nd st from the hook with: sc 15, turn. [15]
Rows 2–14 :
(13 rows) Ch 1, sc 15, turn. [15]
Info :
If making the 1st piece, FO and weave in the ends, then repeat to make a 2nd piece. Cut a piece of plastic canvas slightly smaller than the piece made. If making the 2nd piece, do not FO. Put the two pieces together and switch to working in a joined round around the edge. Inserting the hook through both layers, continue as follows:
Round 1 :
Work across the last row with: inc, sc 13, make 4 sc all into the corner. Continue working along the ends of the rows with: sc 13, make 4 sc all into the corner. At this stage, insert the piece of plastic canvas between the 2 crochet layers. Work along the next edge with: sc 13, make 4 sc all into the corner. Work along the remaining side with: sc 13, inc into the corner and then sl st into the 1st sc to join the round. [68]
Round 2 :
Ch 1, (starting in the same st that you just joined into): (BLO dec, BLO sc 13, BLO dec) x4, join. [60]
Rounds 3–5 :
(3 rounds) Ch 1, sc 60, join. [60]
Info :
At this point, begin working in rows. Continue working in the same direction with:
Row 1 :
Ch 1, (skip the joining sl st), sc 13, turn. Leave the rest of the stitches un-worked. [13]
Rows 2–6 :
(5 rows) Ch 1, sc 13, turn. [13]
Row 7 :
Ch 1, FLO sc 13, turn. [13]
Rows 8–15 :
(8 rows) Ch 1, sc 13, turn. [13]
Info :
FO leaving a tail of yarn. Fold the headboard section in half (folding the top edge down towards the body of the bed) and use the tail of yarn to sew it into this position (sew the top of the headboard into the base of the bed as well as down each side of it). Then weave in the end.
— Sunflower Wall Hanging :
Info :
Start in dark brown, make 1 piece. Work in joined rounds.
Round 1 :
In dark brown, ch 2, sc 6 into 2nd chain from hook. You can use the magic ring method if you prefer. Sl st into the 1st sc to join the round. [6]
Round 2 :
Ch 1, (starting in the same st that you just joined into) make a 3dcbob and sc both into the same stitch x6, join. [12]
Round 3 :
Ch 1, (make a 3dcbob and sc both into the same stitch) x12 changing to yellow yarn in the last st, join. FO the brown yarn now but keep a tail of it for later assembly. [24]
Round 4 :
Now working in yellow: (ch 7, starting in the 2nd ch from the hook, work back down the ch with: sl st, sc 2, hdc 3. Then FLO sl st into the next stitch of the brown section) x24. Then sl st into the leftover back loop behind the 1st petal to join the round. [24 petals]
Info :
You can FO the sunflower at this point if preferred. If you would like the flower to have a fuller appearance, continue as follows:
Round 5 :
This round is worked into the leftover loops behind the petals made in round 4: (ch 7, starting in the 2nd ch from the hook, work back down the ch with: sl st, sc 2, hdc 3. Then BLO sl st into the next stitch of the brown section) x24.
Info :
FO and weave in this end. Keep the brown tail of yarn for later assembly.
— Leaf Blanket / Rug :
Info :
In dark green, make 2 pieces. Work in rows.
Row 1 :
In dark green, leaving a tail of yarn at the start of this section, make a magic ring. Into the open ring work all of the following: ch 1, sc, hdc, dc 2, tr 2, dc 2, hdc, sc. Close the magic ring and then turn your work. [10]
Row 2 :
Ch 2, make 2 dc into each of the first 3 stitches, hdc, inc x2, hdc, make 2 dc into each of the next 3 stitches, turn. [18]
Row 3 :
Ch 2, hdc 7, hdcinc x4, hdc 7, turn. [22]
Row 4 :
Ch 2, hdc 10, hdcinc x2, hdc 10, turn. [24]
Row 5 :
Ch 1, dec, sc 2, inc, hdc 3, hdcinc, dc 2, make 2 tr into each of the next 2 stitches, dc 2, hdcinc, hdc 3, inc, sc 2, dec, turn. [28]
Row 6 :
Ch 1, dec x2, sc 3, hdcinc, dc 4, make 2 dc into the next st, make 2 tr into the next st. Now ch 2. Starting in the 2nd ch from the hook, work back down the ch with: sl st. Continue working around the leaf, make 2 tr into the next st, make 2 dc into the next st, dc 4, hdcinc, sc 3, dec x2. [31]
Info :
FO and weave in this end. Use the tail of yarn left at the start of this section to make the stem: insert your hook through the magic ring and draw up a loop. Ch 5. Work back down the ch with: sc, sl st 3. Sl st back into the leaf, FO and weave in the end. Make 2 leaf pieces in total.
— Squirrel Body Section :
Info :
Start in burnt orange. Work in continuous rounds. Make 2 squirrels (or as many as you like).
Round 1 :
In burnt orange, ch 2, sc 6 into 2nd chain from hook. You can use the magic ring method if you prefer. [6]
Round 3 :
(Inc, sc) x6. [18]
Round 4 :
Sc 6. To make the 1st leg: sl st into the FLO of the next st, ch 2, 3dcpop into the FLO of the same st, ch 2, sl st into the FLO of the same st once more. Continue working around the body with: sc 4. To make the 2nd leg: sl st into the FLO of the next st, ch 2, 3dcpop into the FLO of the same st, ch 2, sl st into the FLO of the same st once more. Continue around the body with: sc 6. [16 + 2 legs]
Round 5 :
Sc 6, sc into the leftover loop behind the 1st leg changing to medium brown as you do so. Now in medium brown, sc 4 changing to burnt orange in the last st. Now in burnt orange, sc into the leftover loop behind the 2nd leg, sc 6. [18]
Round 6 :
Sc 7 changing to medium brown in the last st. Now in medium brown, sc 4 changing to burnt orange in the last st. Now in burnt orange, sc 7. [18]
Round 7 :
Sc 8 changing to medium brown in the last st. Now in medium brown, sc 3 changing to burnt orange in the last st. Now in burnt orange, sc 7. [18]
Round 8 :
(Dec, sc 2) x2 changing to medium brown in the last st. Now in medium brown, dec, sc changing to burnt orange. Now in burnt orange, sc 3, dec, sc 2. [14]
Round 9 :
Sc 6 changing to medium brown in the last st. Now in medium brown, sc 2 changing to burnt orange in the last st. Now in burnt orange, sc 6. Start stuffing. [14]
Round 10 :
Sc 3, dec. To make the 1st arm: sl st into the FLO of the next st, ch 6, work back down the ch starting in the 2nd ch from the hook with: inc, sl st 4, sl st into the FLO of the same st once more. Continue around the body with: sc changing to medium brown. Now in medium brown, sc changing to burnt orange. Now in burnt orange, sc. To make the 2nd arm: sl st into the FLO of the next st, ch 6, work back down the ch starting in the 2nd ch from the hook with: inc, sl st 4, sl st into the FLO of the same st once more. Continue around the body with: sc, dec, sc. [10 + 2 arms]
Round 11 :
Dec x2, sc into the leftover loop behind the 1st arm, sc 3, sc into the leftover loop behind the 2nd arm, sc, dec. [9]
Round 12 :
Sc 9. Finish adding stuffing. [9]
Info :
FO leaving a tail of yarn for later assembly.
— Squirrel Tail Section :
Info :
In burnt orange. Work in continuous rounds.
Round 1 :
In burnt orange, ch 7. Work back down the ch starting in the 2nd st from the hook with: inc, sc 4, inc. Continue in the same direction, working around the other side of the chain with: inc, sc 4, inc. [16]
Round 2 :
(Inc x2, sc 4, inc x2) x2. [24]
Round 3 :
(Sc, inc x2, sc 6, inc x2, sc) x2. [32]
Round 4 :
(Sc, inc) x3, sc 4, (dec, sc) x4, dec, sc 3, (inc, sc) x2, inc. [33]
Round 5 :
Sc 10, skip 15 stitches, sc 8. [18]
Round 6 :
(Dec, sc) x6. [12]
Info :
FO leaving a tail of yarn. Close the hole by passing the tail of yarn through just the front loop of each stitch and then pulling it tight. Add stuffing to this end of the tail.
Round 1B :
Return to the 15 stitches that you skipped in round 5. Skip 3 of these st and re-join your burnt orange yarn into the 4th st. From here: (sc, dec) x3, then skip the remaining 3 st. [6]
Round 2B :
(Sc, dec) x2. Add stuffing to the rest of the tail now. [4]
Info :
FO leaving a tail of yarn. Close the hole by passing the tail of yarn through just the front loop of each stitch and then pulling it tight. Use the remaining tail of yarn to sew the seam in the centre of the tail closed, and then keep any remaining yarn for later assembly.
— Squirrel Head Section :
Info :
Start in burnt orange. Work in continuous rounds.
Round 1 :
In burnt orange, ch 2, sc 4 into 2nd chain from hook. You can use the magic ring method if you prefer. [4]
Round 2 :
Sc changing to medium brown. Now in medium brown, inc x2 changing to burnt orange in the last st. Now in burnt orange, sc. [6]
Round 3 :
Inc changing to medium brown in the last st. Now in medium brown, sc 4 changing to burnt orange in the last st. Now in burnt orange, inc. [8]
Round 4 :
Inc, sc, inc changing to medium brown in the last st. Now in medium brown, sc 3 changing to burnt orange in the last st. Now in burnt orange, inc, sc (you can FO the medium brown yarn now). [11]
Round 5 :
Sc, inc, sc 9. [12]
Round 6 :
Inc, sc 2, inc, sc 8. [14]
Round 7 :
To make the 1st ear: sl st into the FLO of the next st, ch 4, work back down the ch starting in the 2nd ch from the hook with: sl st, sc 2, sl st into the FLO of the same st once more. Continue around the head with: sc 4. To make the 2nd ear: sl st into the FLO of the next st, ch 4, work back down the ch starting in the 2nd ch from the hook with: sl st, sc 2, sl st into the FLO of the same st once more. Continue around the head with: sc 8.
Round 8 :
Sc into the leftover loop behind the 1st ear, sc, dec, sc, sc into the leftover loop behind the 2nd ear, dec x4. Add stuffing now. [9]
Round 9 :
(Dec, sc) x3. [6]
Info :
FO leaving a tail of yarn. Close the hole by passing the tail of yarn through just the front loop of each stitch and then pulling it tight. Weave in the end.
— Adding the Details and Assembling the Squirrel :
Info :
Using some finer black yarn or thread, embroider a Y shape for the nose and mouth, and two small groups of stitches over round 4 to form the eyes. The eyes should be in line with the inside edge of the ears.
Info :
Using some finer beige yarn or thread, add an outline around each eye as shown.
Info :
Using the tail of yarn that you left on the body section, sew the head to the body (ensuring it is central and straight) and then weave in the end.
Info :
Sew the bottom half of the tail to the back of the body. Ensure the base of the tail is level with the base of the body as you do this, as this will enable your squirrel to stand. Weave in the end.
Info :
Sew the 'Home Sweet Home' sign above the front door and weave in the end. The leaf rug, flower basket and acorns should fit into the front half of the log house. Sew the sunflower wall hanging to the centre of the back wall (just attach the brown section of the flower to the wall), ensuring it is high enough to allow space for the bed to fit underneath. Weave in the end. Your log house is now complete!
This is one of those truly once-in-a-lifetime crochet projects — the kind that sits on your shelf and makes every single person who sees it stop and ask, 'Did you really make that yourself?' The Squirrel & Hollow Log House is a fully openable, richly detailed woodland home complete with furniture, decorations, ivy-covered exterior, and a tiny family of squirrels to live inside. It's a project that grows with you as you work through it, each new section revealing a new little world. Whether you're making it as a display piece, a gift for a child who loves imaginative play, or simply for the pure joy of crafting something breathtaking — this pattern will absolutely steal your heart. 🌿🐿️🏡 Happy crocheting! 🧶✨