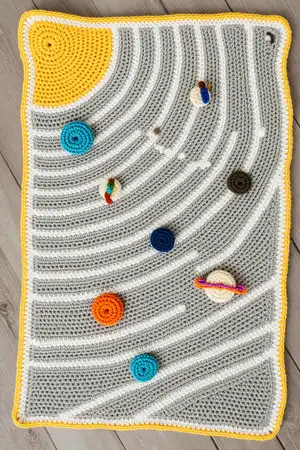
Create a stunning celestial masterpiece with this enchanting Solar System Space Blanket pattern! This gorgeous 38" x 50" blanket features a beautiful sun corner that radiates warmth, complete with orbital lines representing each planet's path through space. Using linked double crochet stitches for a unique texture, you'll craft a cozy blanket adorned with handmade planet appliques including Mercury, Venus, Earth with embroidered continents, Mars with rocky textures, mighty Jupiter with its storm, ringed Saturn and Uranus, distant Neptune, and even optional Pluto! Perfect for astronomy lovers, space enthusiasts, or anyone who dreams among the stars, this blanket brings the wonder of our solar system into your home.
Progress Tracker
0% Complete
— Sun :
R1 :
Ch 2 (pull last ch up to height of dc), dc in 2nd ch from hook, 2Ldc in same ch, turn (3)
R2 :
Ch 1, dc in 1st st, Ldc in same st as last st, 2Ldc in each st across, turn (6)
R3 :
Ch 1, dc in 1st st, Ldc in same st as last, Ldc in next st [2Ldc in next st, Ldc in next st], repeat [ ] 1 more time, turn (9)
R4 :
Ch 1, dc in 1st st, Ldc in next st, 2Ldc in next st, [Ldc in next 2 sts, 2Ldc in next st], repeat [ ] 1 more time, turn (12)
R5 :
Ch 1, dc in 1st st, Ldc in each st across, turn (12)
R6 :
Ch 1, dc in 1st st, Ldc in same st as last, Ldc in next st, [2Ldc in next st, Ldc in next st], repeat [ ] across, turn (18)
R7 :
Ch 1, dc in 1st st, Ldc in each st across, turn (18)
R8 :
Ch 1, dc in 1st st, Ldc in next st, 2Ldc in next st, [Ldc in next 2 sts, 2Ldc in next st], repeat [ ] 3 more times, Ldc in each of the last 3 sts, turn (23)
R9 :
Ch 1, dc in 1st st, Ldc in each st across, turn (23)
R10 :
Ch 1, dc in 1st st, 2Ldc in next st, [Ldc in next 3 sts, 2Ldc in next st], repeat [ ] 4 more times, Ldc in last st, turn (29)
R11 :
Ch 1, dc in 1st st, Ldc in each st across, turn (29)
R12 :
Ch 1, dc in 1st st, Ldc in next 3 sts, 2Ldc in next st, [Ldc in next 4 sts, 2Ldc in next st], repeat [ ] 3 more times, Ldc in each of the last 4 sts, turn (34)
R13 :
Ch 1, dc in 1st st, Ldc in each st across, turn (34)
R14 :
Ch 1, dc in 1st st, Ldc in next st, 2Ldc in next st, [Ldc in next 5 sts, 2Ldc in next st], repeat [ ] 4 more times, Ldc in last st, turn (40)
R15 :
Ch 1, dc in 1st st, Ldc in each st across, turn (40)
R16 :
Ch 1, dc in 1st st, Ldc in next 4 sts, 2Ldc in next st, [Ldc in next 6 sts, 2Ldc in next st], repeat [ ] 3 more times, Ldc in each of the last 6 sts, turn (45)
R17 :
Ch 1, dc in 1st st, Ldc in each st across, turn (45)
R18 :
Ch 1, dc in 1st st, Ldc in next st, 2Ldc in next st, [Ldc in next 7 sts, 2Ldc in next st], repeat [ ] 4 more times, Ldc in last 2 sts, turn (51)
Info :
Long Edges = 11", Switch to Sky/Background Color
R19 :
Ch 1, dc in 1st st, Ldc in each st across, turn (51)
R20 :
Ch 1, dc in 1st st, Ldc in next 6 sts, 2Ldc in next st, [Ldc in next 8 sts, 2Ldc in next st], repeat [ ] 3 more times, Ldc in each of the last 7 sts, turn (56) *mark this row along left side of blanket for a sun outline
R21 :
Ch 1, dc in 1st st, Ldc in each st across, turn (56)
R22 :
Ch 1, dc in 1st st, Ldc in next 2 sts, 2Ldc in next st, [Ldc in next 9 sts, 2Ldc in next st], repeat [ ] 4 more times, Ldc in last 2 sts, turn (62) *mark this row along left side of blanket for a sun outline
R23 :
Ch 1, dc in 1st st, Ldc in each st across, turn (62)
R24 :
Ch 1, dc in 1st st, Ldc in next 7 sts, 2Ldc in next st, [Ldc in next 10 sts, 2Ldc in next st], repeat [ ] 3 more times, Ldc in each of the last 9 sts, turn (67) *mark this row along left side of blanket for a sun outline
R25 :
Ch 1, dc in 1st st, Ldc in each st across, turn (67)
R26 :
Ch 1, dc in 1st st, Ldc in next 2 sts, 2Ldc in next st, [Ldc in next 11 sts, 2Ldc in next st], repeat [ ] 4 more times, Ldc in last 3 sts, turn (73)
R27 :
Ch 1, dc in 1st st, Ldc in each st across, turn (73)
R28 :
Ch 1, dc in 1st st, Ldc in next 9 sts, 2Ldc in next st, [Ldc in next 12 sts, 2Ldc in next st], repeat [ ] 3 more times, Ldc in each of the last 10 sts, turn (78)
R29 :
Ch 1, dc in 1st st, Ldc in each st across, turn (78)
R30 :
Ch 1, dc in 1st st, Ldc in next 3 sts, 2Ldc in next st, [Ldc in next 13 sts, 2Ldc in next st], repeat [ ] 4 more times, Ldc in last 3 sts, turn (84)
R31 :
Ch 1, dc in 1st st, Ldc in each st across, turn (84)
R32 :
Ch 1, dc in 1st st, Ldc in next 10 sts, 2Ldc in next st, [Ldc in next 14 sts, 2Ldc in next st], repeat [ ] 3 more times, Ldc in each of the last 12 sts, turn (89) *mark this row along left side of blanket for Mercury orbit line
R33 :
Ch 1, dc in 1st st, Ldc in each st across, turn (89)
R34 :
Ch 1, dc in 1st st, Ldc in next 3 sts, 2Ldc in next st, [Ldc in next 15 sts, 2Ldc in next st], repeat [ ] 4 more times, Ldc in last 4 sts, turn (95)
R35 :
Ch 1, dc in 1st st, Ldc in each st across, turn (95)
R36 :
Ch 1, dc in 1st st, Ldc in next 12 sts, 2Ldc in next st, [Ldc in next 16 sts, 2Ldc in next st], repeat [ ] 3 more times, Ldc in each of the last 13 sts, turn (100)
R37 :
Ch 1, dc in 1st st, Ldc in each st across, turn (100)
R38 :
Ch 1, dc in 1st st, Ldc in next 4 sts, 2Ldc in next st, [Ldc in next 17 sts, 2Ldc in next st], repeat [ ] 4 more times, Ldc in last 4 sts, turn (106)
R39 :
Ch 1, dc in 1st st, Ldc in each st across, turn (106)
R40 :
Ch 1, dc in 1st st, Ldc in next 13 sts, 2Ldc in next st, [Ldc in next 18 sts, 2Ldc in next st], repeat [ ] 3 more times, Ldc in each of the last 15 sts, turn (111) *mark this row along left side of blanket for Venus orbit line
R41 :
Ch 1, dc in 1st st, Ldc in each st across, turn (111)
R42 :
Ch 1, dc in 1st st, Ldc in next 4 sts, 2Ldc in next st, [Ldc in next 19 sts, 2Ldc in next st], repeat [ ] 4 more times, Ldc in last 5 sts, turn (117)
R43 :
Ch 1, dc in 1st st, Ldc in each st across, turn (117)
R44 :
Ch 1, dc in 1st st, Ldc in next 15 sts, 2Ldc in next st, [Ldc in next 20 sts, 2Ldc in next st], repeat [ ] 3 more times, Ldc in each of the last 16 sts, turn (122)
R45 :
Ch 1, dc in 1st st, Ldc in each st across, turn (122)
R46 :
Ch 1, dc in 1st st, Ldc in next 5 sts, 2Ldc in next st, [Ldc in next 21 sts, 2Ldc in next st], repeat [ ] 4 more times, Ldc in last 5 sts, turn (128)
R47 :
Ch 1, dc in 1st st, Ldc in each st across, turn (128)
R48 :
Ch 1, dc in 1st st, Ldc in next 16 sts, 2Ldc in next st, [Ldc in next 22 sts, 2Ldc in next st], repeat [ ] 3 more times, Ldc in each of the last 18 sts, turn (133) *mark this row along left side of blanket for Earth orbit line
R49 :
Ch 1, dc in 1st st, Ldc in each st across, turn (133)
R50 :
Ch 1, dc in 1st st, Ldc in next 5 sts, 2Ldc in next st, [Ldc in next 23 sts, 2Ldc in next st], repeat [ ] 4 more times, Ldc in last 6 sts, turn (139)
R51 :
Ch 1, dc in 1st st, Ldc in each st across, turn (139)
R52 :
Ch 1, dc in 1st st, Ldc in next 18 sts, 2Ldc in next st, [Ldc in next 24 sts, 2Ldc in next st], repeat [ ] 3 more times, Ldc in each of the last 19 sts, turn (144)
R53 :
Ch 1, dc in 1st st, Ldc in each st across, turn (144)
R54 :
Ch 1, dc in 1st st, Ldc in next 6 sts, 2Ldc in next st, [Ldc in next 25 sts, 2Ldc in next st], repeat [ ] 4 more times, Ldc in last 6 sts, turn (150)
R55 :
Ch 1, dc in 1st st, Ldc in each st across, turn (150)
R56 :
Ch 1, dc in 1st st, Ldc in next 19 sts, 2Ldc in next st, [Ldc in next 26 sts, 2Ldc in next st], repeat [ ] 3 more times, Ldc in each of the last 21 sts, turn (155) *mark this row along left side of blanket for Mars orbit line
R57 :
Ch 1, dc in 1st st, Ldc in each st across, turn (155)
R58 :
Ch 1, dc in 1st st, Ldc in next 6 sts, 2Ldc in next st, [Ldc in next 27 sts, 2Ldc in next st], repeat [ ] 4 more times, Ldc in last 7 sts, turn (161)
R59 :
Ch 1, dc in 1st st, Ldc in each st across, turn (161)
R60 :
Ch 1, dc in 1st st, Ldc in next 21 sts, 2Ldc in next st, [Ldc in next 28 sts, 2Ldc in next st], repeat [ ] 3 more times, Ldc in each of the last 22 sts, turn (166)
R61 :
Ch 1, dc in 1st st, Ldc in each st across, turn (166)
R62 :
Ch 1, dc in 1st st, Ldc in next 7 sts, 2Ldc in next st, [Ldc in next 29 sts, 2Ldc in next st], repeat [ ] 4 more times, Ldc in last 7 sts, turn (172)
R63 :
Ch 1, dc in 1st st, Ldc in each st across, turn (172)
R64 :
Ch 1, dc in 1st st, Ldc in next 22 sts, 2Ldc in next st, [Ldc in next 30 sts, 2Ldc in next st], repeat [ ] 3 more times, Ldc in each of the last 24 sts, turn (177)
R65 :
Ch 1, dc in 1st st, Ldc in each st across, turn (177)
R66 :
Ch 1, dc in 1st st, Ldc in next 7 sts, 2Ldc in next st, [Ldc in next 31 sts, 2Ldc in next st], repeat [ ] 4 more times, Ldc in last 8 sts, turn (183) *mark this row along left side of blanket for Jupiter orbit line
R67 :
Ch 1, dc in 1st st, Ldc in each st across, turn (183)
R68 :
Ch 1, dc in 1st st, Ldc in next 24 sts, 2Ldc in next st, [Ldc in next 32 sts, 2Ldc in next st], repeat [ ] 3 more times, Ldc in each of the last 25 sts, turn (188)
R69 :
Ch 1, dc in 1st st, Ldc in each st across, turn (188)
R70 :
Ch 1, dc in 1st st, Ldc in next 8 sts, 2Ldc in next st, [Ldc in next 33 sts, 2Ldc in next st], repeat [ ] 4 more times, Ldc in last 8 sts, turn (194)
R71 :
Ch 1, dc in 1st st, Ldc in each st across, turn (194)
R72 :
Ch 1, dc in 1st st, Ldc in next 25 sts, 2Ldc in next st, [Ldc in next 34 sts, 2Ldc in next st], repeat [ ] 3 more times, Ldc in each of the last 27 sts, turn (199)
R73 :
Ch 1, dc in 1st st, Ldc in each st across, turn (199)
Info :
Long edges measure 37"
R74 :
Ch 1, dc in 1st st, Ldc in next 8 sts, 2Ldc in next st, [Ldc in next 35 sts, 2Ldc in next st], repeat [ ] 3 more times, Ldc in next 28 sts, Lhdc in next 5 sts, sc in next 2 sts, slst in next st, turn (194)
R75 :
do not ch, (skip slst from prior row) slst in top of sc and next 6 sts, sc in next 3 sts, hdc in next st, Lhdc in next 2 sts, Ldc in each st to end, turn (187)
R76 :
Ch 1, dc in 1st st, Ldc in next 27 sts, 2Ldc in next st, [Ldc in next 36 sts, 2Ldc in next st], repeat [ ] 2 more times, Ldc in next 33 sts, Lhdc in next 3 sts, sc in next 3 sts, slst in next st, turn (183) *mark this row along left side of blanket for Saturn orbit line
R77 :
do not ch, (skip slst from prior row) slst in top of sc and next 7 sts, sc in next 13 sts, hdc in next st, Lhdc in next 2 sts, Ldc in each st to end, turn (175)
R78 :
Ch 1, dc in 1st st, Ldc in next 9 sts, 2Ldc in next st, [Ldc in next 37 sts, 2Ldc in next st], repeat [ ] 3 more times, Ldc in next 3 sts, Lhdc in next 4 sts, sc in next 3 sts, slst in next st, turn (178)
R79 :
do not ch, (skip slst from prior row) slst in top of sc and next 12 sts, sc in next 2 sts, hdc in next st, Lhdc in next st, Ldc in each st to end, turn (165)
R80 :
Ch 1, dc in 1st st, Ldc in next 28 sts, 2Ldc in next st, [Ldc in next 38 sts, 2Ldc in next st], repeat [ ] 2 more times, Ldc in next 8 sts, Lhdc in next 3 sts, sc in next 3 sts, slst in next st, turn (165)
R81 :
do not ch, (skip slst from prior row) slst in top of sc and next 5 sts, sc in next 2 sts, hdc in next st, Lhdc in next 3 sts, Ldc in each st to end, turn (159)
R82 :
Ch 1, dc in 1st st, Ldc in next 9 sts, 2Ldc in next st, [Ldc in next 39 sts, 2Ldc in next st], repeat [ ] 2 more times, Ldc in next 21 sts, Lhdc in next 3 sts, sc in next 2 sts, slst in next st, turn (161)
R83 :
do not ch, (skip slst from prior row) slst in top of sc and next 3 sts, sc in next 2 sts, hdc in next st, Lhdc in next st, Ldc in each st to end, turn (157)
R84 :
Ch 1, dc in 1st st, Ldc in next 30 sts, 2Ldc in next st, [Ldc in next 40 sts, 2Ldc in next st], repeat [ ] 1 more time, Ldc in next 35 sts, Lhdc in next 3 sts, sc in next 2 sts, slst in next st, turn (157)
R85 :
do not ch, (skip slst from prior row) slst in top of sc and next 3 sts, sc in next 2 sts, hdc in next st, Lhdc in next st, Ldc in each st to end, turn (153)
R86 :
Ch 1, dc in 1st st, Ldc in next 10 sts, 2Ldc in next st, [Ldc in next 41 sts, 2Ldc in next st], repeat [ ] 2 more times, Ldc in next 6 sts, Lhdc in next 2 sts, sc in next 2 sts, slst in next st, turn (152) *mark this row along left side of blanket for Uranus orbit line
R87 :
do not ch, (skip slst from prior row) slst in top of sc and next st, sc in next 2 sts, hdc in next st, Lhdc in next st, Ldc in each st to end, turn (150)
R88 :
Ch 1, dc in 1st st, Ldc in next 31 sts, 2Ldc in next st, [Ldc in next 42 sts, 2Ldc in next st], repeat [ ] 1 more time, Ldc in next 23 sts, Lhdc in next 2 sts, sc in next 2 sts, slst in next st, turn (149)
R89 :
do not ch, (skip slst from prior row) slst in top of sc and next 2 sts, sc in next 2 sts, hdc in next st, Lhdc in next st, Ldc in each st to end, turn (146)
R90 :
Ch 1, dc in 1st st, Ldc in next 10 sts, 2Ldc in next st, [Ldc in next 43 sts, 2Ldc in next st], repeat [ ] 1 more time, Ldc in next 38 sts, Lhdc in next 2 sts, sc in next 2 sts, slst in next st, turn (145)
R91 :
do not ch, (skip slst from prior row) slst in top of sc and next 2 sts, sc in next 2 sts, hdc in next st, Lhdc in next st, Ldc in each st to end, turn (142)
R92 :
Ch 1, dc in 1st st, Ldc in next 33 sts, 2Ldc in next st, [Ldc in next 44 sts, 2Ldc in next st], repeat [ ] 1 more time, Ldc in next 10 sts, Lhdc in next 2 sts, sc in next 2 sts, slst in next st, turn (142)
R93 :
do not ch, (skip slst from prior row) slst in top of sc and next 2 sts, sc in next 2 sts, hdc in next st, Lhdc in next st, Ldc in each st to end, turn (139)
R94 :
Ch 1, dc in 1st st, Ldc in next 11 sts, 2Ldc in next st, [Ldc in next 45 sts, 2Ldc in next st], repeat [ ] 1 more time Ldc in next 27 sts, Lhdc in next 2 sts, sc in next 2 sts, slst in next st, turn (139)
Info :
At this point in the pattern the left edge measures 47 long and has been completed. The rows will begin to shorten along both sides to fill in the lower right edge to complete the rectangle shape of the blanket.
R95 :
do not ch, (skip slst from prior row) slst in top of sc and next 2 sts, sc in next st, hdc in next st, Ldc in next 109 sts, Lhdc in next 3 sts, sc in next 6 sts, slst in next st, turn (120)
R96 :
do not ch, (skip slst from prior row) slst in top of sc and next 10 sts, sc in next 2 sts, hdc in next st, Lhdc in next st, Ldc in next 101 sts, Lhdc in next st, sc in next st, slst in next st, turn (107) *mark this row along left side of blanket for Neptune orbit line
R97 :
do not ch, (skip slst from prior row) slst in top of sc and next st, sc in next st, hdc in next st, Ldc in next 92 sts, Lhdc in next 3 sts, sc in next 3 sts, slst in next st, turn (100)
R98 :
do not ch, (skip slst from prior row) slst in top of sc and next 6 sts, sc in next 2 sts, hdc in next st, Lhdc in next st, Ldc in next 85 sts, Lhdc in next st, sc in next st, slst in next st, turn (91)
R99 :
do not ch, (skip slst from prior row) slst in top of sc, sc in next st, hdc in next st, Lhdc in next st, Ldc in next 79 sts, Lhdc in next 2 sts, sc in next 2 sts, slst in next st, turn (86)
R100 :
do not ch, (skip slst from prior row) slst in top of sc and next 4 sts, sc in next 2 sts, hdc in next st, Lhdc in next st, Ldc in next 74 sts, Lhdc in next st, sc in next st, slst in next st, turn (80)
R101 :
do not ch, (skip slst from prior row) slst in top of sc and next st, sc in next st, hdc in next st, Ldc in next 70 sts, Lhdc in next 2 sts, sc in next st, slst in next st, turn (75)
R102 :
do not ch, (skip slst from prior row) slst in top of sc and next 3 sts, sc in next st, hdc in next st, Ldc in next 65 sts, Lhdc in next st, sc in next st, slst in next st, turn (69)
R103 :
do not ch, (skip slst from prior row) slst in top of sc, sc in next st, hdc in next st, Ldc in next 60 sts, Lhdc in next st, sc in next st, slst in next st, turn (64)
R104 :
do not ch, (skip slst from prior row) slst in top of sc and next 2 sts, sc in next st, hdc in next st, Ldc in next 55 sts, Lhdc in next st, sc in next st, slst in next st, turn (59) *Optional: mark this row along left side of blanket for Pluto orbit line
R105 :
do not ch, (skip slst from prior row) slst in top of sc, sc in next st, hdc in next st, Ldc in next 53 sts, Lhdc in next st, sc in next st, slst in next st, turn (57)
R106 :
do not ch, (skip slst from prior row) slst in top of sc and next 3 sts, sc in next st, hdc in next st, Ldc in next 47 sts, Lhdc in next st, sc in next st, slst in next st, turn (51)
R107 :
do not ch, (skip slst from prior row) slst in top of sc, sc in next st, hdc in next st, Ldc in next 43 sts, Lhdc in next st, sc in next st, slst in next st, turn (47)
R108 :
do not ch, (skip slst from prior row) slst in top of sc and next st, sc in next st, hdc in next st, Ldc in next 39 sts, Lhdc in next st, sc in next st, slst in next st, turn (43)
R109 :
do not ch, (skip slst from prior row) slst in top of sc and next st, sc in next st, hdc in next st, Ldc in next 34 sts, Lhdc in next st, sc in next st, slst in next st, turn (38)
R110 :
do not ch, (skip slst from prior row) slst in top of sc and next st, sc in next st, hdc in next st, Ldc in next 31 sts, Lhdc in next st, sc in next st, slst in next st, turn (35)
R111 :
do not ch, (skip slst from prior row) slst in top of sc, sc in next st, hdc in next st, Ldc in next 27 sts, Lhdc in next st, sc in next st, slst in next st, turn (31)
R112 :
do not ch, (skip slst from prior row) slst in top of sc and next st, sc in next st, hdc in next st, Ldc in next 23 sts, Lhdc in next st, sc in next st, slst in next st, turn (27)
R113 :
do not ch, (skip slst from prior row) slst in top of sc, sc in next st, hdc in next st, Ldc in next 20 sts, Lhdc in next st, sc in next st, slst in next st, turn (24)
R114 :
do not ch, (skip slst from prior row) slst in top of sc and next st, sc in next st, hdc in next st, Ldc in next 16 sts, Lhdc in next st, sc in next st, slst in next st, turn (20)
R115 :
do not ch, (skip slst from prior row) slst in top of sc, sc in next st, hdc in next st, Ldc in next 13 sts, Lhdc in next st, sc in next st, slst in next st, turn (17)
R116 :
do not ch, (skip slst from prior row) slst in top of sc, sc in next st, hdc in next st, Ldc in next 10 sts, Lhdc in next st, sc in next st, slst in next st, turn (14)
R117 :
do not ch, (skip slst from prior row) slst in top of sc, sc in next st, hdc in next st, Ldc in next 6 sts, Lhdc in next st, sc in next st, slst in next st, turn (10)
R118 :
do not ch, (skip slst from prior row) slst in top of sc, sc in next st, hdc in next st, Ldc in next 2 sts, Lhdc in next st, sc in next st, slst in next st, fasten off and weave in ends (6)
— Border Round 1 :
Info :
With right side facing you (sun is in the upper left corner), join with the sky color of yarn in the side of R19, sc along row ends (about 3sc per 2 rows works well), crochet down the left side of the blanket
Corner :
When you reach the corner stitch of the blanket work all the following in the corner st {sc, ch 1, sc], mark the chain 1 space with a stitch marker
Bottom Edge :
Continue to evenly crochet along the bottom of the blanket. However, the edge will not be perfectly even. As you work along the bottom of the blanket edge, crochet sc until you reach a spot that may need a little taller stitch to make the row even, substitute hdc or dc to make the edge even
Corner :
When you reach the corner stitch of the blanket work all the following in the corner st {sc, ch 1, sc], mark the chain 1 space with a stitch marker
Right Side :
Evenly crochet along the right side of the blanket, substituting in hdc and/or dc to keep the edge even (final stitch count should match the left edge), when you reach the corner crochet all the following in the corner stitch [sc, ch 1, sc]
Top Edge :
Evenly crochet sc across top of blanket until you reach the edge of R18 (row using sun color), switch to sun color yarn and continue to sc across top of blanket, at corner st work all the following [sc, ch 1, sc]
Final :
Work sc along first 18 rows of blanket edge, join in top of the first sc to complete round 1
— Border Round 2 :
Start :
Turning after Round 1 was completed and still using sun color of yarn, Ch 1, sc in each st to top corner of blanket
Continue :
In corner ch sp crochet all the following [sc, ch 1, sc], continue to sc across row in sun color until the color changes in Round 1, at this same stitch, switch back to sky color
Around :
Single crochet around entire blanket working the corners with a [sc, ch 1, sc] in ch sp of each corner
Finish :
When row is completed, join in top of beg sc, fasten off and weave in end
Info :
2 Rounds of the border has been completed, this is an ideal time to block your blanket
— Adding Orbit Lines :
Preparation :
The blanket should be blocked. Crochet the sun ray and orbit lines by surface crocheting between the marked rows, include the 2 rows of the border for a more polished look
Tension :
Surface stitches must be crocheted at a tension that will not pull blanket tight-double check after each orbit line has been created
Sun Rays :
The first 3 marked rows (R20, R22, R24) will surface crocheted in the same color of yarn as the sun
Orbit Lines :
Each of the remaining 9 rows will be orbit lines and can be done in any color (sample was done in white)
— Blanket Border Continued :
Round 3 :
With right side facing you (sun is in the upper left corner) and using orbit line color, join with a slst in the corner chain of the lower left corner of the blanket. Ch 1, [in ch sp work (sc, ch 1, sc]) sc in each st across to next corner sp], repeat [ ] around, join in top of beg sc
Round 4 :
Switch to sun color of yarn, Ch 1, [in ch sp work (sc, ch 1, sc), sc in each st across to next corner sp], repeat [ ] around, join in top of beg sc
Round 5 :
Switch to sky color of yarn, Ch 1, [in ch sp work (sc, ch 1, sc), sc in each st across to next corner sp], repeat [ ] around, join in top of beg sc
Round 6 :
Switch to sun color of yarn, Ch 1, [in ch sp work (sc, ch 1, sc), sc in each st across to next corner sp], repeat [ ] around, join in top of beg sc
Round 7 :
Ch 1, {in corner ch sp work (sc, ch 1, sc), ch 1, skip next st, [spike sc in next st, ch 1, skip next st], repeat [ ] to corner ch sp}, repeat { }around entire blanket, join in top of beg ch, fasten off and weave in all ends
— Planet Appliques - Basic Planet Pattern :
Info :
All appliques will be crocheted with crochet hook size H. Each planet will be made by crocheting the Basic Planet pattern below, follow the specifications under the specific planet
R1 :
Ch 2, in 2nd ch from hook work 8sc, join in top of beg sc with a slst, turn (8) pull beginning end of yarn to close center hole, (a magic circle may be used instead of a beg chain 2)
R2 :
Ch 1, 2sc in each st around, join & turn (16)
R3 :
ch 1, sc in each st around, join & turn (16)
R4 :
Ch 1, 2sc in 1st st, sc in next st, [2sc in next st, sc in next st], repeat [ ] around, join & turn (24)
R5 :
Ch 1, 2sc in 1st st, sc in next 2 sts, [2sc in next st, sc in next 2 sts], repeat [ ] around, join & turn (32)
R6 :
Ch 1, 2sc in 1st st, sc in next 3 sts, [2sc in next st, sc in next 3 sts], repeat [ ] around, join & turn (40)
R7 :
Ch 1, sc in each st around, join & turn (40)
R8 :
Ch 1, 2sc in 1st st, sc in next 4 sts, [2sc in next st, sc in next 4 sts], repeat [ ] around, join & turn (48)
R9 :
Ch 1, 2sc in 1st st, sc in next 5 sts, [2sc in next st, sc in next 5 sts], repeat [ ] around, join & turn (56)
R10 :
Ch 1, sc in each st around, join (56)
— Mercury :
Details :
Yarn Color: Asphalt Heather, Completed Size: 2 ¼ across center of circle, Complete basic planet pattern through R4, Planet will be sewn onto 1st orbit line
— Venus :
Details :
Yarn Color: Orange, Completed Size: 3 ½ across center of circle, Complete through R6, Planet will be sewn onto 2nd orbit line
— Earth :
Details :
Yarn Color: Celestial, Completed Size: 3 ½ across center of circle, Complete through R6, Planet will be sewn onto 3rd orbit line
Creating the Land (yarn color: Grass) :
Embroider "x" across the stitches in the general shape of North & South America. Ch 5, sc in 2nd ch from hook and each ch across, turn (4). Ch 1, 2sc in 1st st, sc in each st across, turn (5). Ch 1, sc2tog, sc in each st across, turn (4). Ch 2, slst in 2nd ch from hook, slst in next 2 sts, ch 1, sc in next 2 st, turn. Ch 1, sc in 1st 2 sts, turn (2). Ch 1, sc2tog, turn (1). Ch 1, sc in 1st st, ch 2. 2Sc in 2nd ch from hook, sc in next st, turn (3). Ch 1, 2sc in 1st st, sc in each st across, turn (4). Ch 1, sc2tog, sc2tog, turn (2). Ch 1, sc2tog, fasten off and sew to top of blue Earth Planet applique
— Mars :
Details :
Yarn Color: Paprika, Completed Size: 3 ½ across center of circle, Complete through R6, Planet will be sewn onto 4th orbit line
Creating the Rocky Surface (yarn color: Sienna) :
Tie yarn in a knot, tie another knot on top of 1st knot, tie another knot on top for a total of 3 knots. Take yarn ends from knot and weave from front to backside of the applique and tie into place (do not tie so tight that it creates holes). Randomly place knots on applique to replicate the rocky surface of mars. Do not worry about yarn ends on back side of applique, they will be hidden when the applique is sewn onto the blanket
— Jupiter :
Details :
Yarn Color: Marina, Completed Size: 5 ¼ across center of circle, Complete through R10, Planet will be sewn onto 5th orbit line
Creating the Storm Ball (yarn color: Coral) :
Ch 2, 5sc in 2nd ch from hook, join with an invisible join in top of 1st sc. Sew small circle applique to the lower left of the Jupiter applique
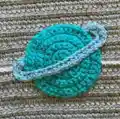
— Saturn :
Details :
Yarn Color: Custard, Completed Size: 4 ¾ across center of circle, Complete through R9, Planet will be sewn onto 6th orbit line
How to crochet planet rings (yarn color: Lady Slipper) :
Ch 25, 3sc in 2nd ch from hook, sc in next 22 sts, 3sc in last st, turn (28). Ch 1, working in the back loop only 2BLsc in 1st 3 sts, BLsc in next 2 sts, 2BLsc in each of the last 3 sts, fasten off (34)
— Uranus :
Details :
Yarn Color: Cornflower, Completed Size: 4 across center of circle, Complete through R8, Planet will be sewn onto 7th orbit line
How to crochet planet rings (yarn color: Sky) :
Ch 27, 2sc in 2nd ch from hook, 2sc in each of the next 2 sts, sc in next 20 sts, 2sc in each of the last 3 sts, fasten off (30)
— Neptune :
Details :
Yarn Color: Solstice Heather, Completed Size: 3 ¾ across center of circle, Complete through R7, Planet will be sewn onto 8th orbit line
— Pluto (optional dwarf planet) :
Details :
Yarn Color: Persimmon, Completed Size: 2 ¼ across center of circle, Complete through R4, Planet will be sewn onto 9th orbit line
This enchanting Solar System Space Blanket pattern was designed to bring the wonder of astronomy into your home with beautiful linked double crochet texture and charming planet details! Whether you're creating this for a space-loving child, an astronomy enthusiast, or simply someone who dreams among the stars, this blanket combines educational value with cozy comfort. The surface-crocheted orbit lines create graceful curves across the fabric while each handcrafted planet applique tells its own story from Earth's continents to Saturn's iconic rings. This is more than just a blanket - it's a journey through our cosmic neighborhood! 🌟✨🪐