🧶 Beautiful ✨ Detailed 💝 Adorable

Sleepy Snuggle-saurus Rag Doll Amigurumi Pattern

Sleepy Snuggle-saurus Rag Doll Amigurumi Pattern
4.7★ Rating
4-6 Hours Time Needed
1.3K Made This
✂️

Beginner Friendly Level

Perfect for those just starting their sewing journey, with clear instructions and simple techniques

⏱️

Weekend Treat

Takes 5-7 hours, making it an enjoyable project to finish over a couple of days.

🧸

Cute Companion

An adorable friend to cherish, handcrafted with love to bring comfort and joy for years to come.

About This Sleepy Snuggle-saurus Rag Doll Amigurumi Pattern

This Sleepy Snuggle-saurus pattern creates a uniquely cuddly dinosaur rag doll with an unstuffed body that makes it extra huggable and perfect for little ones. The pattern features detailed instructions for creating a sweet dinosaur with embroidered sleepy eyes, shaped nostrils, colorful spikes, and adorable toenail accents. Using super bulky yarn, this project works up quickly while still offering plenty of room for creativity through color choices.

Sleepy Snuggle-saurus Rag Doll Amigurumi Pattern crochet pattern - detailed view of completed project

The rag doll construction technique keeps the body soft and floppy while strategically stuffing only the head, feet, and tail for the perfect balance of structure and snuggliness. Customize your dinosaur with one solid spike color or create a rainbow effect with multiple colors.

Why You'll Love This Sleepy Snuggle-saurus Rag Doll Amigurumi Pattern

I absolutely love this pattern because it creates the most huggable dinosaur friend imaginable! The rag doll construction makes it so soft and cuddly, unlike traditional amigurumi that can be too firm. I adore how you can customize the spike colors to match any personality or room decor, and the sleepy expression gives it such a gentle, calming presence. The quick work-up time with super bulky yarn means you can create a special gift without spending weeks on it, and the detailed face-shaping instructions help you achieve that perfect sweet expression every time.

Sleepy Snuggle-saurus Rag Doll Amigurumi Pattern step 1 - construction progress Sleepy Snuggle-saurus Rag Doll Amigurumi Pattern step 2 - assembly progress Sleepy Snuggle-saurus Rag Doll Amigurumi Pattern step 3 - details and accessories Sleepy Snuggle-saurus Rag Doll Amigurumi Pattern step 4 - final assembly and finishing

Switch Things Up

I love experimenting with different color combinations for this Sleepy Snuggle-saurus! While the pattern shows a pale gray body with rainbow spikes, I've made versions in soft pastels with matching spike tones for a dreamy look, and bold jewel tones for a more vibrant dinosaur. You could even use variegated yarn for the spikes to create an ombre effect without changing colors.

I also like to play with the facial expression—moving the eye placement slightly higher or lower changes the whole personality of your dinosaur. Some of mine have looked sleepier while others seem more alert. The nostril size and placement can be adjusted too for different looks.

For a special touch, I sometimes add a little felt heart or star patch on the belly, or embroider a name on the foot. You could also make the tail shorter for a baby dinosaur look or longer for a more dramatic effect. The toenail color is another fun element to customize—try matching them to one of your spike colors instead of using white.

If you want a bigger or smaller version, simply change your yarn weight and hook size accordingly. A fingering weight yarn with a 2.5mm hook creates an adorable mini version perfect for keychains!

Common Mistakes & How to Fix Them

✗ Overstuffing the head, feet, or tail can make the rag doll too firm and less cuddly; stuff lightly for the best snuggly texture ✗ Forgetting to mark the center of the face in Round 8 of the head makes eye placement difficult later; always insert the stitch marker ✗ Working Round 3 of the body too tightly in FLO can make it hard to continue; loosen stitches by inserting hook through both loops first ✗ Pulling the nostril stitches too tight will distort the face shape; keep them loose and natural-looking for best results ✗ Not flattening the spike openings properly before crocheting them closed creates lumpy spikes; take time to flatten evenly before final stitches

Sleepy Snuggle-saurus Rag Doll Amigurumi Pattern

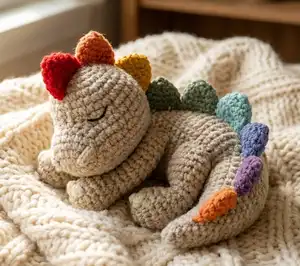
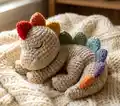
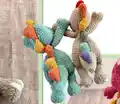
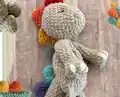
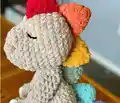
Create an adorable dinosaur companion with this charming Sleepy Snuggle-saurus pattern! This cuddly rag doll features a soft, unstuffed body perfect for snuggling, colorful spikes running down its back and tail, and sweet sleepy embroidered eyes. Made with super bulky yarn, this project works up quickly and offers endless customization options with spike colors. Perfect for dinosaur lovers of all ages, this huggable friend combines simple techniques with delightful details to create a truly special handmade gift.

Beginner Friendly 4-6 Hours

Materials Needed for Sleepy Snuggle-saurus Rag Doll Amigurumi Pattern

— Main Fabric

  • 01
    1 roll (220 yards) of Super Bulky 6 yarn for main body color (Bernat Blanket in Pale Gray recommended)
  • 02
    Super Bulky 6 yarn for spikes in desired colors (Crimson, Burnt Mustard, Orange Leaf, Smoky Green, Light Teal, Dusk Blue)
  • 03
    Small amount of Super Bulky 6 yarn for toenail accents (Vintage White recommended)
  • 04
    Small amount of black yarn for embroidered eyes
  • 05
    Stuffing for head, feet, and tail only

— Tools Required

  • 01
    6.00mm crochet hook
  • 02
    Sewing needle for assembly
  • 03
    Yarn needle for embroidery
  • 04
    Stitch markers
  • 05
    Scissors

Progress Tracker

0% Complete

— Front Legs (Arms) :

Info :

Make 2 pieces. Begin with pale gray and 6.00mm hook. Work in continuous spiral.

Round 1 :

6 sc in mc (6sc)

Round 2 :

inc in each stitch around x 6 (12sc)

Round 3 :

[1sc, inc] repeat around x 6 (18sc)

Round 4 :

BLO sc around (18sc)

Round 5 :

[1sc, dec] repeat around x 6 (12sc)

Round 6 :

sc around (12sc)

Round 7 :

[2sc, dec] repeat x 3 (9sc)

Round 8-16 :

sc around (9sc in each round)

Info :

Stuff only the foot area, leaving the rest free of stuffing

Round 17 :

Press top of leg flat, crochet both sides together to close (4sc)

Info :

Fasten off and weave in ends, set aside for assembly

— Hind Legs :

Info :

Make 2 pieces. Begin with pale gray and 6.00mm hook. Work in continuous spiral.

Round 1 :

6 sc in mc (6sc)

Round 2 :

inc in each stitch around x 6 (12sc)

Round 3 :

[1sc, inc] repeat around x 6 (18sc)

Round 4 :

BLO sc around (18sc)

Round 5 :

[1sc, dec] repeat around x 6 (12sc)

Round 6 :

sc around (12sc)

Round 7 :

[2sc, dec] repeat x 3 (9sc)

Round 8-11 :

sc around (9sc in each round)

Info :

Stuff only the foot area, leaving the rest free of stuffing

For First Hind Leg :

sl st into next stitch, fasten off and weave in ends, leaving top of leg open. Set aside.

For Second Hind Leg Round 12 :

Press top of leg flat, crochet both sides together to close (4sc). Do not cut working yarn.

— Body :

Info :

Continue with pale gray yarn from second hind leg. First 2 parts worked in rows, then in rounds from Round 3.

Row 1 :

Following from Round 12 of second hind leg, chain 5, then sc across first hind leg to close top (4sc, 5ch, 4sc)

Row 2 :

ch 1 and turn, inc in first stitch, 3sc, 5sc in ch 5 from previous row, 3sc, inc in last stitch (15sc)

Round 3 :

ch 1 and turn, inc in first FLO, 14 FLO sc across, turn work and continue on back loops of Row 2, inc in next FLO, 14 FLO sc across other side (32sc)

Info :

From now on, use stitch marker to mark beginning and end of each round, work in spirals

Round 4 :

inc, 15sc, inc, 15sc (34sc)

Round 5 :

inc, 16sc, inc, 16sc (36sc)

Round 6-10 :

sc in each stitch (36sc in each round)

Round 11 :

dec, 16sc, dec, 16sc (34sc)

Round 12 :

sc around (34sc)

Round 13 :

dec, 15sc, dec, 15sc (32sc)

Round 14 :

dec, 14sc, dec, 14sc (30sc)

Round 15 :

[3sc, dec] repeat around x 6 (24sc)

Round 16 :

[2sc, dec] repeat around x 6 (18sc)

Round 17 :

[1sc, dec] repeat around x 6 (12sc)

Round 18 :

sc in each stitch around (12sc)

Round 19 :

Crochet front legs to body: 4sc through front leg and body, 2sc through body only, 4sc through front leg and body, 2sc through body only (12sc)

Round 20 :

sc in each stitch around (12sc)

Info :

sl st into next stitch, fasten off leaving long tail for sewing head. Do not stuff body.

— Head :

Info :

Begin with pale gray and 6.00mm hook. Work in continuous rounds.

Round 1 :

6sc in mc (6sc)

Round 2 :

inc x 6 (12sc)

Round 3 :

[sc, inc] repeat x 6 (18sc)

Round 4 :

[2sc, inc] repeat x 6 (24sc)

Round 5-6 :

sc around (24sc in each round)

Round 7 :

[2sc, inc] repeat around (32sc)

Round 8 :

14sc, inc, inc, insert stitch marker, inc, inc, 14sc (36sc)

Info :

Stitch marker marks center of face for eye placement

Round 9-12 :

sc in each st around (36sc in each round)

Round 13 :

[4sc, dec] repeat x 6 (30sc)

Round 14 :

[3sc, dec] repeat x 6 (24sc)

Info :

Begin stuffing head lightly. Don't overstuff for cuddly texture.

Round 15 :

[2sc, dec] repeat x 6 (18sc)

Round 16 :

[1sc, dec] repeat x 6 (12sc)

Round 17 :

dec x 6 (6sc)

Info :

sl st in next stitch, cut yarn leaving long tail. Weave through remaining stitches to close back of head.

— Eye Details & Nostrils :

Info :

Use remaining tail from closing head or cut new piece of pale gray yarn

Eye Dents :

Press fingers into head on each side of stitch marker from Round 8 to create two slight dents. For example, around row 8 with 5 stitches between them.

Creating Eye Dents :

Insert needle through back of stitch in dent, go back through stitch one row greater and one stitch over. Bring needle to other side dent and repeat. Go back and forth 2-3 times, pulling and squeezing head as you go.

Nostrils :

Decide nostril placement based on what looks best. For example, beginning between rows 2 and 3, spanning to between rows 4 and 5 on center of face. Go through stitches 3 times to create thickness. Don't pull too tight.

Info :

Secure yarn tails inside head after completing nostrils

— Embroidered Sleepy Eyes :

Info :

Use black yarn and yarn needle

Creating Sleepy Eyes :

Follow shape of eye dents to create sleepy eyelid. Work back into lower stitch to pull eyelid into downward arch shape for sleepy look. Repeat for other eye and weave in ends.

— Spikes :

Info :

Make 6 spikes total. Use super bulky yarn in desired colors with 6.00mm hook.

First Spike (Small) :

For top of head

Round 1 :

6 sc in mc (6sc)

Round 2 :

[sc, inc] repeat around x 3 (9sc)

Round 3 :

[2sc, inc] repeat around x 3 (12sc)

Closing :

Flatten opening of spike and crochet closed (6sc). sl st in next stitch, fasten off leaving long tail for sewing.

Remaining 5 Spikes (Large) :

In desired colors

Round 1 :

6 sc in mc (6sc)

Round 2 :

[sc, inc] repeat around x 3 (9sc)

Round 3 :

[2sc, inc] repeat around x 3 (12sc)

Round 4 :

[3sc, inc] repeat around x 3 (15sc)

Closing :

Flatten opening of spike and crochet closed (6sc). sl st in next stitch, fasten off leaving long tail for sewing.

— Tail :

Info :

Use pale gray super bulky yarn and 6.00mm hook

Round 1 :

4sc in mc (4sc)

Round 2 :

[1sc, inc] repeat x 2 (6sc)

Round 3 :

[2sc, inc] repeat x 2 (8sc)

Round 4 :

[3sc, inc] repeat x 2 (10sc)

Round 5 :

[4sc, inc] repeat x 2 (12sc)

Round 6 :

[5sc, inc] repeat x 2 (14sc)

Round 7 :

[6sc, inc] repeat x 2 (16sc)

Round 8 :

[7sc, inc] repeat x 2 (18sc)

Round 9 :

[8sc, inc] repeat x 2 (20sc)

Round 10-11 :

1 sc in each stitch around (20sc in each round)

Round 12 :

inc, inc, insert stitch marker, inc, inc, 16sc (24sc)

Info :

Stitch marker marks center of top of tail. Use as guide when sewing tail to body.

Round 13 :

sc in each stitch around (24sc)

Info :

sl st into next stitch and leave long tail for sewing to body. Set aside for assembly.

Assembly Instructions

  • Sew the head to the body using the yarn tail from finishing the body, aligning the neck opening properly.
  • Stuff the tail lightly with fiberfill to maintain softness and sew to the back center of the body using the long tail.
  • Use the stitch marker from Round 12 of the tail as your guide to center the tail, then remove marker after sewing.
  • Sew the small spike to the top of the head beginning around Row 9 of the head piece.
  • Attach remaining 5 spikes consecutively down the center of the head, back, and tail, placing each spike right next to the previous one.
  • Create toenail details on all 4 feet using vintage white yarn and a yarn needle.
  • For each foot, insert needle into center and out between rows 4 and 5, go over area 2-3 times for thickness, repeat for 3 toes total per foot, spacing toes 2 stitches apart.

Important Notes

  • 💡The body is intentionally left unstuffed for a soft, cuddly rag doll texture—only stuff the head, feet, and tail
  • 💡Use stitch markers throughout the pattern to track important placement points for eyes, tail center, and round beginnings
  • 💡Round 3 of the body can be tricky with bulky yarn—insert hook through both loops first to identify FLO, then reinsert through FLO only
  • 💡Don't overstuff any parts—keep them squishy for the best snuggly feel in this rag doll design
  • 💡Pin all pieces in place before final sewing to ensure proper positioning and symmetry
  • 💡The spike color pattern is completely customizable—use one color, two colors, or a full rainbow depending on your preference

This adorable Sleepy Snuggle-saurus pattern creates the perfect cuddly companion for dinosaur lovers of all ages! The unique rag doll construction with an unstuffed body makes it extra snuggly while the colorful spikes add personality and charm. The detailed face-shaping instructions help you create those sweet sleepy eyes and gentle expression that make this dino so lovable. Using super bulky yarn means quick results, and the endless color customization options let you create a truly one-of-a-kind prehistoric pal. 🦕✨ Happy crocheting! 🧶💚

You ask,

we answer.

FAQs

Why is the body left unstuffed in this pattern?

The unstuffed body creates a soft, floppy rag doll texture that makes the dinosaur extra cuddly and huggable, perfect for snuggling. Only the head, feet, and tail are stuffed to maintain structure where needed.

Can I use regular worsted weight yarn instead of super bulky?

Yes, but you'll need to use a smaller hook (3.5-4mm) and your finished dinosaur will be much smaller. The pattern will take longer to complete with thinner yarn.

How do I choose colors for the spikes?

You can use one solid color, alternate between two colors, or create a rainbow effect with 6 different colors as shown in the pattern examples. Choose colors that complement your main body color.

Is this pattern safe for young children?

Yes! Since the eyes are embroidered rather than using safety eyes, there are no small parts that could be choking hazards, making it safe for babies and toddlers.

How do I work Round 3 of the body in FLO?

Insert your hook through both loops first to help identify the front and back loops, then remove and reinsert through only the front loop. This helps loosen the stitch and makes it easier to work with bulky yarn.