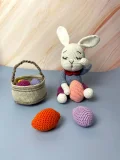
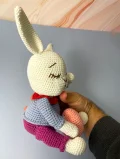
Get ready to create the most charming springtime setup with this sleepy little bunny, its cozy basket, and a collection of colorful Easter eggs! This heartwarming pattern is perfect for adding a touch of handmade magic to your holiday decor or crafting a truly special gift that will be cherished for years. With its sweet closed eyes and adorable sitting pose, this little rabbit is sure to bring a smile to everyone's face.
Progress Tracker
0% Complete
— 1. Head & Body :
Round 1 :
Using White yarn, make a mr and work 6 sc into it (6)
Round 2 :
Work 1 inc in each of the next 6 st (12)
Round 3 :
Repeat (1 sc, 1 inc) 6 times (18)
Round 4 :
Repeat (2 sc, 1 inc) 6 times (24)
Round 5 :
Repeat (3 sc, 1 inc) 6 times (30)
Round 6 :
Repeat (4 sc, 1 inc) 6 times (36)
Round 7 :
Repeat (5 sc, 1 inc) 6 times (42)
Round 8 :
Repeat (6 sc, 1 inc) 6 times (48)
Round 9 :
Repeat (7 sc, 1 inc) 6 times (54)
Round 10-19 :
sc in each st (54)
Info :
Stuff the head firmly and continue to add stuffing as you progress.
Round 20 :
sc in the first 20 st, work 14 inc, sc in the last 20 st (68)
Round 21-27 :
sc in each st (68)
Round 28 :
sc in the first 20 st, work 14 dec, sc in the last 20 st (54)
Round 29 :
Repeat (7 sc, 1 dec) 6 times (48)
Round 30 :
Repeat (6 sc, 1 dec) 6 times (42)
Round 31 :
Repeat (5 sc, 1 dec) 6 times (36)
Round 32 :
Repeat (4 sc, 1 dec) 6 times (30)
Round 33 :
Repeat (3 sc, 1 dec) 6 times (24)
Round 34-36 :
sc in each st (24)
Colour Change :
Switch to Pink yarn
Round 37 :
Repeat (3 sc, 1 inc) 6 times (30)
Round 38 :
Repeat (4 sc, 1 inc) 6 times (36)
Round 39 :
Repeat (5 sc, 1 inc) 6 times (42)
Round 40 :
sc in each st (42)
Round 41 :
Repeat (6 sc, 1 inc) 6 times (48)
Round 42-49 :
sc in each st (48)
Colour Change :
Switch to Lilac yarn
Round 50 :
Working in flo, sc in each st (48)
Round 51-55 :
sc in each st (48)
Round 56 :
Working in flo, sc in each st (48)
Round 57 :
Repeat (6 sc, 1 dec) 6 times (42)
Round 58 :
Repeat (5 sc, 1 dec) 6 times (36)
Round 59 :
Repeat (4 sc, 1 dec) 6 times (30)
Round 60 :
Repeat (3 sc, 1 dec) 6 times (24)
Round 61 :
Repeat (2 sc, 1 dec) 6 times (18)
Round 62 :
Repeat (1 sc, 1 dec) 6 times (12)
Info :
Stuff the body firmly before closing.
Round 63 :
sc dec 6 times (6). FO and weave in the remaining end cleanly.
Sweater Detail :
To make the sweater border, attach Lilac yarn to the unworked blo of Round 56 and sc in each st around (48). FO.
— 2. Legs :
Round 1 :
Using White yarn, make a mr and work 6 sc into it (6)
Round 2 :
Work 1 inc in each of the next 6 st (12)
Round 3 :
Repeat (1 sc, 1 inc) 6 times (18)
Round 4 :
Repeat (2 sc, 1 inc) 6 times (24)
Round 5-7 :
sc in each st (24)
Round 8 :
sc in the first 6 st, work 6 dec, sc in the last 6 st (18)
Round 9 :
sc in the first 5 st, work 4 dec, sc in the last 5 st (14)
Round 10-13 :
sc in each st (14)
Colour Change :
Switch to Lilac yarn
Info :
Stuff the leg firmly, continuing to fill as you crochet.
Round 14 :
sc in each st (14)
Round 15 :
Working in flo, sc in each st (14)
Round 16 :
sc in each st, increasing 2 times evenly around (16)
Round 17-28 :
sc in each st (16)
Round 29 :
Flatten the leg opening and crochet through both thicknesses with 8 sc to close. FO, leaving a long tail for attachment.
Leg Detail 1 :
To make the sleeve border, attach White yarn to the unworked blo of Round 13 and sc in each st around (14). FO.
Leg Detail 2 :
To complete the leg trim, attach Lilac yarn to the unworked blo of Round 14 and sc in each st around (14). FO.
— 3. Collar :
Row 1 :
Using Green yarn, ch 30
Row 2 :
Starting in the second ch from the hook, sc in each ch across (30), turn
Row 3 :
Work 1 inc in each of the 30 st across (60). FO, leaving a long tail to sew onto the neck.
— 4. Arms :
Round 1 :
Using White yarn, make a mr and work 6 sc into it (6)
Round 2 :
Work 1 inc in each of the next 6 st (12)
Round 3 :
sc in each st, increasing 2 times evenly around (14)
Round 4-12 :
sc in each st (14)
Colour Change :
Switch to Pink yarn
Round 13 :
Working in flo, sc in each st (14)
Round 14-29 :
sc in each st (14)
Round 30 :
Flatten the arm opening and crochet through both thicknesses with 7 sc to close. FO, leaving a long tail for attachment.
— 5. Ears :
Round 1 :
Using White yarn, make a mr and work 6 sc into it (6)
Round 2 :
Work 1 inc in each of the next 6 st (12)
Round 3 :
Repeat (5 sc, 1 inc) 2 times (14)
Round 4 :
Repeat (6 sc, 1 inc) 2 times (16)
Round 5 :
Repeat (7 sc, 1 inc) 2 times (18)
Round 6 :
Repeat (8 sc, 1 inc) 2 times (20)
Round 7 :
Repeat (9 sc, 1 inc) 2 times (22)
Round 8 :
Repeat (10 sc, 1 inc) 2 times (24)
Round 9-24 :
sc in each st (24)
Round 25 :
Flatten the ear opening and crochet through both thicknesses with 12 sc to close. FO, leaving a long tail.
— 6. Eggs :
Round 1 :
Make a mr and work 6 sc into it (6)
Round 2 :
Work 1 inc in each of the next 6 st (12)
Round 3 :
sc in each st (12)
Round 4 :
Repeat (1 sc, 1 inc) 6 times (18)
Round 5 :
sc in each st (18)
Round 6 :
Repeat (2 sc, 1 inc) 6 times (24)
Round 7 :
sc in each st (24)
Round 8 :
Repeat (3 sc, 1 inc) 6 times (30)
Round 9 :
sc in each st (30)
Round 10-17 :
sc in each st (30)
Round 18 :
Repeat (3 sc, 1 dec) 6 times (24)
Round 19 :
sc in each st (24)
Round 20 :
Repeat (2 sc, 1 dec) 6 times (18)
Round 21 :
sc in each st (18)
Info :
Stuff the egg firmly, continuing to fill as you finish the remaining rounds.
Round 22 :
Repeat (1 sc, 1 dec) 6 times (12)
Round 23 :
sc in each st (12)
Round 24 :
sc dec 6 times (6). FO and hide the tail inside.
— 7. Basket :
Round 1 :
Using Light Brown yarn, make a mr and work 6 sc into it (6)
Round 2 :
Work 1 inc in each of the next 6 st (12)
Round 3 :
Repeat (1 sc, 1 inc) 6 times (18)
Round 4 :
Repeat (2 sc, 1 inc) 6 times (24)
Round 5 :
Repeat (3 sc, 1 inc) 6 times (30)
Round 6 :
Repeat (4 sc, 1 inc) 6 times (36)
Round 7 :
Repeat (5 sc, 1 inc) 6 times (42)
Round 8 :
Repeat (6 sc, 1 inc) 6 times (48)
Round 9 :
Repeat (7 sc, 1 inc) 6 times (54)
Round 10 :
Repeat (8 sc, 1 inc) 6 times (60)
Round 11 :
Repeat (9 sc, 1 inc) 6 times (66)
Round 12 :
Repeat (10 sc, 1 inc) 6 times (72)
Round 13 :
Repeat (11 sc, 1 inc) 6 times (78)
Round 14 :
Repeat (12 sc, 1 inc) 6 times (84)
Round 15 :
Working in flo, sc in each st (84)
Round 16-26 :
sc in each st (84)
Colour Change :
Switch to Pink yarn
Round 27 :
sc in each st (84)
Colour Change :
Switch to Light Brown yarn
Round 28 :
sc in each st (84)
Colour Change :
Switch to Pink yarn
Round 29 :
sc in each st (84)
Colour Change :
Switch to Light Brown yarn
Round 30-31 :
sc in each st (84). FO.
Basket Handle - Row 1 :
Using Pink yarn, ch 70
Basket Handle - Row 2 :
Starting in the second ch from the hook, sc in each ch across (70). FO, leaving a long tail to sew onto the basket sides.
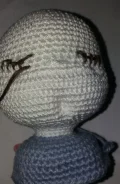
I hope you enjoy every single stitch of making this sleepy little bunny and its colorful Easter treasures! There is nothing quite like the feeling of finishing a handmade set that brings so much warmth and seasonal cheer into your home. Don't forget to take your time embroidering that sweet, sleepy face—it is where the real magic happens! Happy crocheting, my friends, and may your spring be filled with cozy stitches! 🧶🌸✨