🧢 Beautiful ✨ Detailed πŸ’ Adorable

Adorable Teddy Bear Amigurumi Pattern

Adorable Teddy Bear Amigurumi Pattern
4.5β˜… Rating
6-8 Hours Time Needed
3.8K Made This
βœ‚οΈ

Intermediate Level

Ideal for those with basic knitting experience, featuring slightly more advanced stitches and techniques to expand your skills.

⏱️

Weekend Treat

Takes 5-7 hours, making it an enjoyable project to finish over a couple of days.

🧸

Cute Companion

An adorable friend to cherish, handcrafted with love to bring comfort and joy for years to come.

About This Adorable Teddy Bear Amigurumi Pattern

This classic teddy bear pattern brings timeless charm to your crochet collection. Worked with plush yarn for that extra-soft touch, this bear features a dimensional muzzle, perfectly positioned ears, and thoughtful details like embroidered eyebrows and nose. The pattern includes jointed arms and legs for a poseable friend, plus face-tightening techniques to create those signature teddy bear features. With clear row-by-row instructions and assembly guidance, you'll create a huggable companion that captures the essence of childhood comfort.

Adorable Teddy Bear Amigurumi Pattern crochet pattern - detailed view of completed project

The pattern walks you through creating each component separately before assembly, making it manageable even with the multiple parts. Special attention is given to the face details and tightening techniques that give your bear its characteristic expression and charm.

Why You'll Love This Adorable Teddy Bear Amigurumi Pattern

I absolutely love this pattern because it creates such a classic, huggable result that never goes out of style. The plush yarn gives it an irresistibly soft texture that makes you want to keep squeezing it! I appreciate how the pattern includes detailed tightening instructions to really sculpt the face and bring personality to your bear. The jointed limbs add that authentic teddy bear feel, and watching all the separate pieces come together into a complete character is incredibly satisfying. It's one of those projects that feels special from start to finish, and the end result is something you'll be proud to display or gift.

Adorable Teddy Bear Amigurumi Pattern step 1 - construction progress Adorable Teddy Bear Amigurumi Pattern step 2 - assembly progress Adorable Teddy Bear Amigurumi Pattern step 3 - details and accessories Adorable Teddy Bear Amigurumi Pattern step 4 - final assembly and finishing

Switch Things Up

I love experimenting with different yarn textures and colors to give each teddy bear its own unique personality! Instead of the classic brown, try creating a pastel rainbow bear using soft pinks, blues, or lavenders for a nursery-friendly version. You could also use variegated yarn for a magical, color-changing effect that kids absolutely adore.

For the muzzle, I sometimes skip the white contrast and work it in the same color as the body for a more subtle, modern look. If you want to add extra charm, consider embroidering a small heart on the bear's chest or a tiny flower on its ear. I've also experimented with adding a small crocheted scarf or bow tie for dressed-up versions that make perfect gifts.

Another fun variation is sizing - use a smaller hook (3mm) with sport weight yarn to create a mini keychain version, or go larger with a 6mm hook and super bulky yarn for a giant cuddle buddy. The pattern scales beautifully either way, and you can adjust the safety eye size accordingly. Don't be afraid to play with the facial features positioning too - slightly closer or wider eyes can completely change your bear's expression and character!

Common Mistakes & How to Fix Them

βœ— Skipping the face tightening process results in a flat, less expressive bear - take time with the sculpting steps for best results βœ— Not stuffing firmly enough before decreasing rounds causes the head and body to lose their rounded shape and appear deflated βœ— Placing safety eyes too far apart or at wrong rows changes the bear's entire expression - always count carefully and place between rounds 9-10 βœ— Forgetting to stuff the muzzle before sewing it closed leads to a flat face instead of the dimensional snout the pattern creates

Adorable Teddy Bear Amigurumi Pattern

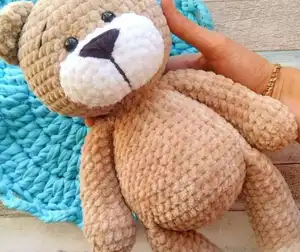
Create your own cuddly companion with this charming teddy bear amigurumi pattern! Perfect for gift-giving or adding warmth to your home, this plush friend features a sweet muzzle design, adorable ears, and loving details that bring personality to life. Using soft plush yarn and straightforward techniques, you'll craft a huggable bear that captures hearts. Whether you're making it for a child, a friend, or yourself, this timeless design combines classic appeal with modern amigurumi craftsmanship to create a treasured keepsake.

Intermediate 6-8 Hours

Materials Needed for Adorable Teddy Bear Amigurumi Pattern

β€” Main Fabric

  • 01
    Plush yarn with density of 120m (131 yards) per 100g in brown or color of choice (two skeins, 1.5 consumed)
  • 02
    Plush yarn in light white color for muzzle design (Himalaya Dolphin Baby recommended)
  • 03
    Black YarnArt Jeans yarn for embroidering eyebrows and nose

β€” Tools Required

  • 01
    Crochet hook 4.5mm
  • 02
    Crochet hook 2.0mm
  • 03
    Fiberfill stuffing
  • 04
    Safety eyes on screw mount, black, 12mm diameter
  • 05
    Scissors
  • 06
    Crocheting marker or thin contrasting color yarn
  • 07
    Needle for sewing on details
  • 08
    Strong yarn for sewing parts and face tightening in bear color

Progress Tracker

0% Complete

β€” Head :

R 1 :

6 sc in mc (6)

R 2 :

(inc)x6 (12)

R 3 :

(1 sc, inc)x6 (18)

R 4 :

(2 sc, inc)x6 (24)

R 5 :

(3 sc, inc)x6 (30)

R 6 :

(4 sc, inc)x6 (36)

R 7 :

(5 sc, inc)x6 (42)

R 8 :

(6 sc, inc)x6 (48)

R 9-14 :

48 sc (6 rows)

Info :

Insert safety eyes between R 9 and R 10

R 15 :

(6 sc, dec)x6 (42)

R 16 :

(5 sc, dec)x6 (36)

R 17 :

(4 sc, dec)x6 (30)

R 18 :

(3 sc, dec)x6 (24)

R 19 :

(2 sc, dec)x6 (18)

Info :

Stuff with fiberfill. F.o.

β€” Ears (make 2) :

R 1 :

8 sc in mc (8)

R 2 :

(inc)x8 (16)

R 3 :

16 sc

R 4 :

(3 sc, inc)x4 (20) F.o.

β€” Muzzle :

Info :

With white yarn: Make 7 ch. Make an oval starting from the 2nd ch from hook, work on both sides of the chain

R 1 :

From the 2nd ch from hook: 5 sc, 3 sc in last st, turn and crochet on the opposite side of the chain: 4 sc, inc (14)

R 2 :

1 ch, inc, 4 sc, (inc)x3, 4 sc, (inc)x2 (20)

R 3 :

1 ch, inc, 5 sc, (1 sc, inc)x4, 5 sc, inc (26)

R 4 :

1 ch, inc, 6 sc, (2 sc, inc)x4, 6 sc, inc (32)

R 5 :

32 sc F.o.

Infos :

Sew muzzle to the head, put some stuffing inside the muzzle before you finish. Sew ears to the head. Embroider eyebrows and nose with black yarn.

β€” Arms (make 2) :

R 1 :

6 sc in mc (6)

R 2 :

(inc)x6 (12)

R 3 :

(5 sc, inc)x2 (14)

R 4 :

(3 sc, inc)x3, 2 sc (17)

R 5 :

17 sc

R 6 :

dec, (1 sc, dec)x5 (11)

R 7-11 :

11 sc (5 rows)

R 12 :

9 sc, dec (10)

R 13-14 :

10 sc (2 rows)

R 15 :

8 sc, dec (9)

R 16-17 :

9 sc (2 rows) Stuff 3/4 full

Info :

Fold top of arm flat and 5 sc through both sides across. F.o.

β€” Legs (make 2) :

Info :

Make 7 ch. Make an oval starting from the 2nd ch from hook, work on both sides of the chain

R 1 :

From the 2nd ch from hook: 5 sc, 4 sc in last st, turn and crochet on the opposite side of the chain: 4 sc, 3 sc in one st (16)

R 2 :

inc, 4 sc, (inc)x4, 4 sc, (inc)x3 (24)

R 3 :

inc, 1 sc, 4 sc, (inc, 1 sc)x4, 4 sc, (inc, 1 sc)x3 (32)

R 4 :

BLO 32 sc

R 5 :

32 sc

R 6 :

7 sc, (dec)x6, 8 sc, (dec)x2, 1 sc (24)

R 7 :

6 sc, (dec)x4, 10 sc (20)

R 8 :

3 sc, (dec)x6, 5 sc (14)

R 9-13 :

14 sc (5 rows)

R 14 :

12 sc, dec (13)

R 15 :

13 sc

R 16 :

11 sc, dec (12)

R 17-19 :

12 sc (3 rows) Stuff with fiberfill

Info :

Fold top of leg flat and 6 sc through both sides across. F.o.

β€” Body :

R 1 :

6 sc in mc (6)

R 2 :

(inc)x6 (12)

R 3 :

(1 sc, inc)x6 (18)

R 4 :

(2 sc, inc)x6 (24)

R 5 :

(3 sc, inc)x6 (30)

R 6 :

(4 sc, inc)x6 (36)

R 7 :

(5 sc, inc)x6 (42)

R 8 :

42 sc

R 9 :

8 sc, 6 sc together with sc of the 1st leg, 14 sc, 6 sc together with sc of the 2nd leg, 8 sc (42)

R 10-11 :

42 sc (2 rows)

R 12 :

(5 sc, dec)x6 (36)

R 13-14 :

36 sc (2 rows)

R 15 :

(4 sc, dec)x6 (30)

R 16 :

30 sc

R 17 :

(3 sc, dec)x6 (24)

R 18-19 :

24 sc (2 rows)

R 20 :

(2 sc, dec)x6 (18)

R 21 :

3 sc, 5 sc together with sc of the 1st arm, 4 sc, 5 sc together with sc of the 2nd arm, 1 sc (18)

R 22 :

18 sc

Info :

Stuff with fiberfill. F.o.

β€” Tail :

R 1 :

6 sc in mc (6)

R 2 :

(inc)x6 (12)

R 3 :

12 sc F.o.

Info :

Sew tail to the body

Assembly Instructions

  • Sew the ears to the head, positioning them on the sides in a vertical line with the feet for proper alignment
  • Place the top edge of the muzzle just under the safety eyes and sew it on with strong yarn, remembering to fill it with stuffing before completing the seam
  • Embroider the nose onto the muzzle and add eyebrows above the eyes using black yarn for facial definition
  • Create eye tightening by introducing a needle at the bottom center of the head near the body seam, bringing it out near the right eye from outside
  • Insert needle from back of the same eye and draw through to the muzzle bottom, pulling gently to create definition around the eye area
  • Repeat the tightening process for the left eye, then introduce the needle from the muzzle bottom and bring eyes slightly closer together by working from inside of right eye through to inside of left eye
  • Sew the tail to the back of the body at desired location

Important Notes

  • πŸ’‘Use stitch markers throughout to track your position, especially during the long rounds on the head and body
  • πŸ’‘Stuff all parts firmly but not overly tight to maintain proper shape while keeping the plush yarn soft and huggable
  • πŸ’‘Take your time with the face tightening steps as they truly define your bear's personality and expression
  • πŸ’‘Pin all pieces in position before sewing to ensure symmetrical placement of ears and proper limb positioning
  • πŸ’‘The BLO (back loops only) technique on the legs creates a natural foot definition line
  • πŸ’‘When joining legs and arms to the body, work through both the limb stitches and body stitches simultaneously for secure attachment
  • πŸ’‘Keep yarn tails long when finishing off pieces as you'll need them for sewing parts together during assembly

This adorable Teddy Bear amigurumi pattern combines classic charm with modern plush yarn techniques to create a huggable friend that will be treasured for years. The detailed instructions guide you through each component, from the dimensional muzzle to the jointed limbs, while the face-sculpting techniques add that special personality that makes each bear unique. Whether you're crafting for a child, creating a heartfelt gift, or building your own collection of handmade companions, this pattern delivers satisfying results with its clear row-by-row guidance and thoughtful assembly instructions. 🧸 Happy crocheting! 🧢✨

You ask,

we answer.

FAQs

What size will the finished teddy bear be?

The finished teddy bear will measure approximately 25-30cm (10-12 inches) tall when using plush yarn with the recommended density and a 4.5mm hook. The exact size may vary slightly depending on your tension and how firmly you stuff the bear.

Can I use regular yarn instead of plush yarn?

Yes, you can use regular worsted weight yarn, but you'll need to adjust your hook size accordingly (typically 3.5-4mm). The texture will be different from the plush version, and you may need to use a smaller hook to prevent stuffing from showing through. The finished bear will also be slightly smaller.

Why do I need two different hook sizes?

The 4.5mm hook is used for the main body parts with plush yarn, while the 2.0mm hook is specifically for working with the thinner black yarn when embroidering facial features like eyebrows and the nose. This ensures neat, precise embroidery details.

What is the face tightening technique and is it necessary?

Face tightening is a sculpting technique using a long needle and strong yarn to create definition around the eyes and give your bear a more expressive, three-dimensional face. While not strictly necessary, it significantly enhances the final appearance and gives your bear that authentic teddy bear character.

Can I make the arms and legs poseable?

While this pattern attaches the limbs directly to the body, you can create poseable limbs by using thread jointing or button joints instead. This would allow the arms and legs to move, though it requires additional materials and slightly different assembly techniques not covered in the basic pattern.

How much stuffing will I need?

You'll need approximately 100-150 grams of polyester fiberfill for the entire bear, depending on how firmly you prefer to stuff it. It's better to have extra on hand, as proper stuffing is crucial for achieving the right shape and cuddly feel.