🧢 Beautiful ✨ Detailed πŸ’ Adorable

Set of 3 Hanging Teardrop Baskets Crochet Pattern

Set of 3 Hanging Teardrop Baskets Crochet Pattern
4.9β˜… Rating
4-6 Hours Time Needed
3.4K Made This
βœ‚οΈ

Intermediate Level

Ideal for those with basic knitting experience, featuring slightly more advanced stitches and techniques to expand your skills.

⏱️

Weekend Treat

Takes 5-7 hours, making it an enjoyable project to finish over a couple of days.

🏑

Cozy Accent

A warm touch for your space that transforms ordinary corners into inviting nooks filled with handmade charm.

About This Set of 3 Hanging Teardrop Baskets Crochet Pattern

Set of 3 Hanging Teardrop Baskets Crochet Pattern crochet pattern - detailed view of completed project

Working in continuous spiral rounds, these baskets build up quickly and showcase beautiful stitch definition. The pattern includes techniques for seamlessly hiding cord ends and creating perfectly positioned hanging loops that distribute weight evenly.

Why You'll Love This Set of 3 Hanging Teardrop Baskets Crochet Pattern

I absolutely love how versatile these hanging baskets areβ€”they're perfect for organizing craft supplies, displaying air plants, or adding storage to small spaces. The satisfaction of watching the teardrop shape emerge as you work the decrease rounds is incredibly rewarding, and I find the crab stitch border adds such an elegant, finished look that makes these baskets feel truly professional. The detailed photo instructions mean you'll never feel lost, even when tackling new techniques like the crab stitch or creating those sturdy hanging loops. Plus, making all three sizes gives you a coordinated set that looks amazing hung at different heights, creating a beautiful cascading effect in any room.

Set of 3 Hanging Teardrop Baskets Crochet Pattern step 1 - construction progress Set of 3 Hanging Teardrop Baskets Crochet Pattern step 2 - assembly progress Set of 3 Hanging Teardrop Baskets Crochet Pattern step 3 - details and accessories Set of 3 Hanging Teardrop Baskets Crochet Pattern step 4 - final assembly and finishing

Switch Things Up

I love experimenting with different cord colors to match various room aesthetics - try natural jute for a bohemian look, or bright colors for a playful nursery vibe. You could even work with two colors held together to create a beautiful marled effect throughout the basket.

For a more rustic appearance, I sometimes skip the crab stitch edge entirely and just work a simple round of slip stitches, which gives a cleaner, minimalist finish. Another fun variation is making the hanging loop longer (try ch20 or ch25 instead of ch14) if you want your baskets to hang lower or create more dramatic height differences in your display.

I've also experimented with adding beads to the hanging loops for extra decoration, or working a contrasting color for just the crab stitch edge to make it pop. If you want smaller catch-all baskets, you could stop the pattern a few rounds earlier and skip some of the increase rounds. These baskets are wonderfully adaptable to your personal style and needs!

Common Mistakes & How to Fix Them

βœ— Not working in the third back loop when instructed BLO, which can make the basket looser and less structured than intended βœ— Forgetting to move the stitch marker each round when working in spiral, leading to losing track of round beginnings and miscounting stitches βœ— Pulling the magic ring too tight before completing the first round, making it difficult to work the initial increases properly βœ— Not placing the hanging loop at the exact center top of the basket, causing it to hang unevenly or tilted to one side βœ— Cutting the cord too short at the end, leaving insufficient length for the wrapping technique to secure and hide ends properly βœ— Skipping decreases or working them too loosely during the shaping rounds, resulting in a basket that doesn't taper correctly into the teardrop shape

Set of 3 Hanging Teardrop Baskets Crochet Pattern

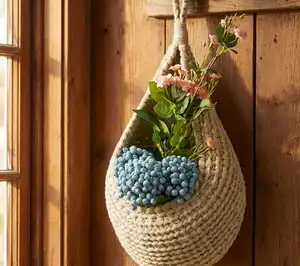
Create a beautiful set of three hanging baskets in small, medium, and large sizes with this comprehensive crochet pattern. These teardrop-shaped baskets are perfect for organizing your space or displaying plants, featuring a decorative crab stitch edge and sturdy hanging loops. Made with cotton, acrylic, or polyester cord, these baskets combine functionality with handmade charm. The pattern includes detailed step-by-step instructions with over 100 helpful photos to guide you through every stitch, from the magic ring base to the finishing touches.

Intermediate 4-6 Hours

Materials Needed for Set of 3 Hanging Teardrop Baskets Crochet Pattern

β€” Main Fabric

  • 01
    4-5mm cotton, acrylic, or polyester cord
  • 02
    250-300 meters total cord for all three baskets (approximately 80-100 meters per basket)

β€” Tools Required

  • 01
    Crochet hook 5mm or 6mm (main hook for working the pattern)
  • 02
    Crochet hook 2.5-3mm (smaller hook for hiding cord ends)
  • 03
    Scissors
  • 04
    Stitch marker
  • 05
    Yarn needle for weaving in ends

Progress Tracker

0% Complete

β€” Small Basket:

Magic Ring Setup:

Make MR: ch1, 6 sc. Pull the ring. Crochet in a spiral. Place a stitch marker in the first stitch of the first round (move it each round)

Round 1:

Work BLO, 6 inc (12) - hide the end inside the stitches then cut it off

Round 2:

Work BLO (inc, sc)*6 (18)

Round 3:

Work BLO (2 sc, inc)*6 (24)

Round 4:

Work BLO (inc, 3 sc)*6 (30)

Round 5:

Work BLO, 2 sc, (inc, 4 sc)*5, inc, 2 sc (36)

Round 6:

Work BLO, sc3inc, 35 sc (38)

Round 7:

Work BLO, sc, sc3inc, 36 sc (40)

Round 8:

Work BLO, 2 sc, sc3inc, 37 sc (42)

Round 9:

Work BLO, 3 sc, sc3inc, 38 sc (44)

Round 10:

Work BLO, 4 sc, sc3inc, 39 sc (46)

Round 11:

Work BLO, 5 sc, sc3inc, 40 sc (48)

Round 12:

Work BLO, 6 sc, sc3inc, 41 sc (50)

Round 13:

Work BLO, 7 sc, sc3inc, 42 sc (52)

Round 14:

Work BLO, 8 sc, sc3inc, 7 sc, 18 dec

Round 15:

Work BLO, 36 sc. Cut off the cord. Fasten off

Info:

Hide the end of the cord and cut off. Take a new cord. Find the middle of the top of the basket. Start crocheting a new round with new yarn. Make ch1
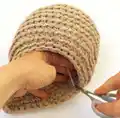
Crab Stitch Edge:

Insert the hook from front to back in the first single crochet stitch on the right. Draw up a loop (two loops on hook). Pull the thread through both stitches (one stitch left on hook). Repeat the crab stitch into each stitch around until you reach the end

Hanging Loop:

Make ch14. Sl st in the stitch at the base. Sc in each stitch of the hanging loop (14). Sl st in the stitch at the base

Finishing:

Cut off the yarn, leaving a tail about 30 inches long. Pull out the rest of the cord. Take a piece of thread about 10 inches, place as shown. Tightly wrap it with the cord first to the upper part, then to the bottom. Insert the 2 ends of the cord into the loop of the thread. Pull the end of the thread up, pull the 2 cords out. Cut the ends

β€” Medium Basket:

Magic Ring Setup:

Make MR: ch1, 6 sc. Pull the ring. Crochet in a spiral. Place a stitch marker in the first stitch of the first round (move it each round)

Round 1:

Work BLO, 6 inc (12) - hide the end inside the stitches then cut it off

Round 2:

Work BLO (inc, sc)*6 (18)

Round 3:

Work BLO (2 sc, inc)*6 (24)

Round 4:

Work BLO (inc, 3 sc)*6 (30)

Round 5:

Work BLO, 2 sc, (inc, 4 sc)*5, inc, 2 sc (36)

Round 6:

Work BLO, 4 sc, (inc, 5 sc)*5, inc, sc (42)

Round 7:

Work BLO, sc3inc, 41 sc (44)

Round 8:

Work BLO, sc, sc3inc, 42 sc (46)

Round 9:

Work BLO, 2 sc, sc3inc, 43 sc (48)

Round 10:

Work BLO, 3 sc, sc3inc, 44 sc (50)

Round 11:

Work BLO, 4 sc, sc3inc, 45 sc (52)

Round 12:

Work BLO, 5 sc, sc3inc, 46 sc (54)

Round 13:

Work BLO, 6 sc, sc3inc, 47 sc (56)

Round 14:

Work BLO, 7 sc, sc3inc, 48 sc (58)

Round 15:

Work BLO, 8 sc, sc3inc, 49 sc (60)

Round 16:

Work BLO, 9 sc, sc3inc, 50 sc (62)

Round 17:

Work BLO, 10 sc, sc3inc, 9 sc, 21 dec

Round 18:

Work BLO, 41 sc. Cut off the cord. Finish crocheting

Crab Stitch & Hanging Loop:

Take a new cord. Make a crab stitch in each stitch. Make a loop for hanging. The hanging loop is made as in a small size basket

β€” Large Basket:

Magic Ring Setup:

Make MR: ch1, 6 sc. Pull the ring. Crochet in a spiral. Place a stitch marker in the first stitch of the first round (move it each round)

Round 1:

Work BLO, 6 inc (12) - hide the end inside the stitches then cut it off

Round 2:

Work BLO (inc, sc)*6 (18)

Round 3:

Work BLO (2 sc, inc)*6 (24)

Round 4:

Work BLO (inc, 3 sc)*6 (30)

Round 5:

Work BLO, 2 sc, (inc, 4 sc)*5, inc, 2 sc (36)

Round 6:

Work BLO, 4 sc, (inc, 5 sc)*5, inc, sc (42)

Round 7:

Work BLO, (6 sc, inc)*6 (48)

Round 8:

Work BLO, sc3inc, 47 sc (50)

Round 9:

Work BLO, sc, sc3inc, 48 sc (52)

Round 10:

Work BLO, 2 sc, sc3inc, 49 sc (54)

Round 11:

Work BLO, 3 sc, sc3inc, 50 sc (56)

Round 12:

Work BLO, 4 sc, sc3inc, 51 sc (58)

Round 13:

Work BLO, 5 sc, sc3inc, 52 sc (60)

Round 14:

Work BLO, 6 sc, sc3inc, 53 sc (62)

Round 15:

Work BLO, 7 sc, sc3inc, 54 sc (64)

Round 16:

Work BLO, 8 sc, sc3inc, 55 sc (66)

Round 17:

Work BLO, 9 sc, sc3inc, 56 sc (68)

Round 18:

Work BLO, 10 sc, sc3inc, 57 sc (70)

Round 19:

Work BLO, 11 sc, sc3inc, 58 sc (72)

Round 20:

Work BLO, 12 sc, sc3inc, 11 sc, 24 dec

Round 21:

Work BLO, 50 sc. Cut off the cord. Finish crocheting

Crab Stitch & Hanging Loop:

Take a new cord. Make a crab stitch in each stitch. Make a loop for hanging. The hanging loop is made as in a small size basket

Assembly Instructions

  • Each basket is worked as a complete piece with no assembly required between parts
  • After completing the main body rounds, fasten off and hide the cord end securely inside the stitches
  • Attach new cord at the center top of the basket to begin the crab stitch edging
  • Work the crab stitch continuously around the entire top edge before creating the hanging loop
  • Create the hanging loop by chaining 14, then slip stitching back to the base and working single crochets up the chain
  • Use the wrapping technique with a separate thread piece to secure and hide the final cord ends neatly
  • Hang baskets at varying heights for a beautiful cascading display effect

Important Notes

  • πŸ’‘When working BLO (back loops only), also grab the third back loop of each stitch to make your work tighter and more structured
  • πŸ’‘Use a stitch marker and move it each round to keep track of where each spiral round begins
  • πŸ’‘The size of your baskets will vary based on your tension and the thickness of cord you choose - thicker cord makes larger baskets
  • πŸ’‘Keep consistent tension throughout to ensure even shaping, especially during the increase and decrease rounds
  • πŸ’‘Leave a 30-inch tail when finishing to have enough cord for the wrapping technique that secures the ends
  • πŸ’‘The pattern includes over 100 detailed photos to guide you through each step, refer to them when uncertain
  • πŸ’‘All three baskets follow the same basic construction method with variations in round counts for different sizes

These charming hanging baskets bring both beauty and practicality to any space in your home. The teardrop shape is achieved through careful shaping techniques, while the back loop only construction creates wonderful texture and strength. Whether you display all three together or spread them throughout your home, these baskets add handmade warmth wherever they hang. The detailed instructions with extensive photo guidance make this an achievable project that yields professional-looking results. Happy crocheting and enjoy creating your beautiful hanging basket set! 🧢✨

You ask,

we answer.

FAQs

Can I use different yarn instead of cord for this pattern?

Yes, you can use any yarn as long as you adjust your hook size accordingly. The pattern recommends 4-5mm cord with a 5-6mm hook, so choose a hook size appropriate for your yarn weight. Keep in mind that different materials will create different sized baskets and may affect the structure and sturdiness.

What does it mean to work in the third back loop when working BLO?

When working back loops only in this pattern, you're instructed to also grab the 'jumper' or third loop of the stitch. This creates a tighter, more structured fabric. The pattern includes detailed photos (13-16) showing exactly where to insert your hook for this technique.

How do I know where to place the hanging loop so the basket hangs straight?

The pattern instructs you to find the middle of the top of the basket before starting the crab stitch edge. This center point is where you'll create the hanging loop after working around the edge. Using the sc3inc stitches as reference points can help you locate the center.

Can I make just one basket instead of all three sizes?

Absolutely! Each basket pattern is complete and can be made independently. The small basket uses approximately 80-100 meters of cord, so adjust your materials accordingly if you're only making one or two sizes.

What is crab stitch and is it difficult to learn?

Crab stitch is reverse single crochet worked from left to right instead of right to left. It creates a beautiful corded edge. The pattern includes detailed step-by-step photos (pages 10-11, pictures 61-72) that walk you through this technique, making it accessible even if you haven't tried it before.

Do I need to stuff these baskets?

No, these are functional storage baskets that remain open and unstuffed. The structure comes from working in back loops only and the strategic shaping through increases and decreases.