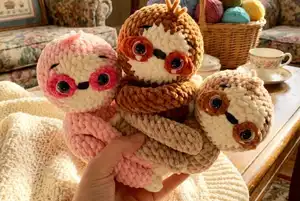
Create your own adorable sloth companions with this detailed crochet pattern featuring two charming designs: Samantha (10 inches tall) and Pierre (6.5 inches tall). These lovable sloths come with poseable limbs, sweet embroidered faces, and optional velcro paws for hugging. Perfect for gifting or adding a cozy touch to any space, this pattern includes clear instructions for crafting these gentle creatures in your favorite colors. Whether you choose the larger Samantha or the petite Pierre, you'll enjoy bringing these slow-moving friends to life stitch by stitch.
Progress Tracker
0% Complete
— Head (Samantha):
Round 1:
ch 10, inc in the 2nd ch from the hook, sc 7, sc 4 in the last ch. Working on the other side of the ch: sc 7, inc. (22)
Round 2:
inc x2, sc 7, inc x4, sc 7, inc x2 (30)
Round 3:
(sc 4, inc) x6 (36)
Round 4:
sc 2, inc (sc 5, inc) x5, sc 3 (42)
Round 5:
sc 6, inc, sc 3 | change for main color: sc 2 | go back to cream color: sc, inc, (sc 6, inc) x4 (48)
Round 6:
sc 3, inc, sc 5 | main color: sc 2, inc, sc 3 | cream color: sc 4, (inc, sc 7) x3, inc, sc 4 (54)
Info:
Cut the cream yarn and continue with main color
Round 7:
(sc 8, inc) x6 (60)
Round 8:
sc 4, inc, (sc 9, inc) x5, sc 5 (66)
Round 9-20:
sc around (12 rounds total) (66)
Round 21:
sc 4, dec, (sc 9, dec) x5, sc 5 (60)
Round 22:
(sc 8, dec) x6 (54)
Round 23:
sc 3, dec, (sc 7, dec) x5, sc 4 (48)
Round 24:
(sc 6, dec) x6 (42)
Round 25:
sc 2, dec, (sc 5, dec) x5, sc 3 (36)
Round 26:
(sc 4, dec) x6 (30)
Info:
Start stuffing and continue as you go
Round 27:
sc, dec, (sc 3, dec) x5, sc 2 (24)
Round 28:
(sc 2, dec) x6 (18)
Round 29:
(dec, sc) x6 (12)
Info:
Finish stuffing. Do not close the opening just yet
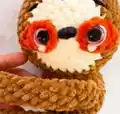
— Eye Patch (x2) - Samantha:
Round 1:
Ch 9, starting in the 3rd ch from the hook: dc-inc, dc-inc, dc, hdc 3, sc 4 in the last ch. Working on the other side of the ch: sc 4, hdc, hdc-inc. (19)
Round 2:
dc-inc, hdc-inc, hdc 4, sc, sl st 3 (end of the round here) (12)
Infos:
Place one eye patch with the right side of the stitches facing and the other eye patch with the wrong side facing. Secure the eyes with about 1 st of space from the eye border. Embroider the cheeks under the eyes with pink yarn. Embroider a white line to the outer side of the eyes. Sew the eye patches to the face: inner part as close as possible to the nose and the outer part between rounds 9-10. Embroider the eyebrows with dark grey or black worsted weight yarn. Close the opening at the back of the head. Add 3 strands of main color hair (6 inches each) between rounds 8-9.
— Body (Samantha):
Round 3:
(sc, inc) x8 (24)
Round 4:
(sc 3, inc) x6 (30)
Round 5:
sc, inc, (sc 4, inc) x5, sc 3 (36)
Round 6:
(sc 5, inc) x6 (42)
Round 7:
sc 2, inc, (sc 6, inc) x5, sc 4 (48)
Round 8-16:
sc around (9 rounds total) (48)
Round 17:
sc 2, dec, (sc 6, dec) x5, sc 4 (42)
Round 18:
(sc 5, dec) x6 (36)
Infos:
Stuff the body and make an invisible fasten off. Sew the body to the head.
— Arms (x2) - Samantha:
Round 3:
(sc 2, inc) x3 (12)
Round 4-5:
sc around (2 rounds) (12)
Round 6:
(sc 3, inc) x3 (15)
Round 7-30:
sc around (15) - adjustable length: make 24-36 rounds total depending on desired arm length
Info:
Start stuffing when the arms are becoming too long for you to reach the tip. Lightly stuff it, just enough so it keeps its shape, but still very soft.
Round 31:
(sc 3, dec) x3 (12)
Infos:
Do not cut the yarn for now. Add the fingers with cream yarn: Insert your hook between rounds 4-5 and join cream yarn. Ch 6, starting in the 2nd ch from the hook: sl st 5 (first finger). Sl st in the next st of the arm. Repeat to make 2 more fingers. Attach fingers to the arm using yarn tail. Stuff the arm if not already done, and close the opening by making 6 sc through both sides. Sew the first arm to the body: in line with the eye closer to the back, the top of the arm should be 1 round lower than the neck.
— Legs (x2) - Samantha:
Round 3:
(sc 3, inc) x3 (15)
Round 4-5:
sc around (2 rounds) (15)
Round 6:
(sc 4, inc) x3 (18)
Round 7-26:
sc around (18)
Round 27:
(sc 4, dec) x3 (15)
Infos:
Do not cut the yarn for now and make the fingers (for Version A). Stuff the leg and close the opening with 7 sc. Sew the first leg 1 round lower than the arm. Sew the other arm and leg to the back of the body, in line with the back of the head.
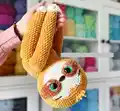
— Head (Pierre):
Round 3:
(sc, inc) x6 (18)
Round 4:
(inc, sc 2) x6 (24)
Round 5:
sc 3, inc, sc | change to main color: sc 2 | change to cream: inc, (sc 3, inc) x4 (30)
Info:
Cut the cream yarn and continue with main color
Round 6:
sc, inc, (sc 4, inc) x5, sc 3 (36)
Round 7:
(sc 11, inc) x3 (39)
Round 8-12:
sc around (5 rounds total) (39)
Round 13:
(sc 11, dec) x3 (36)
Round 14:
sc, dec, (sc 4, dec) x5, sc 3 (30)
Round 15:
(sc 3, dec) x6 (24)
Info:
Start stuffing and continue as you go
Round 16:
(dec, sc 2) x6 (18)
Round 17:
(sc, dec) x6 (12)
Info:
Finish stuffing. Do not close the opening just yet
— Eye Patch (x2) - Pierre:
Round 1:
Ch 5, starting in the 2nd ch from the hook: sc 3, sc 4 in last ch. Working on the other side of the ch: sc 2, sl st in next and sl st in first st of the round (end round here) (11)
Infos:
Place one eye patch with the right side of the stitches facing and the other eye patch with the wrong side facing. Insert the eyes into the last chain (where you made 4 sc) and secure them. Embroider the cheeks under the eyes with pink yarn. Embroider a white line to the outer side of the eyes. Sew the eye patches to the face: inner part as close as possible to the nose and the outer part between rounds 6-7. Embroider the eyebrows with dark grey or black worsted weight yarn. Close the opening at the back of the head. Add 2 strands of main color hair (6 inches each) between rounds 7-8.
— Body (Pierre):
Round 3:
(sc, inc) x6 (18)
Round 4:
(inc, sc 2) x6 (24)
Round 5:
(sc 7, inc) x3 (27)
Round 6-8:
sc around (3 rounds total) (27)
Round 9:
(sc 7, dec) x3 (24)
Round 10:
(dec, sc 2) x6 (18)
Infos:
Stuff the body and make an invisible fasten off. Sew the body to the head.
— Arms (x2) - Pierre:
Round 3-17:
sc around (7) - adjustable: make 15 rounds total or desired length
Info:
Use 2 pipe cleaners per limb, fold them in 3 and twist them. Insert them in the limb. OR start stuffing when the arms are becoming too long for you to reach the tip. Lightly stuff it, just enough so it keeps its shape, but still very soft.
Infos:
Close the opening by making 2 sc through both sides. Cut the yarn and make the fingers (for Version A). Add the fingers with cream yarn: Insert your hook between rounds 3-4 and join cream yarn. Ch 3, starting in the 2nd ch from the hook: sl st 2 (first finger). Sl st in the next st of the arm. Repeat to make 2 more fingers. Attach fingers to the arm using yarn tail. Sew the first arm to the body: in line with the eye closer to the back, the top of the arm should be 1 round lower than the neck.
— Legs (x2) - Pierre:
Round 2:
(sc 2, inc) x2 (8)
Round 16:
(sc 2, dec) x2 (6)
Infos:
Insert the pipe cleaners in the limb and close the opening by making 2 sc through both sides. Cut the yarn and make the fingers (for Version A). Sew the first leg 1 round lower than the arm. Sew the other arm and leg to the back of the body, in line with the back of the head. Optional: sew pieces of Velcro to the tip of the limbs or sew the limbs together.
These charming sloth patterns bring adorable slow-moving friends to life with customizable features and poseable limbs. Whether you create the larger Samantha or the petite Pierre, you'll love the embroidered details and sweet expressions that give each sloth its unique personality. The optional velcro paws add an interactive element that makes these perfect for both display and play. With clear instructions and helpful photo tutorials throughout, you'll enjoy every stitch of this delightful project. Happy crocheting your new sloth companion! 🦥✨