About This Sailor Girl Amigurumi Pattern
This heirloom-quality doll makes a heartwarming gift for anyone who loves the sea, or a stunning addition to your nursery decor display that will be cherished for generations to come.
Ideal for those with basic crocheting experience, featuring slightly more advanced stitches and techniques to expand your skills.
Takes 5-7 hours, making it an enjoyable project to finish over a couple of days.
An adorable friend to cherish, handcrafted with love to bring comfort and joy for years to come.
This heirloom-quality doll makes a heartwarming gift for anyone who loves the sea, or a stunning addition to your nursery decor display that will be cherished for generations to come.
I absolutely fell in love with designing her bouncy curls and the tiny details on her bag. It is one of those deeply satisfying projects where every little accessory adds so much character, keeping you completely hooked from the first stitch to the very last seam.


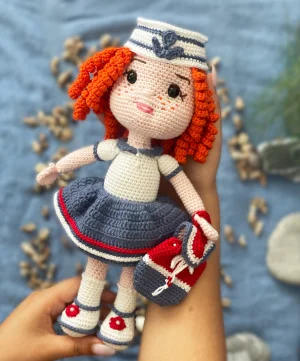
There is something so magical about classic maritime style, and bringing this little sailor to life on my hook was pure joy. When I was working on her bouncy ringlet hair, I realized how much fun it is to customize her look—you could easily swap her fiery orange locks for a sunny blonde or a deep brunette to match a special little someone in your life. \n\nFor the outfit, while the traditional navy, white, and red look is absolutely timeless, don't be afraid to experiment! A pastel mint green or a soft lavender would make a gorgeous alternative colorway. When you crochet the tiny duffle bag, try adding a couple of tiny wooden beads to the drawstring ends for a truly polished, professional finish. I love placing her on a shelf next to some seashells and driftwood to create a beautiful beachy vignette in my craft room. I hope you enjoy making her as much as I did!
Bring a splash of nautical charm to your crochet hook with this darling sailor girl doll. With her bright curly red hair, classic navy and white outfit, and tiny matching duffle bag, she is absolutely bursting with personality. You will love watching this sweet character come to life stitch by stitch as you create a handmade treasure that everyone will adore.
Using Light Pink yarn, make a magic ring and work 6 sc into it. (6)
Work 1 inc in each of the 6 stitches around. (12)
Repeat (1 sc, 1 inc) 6 times around. (18)
Repeat (2 sc, 1 inc) 6 times around. (24)
Repeat (3 sc, 1 inc) 6 times around. (30)
Repeat (4 sc, 1 inc) 6 times around. (36)
Repeat (5 sc, 1 inc) 6 times around. (42)
Repeat (6 sc, 1 inc) 6 times around. (48)
Repeat (7 sc, 1 inc) 6 times around. (54)
Work 1 sc in each of the 54 stitches around for these eleven rounds. (54)
The original pattern has a complicated instruction for Round 21 to reach 66 stitches. To achieve this, work 18 sc, then repeat (6 sc, 1 inc) 6 times, then work 18 sc. (66)
Work 18 sc, then repeat (6 sc, 1 inc) 6 times, then work 18 sc. (66)
Switch to White yarn and work 1 sc in each of the 66 stitches around for these six rounds. (66)
Repeat (9 sc, 1 dec) 6 times around. (60)
Repeat (8 sc, 1 dec) 6 times around. (54)
Repeat (7 sc, 1 dec) 6 times around. (48)
Insert safety eyes between Rounds 18 and 19, leaving a space of 8 sc between them.
Repeat (6 sc, 1 dec) 6 times around. (42)
Repeat (5 sc, 1 dec) 6 times around. (36)
Repeat (4 sc, 1 dec) 6 times around. (30)
Repeat (3 sc, 1 dec) 6 times around. (24)
Repeat (2 sc, 1 dec) 6 times around. (18)
Work 1 sc in each of the 18 stitches around for these four rounds. Fasten off and leave a long tail for sewing. (18)
Using Orange yarn, make a magic ring and work 8 sc into it. (8)
The source pattern states Round 2 results in 18 stitches, but standard math is 16 stitches. Follow standard increases to fit.
Work 1 inc in each of the 8 stitches around. (16)
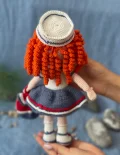
Chain 45, turn and work 2 sc in each of the first 35 chains, then work 1 sc in each of the remaining 10 chains. Slip stitch to the next stitch of the base. Repeat this process to make 11 curly strands. (11 strands)
For the upper layer, chain 50, turn and work 2 sc in each of the first 40 chains, then work 1 sc in each of the remaining 10 chains. Slip stitch to the next stitch. Repeat this process to make another 11 curly strands, giving 22 strands total. (11 strands)
Using White yarn, chain 6. (6)
Work 1 inc in each of the 6 chain stitches. (12)
Work 3 sc, then repeat (1 inc) 6 times, then work 3 sc. (18)
Work 6 sc, then repeat (1 inc) 6 times, then work 6 sc. (24)
Work 8 sc, then repeat (1 inc) 8 times, then work 8 sc. (32)
Work 32 sc in the flo. (32)
Work 1 sc in each of the 32 stitches around for these two rounds. (32)
Work 8 sc, then repeat (1 dec) 8 times, then work 8 sc. (24)
Work 8 sc, then repeat (1 dec) 6 times, then work 8 sc. (18)
Work 1 sc in each of the 18 stitches around for these two rounds. (18)
Work 18 sc in the flo. (18)
Repeat (8 sc, 1 dec) 2 times around. (16)
Work 1 sc in each of the 16 stitches around for these six rounds. (16)
Switch to Light Pink yarn and work 16 sc in the flo. (16)
Stuff the legs firmly with fiberfill, continuing to stuff as you progress.
Work 1 sc in each of the 16 stitches around for these thirteen rounds. (16)
Repeat (8 sc, 1 inc) 2 times around. (18)
Repeat (9 sc, 1 inc) 2 times around. (20)
Work 1 sc in each of the 20 stitches around. (20)
Now we join the legs. Work 20 sc on the first leg, chain 4, then work 20 sc on the second leg. (44)
Work 20 sc, then work 4 sc along the chain, then work 20 sc, and finish with 4 sc along the opposite side of the chain. (48)
Work 1 sc in each of the 48 stitches around for these ten rounds. (48)
Repeat (6 sc, 1 dec) 6 times around. (42)
Switch to White yarn and work 42 sc in the flo. (42)
Work 1 sc in each of the 42 stitches around for these seven rounds. (42)
Repeat (5 sc, 1 dec) 6 times around. (36)
Work 1 sc in each of the 36 stitches around. (36)
Repeat (4 sc, 1 dec) 6 times around. (30)
Repeat (3 sc, 1 dec) 6 times around. (24)
Work 24 sc in the flo. (24)
Switch to Light Pink yarn and work 1 sc in each of the 24 stitches around. (24)
Repeat (2 sc, 1 dec) 6 times around. (18)
Repeat (1 sc, 1 dec) 6 times around. (12)
Work 1 sc in each of the 12 stitches around for these two rounds. Fasten off. (12)
Using Sailor Blue yarn, attach to the blo of Round 51 of the body and work 42 sc. (42)
Work 2 dc in each of the 42 stitches around. (84)
Work 1 dc in each of the 84 stitches around for these two rounds. (84)
Repeat (5 dc, 1 inc) 15 times, then work 9 dc. (99)
Work 99 dc in the flo. (99)
Work 99 dc in the flo. (99)
Work 99 hdc in the flo. (99)
Work 99 sc in the blo. Fasten off. (99)
Using Red yarn, attach to the blo of Round 6 and work 99 sc. (99)
Using White yarn, attach to the blo of Round 7 and work 99 sc. Fasten off. (99)
Using Light Pink yarn, make a magic ring and work 6 sc into it. (6)
Work 1 inc in each of the 6 stitches around. (12)
Work 1 sc in each of the 12 stitches around for these five rounds. (12)
Work 6 sc, chain 3, then work 6 sc. (12)
Work 6 sc, work 3 sc in the chains to keep stitch count, then work 6 sc. (12)
Work 6 dec around. (6)
Work 1 sc in each of the 6 stitches around. (6)
Work 1 inc in each of the 6 stitches around. (12)
Work 1 sc in each of the 12 stitches around for these thirteen rounds. (12)
Switch to White yarn and work 12 sc in the flo. (12)
Stuff the sleeves lightly with fiberfill.
Repeat (1 sc, 1 inc) 6 times around. (18)
Work 1 sc in each of the 18 stitches around for these four rounds. (18)
Repeat (1 sc, 1 dec) 6 times around. (12)
Flatten the opening and work 6 sc through both layers to close. Fasten off. (6)
Using White yarn, make a magic ring and work 6 sc into it. (6)
Work 1 inc in each of the 6 stitches around. (12)
Repeat (1 sc, 1 inc) 6 times around. (18)
Repeat (2 sc, 1 inc) 6 times around. (24)
Repeat (3 sc, 1 inc) 6 times around. (30)
Repeat (4 sc, 1 inc) 6 times around. (36)
Repeat (5 sc, 1 inc) 6 times around. (42)
Repeat (6 sc, 1 inc) 6 times around. (48)
Repeat (7 sc, 1 inc) 6 times around. (54)
Work 54 sc in the flo. (54)
Work 1 sc in each of the 54 stitches around for these two rounds. (54)
Switch to Sailor Blue yarn and work 1 sc in each of the 54 stitches around. (54)
Switch to White yarn and work 1 sc in each of the 54 stitches around. (54)
Work 1 sc in each of the 54 stitches around. Fasten off. (54)
Attach Sailor Blue yarn to the blo of Round 10 of the hat and work 54 sc. (54)
Switch to White yarn and work 1 sc in each of the 54 stitches around for two rounds. Fasten off. (54)
Using Sailor Blue yarn, chain 10. (10)
Work around both sides of the chain to make 20 sc. (20)
Work 10 sc, then repeat (1 inc) in the next stitch, work 10 sc, and 1 inc in the final stitch. (22)
Repeat (11 sc, 1 inc) 2 times around. (24)
Work 24 sc in the flo. (24)
Repeat (1 sc, 1 inc) 12 times around. (36)
Work 1 sc in each of the 36 stitches around for these five rounds. (36)
Switch to White yarn and work 1 sc in each of the 36 stitches around for these two rounds. (36)
Switch to Red yarn and work 1 sc in each of the 36 stitches around for these five rounds. (36)
Work 36 hdc around. Fasten off. (36)
Using Red yarn, chain 12. (12)
Work around both sides of the chain to make 24 sc. (24)
Repeat (1 sc, 1 inc) 12 times around. (36)
Work 1 sc in each of the 36 stitches around. (36)
Switch to White yarn and work 1 sc in each of the 36 stitches around. (36)
Repeat (2 sc, 1 inc) 12 times around. (48)
Switch to Sailor Blue yarn and work 1 sc in each of the 48 stitches around. Fasten off. (48)
Thank you so much for crafting along with me! I cannot wait to see your beautiful sailor doll take shape. Don't forget to take your time with the facial embroidery and the curly hair placement—those little details are where her unique personality truly shines through. Happy crocheting, and may your stitches always be smooth sailing! 🧶⚓✨
Yes! The pattern actually calls for safety eyes placed between rounds 18 and 19 of the head, spaced about 8 stitches apart. You can then embroider the eyelashes and eyebrows around them to add extra expression.
This pattern is designed using sport or DK weight yarn with a 2.5 mm hook to keep the stitches nice and tight, which prevents the stuffing from showing through. If you use worsted weight yarn, your doll will just turn out slightly larger!
The secret to these beautiful ringlets is working multiple stitches into each chain. As you crochet two single crochets into each chain stitch, the strand will naturally twist and curl on its own. Just give them a gentle twist with your fingers to shape them!
This project is best suited for intermediate crocheters. It involves basic shaping, color changes, and joining limbs, but the step-by-step instructions make it very manageable if you have mastered the basic stitches.
