🧢 Beautiful ✨ Detailed πŸ’ Adorable

Pusheen Cat with Ice Cream Amigurumi Pattern

Pusheen Cat with Ice Cream Amigurumi Pattern
4.4β˜… Rating
8-10 Hours Time Needed
1.4K Made This
βœ‚οΈ

Intermediate Level

Ideal for those with basic knitting experience, featuring slightly more advanced stitches and techniques to expand your skills.

⏱️

All-Day Adventure

Requires 8-10 hours, ideal for a full day of immersive knitting.

🧸

Cute Companion

An adorable friend to cherish, handcrafted with love to bring comfort and joy for years to come.

About This Pusheen Cat with Ice Cream Amigurumi Pattern

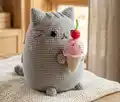
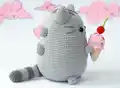
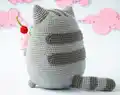
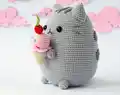
This Pusheen with Ice Cream amigurumi pattern brings the internet's favorite chubby gray tabby cat to life in an utterly charming crocheted form. The pattern is worked primarily in continuous spiral rounds, with the head and body created as one seamless piece for a sturdy construction. What makes this pattern special is the attention to detail - from Pusheen's distinctive tabby stripes on the back and tail to the adorable ice cream cone complete with textured waffle cone, creamy scoops, colorful sprinkles, and a bright red cherry on top.

Pusheen Cat with Ice Cream Amigurumi Pattern crochet pattern - detailed view of completed project

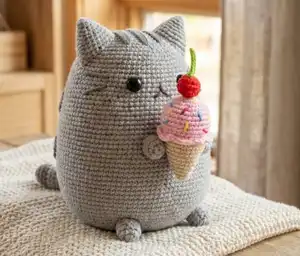
Standing at approximately 17cm tall when finished, this cuddly creation uses a combination of light and dark gray yarn to capture Pusheen's classic coloring, while the ice cream adds pops of pink, brown, red, and green. The pattern includes clear instructions for all components including ears, tail, paws, stripes, and the delightful ice cream accessory.

Why You'll Love This Pusheen Cat with Ice Cream Amigurumi Pattern

I absolutely love this pattern because it combines two of my favorite things - adorable cats and sweet treats! The way Pusheen holds that ice cream cone just melts my heart every time. What I really appreciate is how the pattern breaks down what seems like a complex design into manageable, easy-to-follow steps. The continuous spiral technique makes the main body work up surprisingly quickly, and I find the color changes for the stripes oddly satisfying to complete. The ice cream cone is such a fun bonus element - I love how you can actually make it removable so Pusheen can hold different accessories if you want to get creative later. Plus, there's something incredibly rewarding about seeing this beloved internet character come to life stitch by stitch in your own hands.

Pusheen Cat with Ice Cream Amigurumi Pattern step 1 - construction progress Pusheen Cat with Ice Cream Amigurumi Pattern step 2 - assembly progress Pusheen Cat with Ice Cream Amigurumi Pattern step 3 - details and accessories Pusheen Cat with Ice Cream Amigurumi Pattern step 4 - final assembly and finishing

Switch Things Up

I love experimenting with color variations on this Pusheen pattern! While the classic grey tabby is absolutely adorable, I've made versions in orange for a ginger cat vibe, or even pastel colors for a more kawaii aesthetic. The ice cream is where you can really let your creativity shine - I've done chocolate brown with vanilla swirls, mint green with chocolate chips, and even rainbow sherbet using multiple colors.

For a seasonal twist, I sometimes swap the ice cream for other accessories. I've made a Pusheen holding a pumpkin for fall, a heart for Valentine's Day, or a tiny wrapped present for Christmas. You could even make a donut, coffee cup, or slice of pizza instead! The hands are positioned perfectly to hold all sorts of small props.

If you want to make a bigger or smaller version, simply change your yarn weight and hook size accordingly. I've made tiny keychain-sized Pusheens using sport weight yarn and a 2mm hook, and giant cuddle-sized ones using bulky yarn with a 5mm hook. The proportions stay perfect no matter what size you make.

For embroidery details, I sometimes add little pink cheeks with embroidery or felt, or give Pusheen different expressions - closed happy eyes, surprised eyes, or sleepy eyes. You can also add more stripes, change the stripe pattern, or even make spots instead for a completely different cat personality while using the same basic body construction.

Common Mistakes & How to Fix Them

βœ— Forgetting to place stitch markers at the end of each round leads to losing track of where rounds begin and end, especially during increases and decreases βœ— Not stuffing the head and body firmly enough as you work results in a floppy finished piece that won't hold its shape properly over time βœ— Placing safety eyes too early before rounds 42-43 can make it difficult to position them correctly with the proper spacing of eleven stitches between them βœ— Skipping the invisible decrease technique and using regular decreases creates visible holes and an unprofessional finish on the rounded surfaces of the body βœ— Not leaving long enough yarn tails when fastening off parts like ears, tail, and stripes makes sewing them onto the body securely much more difficult βœ— Attempting to embroider facial features before attaching all the parts can lead to misaligned or asymmetrical placement when everything is assembled together

Pusheen Cat with Ice Cream Amigurumi Pattern

Create your own adorable Pusheen cat holding a sweet ice cream cone with this delightful amigurumi pattern! This charming design features Pusheen's signature gray tabby stripes, cute rounded shape, and a colorful ice cream treat complete with sprinkles and a cherry on top. Standing approximately 17cm tall, this cuddly companion is perfect for cat lovers and dessert enthusiasts alike. The pattern includes detailed instructions for crafting Pusheen's iconic features including striped tail, perky ears, and sweet expression, plus a removable ice cream cone that adds an extra touch of whimsy to this beloved internet cat character.

Intermediate 8-10 Hours

Materials Needed for Pusheen Cat with Ice Cream Amigurumi Pattern

β€” Main Fabric

  • 01
    DK light worsted weight yarn (number 3) in light grey - 100-150 grams needed for main body
  • 02
    DK light worsted weight yarn (number 3) in dark grey - less than 50 grams for stripes and tail
  • 03
    Sport/baby weight yarn (number 2) in light brown for ice cream cone
  • 04
    Sport/baby weight yarn (number 2) in rosΓ©/pink for ice cream scoop
  • 05
    Sport/baby weight yarn (number 2) in red for cherry
  • 06
    Sport/baby weight yarn (number 2) in green for cherry stem
  • 07
    Black or dark grey embroidery thread for nose, mouth, and whiskers

β€” Tools Required

  • 01
    Crochet hook size 4/2.5mm
  • 02
    Safety eyes 12mm
  • 03
    Embroidery needle
  • 04
    Yarn needle
  • 05
    Pin needles
  • 06
    Stitch markers
  • 07
    Scissors
  • 08
    Polyester fiberfill stuffing

Progress Tracker

0% Complete

β€” Head/Body :

Info :

With light grey yarn

R1 :

6 sc in magic ring (6)

R2 :

2 sc in each stitch around (12)

R3 :

(1 sc, inc) x6 (18)

R4 :

(2 sc, inc) x6 (24)

R5 :

(3 sc, inc) x6 (30)

R6 :

(4 sc, inc) x6 (36)

R7 :

(5 sc, inc) x6 (42)

R8 :

(6 sc, inc) x6 (48)

R9 :

(7 sc, inc) x6 (54)

R10 :

(8 sc, inc) x6 (60)

R11 :

(9 sc, inc) x6 (66)

R12 :

(10 sc, inc) x6 (72)

R13 :

(11 sc, inc) x6 (78)

R14 :

(12 sc, inc) x6 (84)

R15 :

(13 sc, inc) x6 (90)

R16 :

(14 sc, inc) x6 (96)

R17-30 :

sc around (96) - 14 rounds total

R31 :

14 sc, invdec (90)

R32-35 :

sc around (90) - 4 rounds total

R36 :

(13 sc, invdec) x6 (84)

R37-40 :

sc around (84) - 4 rounds total

R41 :

(12 sc, invdec) x6 (78)

R42-43 :

sc around (78) - 2 rounds total

Info :

Add safety eyes between round 42 and 43 with 11 stitches in between. Stuff as you go.

R44 :

(11 sc, invdec) x6 (72)

R45-48 :

sc around (72) - 4 rounds total

R49 :

(10 sc, invdec) x6 (66)

R50 :

(9 sc, invdec) x6 (60)

R51 :

(8 sc, invdec) x6 (54)

R52 :

(7 sc, invdec) x6 (48)

R53 :

(6 sc, invdec) x6 (42)

R54 :

(5 sc, invdec) x6 (36)

R55 :

(4 sc, invdec) x6 (30)

R56 :

(3 sc, invdec) x6 (24)

R57 :

(2 sc, invdec) x6 (18)

R58 :

(1 sc, invdec) x6 (12)

R59 :

invdec around (6)

Info :

To close the last round, cut yarn leaving a yarn end. With a yarn-needle go into outer loops from inside out, pull tight to close hole.

β€” Ears (Make 2) :

Info :

With light grey yarn

R1 :

6 sc in magic ring (6)

R2 :

(1 sc, inc) x3 (9)

R3 :

sc around (9)

R4 :

(1 sc, inc) x3, 3 sc (12)

R5 :

(1 sc, inc) x6 (18)

R6 :

sc around (18)

R7 :

(1 sc, inc) x6, 6 sc (24)

R8 :

sc around (24)

R9 :

(2 sc, inc) x6, 6 sc (30)

Info :

Cut yarn keeping a longer yarn tail for sewing. The side with the increases will later be at the outer edge of the head and the side without will be on the inner side.

β€” Stripes on the Back :

Info :

With dark grey yarn

Smaller stripe R1 :

ch 26, beginning in second ch from hook 25 sc, ch1, turn

Smaller stripe R2 :

25 sc, ch 1, turn

Smaller stripe R3 :

25 sc, (inc) x3, 22 sc, (inc) x3, slst (60)

Bigger stripe R1 :

ch 29, beginning in second ch from hook 28 sc, ch 1, turn

Bigger stripe R2 :

29 sc, ch 1, turn

Bigger stripe R3 :

27 sc, (inc) x3, 26 sc, (inc) x3, 1 sc, slst (67)

Info :

Cut yarn leaving a long piece to sew the stripes to the back later.

β€” Tail :

Info :

With dark grey yarn

R1 :

6 sc in magic ring (6)

R2 :

2 sc in each stitch around (12)

R3-4 :

sc around (12)

Info :

Color change to light grey

R5-7 :

sc around (12) - 4 rounds total with light grey

Info :

Change to dark grey

R8-10 :

sc around (12) - 4 rounds total with dark grey

Info :

Change to light grey

R11-14 :

sc around (12) - 4 rounds total with light grey

Info :

Change to dark grey

R15-18 :

sc around (12) - 4 rounds total with dark grey

Info :

Stuff tail. Hold both sides of the last round together. Slst across to close the tail. Cut yarn, leaving a yarn end for sewing on the body later.

β€” Hands/Feet (Make 4) :

R1 :

6 sc in magic ring (6)

R2 :

2 sc in each stitch around (12)

R3-4 :

sc around (12)

R5 :

(1 sc, invdec) x3, 3 sc (9)

Info :

Stuff.

β€” Ice Cream :

Info :

With rosΓ© yarn

R1 :

6 sc in magic ring (6)

R2 :

2 sc in each stitch around (12)

R3 :

(1 sc, inc) x6 (18)

R4 :

(2 sc, inc) x6 (24)

R5 :

(3 sc, inc) x6 (30)

R6-10 :

sc around (30) - 5 rounds total

R11 :

(3 sc, invdec) x6 (24)

R12 :

in FLO: [(hdc + sc) x3 in same stitch, slst in next stitch, skip one stitch] repeat around

R13 :

in BLO sc around (24)

Info :

Color change to brown

R14-15 :

sc around (24)

R16 :

(3 sc, invdec) x5 (20)

R17 :

sc around (20)

R18 :

(2 sc, invdec) x5 (16)

R19 :

sc around (16)

Info :

Stuff ice cream.

R20 :

(1 sc, invdec) x5 (10)

R21 :

sc around (10)

R22 :

Invdec around (5)

Info :

Cut yarn, hide yarn end. Embroider sprinkles.

β€” Cherry :

Info :

With red yarn

R1 :

6 sc in magic ring (6)

R2 :

2 sc in each stitch around (12)

R3-4 :

sc around (12)

Info :

Stuff.

R5 :

invdec around (6)

Info :

Close last round

Cherry Stalk :

With green yarn ch 11, beginning in second ch from hook slst 10. Fasten off.

Infos :

Sew stalk to cherry. Sew cherry on ice cream.

Assembly Instructions

  • Sew on ears to the top of the head, positioning them symmetrically with the side containing increases facing outward as the outer edge.
  • Attach the striped tail to the back of the body, positioning it so the cat can stand stable and balanced.
  • Sew on all four feet to the bottom of the body, arranging them so Pusheen can sit or stand upright securely.
  • Attach the two back stripes to the back of the body with the smaller stripe positioned on top of the bigger stripe.
  • Embroider the hair/fur details by taking the yarn double and going over each stripe twice for texture.
  • Embroider the nose and mouth with dark grey or black yarn between the eyes using simple straight stitches.
  • Add whiskers by embroidering lines extending from the sides of the face for that classic cat appearance.
  • Position the ice cream cone and sew the hands/paws to the body so they appear to be holding the treat.
  • Finally, secure the ice cream to the hands by sewing it in place for a completed adorable Pusheen display.

Important Notes

  • πŸ’‘Use stitch markers consistently to track the beginning and end of each round, especially important during the extensive increase and decrease sequences
  • πŸ’‘Stuff the head and body firmly as you go rather than waiting until the end for better shaping control
  • πŸ’‘Pay attention to color changes in the tail - the pattern alternates between light grey and dark grey every 4 rounds
  • πŸ’‘When working the ice cream cone, Round 12 uses front loops only for texture while Round 13 uses back loops only
  • πŸ’‘Leave longer yarn tails when finishing each piece to make assembly easier and more secure
  • πŸ’‘The ears have increases on one side only - this creates the natural curved shape when attached to the head
  • πŸ’‘Safety eyes should be placed between rounds 42 and 43 with exactly 11 stitches spacing between them for proper eye placement

This absolutely adorable Pusheen with Ice Cream pattern captures the essence of everyone's favorite chubby internet cat in the most delightful way! Designed by Roxy's Crochet, this pattern brings together classic amigurumi techniques with charming details like tabby stripes, a striped tail, and the sweetest ice cream cone accessory. Perfect for cat enthusiasts and dessert lovers alike, this cuddly companion stands approximately 17cm tall and makes a wonderful gift or display piece. The continuous spiral construction keeps the work flowing smoothly, while the separate components allow you to customize colors and details to your heart's content. 🍦🐱 Happy crocheting! 🧢✨

You ask,

we answer.

FAQs

What size will my finished Pusheen be?

Using DK light worsted weight yarn with a 2.5mm hook, your finished Pusheen will be approximately 17cm (about 6.7 inches) tall. If you use a different yarn weight and corresponding hook size, the finished size will scale proportionally larger or smaller.

Can I make the ice cream removable so Pusheen can hold other things?

Yes! Simply don't sew the ice cream directly to the hands. Instead, sew the hands to the body in a holding position, and you can place different accessories between them. This allows you to swap out the ice cream for seasonal items or other props.

Why do the ears have increases only on one side?

The asymmetric increases create a natural curved shape for the ears. When sewn to the head, the side with increases forms the outer edge of the ear, giving them a realistic rounded appearance rather than being completely flat.

What's the difference between working in FLO and BLO on the ice cream?

Round 12 works in front loops only (FLO) to create the textured waffle pattern on the cone, while Round 13 works in back loops only (BLO) to transition smoothly to the cone portion. This creates dimensional texture that mimics a real ice cream cone.

How do I keep track of color changes in the striped tail?

Use a small piece of paper to mark which round you're on, or use different colored stitch markers for each color section. The pattern alternates every 4 rounds between light grey and dark grey, starting with dark grey.

Do I need to stuff all the parts?

Stuff the head/body firmly as you work, and stuff the hands/feet, tail, ice cream, and cherry. The ears and stripes do not need stuffing as they are flat pieces that will be sewn onto the body.