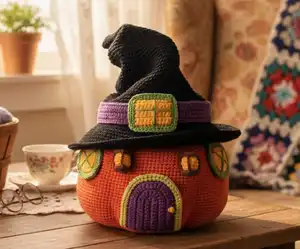
Transform your home into a spooky haven with this enchanting Pumpkin House crochet pattern! This delightful Halloween-themed project features a charming terracotta pumpkin transformed into a whimsical witch's cottage, complete with a towering black witch hat, glowing yellow windows, and a welcoming purple door. The pattern also includes adorable Halloween treats like monster cookies, M&M's cookies, wrapped candies, striped sweets, Chupa Chups lollipops, and candy corn to fill your magical pumpkin house. Perfect for creating a festive centerpiece or a unique handmade gift that captures the spirit of Halloween with every stitch!
Progress Tracker
0% Complete
— Pumpkin :
Preparation :
Prepare 1mm diameter fishing line. Neatly burn the end with a lighter so that a small ball appears on the tip.
Info :
Add the fishing line from the 3rd round. Apply it to crocheting and crochet so that it lays under the stitches. The ball at the end will not let it slip out.
Round 3 :
(1 sc, inc)*6=18 sc
Round 4 :
(2 sc, inc)*6=24 sc
Round 5 :
(3 sc, inc)*6=30 sc
Round 6 :
(4 sc, inc)*6=36 sc
Round 7 :
(5 sc, inc)*6=42 sc
Round 8 :
(6 sc, inc)*6=48 sc
Round 9 :
(7 sc, inc)*6=54 sc
Round 10 :
(8 sc, inc)*6=60 sc
Round 11 :
(9 sc, inc)*6=66 sc
Round 12 :
(10 sc, inc)*6=72 sc
Round 13 :
(11 sc, inc)*6=78 sc
Round 14 :
(12 sc, inc)*6=84 sc
Round 15 :
Work only this round through the back loops: (13 sc, inc)*6=90 sc
Round 16 :
(14 sc, inc)*6=96 sc
Round 17 :
(15 sc, inc)*6=102 sc
Round 18-37 :
20 rounds of 102 sc
Round 38 :
(15 sc, dec)*6=96 sc
Round 39 :
(14 sc, dec)*6=90 sc
Round 40 :
(13 sc, dec)*6=84 sc
Info :
Cut the fishing line, leaving a short end. Melt it with a lighter and quickly press to the crocheting so that the end sticks to the yarn. Crochet a few more sc to close the line. Finish with sl st, cut the yarn.
Second Layer Round 1 :
Join yarn to the 14th round and crochet through the front loops: (13 sc, inc)*6=90 sc
Second Layer Round 2 :
(14 sc, inc)*6=96 sc
Second Layer Round 3 :
(15 sc, inc)*6=102 sc
Second Layer Round 4 :
(16 sc, inc)*6=108 sc
Second Layer Round 5 :
(17 sc, inc)*6=114 sc
Second Layer Round 6 :
(18 sc, inc)*6=120 sc
Second Layer Round 7 :
(19 sc, inc)*6=126 sc
Second Layer Round 8-30 :
23 rounds of 126 sc
Second Layer Round 31 :
(19 sc, dec)*6=120 sc
Second Layer Round 32 :
(18 sc, dec)*6=114 sc
Second Layer Round 33 :
(17 sc, dec)*6=108 sc. Do not cut the yarn.
Info :
Neatly stuff the space between 2 layers, not tightly.
Second Layer Round 34 :
(16 sc, dec)*6=102 sc
Second Layer Round 35 :
(15 sc, dec)*6=96 sc
Second Layer Round 36 :
(14 sc, dec)*6=90 sc
Second Layer Round 37 :
(13 sc, dec)*6=84 sc
Closing :
Join together the upper edges of both layers and sc 84 through both of them.
Shaping :
Thread the needle. Starting from the bottom (approximately along the inc lines), drag the needle straight through the stitches to the top edge. Slightly pull this thread and fasten at the top edge of the pumpkin. Make 6 such shaping lines.
— Witch Hat Roof :
Round 2 :
(1 sc, inc)*3=9 sc
Round 4 :
(2 sc, inc)*3=12 sc
Round 6 :
(3 sc, inc)*3=15 sc
Round 8 :
(4 sc, inc)*3=18 sc
Round 10 :
(5 sc, inc)*3=21 sc
Round 12 :
(6 sc, inc)*3=24 sc
Round 14 :
(7 sc, inc)*3=27 sc
Round 16 :
(8 sc, inc)*3=30 sc
Round 18 :
(9 sc, inc)*3=33 sc
Round 20 :
(10 sc, inc)*3=36 sc
Round 22 :
(11 sc, inc)*3=39 sc
Round 24 :
(12 sc, inc)*3=42 sc
Round 26 :
(13 sc, inc)*3=45 sc
Round 27 :
(14 sc, inc)*3=48 sc
Round 29 :
(15 sc, inc)*3=51 sc
Round 30 :
(16 sc, inc)*3=54 sc
Round 32 :
(17 sc, inc)*3=57 sc
Round 33 :
(18 sc, inc)*3=60 sc
Round 35 :
(19 sc, inc)*3=63 sc
Round 36 :
(20 sc, inc)*3=66 sc
Round 37 :
(21 sc, inc)*3=69 sc
Round 38 :
(22 sc, inc)*3=72 sc
Round 39 :
(23 sc, inc)*3=75 sc
Round 40 :
(24 sc, inc)*3=78 sc
Round 41 :
(25 sc, inc)*3=81 sc
Round 42 :
(26 sc, inc)*3=84 sc
Round 43 :
(27 sc, inc)*3=87 sc
Round 44 :
(28 sc, inc)*3=90 sc
Round 45 :
(29 sc, inc)*3=93 sc
Round 46 :
(30 sc, inc)*3=96 sc
Info :
Add a fishing line to crocheting, after melting its tip.
Round 47-51 :
5 rounds of 96 sc with the line
Info :
Cut the line and fasten the end as when crocheting a pumpkin.
Round 52 :
Join new fishing line, work only this round through the front loops: (11 sc, inc)*8=104 sc
Round 53 :
(12 sc, inc)*8=112 sc
Round 54 :
(13 sc, inc)*8=120 sc
Round 55 :
(14 sc, inc)*8=128 sc
Round 56 :
(15 sc, inc)*8=136 sc
Round 57 :
(16 sc, inc)*8=144 sc
Info :
Pull out the yarn marker. Thread black yarn into the needle and stitch the crown of the hat along the trail of the marking thread, starting from the fishing line up to the tip.
Round 58 :
(17 sc, inc)*8=152 sc
Round 59 :
(18 sc, inc)*8=160 sc
Round 60 :
(19 sc, inc)*8=168 sc
Round 61 :
(20 sc, inc)*8=176 sc
Info :
Cut and fasten the line. Pull the yarn to make the crown bend and fasten the end on the tip.
Hat Ribbon :
Crochet a ribbon with purple yarn. Chain 96, work back and forth rows with a turning ch: 95 sc*5 rows. Steam the finished ribbon with an iron.
Info :
Glue or sew the ribbon on that part of the crown which is crocheted with fishing line. The joint should be in the center of the intended front of the hat.
— Attic Window :
Yellow Base :
Chain 11 and sc a rectangle 10 sc*7 rows. Cut the yarn.
Green Border :
Join green yarn and sl st around all 4 sides. Sc around through the both loops of green sc. Crochet 3 sc in 1 st on angles. Sl st around. Leave a long end.
Window Frame :
Thread the green yarn into the needle and stitch a cross frame on the window. Cut the yarn.
Placement :
Glue the finished window on the joint of the ribbon.
— Door :
Round 1 :
Chain 11. 9 sc, 3 sc in the last loop of the chain, 9 sc along the bottom side of the chain=21 sc
Info :
Next, crochet in U-shaped turning rows with a turning loop at the beginning of the row.
Round 2 :
9 sc, inc*3, 9 sc=24 sc
Round 3 :
9 sc, (1 sc, inc)*3, 9 sc=27 sc
Round 4 :
9 sc, (2 sc, inc)*3, 9 sc=30 sc
Round 5 :
9 sc, (3 sc, inc)*3, 9 sc=33 sc
Round 6 :
9 sc, (4 sc, inc)*3, 9 sc=36 sc. Cut the yarn.
Olive Border :
Join light olive yarn. Sl st around except the bottom side of the door. Turn to the wrong side and sc through the both loops of the olive sl st: 9 sc, (5 sc, inc)*3, 9 sc=39 sc. Turn to the front side and sl st around. Cut the yarn.
Door Knob :
Make a several stitches with yellow yarn for a door knob.
— Round Windows :
Round 3 :
(1 sc, inc)*6=18 sc
Round 4 :
(2 sc, inc)*6=24 sc. Finish with a sl st, cut the yarn.
Round 5 :
Join green yarn and sl st around.
Round 6 :
sc through the both loops of the green sl st: (3 sc, inc)*6=30 sc
Round 7 :
sl st around. Leave a long end.
Window Frame :
Stitch a cross frame with the end of the yarn.
Assembly :
Glue (or sew if you prefer) the door. Then attach the windows on the sides of the door.
— Lanterns :
Round 3-5 :
3 rounds of 12 sc
Round 6 :
Dec every st until the opening closes. Stuff while crocheting.
Brown Circles :
Crochet 2 circles with brown yarn and leave one of them with a long end of the yarn: Round 1: 6 sc in AR, Round 2: inc*6=12 sc
Assembly :
Glue the brown circles on the top and bottom of the lantern. Thread the end of the yarn into the needle and draw a line from one circle to another. Then go back, wrapping the yarn around this line several times, fasten. Make 4 such vertical lines at equal distances from each other.
Placement :
Glue lanterns on the sides of the door.
— Monster Cookies :
Round 3 :
(1 sc, inc)*6=18 sc
Round 4 :
1 sc, inc, (2 sc, inc)*5, 1 sc=24 sc
Round 5 :
(3 sc, inc)*6=30 sc
Round 6 :
2 sc, inc, (4 sc, inc)*5, 2 sc=36 sc
Round 7 :
(5 sc, inc)*6=42 sc
Round 8 :
3 sc, inc, (6 sc, inc)*5, 3 sc=48 sc
Round 9 :
(7 sc, inc)*6=54 sc
Round 11 :
(7 sc, dec)*6=48 sc
Round 12 :
3 sc, dec, (6 sc, dec)*5, 3 sc=42 sc
Round 13 :
(5 sc, dec)*6=36 sc
Round 14 :
2 sc, dec, (4 sc, dec)*5, 2 sc=30 sc
Round 15 :
(3 sc, dec)*6=24 sc
Round 16 :
1 sc, dec, (2 sc, dec)*5, 1 sc=18 sc
Round 17 :
(1 sc, dec)*6=12 sc
Round 18 :
dec*6. Do not stuff! Leave a long end.
Finishing :
Thread the needle and stitch through the center several times.
Icing Round 1 :
6 sc in AR
Icing Round 2 :
inc*6=12 sc
Icing Round 3 :
(1 sc, inc)*6=18 sc
Icing Round 4 :
1 sc, inc, (2 sc, inc)*5, 1 sc=24 sc
Icing Round 5 :
(3 sc, inc)*6=30 sc
Icing Round 6 :
2 sc, inc, (4 sc, inc)*5, 2 sc=36 sc
Icing Round 7 :
(5 sc, inc)*6=42 sc
Icing Round 8 :
3 sc, inc, (6 sc, inc)*5, 3 sc=48 sc. Finish with a sl st, cut the yarn.
Eyes :
Crochet eyes with white yarn of 2 sizes: 2 rounds circle and 3 rounds. Crochet pupils with black yarn - 1 round circle.
Face :
Glue eyes on the icing and embroider a smile with black yarn.
— M&M's Cookies :
Cookie Base :
Crochet cookies in the same way as for monsters but stuff them a little while crocheting, keeping their flat shape. Steam the finished cookie with an iron on both sides.
M&M's Round 1 :
6 sc in AR
M&M's Round 2 :
inc6=12 sc
M&M's Round 3-4 :
2 rounds of 12 sc. Finish with a sl st, leave a long end.
Shaping :
Thread the end of the yarn into the needle and bring it through the every second back loop of the last round. Do not stuff, pull off the opening and fix the end.
Assembly :
Crochet such dragees of any colors, as many as you want. Glue them on the cookies in chaotic order. Embroider multicolored sprinkles on free spaces.
— Wrapped Candy :
Round 3 :
(1 sc, inc)*6=18 sc
Round 4-11 :
8 rounds of 18 sc
Round 12 :
(1 sc, dec)6=12 sc. Stuff.
Round 14 :
3 ch, crochet 2 dc in every st. Close round with a sl st. Cut the yarn and fix the end.
Second Wrapper :
For the second wrapper end crochet 3 ch and 12 dc in AR. Pull the ring, close round with a sl st. Leave a long end. Sew to the second side of the candy.
Info :
Crochet any number of different colors as desired.
— Striped Candy :
Round 1 :
8 sc in AR, do not close the round.
Round 2 :
Crochet 1 yellow sc in the first st, but do not make the last step, leaving 2 loops on the hook. Join green yarn and finish the yellow sc with green. Subsequently, all color changes should be done in this way. Make 2 green sc in the second st, 2 yellow sc in the third and so on. Remember how to change yarn color correctly! In total, in this round we should get 15 sc (since only 1 sc was crocheted in the first st)
Round 3-10 :
Crochet 2 yellow sc. The second of them will be above the green st. Next, crochet alternately 2 green and 2 yellow sc. Due to the odd number of st in a row, they will constantly shift and form oblique lines. Crochet 8 rounds in this way.
Round 11 :
Stuff. Make 8 dec alternating yarn color.
Round 12 :
Cut the yellow yarn, make 4 dec with green yarn.
Round 13 :
3 ch, crochet 3 dc in every st. Close round with a sl st, cut the yarn and fix the end.
Second Wrapper :
Crochet the second end of a wrapper with yellow yarn: 3 ch and 12 dc in AR. Pull the ring, close round with a sl st. Leave a long end. Sew to the candy.
Info :
Make striped candies in different colors.
— Chupa Chups :
Round 1 :
6 sc in AR. Do not close round with sl st. Leave a long working loop, remove the hook from it.
Round 2 :
Join brown yarn and make a new working loop from the center (from AR). Crochet 2 brown sc in every orange st. Leave a long brown working loop.
Round 3 :
Return the hook to the orange loop and crochet (1 sc, inc)6=18 sc.
Round 4 :
Return to the brown round: (2 sc, inc)6=24 sc.
Round 9 :
Orange: (2 sc, dec)6=18 sc
Round 10 :
Brown: (1 sc, dec)6=12 sc. Stuff.
Round 11 :
Orange: dec6=6 sc
Round 12 :
Brown: dec every st until the hole closes. Cut both yarns and fasten the ends.
Stick :
Cut the manicure stick in half. Insert the sharp end into the candy. Crochet with white yarn: 7 sc in AR, then crochet spiral rounds up according to the stick length. Finish with a sl st, leave a long end.
Assembly :
Put on the stick and sew with the end of the yarn. Repeat in other colors.
— Candy Corn :
Round 1 :
Chain 5, crochet on the both sides of the chain. 3 sc in the second loop from the hook, 2 sc, 3 sc in the last loop, 2 sc along the bottom side of the chain=10 sc
Round 2 :
inc3, 2 sc, inc3, 2 sc=16 sc. Close with a sl st.
Round 3 :
no turning ch, 16 sc through the back loops. Do not close the rows, work spiral rounds.
Round 4-5 :
2 rounds of 16 sc (from the 4th round crochet through the both loops)
Round 6 :
change yarn to the orange: 2 sc, dec, 6 sc, dec, 4 sc =14 sc
Round 8 :
2 sc, dec, 5 sc, dec, 3 sc =12 sc
Round 9 :
Change yarn to the white, 12 sc
Round 10 :
1 sc, dec, 4 sc, dec, 3 sc=10 sc, stuff.
Round 11 :
dec5. Cut the yarn, sew the opening with the end. Make as many pcs as you want.
This enchanting Pumpkin House pattern transforms traditional Halloween decor into an extraordinary handmade masterpiece that will be treasured for years to come. The combination of structural fishing line techniques and detailed embellishments creates a stunning three-dimensional piece that showcases advanced crochet skills. From the towering witch hat to the tiny candy corn treats, every element has been thoughtfully designed to capture the whimsical magic of Halloween. Whether displayed as a seasonal centerpiece or gifted to someone special, this pattern offers both a rewarding challenge and a delightful result. 🎃 Happy Halloween crocheting! 🧶✨