🧢 Beautiful ✨ Detailed πŸ’ Adorable

Plush Snuggler Bunny Amigurumi Pattern

Plush Snuggler Bunny Amigurumi Pattern
4.6β˜… Rating
6-8 Hours Time Needed
3.6K Made This
βœ‚οΈ

Intermediate Level

Ideal for those with basic knitting experience, featuring slightly more advanced stitches and techniques to expand your skills.

⏱️

All-Day Adventure

Requires 8-10 hours, ideal for a full day of immersive knitting.

🧸

Cute Companion

An adorable friend to cherish, handcrafted with love to bring comfort and joy for years to come.

About This Plush Snuggler Bunny Amigurumi Pattern

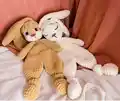
This plush snuggler bunny pattern creates a lovable companion that's perfect for snuggling. Standing at 41 cm tall, this cuddly friend features an adorable two-tone color scheme with soft chenille yarn that makes it irresistibly huggable. The pattern uses simple increase and decrease techniques worked in a continuous spiral, making it accessible for intermediate crocheters while still offering a satisfying project. With long floppy ears and sweet embroidered details, this bunny has tons of personality.

Plush Snuggler Bunny Amigurumi Pattern crochet pattern - detailed view of completed project

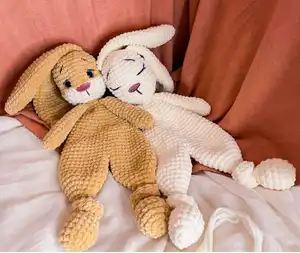
The finished bunny is worked entirely in single crochet using plush chenille yarn, giving it that extra-soft snuggly texture. Each piece is constructed separately and then assembled for a polished, professional-looking finish.

Why You'll Love This Plush Snuggler Bunny Amigurumi Pattern

I absolutely love this plush bunny pattern because it combines simplicity with serious cuteness factor! The chenille yarn makes every stitch feel like you're working with clouds, and watching this adorable character come to life is incredibly rewarding. I appreciate how the spiral construction keeps things moving smoothly without constant joining, and the way those long floppy ears add so much charm. The two-tone design gives you creative freedom to play with colors while keeping the pattern straightforward. Plus, there's something deeply satisfying about creating a huggable friend that will bring comfort and joy for years to come!

Plush Snuggler Bunny Amigurumi Pattern step 1 - construction progress Plush Snuggler Bunny Amigurumi Pattern step 2 - assembly progress Plush Snuggler Bunny Amigurumi Pattern step 3 - details and accessories Plush Snuggler Bunny Amigurumi Pattern step 4 - final assembly and finishing

Switch Things Up

I absolutely love experimenting with this bunny pattern to create unique variations! Sometimes I work it entirely in a single soft pastel color for a minimalist aesthetic, or I'll add a contrasting belly panel for extra visual interest. I've tried using different chenille yarn brands to see how the texture changes, and each one gives the bunny its own special softness.

For a more whimsical touch, I like to embroider tiny flowers or hearts on the ears or add a simple crocheted bow tie around the neck. You could also play with ear positioning - making them stand upright instead of floppy gives a completely different personality. I've even made seasonal versions with holiday-themed colors like pastels for Easter or reds and greens for Christmas.

Consider adding a little crocheted carrot accessory or making the bunny hold a tiny heart. You could experiment with safety eye sizes for different expressions, or try embroidered closed eyes for a sleepy version. The possibilities are endless, and each small change makes your bunny uniquely yours!

Common Mistakes & How to Fix Them

βœ— Not maintaining consistent tension with plush yarn can create uneven stitches and visible gaps in your work βœ— Forgetting to add stuffing gradually as you decrease rounds can make it difficult to achieve proper shaping βœ— Skipping stitch markers when working in spiral rounds often leads to miscounts and misaligned pattern sections βœ— Overstuffing the body and limbs can stretch the fabric too tight and make details look distorted

Plush Snuggler Bunny Amigurumi Pattern

Create your own adorable plush snuggler bunny with this charming amigurumi pattern! This cuddly companion stands approximately 41 cm tall and features a sweet two-tone design with floppy ears and an irresistibly soft texture. Perfect for gift-giving or adding a cozy touch to any nursery, this plush bunny is worked in a continuous spiral using chenille or plush yarn for that extra-huggable feel. Whether you're crafting for a little one or treating yourself to a handmade treasure, this snuggler bunny will bring warmth and comfort to any space.

Intermediate 6-8 Hours

Materials Needed for Plush Snuggler Bunny Amigurumi Pattern

β€” Main Fabric

  • 01
    Plush chenille yarn 100g/120m: 2 skeins main color (Wolans Yarns BUNNY BABY shade 100-18 or equivalent)
  • 02
    Plush chenille yarn 100g/120m: partial skein secondary color for head (Wolans Yarns BUNNY BABY shade 100-02 or equivalent)
  • 03
    Alternative yarns: Yarn Art DOLCE, Premier Yarns PARFAIT CHUNKY, Katia BAMBI, King Cole YUMMY, Universal Yarn BELLA CHENILLE, or Cygnet JELLY CHUNKY CHENILLE

β€” Tools Required

  • 01
    Crochet hook 4mm (G6)
  • 02
    16mm toy safety eyes or dark embroidery thread
  • 03
    Toy filling or fabric/yarn scraps for stuffing
  • 04
    Stitch markers
  • 05
    Tapestry needle
  • 06
    Scissors
  • 07
    Sewing thread for attaching details
  • 08
    Rose/pink embroidery thread for nose

Progress Tracker

0% Complete

β€” Legs (make 2) :

Round 1 :

6 sc inside MR (6)

Round 2 :

6 inc (12)

Round 3 :

(1 sc, inc) x 6 (18)

Rounds 4-6 :

18 sc (18)

Round 7 :

(4 sc, dec) x 3 (15)

Round 8 :

(3 sc, dec) x 3 (12)

Info :

Add some filler

Round 9 :

(2 sc, dec) x 3 (9)

Round 10 :

(1 sc, dec) x 3 (6)

Rounds 11-25 :

6 sc (6)

Round 26 :

(1 sc, inc) x 3 (9)

Round 27 :

(2 sc, inc) x 3 (12)

Round 28 :

(3 sc, inc) x 3 (15)

Round 29 :

(4 sc, inc) x 3 (18)

Round 30 :

(5 sc, inc) x 3 (21)

Round 31 :

(6 sc, inc) x 3 (24)

Rounds 32-36 :

24 sc (24)

Info :

Cut the yarn. Make the second leg in the same way, but don't cut the thread at the end

β€” Body :

Assembling Round 1 :

Join the 2nd leg with 1st leg (insert hook and make sc in the point where stitch 24 of the last round ended), 23 sc of 1st leg, join with the leg 2 (insert hook and make sc in the point where stitch 24 of last round ended), 23 sc of 2nd leg (48)

Rounds 2-5 :

48 sc (48)

Round 6 :

(6 sc, dec) x 6 (42)

Rounds 7-8 :

42 sc (42)

Round 9 :

(5 sc, dec) x 6 (36)

Rounds 10-11 :

36 sc (36)

Round 12 :

(4 sc, dec) x 6 (30)

Rounds 13-14 :

30 sc (30)

Round 15 :

(3 sc, dec) x 6 (24)

Rounds 16-17 :

24 sc (24)

Round 18 :

(2 sc, dec) x 6 (18)

Rounds 19-20 :

18 sc (18)

Round 21 :

(1 sc, dec) x 6 (12), sl st

Info :

Cut the yarn. Make knots on the legs

β€” Arms (make 2) :

Round 1 :

6 sc inside MR (6)

Round 2 :

(1 sc, inc) x 3 (9)

Round 3 :

(2 sc, inc) x 3 (12)

Rounds 4-6 :

12 sc (12)

Round 7 :

10 sc, dec (11)

Round 8 :

9 sc, dec (10)

Rounds 9-16 :

10 sc (10)

Info :

Fold and crochet the edges together 5 sc. Cut the yarn

Info :

Make the second arm in the same way in rounds 1-6

Round 7 (Second Arm) :

dec, 10 sc (11)

Round 8 (Second Arm) :

dec, 9 sc (10)

Rounds 9-16 (Second Arm) :

10 sc (10)

Info :

Fold and crochet the edges together 5 sc. Cut the yarn

β€” Head :

Info :

Start with secondary color yarn

Round 1 :

6 sc inside MR (6)

Round 2 :

6 inc (12)

Round 3 :

(1 sc, inc) x 6 (18)

Round 4 :

(2 sc, inc) x 6 (24)

Round 5 :

(3 sc, inc) x 6 (30)

Round 6 :

(4 sc, inc) x 6 (36)

Rounds 7-8 :

36 sc (36)

Info :

Change yarn to the main color

Rounds 9-15 :

36 sc (36)

Info :

If you use the safety eyes, attach them between rounds 10 and 11 (leave 8 stitches between the eyes)

Round 16 :

(4 sc, dec) x 6 (30)

Round 17 :

(3 sc, dec) x 6 (24)

Info :

Fill the head with filler

Round 18 :

(2 sc, dec) x 6 (18)

Round 19 :

(1 sc, dec) x 6 (12)

Info :

Add more filler to the head

Round 20 :

6 dec (6)

Info :

Cut the yarn, pull the hole. Hide the end of the thread inside the head

β€” Ears (make 2) :

Round 1 :

6 sc inside MR (6)

Round 2 :

(1 sc, inc) x 3 (9)

Round 3 :

(2 sc, inc) x 3 (12)

Round 4 :

(3 sc, inc) x 3 (15)

Round 5 :

(4 sc, inc) x 3 (18)

Round 6 :

(5 sc, inc) x 3 (21)

Round 7 :

(6 sc, inc) x 3 (24)

Rounds 8-14 :

24 sc (24)

Round 15 :

(6 sc, dec) x 3 (21)

Rounds 16-17 :

21 sc (21)

Round 18 :

(5 sc, dec) x 3 (18)

Rounds 19-20 :

18 sc (18)

Round 21 :

(4 sc, dec) x 3 (15)

Rounds 22-23 :

15 sc (15)

Round 24 :

(3 sc, dec) x 3 (12)

Rounds 25-26 :

12 sc (12)

Info :

Fold and crochet the edges together 6 sc. Cut the yarn

β€” Tail :

Round 1 :

6 sc inside MR (6)

Round 2 :

6 inc (12)

Round 3 :

12 sc (12)

Round 4 :

(2 sc, dec) x 3 (9)

Info :

Cut the yarn

Assembly Instructions

  • Sew the head securely to the body using matching thread and a tapestry needle
  • Attach the arms to the body sides, leaving 4 stitches between them for proper proportions
  • Sew the tail to the back center of the body at an appropriate height
  • Attach the ears to the head between rounds 17 and 18, positioning them symmetrically
  • Embroider the nose with pink thread between rounds 8 and 9, making it approximately 5 stitches wide
  • Embroider eyelashes and eyebrows using dark thread for added facial expression
  • Tighten the muzzle area using the main color thread following the numbered guide (1 through 8) for proper shaping

Important Notes

  • πŸ’‘Work all pieces using the spiral method without joining rounds with slip stitches
  • πŸ’‘Use stitch markers to track your place when working in continuous spiral rounds
  • πŸ’‘Stuff the legs and head gradually as you decrease to achieve the best shaping
  • πŸ’‘If using safety eyes, attach them between rounds 10 and 11 with 8 stitches between them
  • πŸ’‘Maintain consistent tension when working with plush yarn to avoid gaps in the fabric
  • πŸ’‘Pin all parts in place before sewing to ensure proper positioning and symmetry

This adorable plush snuggler bunny pattern creates the perfect cuddly companion for little ones or anyone who loves handmade softness! With its charming two-tone design, floppy ears, and sweet embroidered features, this 41 cm tall friend is sure to become a treasured favorite. The pattern uses simple spiral construction with chenille yarn for that extra-huggable plush texture. Whether you're making it as a heartfelt gift or a nursery decoration, this lovable bunny will bring smiles and snuggles for years to come. 🐰🧢✨

You ask,

we answer.

FAQs

Can I use regular yarn instead of plush chenille yarn?

Yes, you can use regular yarn, but the finished bunny will have a different texture and may be smaller. Adjust your hook size accordingly and be aware that the soft, plush snuggler effect comes specifically from chenille yarn.

What size will my bunny be if I use different yarn weight?

The pattern creates a 41 cm bunny with 100g/120m chenille yarn and a 4mm hook. Using lighter yarn will create a smaller bunny, while heavier yarn will make it larger. Always make a test swatch first.

Do I have to use two colors for this pattern?

No, you can make the entire bunny in one color using 2 skeins of yarn. The two-color design with a contrasting head is optional and purely aesthetic.

How do I work in a spiral without losing my place?

Use a stitch marker at the beginning of each round and move it up as you go. This helps you track where rounds begin and end without having to join with slip stitches.

Can I make the arms and legs poseable?

Yes, you can insert pipe cleaners or floral wire into the arms and legs before closing them to make them poseable. Just ensure all wire ends are secured safely if making for young children.