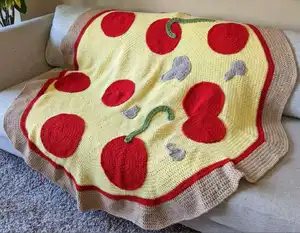
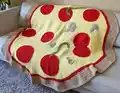
Transform yourself into the ultimate pizza lover with this delightful Pizza Blanket crochet pattern! This creative and fun project lets you craft a circular blanket that looks just like a delicious pizza slice, complete with cheese, sauce, crust, and customizable toppings. Perfect for pizza enthusiasts of all ages, this blanket features detailed instructions for creating pepperonis, peppers, olives, mushrooms, and even pineapple toppings. Whether you're snuggling up for movie night or looking for a unique gift, this pizza blanket brings cozy comfort with a playful twist that's sure to make everyone smile.
Progress Tracker
0% Complete
— Pizza Base (Yellow Cheese Layer) :
Start R1 :
With 5mm hook and yellow yarn Mc, Ch 3, and then work 11 Dc into the Mc. (12)
Info :
At the end of each round: insert your hook into the top of the Ch 3, Sl St, Ch 3, and then Dc into the same stitch. The Ch 3 will act as a stitch thus making the Ch3 + Dc = an Inc
R2 :
Inc in each stitch around (24)
R3 :
Dc 1 (Inc 1, Dc 1) x11 (36)
R4 :
Dc 2 (Inc 1, Dc 2) x11 (48)
R5 :
Dc 3 (Inc 1, Dc 3) x11 (60)
R6 :
Dc 4 (Inc 1, Dc 4) x11 (72)
R7 :
Dc 5 (Inc 1, Dc 5) x11 (84)
R8 :
Dc 6 (Inc 1, Dc 6) x11 (96)
R9 :
Dc 7 (Inc 1, Dc 7) x11 (108)
R10 :
Dc 8 (Inc 1, Dc 8) x11 (120)
R11 :
Dc 9 (Inc 1, Dc 9) x11 (132)
R12 :
Dc 10 (Inc 1, Dc 10) x11 (144)
R13 :
Dc 11 (Inc 1, Dc 11) x11 (156)
R14 :
Dc 12 (Inc 1, Dc 12) x11 (168)
R15 :
Dc 13 (Inc 1, Dc 13) x11 (180)
R16 :
Dc 14 (Inc 1, Dc 14) x11 (192)
R17 :
Dc 15 (Inc 1, Dc 15) x11 (204)
R18 :
Dc 16 (Inc 1, Dc 16) x11 (216)
R19 :
Dc 17 (Inc 1, Dc 17) x11 (228)
R20 :
Dc 18 (Inc 1, Dc 18) x11 (240)
R21 :
Dc 19 (Inc 1, Dc 19) x11 (252)
R22 :
Dc 20 (Inc 1, Dc 20) x11 (264)
R23 :
Dc 21 (Inc 1, Dc 21) x11 (276)
R24 :
Dc 22 (Inc 1, Dc 22) x11 (288)
R25 :
Dc 23 (Inc 1, Dc 23) x11 (300)
R26 :
Dc 24 (Inc 1, Dc 24) x11 (312)
R27 :
Dc 25 (Inc 1, Dc 25) x11 (324)
R28 :
Dc 26 (Inc 1, Dc 26) x11 (336)
R29 :
Dc 27 (Inc 1, Dc 27) x11 (348)
R30 :
Dc 28 (Inc 1, Dc 28) x11 (360)
R31 :
Dc 29 (Inc 1, Dc 29) x11 (372)
R32 :
Dc 30 (Inc 1, Dc 30) x11 (384)
R33 :
Dc 31 (Inc 1, Dc 31) x11 (396)
R34 :
Dc 32 (Inc 1, Dc 32) x11 (408)
R35 :
Dc 33 (Inc 1, Dc 33) x11 (420)
R36 :
Dc 34 (Inc 1, Dc 34) x11 (432)
R37 :
Dc 35 (Inc 1, Dc 35) x11 (444)
R38 :
Dc 36 (Inc 1, Dc 36) x11 (456)
R39 :
Dc 37 (Inc 1, Dc 37) x11 (468)
R40 :
Dc 38 (Inc 1, Dc 38) x11 (480)
R41 :
Dc 39 (Inc 1, Dc 39) x11 (492)
R42 :
Dc 40 (Inc 1, Dc 40) x11 (504)
R43 :
Dc 41 (Inc 1, Dc 41) x11 (516)
R44 :
Dc 42 (Inc 1, Dc 42) x11 (528)
R45 :
Dc 43 (Inc 1, Dc 43) x11 (540)
R46 :
Dc 44 (Inc 1, Dc 44) x11 (552)
R47 :
Dc 45 (Inc 1, Dc 45) x11 (564)
R48 :
Dc 46 (Inc 1, Dc 46) x11 (576)
R49 :
Dc 47 (Inc 1, Dc 47) x11 (588)
R50 :
Dc 48 (Inc 1, Dc 48) x11 (600)
R51 :
Dc 49 (Inc 1, Dc 49) x11 (612)
— Pizza Sauce Layer (Red) :
Info :
Change to Red yarn. At the end of each round: Insert your hook into the top of the ch 3, sl st, ch 3, and then Dc into the same stitch. The Ch 3 will act as a stitch thus making the Ch3 + Dc = an Inc
R52 :
Dc 50 (Inc 1, Dc 50) x11 (624)
R53 :
Dc 51 (Inc 1, Dc 51) x11 (636)
— Pizza Crust Layer (Brown) :
Info :
Change to Brown yarn before you Ch 3
R54 :
Dc 52 (Inc 1, Dc 52) x11 (648)
R55 :
Dc 53 (Inc 1, Dc 53) x11 (660)
R56 :
Dc 54 (Inc 1, Dc 54) x11 (672)
R57 :
Dc 55 (Inc 1, Dc 55) x11 (684)
R58 :
Dc 56 (Inc 1, Dc 56) x11 (696)
R59 :
Dc 57 (Inc 1, Dc 57) x11 (708)
R60 :
Dc 58 (Inc 1, Dc 58) x11 (720)
To Finish :
Don't Ch 3, make a Sl St in the first stitch and finish off
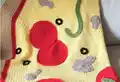
— Pepperonis :
R1 :
With red yarn and a 5 mm hook: Mc, Ch 3, and then work 11 Dc into the Mc. (12)
Info :
At the end of each round: insert your hook into the top of the Ch 3, Sl St, Ch 3, and then Dc into the same stitch. The ch 3 will act as a stitch thus making the Ch3 + Dc = an Inc
R2 :
Inc in each stitch (24)
R3 :
Dc 1 (Inc 1, Dc 1) x11 (36)
R4 :
Dc 2 (Inc 1, Dc 2) x11 (48)
R5 :
Dc 3 (Inc 1, Dc 3) x11 (60)
R6 :
Dc 4 (Inc 1, Dc 4) x11 (72)
R7 :
Dc 5 (Inc 1, Dc 5) x11 (84)
R8 :
Dc 6 (Inc 1, Dc 6) x11 (96)
R9 :
Dc 7 (Inc 1, Dc 7) x11 (108)
To Finish :
Sl St into the first stitch and finish off, leave a long tail for sewing
— Peppers :
R1 :
With green yarn and a 4.5 mm hook, Ch 60. Starting in the 3rd ch from the hook, Dc 57 across, Dc 3 in the last Ch
Continuing :
Rotate the pepper 180 degrees. Sc in each Ch, place Sc 2 in the last Ch, Sl St in the first Dc
To Finish :
Finish off and leave a long tail for sewing
— Olives :
Start :
With black yarn and a 4.5 mm hook: Ch 15, insert your hook into the first Ch and Sl St to make a circle
R1 :
Ch 1, Sc in the same stitch as the Sl St, ScInc in the remaining Chs (30)
To Finish :
Sl St into the first stitch and finish off, leave a long tail for sewing. If your olive curls, try with a looser tension
— Small Mushrooms :
Info :
Using a 4.5mm hook and warm grey yarn, we will be working in rows, be sure to Ch 1 and turn at the end of each row
Row 1 :
Ch 6, starting in the 2nd Ch from the hook, Sc across (5)
R2-8 :
Sc across (5) - 7 rows total. In the last row, do not Ch1 and turn
R9 :
Ch 6, turn, Starting in the 2nd Ch from the hook, Sc 5 across Chs, Sc 5 across the stem, Ch 6 (15). Don't Ch 1 at the end of this row
R10 :
Starting in the 2nd Ch from the hook, Sc across (15)
R11 :
Sc 4, Dec, Sc 3, Dec, Sc 4 (13)
R12 :
Sc 3, Dec, Sc 3, Dec, Sc 3, (11)
R13 :
Sc 4, Dec, Sc 5, (10)
R16 :
Sc 4, Dec, Sc 3 (8) Ch 1
R17 :
Sc around the sides of the mushroom, place 2 Sc in the two cap corners, and the two bottom stem corners, Sl St in the first stitch
— Large Mushrooms :
Info :
Using a 4.5mm hook and warm grey yarn, we will be working in rows, be sure to Ch 2 and turn at the end of each row
Row 1 :
Ch 14, starting in the 3rd Ch from the hook, Dc across (12)
R2-R3 :
Dc across (12) - 2 rows total
R4 :
Ch 10, turn, starting in the 3rd Ch from the hook, Dc 8 across the Chs, Dc 6 across the stem, Ch 10 (Don't Ch 2 at the end of this row)
R5 :
Turn, Dc in the 3rd Ch from the hook, Dc across (22)
R6 :
(Dc 4, dcdec) x3, Dc 4 (19)
R7 :
(Dc 5, dcdec) x2, Dc 5 (17)
R9 :
(Dc 3, dcdec) x3, Dc 2 (14)
R10 :
(Dc 2, dcdec) x3, Dc 2 (11)
R11 :
dcdec, Dc 7, dcdec, (9) Ch 1
R12 :
Sc around the sides of the mushroom, place 2 Sc in the cap corners and 2 Sc in the stem corners
— Pineapple :
Info :
Ch 2 and turn at the end of each row
Row 1 :
With darker yellow yarn and a 4.5 mm hook: Ch 9, start in the 3rd Ch from the hook, Dc across (7)
R2 :
Dc 3, Inc 1, Dc 3 (8)
R3 :
Dc 4, Inc 1, Dc 3 (9)
R4 :
Dc 4, Inc 1, Dc 4 (10)
R6 :
Dc 5, Inc 1, Dc 4 (11)
R8 :
Dc 5, Inc 1, Dc 5 (12)
R9 :
Dc 6, Inc 1, Dc 5 (13)
R10 :
Dc 6, Inc 1, Dc 6 (14)
R11 :
Dc 7, Inc 1, Dc 6 (15) Ch 1
Edging :
Sc around all 4 sides of the pineapple. Start by placing 2 Sc in the first corner. Place 3 Sc in the 3 remaining corners. When we Sc across the top, Sl st into the last 3 stitches
To Finish :
Finish off and leave a long tail for sewing
This delightful Pizza Blanket pattern was designed to bring joy, warmth, and a touch of whimsy to your crochet projects! Whether you're a pepperoni purist or a pineapple enthusiast, this pattern lets you customize your dream pizza while learning valuable circular crochet techniques and color-changing skills. The fun assembly process encourages creativity and makes each blanket truly one-of-a-kind. Perfect as a gift for pizza lovers or as a cozy companion for movie nights, this blanket is sure to be a conversation starter wherever it goes! 🍕 Happy crocheting and enjoy being the sauce to your pizza! 🧶✨