🧶 Beautiful ✨ Detailed 💝 Adorable

Pine Cone Baby Amigurumi Pattern

Pine Cone Baby Amigurumi Pattern
4.2★ Rating
4-5 Hours Time Needed
1.5K Made This
✂️

Intermediate Level

Ideal for those with basic knitting experience, featuring slightly more advanced stitches and techniques to expand your skills.

⏱️

Weekend Treat

Takes 5-7 hours, making it an enjoyable project to finish over a couple of days.

🍁

Autumn Vibes

Earthy tones with cozy textures inspired by falling leaves and the rich, warm colors of harvest season.

About This Pine Cone Baby Amigurumi Pattern

Pine Cone Baby Amigurumi Pattern crochet pattern - detailed view of completed project

With continuous round construction and clear color-coded instructions, this pattern guides you through creating each magical component. The bobble stitch technique creates authentic pine cone texture while remaining enjoyable to work, making this an ideal project for expanding your crochet skills.

Why You'll Love This Pine Cone Baby Amigurumi Pattern

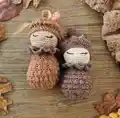
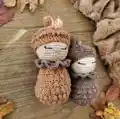
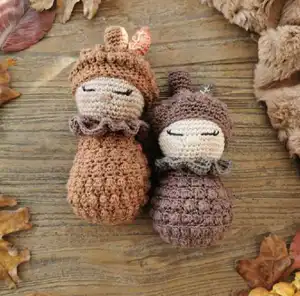
I absolutely love how this pattern captures the whimsical magic of autumn in such a unique way! The bobble stitch work is incredibly satisfying to create, and watching the pine cone texture emerge with each round feels like pure crochet joy. I'm particularly fond of the sweet embroidered face that gives this little forest creature so much personality and charm. The combination of seasonal colors and textures makes this perfect for fall decorating, and it's become one of my favorite shelf companions. What really makes my heart sing is how this pattern tells a story—it's not just an amigurumi, it's a tiny piece of enchanted forest magic you can hold in your hands.

Pine Cone Baby Amigurumi Pattern step 1 - construction progress Pine Cone Baby Amigurumi Pattern step 2 - assembly progress Pine Cone Baby Amigurumi Pattern step 3 - details and accessories Pine Cone Baby Amigurumi Pattern step 4 - final assembly and finishing

Switch Things Up

I love experimenting with seasonal variations of this enchanting pattern! You could create a whole magical forest family by adjusting the color palette—imagine a snowy winter version using icy blues and whites, or a spring edition with pastel pinks and fresh greens. The bobble stitch body technique works beautifully for other nature-inspired creatures too.

For a more whimsical touch, I sometimes add tiny felt acorns or miniature crocheted mushrooms around the base, turning it into a complete woodland scene. You could also vary the facial expressions by changing the embroidered features—sleepy eyes, surprised expressions, or happy smiles all give unique personalities to each pine cone baby.

I've found that using sparkly or metallic yarn for the leaf veins creates a gorgeous magical shimmer, perfect for gift-giving during the holidays. Another fun variation is making the collar in different colors or patterns—rainbow ruffles or striped collars add playful charm. The hat could also be decorated with tiny embroidered flowers or French knots to represent forest berries. These personalization options make each creation uniquely yours while keeping the enchanted forest magic alive!

Common Mistakes & How to Fix Them

✗ Bobble stitches too loose or tight—maintain consistent tension by practicing the five-loop technique on a swatch first before starting the body ✗ Losing stitch count during bobble stitch rounds—use multiple stitch markers to track pattern repeats and count carefully after each round completion ✗ Uneven pine cone texture appearance—ensure you're always working bobble stitches in the correct stitch and pulling through all loops simultaneously for uniform bumps ✗ Head not securely attached to body—pin pieces together first, stuff both firmly before sewing, and use mattress stitch with doubled thread for strength

Pine Cone Baby Amigurumi Pattern

Step into an enchanted autumn forest with this adorable Pine Cone Baby amigurumi! This whimsical woodland creature features a textured pine cone body created with charming bobble stitches, a sweet little face, and delightful leaf collar details. Perfect for fall décor or as a magical companion for little ones, this pattern combines intermediate techniques with creative embroidery touches. Bring the magic of the forest into your home with this unique seasonal crochet project that captures the essence of autumn enchantment.

Intermediate 4-5 Hours

Materials Needed for Pine Cone Baby Amigurumi Pattern

— Main Fabric

  • 01
    Scheepjes Catona cotton yarn in white (color 404) - 1x25g
  • 02
    Scheepjes Catona cotton yarn in brown (color 507) - 1x50g
  • 03
    Scheepjes Catona cotton yarn in green (color 387) - 1x25g
  • 04
    Alternative: Any sport weight or DK cotton or acrylic yarn in white, brown, and green colors

— Tools Required

  • 01
    Crochet hook 2.5mm
  • 02
    Yarn needle for sewing
  • 03
    Embroidery needle
  • 04
    Golden embroidery thread for leaf veins
  • 05
    Yarn for embroidering facial features
  • 06
    Fiberfill stuffing
  • 07
    Scissors
  • 08
    Stitch markers
  • 09
    Pink blush for cheeks (optional)

Progress Tracker

0% Complete

— Head :

Info :

Work with white yarn

Round 1 :

6 sc in a magic ring (6)

Round 2 :

inc x 6 (12)

Round 3 :

(1 sc, inc) x 6 (18)

Round 4 :

(2 sc, inc) x 6 (24)

Round 5 :

(3 sc, inc) x 6 (30)

Round 6 :

(4 sc, inc) x 6 (36)

Round 7 :

(5 sc, inc) x 6 (42)

Round 8 :

(6 sc, inc) x 6 (48)

Round 9-15 :

Sc in all st [7 rounds] (48)

Round 16 :

(6 sc, dec) x 6 (42)

Round 17 :

(5 sc, dec) x 6 (36)

Round 18 :

(4 sc, dec) x 6 (30)

Round 19 :

(3 sc, dec) x 6 (24)

Info :

Fasten off and leave enough yarn for sewing. Stuff firmly.

— Leaf :

Info :

Work with green yarn

Round 1 :

4 sc in a magic ring (4)

Round 2 :

(1 sc, inc) x 2 (6)

Round 3 :

(2 sc, inc) x 2 (8)

Round 4 :

(3 sc, inc) x 2 (10)

Round 5 :

(4 sc, inc) x 2 (12)

Round 6-8 :

Sc in all st [3 rounds] (12)

Round 9 :

(2 sc, dec) x 3 (9)

Round 10 :

(1 sc, dec) x 3 (6)

Info :

Fasten off and leave enough yarn for sewing. Do not stuff.

— Collar :

Info :

Work in rows with green yarn. Ch 27, start in the 2nd ch from the hook.

Row 1 :

26 sc, ch 2, turn (26)

Row 2 :

3 Dc in all st, ch 1, turn (78)

Row 3 :

1 Hdc in all st (78)

Info :

Fasten off and leave enough yarn for sewing

— Body :

Info :

Work with brown yarn

Round 1 :

6 sc in a magic ring (6)

Round 2 :

inc x 6 (12)

Round 3 :

inc x 12 (24)

Round 4 :

(BS, 1 sc) x 12 (24)

Round 5 :

(1 sc, inc) x 12 (36)

Round 6 :

(BS, 1 sc) x 18 (36)

Round 7 :

(2 sc, inc) x 12 (48)

Round 8 :

(BS, 1 sc) x 24 (48)

Round 9 :

Sc in the back loop of all st (48)

Round 10 :

(BS, 1 sc) x 24 (48)

Round 11 :

(2 sc, dec) x 12 (36)

Round 12 :

(BS, 1 sc) x 18 (36)

Round 13 :

Sc in all st (36)

Round 14 :

(BS, 1 sc) x 18 (36)

Round 15 :

(4 sc, dec) x 6 (30)

Round 16 :

(BS, 1 sc) x 15 (30)

Round 17 :

(3 sc, dec) x 6 (24)

Round 18 :

(BS, 1 sc) x 12 (24)

Round 19 :

Sc in all st (24)

Info :

Fasten off and hide the yarn. Stuff firmly.

— Stalk :

Info :

Work with brown yarn

Round 1 :

6 sc in a magic ring (6)

Round 2 :

inc x 6 (12)

Round 3 :

(3 sc, inc) x 3 (15)

Round 4 :

Sc in the back loop of all st (15)

Round 5 :

Sc in all st (15)

Round 6 :

(3 sc, dec) x 3 (12)

Round 7 :

Sc in all st (12)

Round 8 :

(2 sc, dec) x 3 (9)

Round 9-11 :

Sc in all st [3 rounds] (9)

Info :

Fasten off and leave enough yarn for sewing. Stuff firmly.

— Hat :

Info :

Work with brown yarn

Round 1 :

6 sc in a magic ring (6)

Round 2 :

inc x 6 (12)

Round 3 :

inc x 12 (24)

Round 4 :

(BS, 1 sc) x 12 (24)

Round 5 :

(1 sc, inc) x 12 (36)

Round 6 :

(BS, 1 sc) x 18 (36)

Round 7 :

(2 sc, inc) x 12 (48)

Round 8 :

(BS, 1 sc) x 24 (48)

Round 9 :

(3 sc, inc) x 12 (60)

Round 10 :

(BS, 1 sc) x 30 (60)

Round 11 :

(3 sc, dec) x 12 (48)

Round 12 :

(6 sc, dec) x 6 (42)

Round 13 :

(5 sc, dec) x 6 (36)

Round 14 :

(4 sc, dec) x 6 (30)

Info :

Fasten off and hide the yarn

Assembly Instructions

  • Using golden embroidery thread, carefully embroider the delicate veins on the leaf piece to create realistic botanical detail.
  • Sew the stuffed stalk securely to the top center of the hat using matching brown yarn and invisible stitches.
  • Position the leaf between the stalk and hat, sewing it in place to create a natural connection point.
  • Align the head and body pieces, pinning them together first to ensure proper positioning, then sew securely with doubled thread.
  • Embroider the nose between rounds 14 and 15 of the head, making it 3 stitches long with matching yarn.
  • Embroider the base of the eyes between rounds 13 and 14, spacing them 3 stitches long, then add lashes one row above.
  • Apply pink blush to the cheeks if desired, attach the ruffled collar around the neck, and place the pine cone hat on the head.

Important Notes

  • 💡Practice the bobble stitch technique on a small swatch before starting the body to ensure consistent texture and tension
  • 💡Use stitch markers generously, especially during bobble stitch rounds, to avoid losing your place in the pattern
  • 💡The pattern uses continuous rounds without joining, so marking the beginning of each round is essential for accuracy
  • 💡Stuff the head and body firmly but not overly tight to maintain the proper rounded shape and prevent lumps
  • 💡Pay attention to the color chart provided if using the recommended Scheepjes yarns for accurate color matching
  • 💡Back loop only (BLO) rounds create definition between sections—make sure to work only in the back loops as indicated

This enchanting Pine Cone Baby pattern brings the magic of autumn forests right into your hands! With its charming bobble stitch texture and whimsical woodland character, this intermediate-level project is perfect for crocheters ready to expand their skills. The detailed instructions guide you through creating each magical component, from the textured pine cone body to the sweet embroidered face. Whether displayed as seasonal décor or gifted as a treasured handmade companion, this little forest creature will capture hearts with its unique charm. 🍂🧶✨

You ask,

we answer.

FAQs

What is a bobble stitch and how do I make it?

A bobble stitch creates a textured bump on your work. Following the pattern's detailed instructions, you'll yarn over and work partial double crochets into the same stitch (creating 5 loops on your hook), then yarn over and pull through all loops at once. The pattern includes step-by-step visual instructions to guide you through this technique.

Can I use different yarn brands instead of Scheepjes?

Absolutely! You can substitute any sport weight or DK cotton or acrylic yarn in white, brown, and green colors. Keep in mind that using different yarn weights or hook sizes will affect the finished size of approximately 14cm, so adjust accordingly.

Do I need to know how to embroider for this pattern?

Basic embroidery skills are helpful for adding the facial features and leaf veins. The pattern provides clear placement instructions (like positioning eyes between specific rounds). If you're new to embroidery, simple straight stitches will work beautifully for this project.

Is this pattern suitable for a baby toy?

Yes! The pattern specifically mentions it can be used as a baby toy. However, ensure all embroidered features are securely attached and consider using safety eyes if making it for very young children. Always supervise babies with handmade toys.

How do I keep track of my rounds when working continuously?

Use a stitch marker at the beginning of each round! Since this pattern works in continuous rounds without slip stitch joins, marking your starting point is essential. Move your marker up as you complete each round to avoid confusion.

What does 'back loop only' (BLO) mean?

When you look at your stitches, you'll see two loops forming a 'V' at the top. Working in the back loop only means inserting your hook through only the loop farthest from you, which creates a ridge effect and adds definition to your work.