๐Ÿงถ Beautiful โœจ Detailed ๐Ÿ’ Adorable

Coraline Squid Amigurumi Pattern

Coraline Squid Amigurumi Pattern
3.9โ˜… Rating
6-8 Hours Time Needed
1.7K Made This
โœ‚๏ธ

Intermediate Level

Ideal for those with basic knitting experience, featuring slightly more advanced stitches and techniques to expand your skills.

โฑ๏ธ

All-Day Adventure

Requires 8-10 hours, ideal for a full day of immersive knitting.

๐Ÿงธ

Cute Companion

An adorable friend to cherish, handcrafted with love to bring comfort and joy for years to come.

About This Coraline Squid Amigurumi Pattern

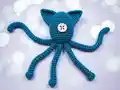
This Coraline Squid amigurumi pattern captures the whimsical charm of the movie's beloved character in a huggable 21 cm form. The design features a rounded body with distinctive pointed ears and six individual arms that are reinforced with pipe cleaners for posability. Each arm can be shaped and positioned to give your squid unique personality and character. The pattern uses simple increase and decrease techniques worked in continuous rounds, making it straightforward to follow once you establish your rhythm.

Coraline Squid Amigurumi Pattern crochet pattern - detailed view of completed project

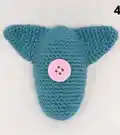
The signature pink button sewn onto the body adds that authentic Coraline touch, while the medium blue cotton yarn creates the perfect oceanic color. The unstuffed ears give the squid a soft, floppy charm that contrasts beautifully with the firmly stuffed body.

Why You'll Love This Coraline Squid Amigurumi Pattern

I absolutely adore this Coraline squid pattern because it combines nostalgia with creativity in the most delightful way! The movie holds such a special place in my heart, and being able to recreate this character through crochet feels magical. What I really love is how the pipe cleaners in the arms make this amigurumi interactive โ€“ you can pose the tentacles however you want, draping them over shelves or wrapping them around objects. The button detail is such a clever nod to the film that instantly makes this recognizable to any Coraline fan. I also appreciate how this pattern doesn't require color changes, making it perfect for a relaxing crafting session. The repetitive rounds for the arms become almost meditative, and watching all six tentacles come together is incredibly satisfying. Plus, at 21 cm tall, it's the perfect size for display or cuddling!

Coraline Squid Amigurumi Pattern step 1 - construction progress Coraline Squid Amigurumi Pattern step 2 - assembly progress Coraline Squid Amigurumi Pattern step 3 - details and accessories Coraline Squid Amigurumi Pattern step 4 - final assembly and finishing

Switch Things Up

I love experimenting with this Coraline squid pattern, and there are so many creative variations you can try! Instead of the classic medium blue, imagine creating a whole rainbow family of squids in vibrant colors like hot pink, sunshine yellow, mint green, or even sparkly metallic yarn for a magical effect. You could also swap out the pink button for different colored buttons to match your yarn choice, or even use safety eyes for a different look entirely.

For a more elaborate version, I've tried adding embroidered details like a sweet smile or closed peaceful eyes using black embroidery floss, which gives each squid its own personality. You could also experiment with the arms โ€“ instead of making all six the same length, try varying them for a more organic, whimsical appearance. Some crafters have even added small accessories like tiny crocheted hats or scarves to dress up their squids.

If you want to make this pattern more challenging, consider adding stripes or spots using color changes throughout the body rounds. Another fun variation is creating different textures by working some rounds in the back loops only to create ridges. I've also seen beautiful versions where crafters add French knots or small beads scattered across the body for a starry night effect, which looks absolutely magical.

For gift-giving, you could personalize each squid with embroidered initials or attach a small tag with the recipient's name. The pattern also scales beautifully โ€“ try it with bulky yarn and a larger hook for a giant cuddle buddy, or use thread and a tiny steel hook for an adorable miniature keychain version!

Common Mistakes & How to Fix Them

โœ— Not stuffing the body firmly enough before closing, which causes the squid to be floppy and lose its rounded shape
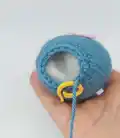
 โœ— Forgetting to insert pipe cleaners into the arms before closing them off, making it impossible to pose the tentacles properly โœ— Sewing the button in the wrong position or too loosely, causing it to shift or look misaligned on the finished piece โœ— Not leaving the ears unstuffed as instructed, making them stiff and upright instead of soft and floppy as designed โœ— Cutting pipe cleaners too long or not folding them properly, creating sharp edges that could poke through the crochet fabric โœ— Attaching arms at uneven intervals around the body instead of spacing them evenly, resulting in an asymmetrical appearance

Coraline Squid Amigurumi Pattern

Bring the enchanting world of Coraline to life with this adorable squid amigurumi pattern! This charming character stands 21 cm tall when crocheted with 2.5mm cotton yarn and features distinctive ears, six posable arms with pipe cleaner armature, and a sweet pink button detail. Perfect for movie fans and amigurumi enthusiasts alike, this pattern creates a whimsical companion that captures the magical essence of the beloved film. The pattern includes clear instructions for creating the body, unique ear details, and multiple tentacle arms that can be posed in various positions for added character and playfulness.

Intermediate 6-8 Hours

Materials Needed for Coraline Squid Amigurumi Pattern

โ€” Main Fabric

  • 01
    2.5mm cotton yarn in Medium Blue
  • 02
    Synthetic cotton filling for stuffing

โ€” Tools Required

  • 01
    2.5mm crochet hook
  • 02
    2 cm light pink button
  • 03
    6 pipe cleaners for posable arms
  • 04
    Needle and thread to sew the button
  • 05
    Wool needle for assembly
  • 06
    Scissors

Progress Tracker

0% Complete

โ€” Body :

Info :

With 2.5 mm blue cotton yarn

R.1 :

6 sc in a magic ring (6)

R.2 :

6 inc (12)

R.3 :

1 sc (12)

R.4 :

1 sc, 1 inc (18)

R.5 :

2 sc, 1 inc (24)

R.6 :

1 sc (24)

R.7 :

3 sc, 1 inc (30)

R.8 :

4 sc, 1 inc (36)

R.9 - R.23 :

1 sc (36) (15 turns)

R.24 :

4 sc, 1 dec (30)

R.25 - R.26 :

1 sc (30)

R.27 :

3 sc, 1 dec (24)

R.28 :

1 sc (24)

Info :

Sew the button between R.14 and R.19 and stuffing

R.29 :

2 sc, 1 dec (18)

R.30 :

1 sc, 1 dec (12)

R.31 :

6 dec (6)

Info :

Fasten off with slst, cut and hide the thread

โ€” Ears :

Info :

With 2.5 mm blue cotton yarn. Make 2 pieces

R.1 :

6 sc in a magic ring (6)

R.2 :

1 sc, 1 inc (9)

R.3 :

1 sc (9)

R.4 :

2 sc, 1 inc (12)

R.5 :

1 sc (12)

R.6 :

3 sc, 1 inc (15)

R.7 :

1 sc (15)

R.8 :

4 sc, 1 inc (18)

R.9 :

1 sc (18)

R.10 :

5 sc, 1 inc (21)

R.11 :

1 sc (21)

Info :

Fasten off with slst and leave a thread to sew to body between R.4 and R.15. This piece is not stuffed

โ€” Arms :

Info :

With 2.5 mm blue cotton yarn. Make six equal pieces

R.1 :

4 sc in a magic ring (4)

R.2 :

4 inc (8)

R.3 - R.31 :

1 sc (8) (24 turns)

Info :

Insert the pipe cleaner folded in half and cut off the excess piece

Info :

Fasten off with slst, leave a thread and sew to body between R.27 and R.28

Assembly Instructions

  • Sew the 2 cm light pink button onto the body between rounds 14 and 19, positioning it centered on the front of the squid
  • Stuff the body firmly with synthetic cotton filling after round 28, ensuring the shape is rounded and smooth before continuing to close
  • Attach the two ears to the body between rounds 4 and 15, spacing them evenly on either side of the head area, leaving them unstuffed for a floppy appearance
  • For each of the six arms, fold a pipe cleaner in half and insert it into the crocheted tube before closing, cutting off any excess length that extends beyond the fabric
  • Sew all six arms evenly spaced around the body between rounds 27 and 28, ensuring they're distributed symmetrically around the circumference
  • After attaching all arms, shape and position them as desired, taking advantage of the pipe cleaner armature to create unique poses
  • Weave in all remaining yarn ends securely and trim excess threads for a clean finished appearance

Important Notes

  • ๐Ÿ’กThe finished size is approximately 21 cm tall when using 2.5mm cotton yarn, but will vary if you change yarn weight
  • ๐Ÿ’กDo not stuff the ears - they should remain flat and floppy for the correct character appearance
  • ๐Ÿ’กInsert pipe cleaners into arms before closing them off, as it's impossible to add them later
  • ๐Ÿ’กWork in continuous rounds without joining unless specified to maintain smooth spiral construction
  • ๐Ÿ’กThe button should be sewn securely with needle and thread, not attached with yarn, for durability
  • ๐Ÿ’กFold pipe cleaners in half before inserting to eliminate sharp edges and provide better structure

This enchanting Coraline Squid amigurumi pattern brings movie magic into your hands! With its distinctive button eye, floppy ears, and six posable tentacle arms, this 21 cm character is perfect for fans of the beloved film. The pattern uses simple stitches and clever construction techniques to create a huggable companion full of whimsy and charm. Whether displayed on a shelf or used as a cuddly friend, this squid will capture hearts with its sweet personality and nostalgic appeal. ๐Ÿงถ Happy crocheting! ๐Ÿงตโœจ

You ask,

we answer.

FAQs

What size will my finished squid be if I use different yarn weight?

The pattern specifies 21 cm tall when using 2.5mm cotton yarn. If you use thicker yarn and a larger hook, your squid will be bigger, while thinner yarn will make it smaller. The proportions will remain the same regardless of size.

Can I make this squid without pipe cleaners in the arms?

Yes, you can omit the pipe cleaners if you prefer, but the arms won't be posable. They'll still look cute but will hang naturally without the ability to shape them. This might be preferable for very young children for safety reasons.

Where exactly should I sew the pink button?

The button should be sewn onto the body between rounds 14 and 19, centered on what will be the front face of your squid. Use regular needle and thread rather than yarn for a more secure attachment.

Do I need to make two ears or is it just one?

The pattern requires two ears, though it's not explicitly stated in every instruction. Make two identical ear pieces following the same pattern and attach them on opposite sides of the body.

Why shouldn't I stuff the ears?

The ears are designed to be floppy and soft, which is characteristic of the Coraline squid design. Stuffing them would make them stiff and stick out, rather than droop naturally as intended.

How do I prevent the pipe cleaners from poking through the crochet?

Fold each pipe cleaner in half before inserting it into the arm, which eliminates sharp ends. Cut off any excess length, and make sure the folded end is positioned at the tip of the arm for maximum safety.

What's the best way to attach all six arms evenly?

Attach all six arms between rounds 27 and 28 of the body. To ensure even spacing, you can use pins to mark positions around the circumference before sewing, dividing the circle into six equal sections.