๐Ÿงถ Beautiful โœจ Detailed ๐Ÿ’ Adorable

Pig Minecraft Character Amigurumi Pattern

Pig Minecraft Character Amigurumi Pattern
4.5โ˜… Rating
3.5-4 Hours Time Needed
2.9K Made This
โœ‚๏ธ

Beginner Friendly Level

Perfect for those just starting their sewing journey, with clear instructions and simple techniques

โฑ๏ธ

Weekend Treat

Takes 5-7 hours, making it an enjoyable project to finish over a couple of days.

๐Ÿท

Cute Companion

An adorable friend to cherish, handcrafted with love to bring comfort and joy for years to come.

About This Pig Minecraft Character Amigurumi Pattern

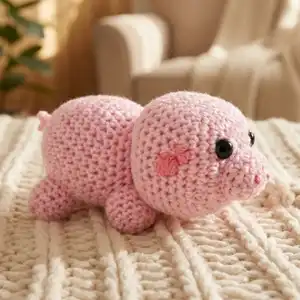
This Pig amigurumi pattern brings Minecraft's most beloved farm animal to life in adorable pink perfection! Using primarily pink yarn with dark pink accents and black and white details, you'll create the signature cubic body and head with a dimensional snout attachment. The pattern teaches oval construction for the prominent snout, simple leg shaping, and a fun spiral chain technique for the curly tail that adds personality and charm to this friendly mob.

Pig Minecraft Character Amigurumi Pattern crochet pattern - detailed view of completed project

With straightforward square construction, four identical legs, and easy embroidered details, this pattern is perfect for beginners who want to create something recognizable and cute. The snout piece adds dimension without complexity, making this an ideal introduction to multi-piece amigurumi assembly.

Why You'll Love This Pig Minecraft Character Amigurumi Pattern

I absolutely love this Pig pattern because it's pure adorable charm in every stitch! There's something wonderfully satisfying about creating that prominent pink snout - it brings so much personality to the face and really captures what makes Minecraft pigs so endearing. I find the simplicity of the all-pink construction relaxing and meditative, allowing me to focus on perfecting my cube-shaping technique without worrying about complex color changes. The curly tail is my favorite element - working 3SC into each chain creates this delightful spiral that adds such playful character! I especially love making the four stubby legs because they're quick, identical, and watching the pig come together with all four attached is incredibly rewarding. The embroidered square eyes and nostrils are simple yet effective, capturing that iconic Minecraft pixelated style. This pattern is quick enough to finish in an afternoon but impressive enough to bring smiles to everyone who sees it!

Pig Minecraft Character Amigurumi Pattern step 1 - construction progress Pig Minecraft Character Amigurumi Pattern step 2 - assembly progress Pig Minecraft Character Amigurumi Pattern step 3 - details and accessories Pig Minecraft Character Amigurumi Pattern step 4 - final assembly and finishing

Switch Things Up

I love creating different pig variations from this pattern! For a muddy pig, I use brown yarn patches randomly placed on the body and head to create that fresh-from-the-mud appearance. You could also make piglets in lighter shades of pink, or even create the rare pink sheep by changing colors and adding fluffy texture with loop stitches!

For the snout, I sometimes add extra dimension by embroidering a darker pink outline around the edge before adding the nostrils, creating more definition and depth. You could also vary the tail - make it longer with CH15 or shorter with CH6 for different personalities.

I've successfully made a jumbo pig using worsted weight yarn and a 5mm hook, creating an adorable 8-inch cube that works perfectly as a pillow or room decoration for Minecraft bedrooms. For party favors or keychains, use sport weight yarn and a 2.5mm hook for palm-sized piggies.

Try creating a whole Minecraft farm scene by making multiple pigs along with cows, chickens, and sheep! You could also make a saddle accessory from brown and grey yarn that sits on the pig's back, or create tiny carrots, potatoes, and beetroots as food items since pigs follow players holding these in the game.

For a fun twist, add small safety eyes instead of embroidered ones for a more dimensional look, though traditional embroidery stays truer to the blocky Minecraft style. Some crafters also add small pink felt ears on the sides of the head for extra cuteness, though this deviates from the pure cubic aesthetic!

Common Mistakes & How to Fix Them

โœ— Not stuffing the snout firmly enough which causes it to flatten against the face and lose its prominent three-dimensional appearance โœ— Sewing the four legs at uneven heights or spacing which causes the pig to stand crooked or tip to one side โœ— Pulling the spiral tail chain too tightly when working 3SC into each chain stitch which prevents proper curling and creates a straight tail โœ— Forgetting to maintain square shaping with proper corner marker placement resulting in rounded body and head that lose cubic Minecraft authenticity

Pig Minecraft Character Amigurumi Pattern

Create the adorable and iconic Pig from Minecraft with this charming amigurumi crochet pattern! This pattern features the classic pink cubic body with a prominent snout, curly tail, four stubby legs, and those characteristic square eyes and nostrils. Perfect for Minecraft farm enthusiasts and animal lovers, this pattern uses simple cube-shaping techniques with dimensional snout construction. With step-by-step instructions for the square body and head, oval snout piece, four identical legs, spiral tail, and embroidered facial details, you'll craft an irresistibly cute farmyard companion!

Beginner Friendly 3.5-4 Hours

Materials Needed for Pig Minecraft Character Amigurumi Pattern

โ€” Main Fabric

  • 01
    DK yarn in pink, dark pink, black, and white

โ€” Tools Required

  • 01
    3.5mm crochet hook
  • 02
    Embroidery needle
  • 03
    Scissors
  • 04
    Toy stuffing
  • 05
    4 clip markers

Progress Tracker

0% Complete

โ€” Body :

Info :

Make with pink yarn

Round 1 :

8SC into a magic loop {8}

Round 2 :

(SC1, 3SC into the next ST) 4 times {16}

Round 3 :

SC2, 3SC into next ST, (SC3, 3SC into next ST) 3 times, SC1 {24}

Round 4 :

SC3, 3SC into next ST, (SC5, 3SC into next ST) 3 times, SC2 {32}

Round 5-16 :

SC around {32}

Info :

Add clip marker into 4 corners where decreases will be, with 7 stitches between every 2 stitches. Replace markers after each row

Round 17 :

(SC to stitch before marker SC3TOG) 4 times, SC to end {24}

Round 18 :

(SC to stitch before marker SC3TOG) 4 times, SC to end {16}

Info :

Stuff body

Round 19 :

(SC to stitch before marker SC3TOG) 4 times, SC to end, remove markers {8}

Info :

Join and FO. With yarn tail pick up front loop only of remaining 8 stitches in order, pull tight to close

โ€” Head :

Info :

Make with pink yarn

Round 1 :

8SC into a magic loop {8}

Round 2 :

(SC1, 3SC into the next ST) 4 times {16}

Round 3 :

SC2, 3SC into next ST, (SC3, 3SC into next ST) 3 times, SC1 {24}

Round 4 :

SC3, 3SC into next ST, (SC5, 3SC into next ST) 3 times, SC2 {32}

Round 5 :

SC4, 3SC into next ST, (SC6, 3SC into next ST) 3 times, SC2 {40}

Round 6-15 :

SC around {40}

Info :

Add clip marker into 4 corners where decreases will be, with 9 stitches between every 2 stitches. Replace markers after each row

Round 16 :

(SC to stitch before marker SC3TOG) 4 times, SC to end {32}

Round 17 :

(SC to stitch before marker SC3TOG) 4 times, SC to end {24}

Round 18 :

(SC to stitch before marker SC3TOG) 4 times, SC to end {16}

Info :

Stuff body

Round 19 :

(SC to stitch before marker SC3TOG) 4 times, SC to end, remove markers {8}

Info :

Join and FO. With yarn tail pick up front loop only of remaining 8 stitches in order, pull tight to close. Sew head onto body

โ€” Snout :

Info :

Make with pink yarn

Round 1 :

CH6, SC in 2nd chain from hook, SC across, 3SC into last chain, working down opposite side of foundation chain, SC3, 2SC in the last ST (first ST of previous round) {12}

Round 2 :

2SC into 1st ST, SC3, 2SC into next 3 STS, SC3, 2SC into last 2 STS {18}

Round 3-5 :

SC around {18}

Info :

Join and FO. Stuff snout, pin and sew into place in centre of Pig's head

โ€” Legs :

Info :

Make 4 with pink yarn

Round 1 :

4SC into a magic loop {4}

Round 2 :

3SC into every ST {12}

Round 3-6 :

SC around {12}

Info :

Join and FO. Pin and sew into place beneath pig

โ€” Tail :

Info :

Make with pink yarn

Round 1 :

CH10, 3SC into the 2nd CH from hook and all other chains along

Info :

Join and FO. Sew onto back of pig

โ€” Face Detail :

Info :

With black and white yarn sew on pig's eyes in square shapes. With dark pink yarn sew nostrils onto snout and marks onto side of head. Sew square shapes first, then fill in with colour

Assembly Instructions

  • Sew completed cubic head onto body ensuring proper alignment with face positioned forward for best appearance
  • Attach stuffed pink snout to center of face prominently so it extends outward creating that characteristic pig profile
  • Pin all four legs beneath the body ensuring even spacing and height before sewing for balanced standing position
  • Embroider two square eyes using black yarn with white highlights positioned above and to sides of snout
  • Use dark pink yarn to embroider two small square nostrils on the front flat surface of the snout
  • Add dark pink marks on sides of head near ears for authentic Minecraft pig texture details
  • Attach curly spiral tail to back of body ensuring it extends outward and curls naturally upward

Important Notes

  • ๐Ÿ’กAll four legs are identical so use the first one as your template for consistent sizing throughout construction
  • ๐Ÿ’กStuff the snout very firmly so it maintains its prominent three-dimensional shape and doesn't flatten against the face
  • ๐Ÿ’กFor the spiral tail, work 3SC into every chain stitch - this triple increase creates the natural curl and spiral effect
  • ๐Ÿ’กPin all four legs in place before sewing to ensure the pig will stand evenly without tipping to one side
  • ๐Ÿ’กPlace corner markers carefully with exactly 7 stitches between each pair on body and 9 on head for proper cube proportions
  • ๐Ÿ’กThe snout should be centered on the face and extend forward prominently - this is the pig's most distinctive feature
  • ๐Ÿ’กEmbroider facial details in square shapes using grid-like stitches to maintain that pixelated Minecraft aesthetic

This adorable Pig amigurumi pattern brings Minecraft's friendliest farm animal to life in pink perfection! With simple cube construction, a prominent dimensional snout, four stubby legs, and a delightful curly spiral tail, this pattern is perfect for beginners wanting quick, satisfying results. The embroidered square details capture authentic Minecraft charm while remaining wonderfully cute and huggable! ๐Ÿท๐Ÿ’• Happy crocheting! โœจ

You ask,

we answer.

FAQs

How do I make the tail curl properly?

The key is working 3SC into each chain stitch along the entire CH10. This creates triple the stitches along one side, which naturally forces the piece to curl into a spiral. Don't pull your stitches too tight or it won't curl as nicely.

How should I position the four legs?

Think of the bottom as having four corners. Place one leg at each corner position, ensuring they're all at the same height from the bottom edge. Pin all four in place and check that the pig sits level before sewing permanently.

Can I make a baby pig or piglet?

Absolutely! Use sport weight yarn with a 3mm hook for a smaller version, or skip one increase round on both body and head for a more compact piglet. You could also make the legs slightly shorter by working only 4-5 rounds instead of 6.

What if my snout looks flat instead of prominent?

Make sure you're stuffing it very firmly and fully before attaching. When sewing it on, only sew around the back edge where it meets the face, leaving the front unsewn so it extends forward prominently rather than being flattened against the head.

Can I make different pig variants like in Minecraft?

Yes! While standard pigs are pink, you could create muddy pigs by using brown yarn, or make zombie pigmen (now piglins) by using pink with green patches and adding a sword accessory. Get creative with color combinations!