🧢 Beautiful ✨ Detailed πŸ’ Adorable

Paris Granny Star Hexagon Bag Crochet Pattern

Paris Granny Star Hexagon Bag Crochet Pattern
4.6β˜… Rating
8-10 Hours Time Needed
2.4K Made This
βœ‚οΈ

Intermediate Level

Ideal for those with basic knitting experience, featuring slightly more advanced stitches and techniques to expand your skills.

⏱️

All-Day Adventure

Requires 8-10 hours, ideal for a full day of immersive knitting.

✨

Stylish Touch

An elegant detail to elevate any look, combining traditional techniques with contemporary design sensibilities.

About This Paris Granny Star Hexagon Bag Crochet Pattern

Paris Granny Star Hexagon Bag Crochet Pattern crochet pattern - detailed view of completed project

The pattern uses approximately 180-200 grams of paper twisted raffia yarn in each of two colors and results in a structured, durable bag perfect for everyday use or special occasions.

Why You'll Love This Paris Granny Star Hexagon Bag Crochet Pattern

I absolutely love this pattern because it transforms simple granny squares into something truly spectacular. The hexagon shape adds such visual interest, and watching those eleven pieces come together into a cohesive bag is incredibly satisfying. I appreciate how the pattern doesn't just stop at the crochet work - it takes you all the way through to a fully finished, lined bag with proper hardware. The two-color technique creates beautiful geometric patterns without being overly complicated, and the raffia yarn gives it a lovely summery texture that's both sturdy and stylish. Plus, there's something special about carrying a bag you've made entirely by hand!

Paris Granny Star Hexagon Bag Crochet Pattern step 1 - construction progress Paris Granny Star Hexagon Bag Crochet Pattern step 2 - assembly progress Paris Granny Star Hexagon Bag Crochet Pattern step 3 - details and accessories Paris Granny Star Hexagon Bag Crochet Pattern step 4 - final assembly and finishing

Switch Things Up

I love experimenting with this pattern to make each bag uniquely mine! One of my favorite variations is playing with color combinations - instead of just two colors, I've tried creating ombre effects by gradually transitioning through three or four shades across the hexagons. It creates such a stunning visual gradient that people always ask about.

I've also switched up the yarn choice entirely. While raffia gives that perfect summer vibe, I've made winter versions using chunky wool yarn with a larger hook, and the result is a cozy, textured bag perfect for colder months. The hexagons look completely different with fuzzy yarn!

For a more bohemian look, I sometimes add fringe to the bottom edge or macramΓ© details to the handles. I've even embroidered small designs onto individual hexagons before joining them - little flowers, initials, or geometric patterns that make the bag extra special.

Another fun twist is making mini versions using the same pattern but with fewer hexagons - I've created adorable coin purses and phone pouches that work up quickly and make perfect gifts. You could also go bigger and create a beach tote or shopping bag by adding more hexagons to the layout.

Don't be afraid to get creative with the hardware too - I've used vintage closures from thrift stores, leather straps instead of crocheted handles, or even added adjustable crossbody straps for hands-free carrying!

Common Mistakes & How to Fix Them

βœ— Not steaming hexagons before assembly can result in uneven shapes and difficulty joining pieces together properly throughout the construction process βœ— Pulling raffia yarn too tightly while crocheting creates stiff, puckered fabric that won't drape nicely and may distort the hexagon shapes βœ— Forgetting to alternate colors correctly in rows 3-5 of hexagons disrupts the beautiful geometric pattern and visual balance of design βœ— Skipping the back loop only technique when joining hexagons results in visible, bulky seams that detract from the bag's professional appearance βœ— Not securing thread ends properly between hexagons can cause seams to unravel during use and compromise the bag's structural integrity

Paris Granny Star Hexagon Bag Crochet Pattern

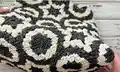
Create this stunning handmade tote bag featuring beautiful granny star hexagons in a two-tone color scheme. This intermediate-level pattern guides you through crocheting 11 hexagons, joining them into a gorgeous canvas, and assembling a fully lined bag with sturdy handles. Perfect for summer outings or as a stylish everyday accessory, this Paris-inspired design combines classic crochet techniques with modern elegance. The finished bag measures 13 inches long, 9 inches high, and 8 inches wide with 24-inch handles, making it the perfect size for daily essentials.

Intermediate 8-10 Hours

Materials Needed for Paris Granny Star Hexagon Bag Crochet Pattern

β€” Main Fabric

  • 01
    Paper twisted raffia yarn, 180-200 gr (440 yards/400 m) of base/dark color
  • 02
    Paper twisted raffia yarn, 180-200 gr (440 yards/400 m) of additional/light color
  • 03
    Fabric for lining, 40x40 inches (1x1 meter)

β€” Tools Required

  • 01
    Crochet hook 3-3.5 mm
  • 02
    Small lock or snap hook (60x20 mm)
  • 03
    Snap hook ring (35 mm)
  • 04
    Plastic needle with large eyelet
  • 05
    Sewing needle and thread matching yarn color
  • 06
    Scissors
  • 07
    Pins for assembly
  • 08
    Iron for steaming
  • 09
    Towel for blocking

Progress Tracker

0% Complete

β€” Granny Star Hexagon (Make 11) :

Setup :

Base color - dark, Additional color - light. Crochet 5 CH, join in a circle with SlSt

Row 1 :

Pull loop 20mm, twist hook clockwise then over loop, pull one more loop, crochet two loops together then two more (mock stitch and first post), 2 DC, CH. Next (3 DC, CH) x 4, 3 DC. Crochet end into row, cut excess

Row 2 :

Take additional color yarn, insert hook under 1st loop, pull loop 20mm, make mock stitch, 2 DC, CH, 3 DC, CH. Next (3 DC, CH, 3 DC, CH) x 4, 3 DC, CH, 3 DC, SlSt. Crochet in base thread, cut excess

Row 3 :

Pull loop 20mm, make mock stitch, 2 DC, change to base color, CH. Next (3 DC, CH, 3 DC, change to additional color, CH, 3 DC, change to base color, CH) x 5, 3 DC, CH, 3 DC, SlSt. Turn work on hook after each color change to prevent twisting

Row 4 :

Pull loop 20mm, make mock stitch, 2 DC, CH, 3 DC, change to additional color, CH. Next (3 DC, CH, 3 DC, change to base color, CH, 3 DC, CH, 3 DC, change to additional color, CH) x 5, 3 DC, CH, 3 DC, SlSt

Row 5 :

Pull loop 20mm, make mock stitch, 2 DC, change to base color, CH, 3 DC, change to additional color, CH, 3 DC, change to base color, CH. Next (3 DC, CH, 3 DC, change to additional color, CH, 3 DC, change to base color, CH, 3 DC, change to additional color, CH, 3 DC, change to base color, CH) x 5, 3 DC, CH, 3 DC, change to additional color, CH. Cut thread, pull end, insert hook under 1st loop, pull end, insert under last loop, pull back to wrong side, tie knot, hide ends

Info :

Steam each hexagon on front and wrong side. Hexagon measures approximately 6 inches (15 cm)

β€” Sew the Canvas :

Join Hexagons :

Take 2 hexagons, turn wrong side up. Use base color, insert hook on back loops only in corner, pull loop, crochet 3 SlSt BLO. Take additional color, crochet 4 SlSt BLO, change to base, 4 SlSt BLO, change to additional, 4 SlSt BLO, change to base, 4 SlSt BLO. Last SlSt in CH in corner (15 SlSt total). Cut thread, strengthen ends

Info :

Join 8 hexagons in 4 pairs. Then join 2 pairs and 1 hexagon into strip of 5 hexagons. Place strip of 5 and 1 pair parallel, join from left side with 15 SlSt BLO plus additional SlSt in corner to strengthen. Continue joining to create full canvas following diagram. Steam canvas on front and wrong sides

β€” Lining :

Preparation :

Fold fabric in half, draw along contour of canvas. Cut with 10-15mm seam allowances. Optional: cut out pocket

Sewing :

Sew lining on side seams, fold top edge. Shape repeats bag shape resembling 3D trapezoid

β€” Assembly :

Side Seams :

Join side seams of bag same way as canvas was joined. Strengthen and hide all ends. Twist towel into roll, steam seams on wrong side. Turn bag inside out, straighten seams with hands
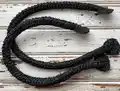
β€” Handle (Make 2) :

Base Chain :

Take base color yarn, crochet 76 CH loosely without tightening loops

Row 1 :

75 SC from 2nd loop from hook, CH. Insert hook through last SC, pull out end, crochet end into next row

Row 2 :

75 SC BLO, CH

Row 3 :

75 SC BLO and FLO of pre-previous row, CH

Rows 4-6 :

75 SC BLO and FLO of pre-previous row, CH

Row 7 :

75 SC BLO and FLO of pre-previous row. Cut thread, pull out end, strengthen and hide

β€” Base Trim and Join Handle :

Trim :

Turn canvas to other side. Count 4 SC from left corner, insert hook in 5th SC, pull loop. Crochet 3 SC, 3 SC in 1 in corner, 3 SC, 3 SC in 1 in corner, 3 SC

Fold and Join :

Turn fabric wrong side up, fold handle in half lengthwise. Insert hook on 5th loops from edge, pull loop. Crochet 66 SlSt to other end loosely through loop of chain and both loops of SC. Crochet to 4th loops from edge, turn handle, crochet 3 SC, 3 SC in 1 in corner, 3 SC, 3 SC in 1 in corner, 3 SC. Cut thread, hide ends

Finishing :

Steam handle along seam and ends, shape with hands. Repeat for 2nd handle. Optional: decorate with rivets or legs

β€” Sew on Handle :

Attachment :

Sew handle with plastic needle to where 3 hexagons meet. Make 2 stitches in each loop. Strengthen ends on wrong side. Turn handbag, sew on 2nd handle

β€” Install Snap Hook and Ring :

Snap Hook :

Count 5 loops at end of hexagon overlapping bag top. Insert hook in 1st loop, pull loop. Crochet 4 SC through eyelet of snap hook. Crochet end into row, cut thread, tie knot, hide end

Snap Ring :

Try positioning where snap hook ring will be, place to 2-3 posts

β€” Crochet the Necklace :

Setup :

Crochet 5 CH, join in circle with SlSt

Row 1 :

Pull loop 20mm, make mock stitch, 14 DC, SlSt. Crochet end into row

Base Trim :

(CH, SlSt) x 15. Stretch with hands to make oval. Crochet 22 CH, cut thread, pull end. Wrap handle with chain, hide end on wrong side. Sew tag

β€” Sew in Lining :

Final Assembly :

Put lining inside, straighten with hands. Pin 15-20mm from edge. Sew lining to bag with hidden stitches, threading needle over edge of lining. Make securing stitches in corners, hide thread end. Straighten lining throughout bag. Optional: steam lining seam with iron through damp cloth

Assembly Instructions

  • Join all 11 crocheted hexagons following the diagram pattern: first create 4 pairs, then join into strips, and finally connect all pieces into the bag canvas
  • Steam the completed canvas thoroughly on both front and wrong sides to set the shape and ensure even tension before proceeding with assembly
  • Join the side seams of the bag using the same slip stitch technique used for hexagon joining, working on back loops only with alternating colors
  • Attach both handles to the bag where three hexagons meet, sewing through each loop twice with a large-eyed plastic needle for maximum security
  • Install the snap hook hardware by crocheting 4 single crochets through the eyelet, positioning it 5 loops from the hexagon edge that overlaps the top
  • Pin the fabric lining inside the bag 15-20mm from the edge, then sew in place using hidden stitches and secure corners with extra reinforcement stitches
  • Steam all seams and the lining through a damp cloth for a professional finish, and add the decorative necklace tag to complete your Paris bag

Important Notes

  • πŸ’‘Unwind twisted raffia into balls before starting and secure with rubber bands to prevent tangling during work
  • πŸ’‘Join new raffia strands by cutting ends diagonally, overlapping with 5mm gap, gluing, and twisting fibers back together for invisible joins
  • πŸ’‘Turn your work away from yourself after each color change to prevent yarns from twisting together when working multi-color hexagon rows
  • πŸ’‘Always crochet slip stitches on back loops only when joining hexagons to create flat, invisible seams that maintain the bag's structure
  • πŸ’‘Steam each hexagon individually before assembly to ensure they measure 6 inches and have even tension for easier joining
  • πŸ’‘Work handle stitches loosely to maintain flexibility and prevent the handle from being too stiff or uncomfortable to carry
  • πŸ’‘Pin lining in place before sewing and try the bag to ensure proper fit and positioning of all components

This beautiful Paris bag pattern brings together classic granny star hexagons and modern raffia yarn for a stunning accessory perfect for any season. With detailed instructions for every step from crocheting individual motifs to installing professional hardware and lining, you'll create a bag you'll be proud to carry everywhere. The two-tone color scheme creates gorgeous geometric patterns that catch the eye, while the sturdy construction ensures your handmade bag will be a cherished piece for years to come. 🧢 Happy crocheting! ✨

You ask,

we answer.

FAQs

Can I use regular yarn instead of paper twisted raffia?

Yes, you can substitute with cotton or acrylic yarn of similar weight, but the finished bag will have a different drape and texture. Raffia provides structure and a summery aesthetic, while regular yarn will be softer and more flexible.

How do I join the raffia strands when one ball runs out?

Separate the fibers, straighten the ribbon ends, cut them diagonally, overlap with a 5mm gap, glue together, wait to dry, then twist the ribbons and fibers back together. There's a video tutorial linked in the pattern for visual guidance.

What if my hexagons aren't the same size?

Steam each hexagon thoroughly on both sides to block them to the correct 6-inch measurement. If they're still uneven, check your tension - you may be crocheting too tightly or loosely compared to the pattern's gauge.

Do I need to make a lining or can I skip it?

The lining is highly recommended as it gives the bag structure, prevents stretching, protects your belongings, and provides a professional finish. However, if you prefer, you can skip it for a more casual, open-weave look.

Can I make the bag larger or smaller?

Yes! To make it larger, add more hexagons to your layout or use a larger hook and thicker yarn. For a smaller bag, use fewer hexagons or a smaller hook. Just remember to adjust your lining fabric and handle lengths accordingly.