🧢 Beautiful ✨ Detailed πŸ’ Adorable

Reversible Christmas Amigurumi Pattern

Reversible Christmas Amigurumi Pattern
4.6β˜… Rating
6-8 Hours Time Needed
2.1K Made This
βœ‚οΈ

Advanced Level

Designed for experienced knitters, these patterns involve intricate designs and complex techniques to challenge and inspire.

⏱️

All-Day Adventure

Requires 8-10 hours, ideal for a full day of immersive knitting.

πŸŽ„

Holiday Cheer

Festive fun for the season, bringing handmade magic to celebrations and creating new family traditions.

About This Reversible Christmas Amigurumi Pattern

This reversible Christmas amigurumi pattern is a truly special holiday project that combines creativity with festive charm. You'll craft Santa Claus complete with his iconic pink suit, fluffy white beard, and sweet facial features on one side. Then, flip it inside out to reveal a beautifully decorated Christmas tree adorned with colorful balls, a shining star on top, and even a little gift at the base. The reversible design is achieved through clever construction techniques that join both characters at their base, creating a magical transformation that delights both makers and gift recipients alike.

Reversible Christmas Amigurumi Pattern crochet pattern - detailed view of completed project

Standing approximately 8 cm (3.15 inches) tall when made with the recommended materials, this charming duo makes a perfect holiday decoration or handmade gift. The pattern includes detailed instructions for surface slip stitches, invisible finishing techniques, and special construction methods that bring both characters to life in one amazing reversible design.

Why You'll Love This Reversible Christmas Amigurumi Pattern

I absolutely love this pattern because it's unlike anything I've made before! The reversible concept is so clever and innovative - imagine the delight on someone's face when they discover their cute Santa transforms into a Christmas tree. I enjoy how this pattern challenges my skills with advanced techniques like surface slip stitches and color changes, while still being achievable with patience and attention to detail. The finished piece is incredibly unique and makes such a thoughtful handmade gift. I also appreciate that you can choose to make them as two separate toys if you prefer, giving you flexibility in how you use the pattern. It's a project that truly captures the magic of Christmas crafting!

Reversible Christmas Amigurumi Pattern step 1 - construction progress Reversible Christmas Amigurumi Pattern step 2 - assembly progress Reversible Christmas Amigurumi Pattern step 3 - details and accessories Reversible Christmas Amigurumi Pattern step 4 - final assembly and finishing

Switch Things Up

I absolutely love experimenting with this reversible pattern to make it uniquely mine! One of my favorite modifications is changing the color scheme - instead of traditional pink for Santa's suit, I've tried making him in classic red or even a fun blue for a winter wonderland theme. The tree colors can also be customized with deeper forest greens or even snowy white tips for a frosted effect.

I've also played around with the decorations on the Christmas tree. Instead of just simple balls, I sometimes add tiny crocheted ornaments like stars, hearts, or even miniature candy canes using surface embroidery techniques. You could also experiment with adding small beads or sequins for extra sparkle, though be mindful if the toy is for young children.

Another variation I enjoy is adjusting the size by using different yarn weights. With bulky yarn and a larger hook, you can create a much bigger version that makes a stunning holiday centerpiece. Conversely, using thread and a tiny steel hook creates an adorable miniature version perfect for ornaments or gift tags.

I've found that personalizing the faces adds so much character too. Try different eye placements or sizes to give each creation a unique expression. Some of mine have sleepy eyes, others look surprised and excited! You can also add rosy cheeks with a bit of pink embroidery or even real blush powder sealed with a fabric sealer.

For gift-giving, I love packaging these with a little card explaining how to flip them, making the discovery of the reversible feature a delightful surprise for the recipient!

Common Mistakes & How to Fix Them

βœ— Not maintaining consistent stitch tension between Santa and the tree sides can make the reversible feature difficult to work properly βœ— Skipping the surface slip stitches on Santa's body results in missing the iconic belt and button details that define his costume βœ— Stuffing too firmly prevents the plushie from being easily reversed and can damage the stitches during transformation βœ— Forgetting to leave long starting tails from the magic rings makes joining the two pieces together at the end nearly impossible

Reversible Christmas Amigurumi Pattern

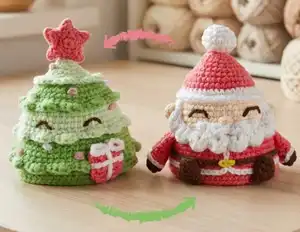
Create holiday magic with this unique reversible amigurumi that transforms between Santa Claus and a Christmas tree! This innovative pattern lets you craft two festive characters in one adorable plushie. Perfect for spreading Christmas cheer, this reversible design features Santa with his cozy pink suit and fluffy white beard on one side, and a beautifully decorated Christmas tree with colorful ornaments on the other. With detailed instructions and creative techniques, you'll love making this special holiday companion that brings double the joy!

Advanced 6-8 Hours

Materials Needed for Reversible Christmas Amigurumi Pattern

β€” Main Fabric

  • 01
    4 ply cotton blend yarn in pink for Santa's suit
  • 02
    4 ply cotton blend yarn in light pink for decorative details
  • 03
    4 ply cotton blend yarn in white for Santa's trim and beard
  • 04
    4 ply cotton blend yarn in dark brown for details and embroidery
  • 05
    4 ply cotton blend yarn in skin color for Santa's face and hands
  • 06
    4 ply cotton blend yarn in apple green for Christmas tree layers
  • 07
    4 ply cotton blend yarn in pale green for Christmas tree layers
  • 08
    4 ply cotton blend yarn in moss green for Christmas tree base
  • 09
    4 ply cotton blend yarn in yellow for tree decorations
  • 10
    4 ply cotton blend yarn in peach for Santa's nose

β€” Tools Required

  • 01
    2.0 mm crochet hook or size suitable for yarn
  • 02
    Tapestry needle for sewing and weaving
  • 03
    Fiberfill for stuffing
  • 04
    Scissors
  • 05
    Stitch marker or piece of yarn to mark rounds

Progress Tracker

0% Complete

β€” HEAD AND BODY (Santa Claus):

Info:

Start with white yarn. Leave a long starting yarn tail, approximately 10 cm (4"). This tail will be used to join both Santa Claus and Christmas tree at the end.

R1:

6sc in MR (6)

R2:

6inc (12)

R3:

[sc, inc]x6 (18)

R4-5:

2 rounds: 18sc (18)

R6:

[sc, dec]x6 (12)

Info:

Stuffed with fiberfill.

R7:

6dec (6)

Info:

Change to pink yarn.

R8:

FLO 6inc (12)

R9:

[3sc, inc]x3 (15)

R10:

[sc, inc, sc]x5 (20)

R11:

[3sc, inc]x5 (25)

R12:

[2sc, inc, 2sc]x5 (30)

R13:

[2sc, inc, 2sc]x6 (36)

R14:

[5sc, inc]x6 (42)

R15:

42sc (42)

Info:

Change to white yarn.

R16:

[3sc, inc, 3sc]x6 (48)

R17:

48sc (48)

Info:

Change to skin color yarn. Do not cut the white yarn. The remaining white tail should stay outside.

R18:

BLO 48sc (48)

R19-20:

2 rounds: 48sc (48)

Info:

Stop for a while to make some sl st around the FLs of R17 (you worked R18 BLO) using white yarn. End with invisible finish.

Info:

Then continue working with skin color yarn again.

R21:

[7sc, inc]x6 (54)

R22-23:

2 rounds: 54sc (54)

Info:

Change to white yarn.

R24:

54sc (54)

Info:

Change to pink yarn. Do not cut the white yarn because it will be used to make some surface slip stitches.

R25-26:

2 rounds: 54sc (54)

R27:

[4sc, inc, 4sc]x6 (60)

R28:

60sc (60)

R29:

BLO 60sc (60)

R30:

60sc (60)

Info:

Fasten off and finish with invisible finish. Then weave in ends.

Info:

Make surface slip stitches on Santa's body using white yarn: Make a loop between R23-24, then make some surface slip stitches around until you reach the middle of Santa's front part.

Info:

Do 5 surface slip stitches vertically between R25-28.

Info:

Continue to go to a st between R28-29 around, right under the FL left of R28, and do some surface slip stitches around until you meet the vertical slip stitch again.

Info:

Make a surface slip stitch to the last st of vertical slip stitch at R28. Cut the white yarn about 50 cm long. Fasten off. Pass the white thread inside through the last st of vertical surface slip stitch. Continue making surface slip stitches around R23-24 again until you meet the first st of surface slip stitch. End with invisible finish.

Info:

Using dark brown yarn: Make a loop between R27-28, at the second st from the white line. Make some surface slip stitches around until you reach the second st before the white line.

Info:

Change to yellow yarn: make 3 surface slip stitches to connect to the dark brown line. Fasten off and hide and secure the tails.

β€” BEARD:

Info:

Start with white yarn, make 36ch. Start from the second ch from the hook, 2sl st, [skip 1st, 5hdc in the same st, skip 1st, sl st]x8, sl st.

Info:

Fasten off, leave a long tail for sewing. With the ugly side facing forward, sew the beard to the face part of the body. Only sew the chains to the face and let the shells remain unsewn.

β€” EARS (make 2):

Info:

Start with skin color yarn, make 5sc in MR. Fasten off and leave a long tail for sewing.

Info:

Sew the ears between R20-22 of the body.

β€” ARMS (make 2):

Info:

Start with dark brown yarn.

R1:

6sc in MR (6)

R2:

[sc, inc]x3 (9)

Info:

Change to pink yarn.

R3-5:

3 rounds: 9sc (9)

Info:

Make a round of surface slip stitch between R2-3 using white yarn.

R6:

dec, 7sc (8)

Info:

Stuff 50% of the arm with fiberfill.

Last round:

flatten and work through both stitches 4sc (4). FO, leave a long tail for sewing.

Info:

Sew the arms to the body between R24-25.

β€” FEET (make 2):

Info:

Start with dark brown yarn.

R1:

6sc in MR (6)

R2:

[2sc, inc]x2 (8)

R3:

8sc (8)

Info:

No need to stuff.

Last round:

flatten and work through both stitches 4sc (4). Fasten off, leave a long tail for sewing.

β€” MOUSTACHE:

Info:

Start with white yarn, make 13ch. Start from the second ch from the hook, sl st, inc, hdc, dc inc, skip 1 st, 2sl st, skip 1st, dc inc, hdc, inc, ss.

Info:

Fasten off, leave a long tail for sewing. With the ugly side facing forward, sew the moustache to the face part of the body.

Info:

Embroider the eyes with dark brown yarn at R20 of the body, 3 st wide and 6 st apart.

Info:

Embroider the nose with peach yarn between R21-22, right on the top of moustache, 2st wide.

β€” TREE:

Info:

Start with pale green yarn. Leave a long starting yarn tail, approximately 10 cm (4").

R1:

6sc in MR (6)

R2:

6inc (12)

R3:

[3sc, inc]x3 (15)

R4:

[sc, inc, sc]x5 (20)

R5:

[3sc, inc]x5 (25)

R6:

[2sc, inc, 2sc]x5 (30)

Info:

Change to apple green yarn.

R7:

BLO [2sc, inc, 2sc]x6 (36)

R8:

[5sc, inc]x6 (42)

R9:

42sc (42)

R10:

[3sc, inc, 3sc]x6 (48)

Info:

Change to pale green yarn.

R11:

BLO 48sc (48)

R12-14:

3 rounds: 48sc (48)

R15:

[7sc, inc]x6 (54)

Info:

Change to apple green yarn.

R16:

BLO 54sc (54)

R17-19:

3 rounds: 54sc (54)

R20:

[4sc, inc, 4sc]x6 (60)

Info:

Change to moss green yarn.

R21:

BLO 60sc (60)

R22-23:

2 rounds: 60sc (60)

Info:

Fasten off, leave a long tail for sewing, about 50 cm long. Do an invisible finish.

Info:

Hold your tree so the bottom side is facing you. At the back side, right at the first st of the round, attach the pale green yarn at the FL of R6 (you worked R7 BLO). Make: [sl st, sc, hdc inc, sc]x7, 2sl st. Sl st to the first st of this round. Fasten off, secure and hide the tails.

Info:

Attach the apple green yarn at the FL of R10 (you worked R11 BLO). Make: [sl st, sc, hdc inc, sc]x11, 4sl st. Sl st to the first st of this round. Fasten off, secure and hide the tails.

Info:

Attach the pale green yarn at the FL of R15 (you worked R16 BLO). Make: [sl st, sc, hdc inc, sc]x13, 2sl st. Sl st to the first st of this round. Fasten off, secure and hide the tails.

Info:

Attach the apple green yarn at the FL of R20 (you worked R21 BLO). Make: [sl st, sc, hdc inc, sc]x14, 4sl st. Sl st to the first st of this round. Fasten off, secure and hide the tails.

β€” STAR (make 2):

Info:

Start with pink yarn.

R1:

5sc in MR (5)

R2:

5inc (10)

R3:

[3ch, start from the second ch from the hook: sl st, sc, skip 1st, sl st to the next st]x5

Info:

Fasten off, leave a long tail for sewing. With the ugly parts facing each other, sew them together with tapestry needle. Sew the star to the top of the tree.

Info:

Embroider the eyes with dark brown yarn at R14, 3 st wide and 5 st apart.

β€” BALLS:

Info:

Make some balls to decorate the christmas tree using light pink and white yarn. Attach the thread to the desired position to make a ball. Work 3ch, then sl st to the st where you started attaching the yarn. Fasten off, secure and hide the tails.

β€” GIFT:

Info:

Start with pink yarn. Work in rows. Make 5ch

R1:

From the second ch from the hook, 4sc (4), 1ch

R2:

turn, 4sc (4), 1ch.

R3:

turn, 4sc (4)

Info:

Fasten off, leave a short tail. Make another one, but do not fasten off. Join them together with some sc around (work inc3 for every corner). Then fasten off, leave a long tail for sewing.

Info:

Attach white yarn to the middle of the bottom edge of the gift. Make some ch until it reaches the top. Sl st to the middle of the upper part. Make 8ch and sl st to the same st. Then make 8ch again and sl st again near the previous st. Tidy up the bows by sewing them using tapestry needle. Pass the thread to the middle of side part, and make a loop. Make some ch until it reaches the other side. Fasten off. Fix the position of the white ch by sewing at the overlapping point of both ch.

Info:

Sew the gift to the bottom five rounds of the tree. Do not use the BL of the last round when sewing the gift because they will be used to join the santa and the tree.

Info:

Sew the legs at the bottom three rounds of the body, 8st apart. Do not use the BL of the last round when sewing the legs because they will be used to join the santa and the tree. Sew the legs only on 60% of their height, and let the top parts remain not sewn.

β€” JOINING THE SANTA AND THE CHRISTMAS TREE:

Info:

Flip the santa and the christmas tree so the ugly sides are facing you. Make a knot with the yarn left from the magic ring. Try to leave a small space between them.

Info:

Flip the christmas tree back so the good side is facing you, but keep the santa stay with the ugly side. No need to stuff with fiberfill. Push the santa inside the christmas tree. Since there is not any shared part between them, it is optional to make the position of both faces matched up.

Info:

Join the last rounds of the santa and the christmas tree. Sew them together with moss green yarn tail through the BL of each piece. To finish, make a knot and hide the tail.

β€” OPTIONAL BASE (for separate toys):

Info:

If you want them as two separated toys (not as a reversible one), you can close the hole by sewing a round flat piece as the base. Use pink yarn for santa side and moss green yarn for christmas tree side.

R1:

6sc in MR (6)

R2:

6inc (12)

R3:

[sc, inc]x6 (18)

R4:

[sc, inc, sc]x6 (24)

R5:

[3sc, inc]x6 (30)

R6:

[2sc, inc, 2sc]x6 (36)

R7:

[5sc, inc]x6 (42)

R8:

[3sc, inc, 3sc]x6 (48)

R9:

[7sc, inc]x6 (54)

R10:

[4sc, inc, 4sc]x6 (60)

Info:

Fasten off. Leave a long tail for sewing. Stuff the body with fiberfill (you can continue stuffing while sewing the base). Prepare a circular piece of cardboard or rigid plastic to fit inside the bottom of the body. Place the cardboard/rigid plastic to the bottom, and sew the base to the BL of the last round of the body.

Assembly Instructions

  • Sew the beard to Santa's face using the chain edge only, leaving the shell edges free to create a fluffy dimensional effect.
  • Attach the ears between rounds 20-22 on both sides of Santa's head, positioning them symmetrically.
  • Sew the arms to Santa's body between rounds 24-25, making sure they're positioned evenly on both sides.
  • Attach the feet to the bottom three rounds of Santa's body, spacing them 8 stitches apart and sewing only 60% of their height.
  • Create the tree's decorative layers by working into the front loops of the specified rounds with different green yarns to form ruffled edges.
  • Sew two star pieces together with wrong sides facing each other, then attach the completed star to the top of the tree.
  • Add decorative balls using light pink and white yarn by making 3-chain loops at various positions on the tree, then slip stitching to secure.

Important Notes

  • πŸ’‘Leave long starting tails (approximately 10 cm) from the magic rings for both Santa and the tree as these will be used to join them together
  • πŸ’‘Do not cut yarn tails when changing colors if they will be used later for surface slip stitches or other decorative elements
  • πŸ’‘Work with tight stitches but not too tight, so the reversible plushie remains stretchable and can be turned inside out easily
  • πŸ’‘When sewing the legs and gift, do not use the back loops of the last round as they will be needed to join Santa and the tree
  • πŸ’‘Use stitch markers or contrasting yarn to mark the end of rounds, as continuous spiral construction can be easy to lose track of
  • πŸ’‘The invisible finish technique is crucial for a professional look, especially on visible parts like the beard and star
  • πŸ’‘If making separate toys instead of a reversible one, prepare a circular cardboard or rigid plastic base to help the figures stand properly

This magical Reversible Christmas Amigurumi pattern brings innovation and festive joy to your crochet projects! Designed by Chibicraft, this advanced pattern challenges you with unique construction techniques while rewarding you with an absolutely delightful dual-character creation. The clever reversible design means you get two adorable Christmas figures in one - perfect for spreading holiday cheer or creating a truly memorable handmade gift. Whether displayed as Santa or flipped to reveal the decorated Christmas tree, this pattern showcases your advanced crochet skills beautifully. πŸŽ„πŸŽ… Happy crocheting and may your holidays be filled with handmade magic! 🧢✨

You ask,

we answer.

FAQs

Can I use different yarn weights for this pattern?

Yes, you can use different yarn weights, but keep in mind that your finished amigurumi size will vary accordingly. If using thicker yarn, use a larger hook size to maintain the proper stitch tension. The pattern recommends 4-ply cotton blend yarn with a 2.0mm hook for an 8cm (3.15 inch) tall finished piece.

How do I make the reversible feature work smoothly?

The key to a successful reversible amigurumi is maintaining consistent stitch tension and not stuffing too firmly. Make sure to follow the joining instructions carefully, leaving a small space between Santa and the tree when knotting them together. The pattern is designed so you can gently push one character inside the other without forcing or damaging the stitches.

What are surface slip stitches and why are they important?

Surface slip stitches are decorative stitches worked on top of already crocheted fabric to add details without bulk. They're essential in this pattern for creating Santa's belt, buttons, and costume details. The pattern includes detailed instructions on how to execute this technique, and it's what gives Santa his iconic look.

Can I make Santa and the tree as two separate toys instead of reversible?

Absolutely! The pattern includes optional instructions for creating flat circular bases (round 1-10) that you can sew to the bottom of each character. This allows you to make them as standalone toys. You can even insert a circular cardboard or plastic piece inside the base to help them stand upright.

How much yarn do I need for each color?

While exact yardage depends on your tension and yarn brand, you'll need approximately 20-30 yards each of pink, white, and the green shades (apple green, pale green, moss green). You'll need smaller amounts of dark brown, skin color, light pink, yellow, and peach - about 5-10 yards each should be sufficient for the details.

Why is this pattern rated as Advanced difficulty?

This pattern is rated advanced because it involves multiple complex techniques including: working in back loops only and front loops only, color changes, surface slip stitches, invisible finishing, precise assembly of multiple components, and the unique reversible construction method. It's best suited for crocheters who are comfortable with amigurumi basics and want to expand their skills.