🧶 Beautiful ✨ Detailed 💝 Adorable

Owl Granny Square Crochet Pattern

Owl Granny Square Crochet Pattern
3.9★ Rating
1.5-2 Hours Time Needed
1.9K Made This
✂️

Beginner Friendly Level

Perfect for those just starting their sewing journey, with clear instructions and simple techniques

⏱️

Bite-Sized Project

Complete in under 2 hours—quick, fun, and perfect for a little creative escape.

🧸

Cute Companion

An adorable friend to cherish, handcrafted with love to bring comfort and joy for years to come.

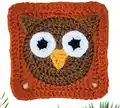
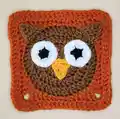
About This Owl Granny Square Crochet Pattern

This charming owl granny square pattern transforms the traditional granny square into an adorable woodland creature that will capture hearts! The pattern features a classic brown granny square base with carefully crafted facial features including big expressive eyes, triangular ears, and a sweet little beak. Each component is worked separately and then assembled onto the square, allowing you to customize colors and expressions to create your own unique owl personality.

Owl Granny Square Crochet Pattern crochet pattern - detailed view of completed project

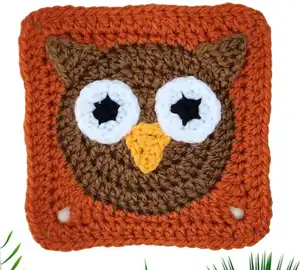
The square works up quickly using lightweight acrylic yarn and a 4mm hook, making it perfect for using up yarn scraps or creating coordinated sets. The finished 11cm x 11cm size is ideal for joining multiples into baby blankets, throw pillows, or tote bags.

Why You'll Love This Owl Granny Square Crochet Pattern

I absolutely love how this pattern transforms something as simple as a granny square into an adorable woodland friend! The satisfaction of watching the owl's personality emerge as you add each facial feature is incredibly rewarding. I appreciate that it's perfect for beginners who want to try something beyond basic squares while still building fundamental skills. The pattern is also wonderfully versatile—you can make just one as a coaster or create dozens for a whimsical baby blanket. I find myself reaching for this pattern whenever I need a quick, cheerful project that never fails to bring smiles.

Owl Granny Square Crochet Pattern step 1 - construction progress Owl Granny Square Crochet Pattern step 2 - assembly progress Owl Granny Square Crochet Pattern step 3 - details and accessories Owl Granny Square Crochet Pattern step 4 - final assembly and finishing

Switch Things Up

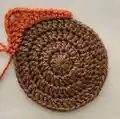
I love experimenting with this owl pattern by changing up colors to create different owl species! Try using gray and white for a snowy owl look, or go bold with bright rainbow colors for a fantasy owl. You could even use variegated yarn for the main square to create a magical ombré effect that makes each owl completely unique.

Another fun variation I enjoy is adding embroidered details like tiny eyebrows, eyelashes, or even little tufts on the ears using embroidery floss. These small touches really bring out your owl's personality! Sometimes I'll add a small bow tie or flower between the ears for extra charm.

For a different texture, try working the main granny square in different stitch patterns—perhaps use puff stitches or popcorn stitches instead of regular double crochets. I've also made mini versions using fingering weight yarn and a 2mm hook for adorable tiny owls that work perfectly as keychains or ornaments.

If you're making a blanket, consider alternating the owl squares with plain granny squares in coordinating colors to let your owls really stand out. I've found that mixing different background colors while keeping the owl features consistent creates a cohesive but interesting design that never looks boring!

Common Mistakes & How to Fix Them

✗ Forgetting to chain 2 at the beginning of double crochet rounds, which can throw off your stitch count and square shape 
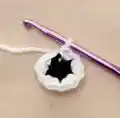
✗ Not tightening the magic ring properly before continuing, resulting in a visible hole in the center of your granny square ✗ Placing corner stitches incorrectly by missing the chain-2 space, causing your square to become misshapen or rounded instead of having defined corners ✗ Sewing facial features too loosely or in wrong positions, making the owl look unbalanced—always pin components first before permanently stitching them down

Owl Granny Square Crochet Pattern

Create an adorable owl granny square that brings woodland charm to any crochet project! This delightful pattern combines classic granny square construction with sweet facial features including expressive eyes, pointy ears, and a tiny beak. Perfect for blankets, bags, or decorative pillows, this versatile square measures 11cm x 11cm and works beautifully as a standalone piece or combined with other squares. The pattern guides you through creating dimensional features that make your owl truly come to life with personality and charm.

Beginner Friendly 1.5-2 Hours

Materials Needed for Owl Granny Square Crochet Pattern

— Main Fabric

  • 01
    Lightweight acrylic yarn in brown color for the main granny square
  • 02
    Lightweight acrylic yarn in black color for the eye centers
  • 03
    Lightweight acrylic yarn in white color for the eye backgrounds
  • 04
    Lightweight acrylic yarn in light orange color for the beak
  • 05
    Lightweight acrylic yarn in dark orange color (optional for beak variation)

— Tools Required

  • 01
    4mm crochet hook
  • 02
    Yarn needle for weaving in ends and assembly
  • 03
    Scissors for cutting yarn
  • 04
    Stitch markers (optional but helpful for tracking rounds)

Progress Tracker

0% Complete

— Square :

Round 1 :

Using brown yarn, MR, ch2, 12dc inside MR (12). Tighten the MR by pulling on the tail and then sl st in the 1st dc (skip the ch2).

Round 2 :

ch2, *dc inc* all around (24)

Round 3 :

ch2, *dc, dc inc* all around (36)

Round 4 :

ch2, *2dc, dc inc* all around (48)

Info :

Color Change: at the end of Round 4, change color using Method 1 (change color at the last dc of Round 4) or Method 2 (finish off with an invisible stitch and then attach the new color by inserting your hook into any stitch).

Round 5 :

ch1, *3sc, 2hdc, 2dc, [2tc + ch2 + 2tc] in the same stitch, 2dc, 2hdc* all around (68). Sl st in the first sc that you did at the beginning of Round 5.

Round 6 :

ch2, *dc* all around and [2dc + ch2 + 2dc] in the ch2 space (84). At the end of the round, finish off and weave in any excess yarn.

— Ears (Make 2) :

Row 1 :

Using brown yarn, sl knot, ch5, sc in the 2nd ch away from the hook, hdc, dc, tc (4). Cut the yarn and finish off. Leave a long tail for stitching.

— Beak :

Row 1 :

Using light orange yarn, sl knot, ch5, sc in the 2nd ch away from the hook, hdc, dc, tc (4). Cut the yarn and finish off. Leave a long tail for stitching.

— Eyes (Make 2) :

Round 1 :

Using black yarn, MR, ch1, 5sc in MR (5). Change to white at the last sc and tighten the MR.

Info :

The eyes are worked in continuous rounds; continue to the next round without slip stitching or connecting the rounds.

Round 2 :

*inc* all around (10)

Round 3 :

*sc, inc* all around (15). Cut the yarn and finish off. Leave a long tail for stitching.

Assembly Instructions

  • Position the two eyes on the upper portion of the granny square, spacing them evenly to create the owl's face.
  • Place the ears in the corner stitches of the granny square (the corners with [2tc + ch2 + 2tc] from Round 5).
  • Position the beak between the eyes with the tip (the sc end) facing downwards.
  • Pin all facial features in place before stitching to ensure proper placement and symmetry.
  • Use the long yarn tails left on each component to stitch them securely to the square using a whip stitch or invisible stitch.
  • Weave in all remaining yarn ends on the back of the square for a clean finish.

Important Notes

  • 💡The invisible stitch method for color changes provides a cleaner finish, but both methods work well
  • 💡Make sure to tighten your magic rings completely before continuing to prevent holes in the center
  • 💡Leave long tails on all facial features for easier assembly and more secure attachment
  • 💡The chain-2 at the beginning of rounds does not count as a stitch unless specifically stated
  • 💡Pin all components before permanently sewing them to ensure your owl has a balanced, symmetrical face
  • 💡You can customize the owl by using different colors for the main square or adding embroidered details like eyebrows

This delightful Owl Granny Square pattern brings woodland whimsy to your crochet collection! It's the perfect project for adding personality to blankets, bags, or home decor while practicing your granny square skills. The separate facial features make assembly fun and allow for endless customization possibilities. Whether you're making one charming owl or a whole parliament, this pattern delivers quick satisfaction and adorable results every time. 🦉🧶✨

You ask,

we answer.

FAQs

Can I use different yarn weights for this pattern?

Yes! The pattern mentions you can use any yarn weight—just adjust your hook size accordingly. Using a smaller hook and lighter yarn will create a smaller square, while bulkier yarn will make a larger square.

What's the difference between Method 1 and Method 2 for color changes?

Method 1 changes color during the last stitch of Round 4, creating a seamless transition. Method 2 finishes the round completely with an invisible stitch, cuts the yarn, and then attaches the new color. The invisible stitch method provides the cleanest finish.

How do I know where exactly to place the ears?

The ears should be positioned in the corner stitches of the granny square—specifically in the spots where you worked [2tc + ch2 + 2tc] in Round 5. These create the defined corners of your square.

Can I make the eyes bigger or smaller?

Absolutely! You can add or remove rounds from the eye pattern. For smaller eyes, stop after Round 2. For larger eyes, continue the increase pattern (adding one more sc between increases each round) for additional rounds.

What can I make with multiple owl squares?

These owl squares are perfect for baby blankets, throw pillows, tote bags, wall hangings, or even as individual coasters. You can join multiple squares together or use them as appliqués on other projects.