🧢 Beautiful ✨ Detailed πŸ’ Adorable

Oversized Habitat Cardigan Crochet Pattern

Oversized Habitat Cardigan Crochet Pattern
4.9β˜… Rating
15-20 Hours Time Needed
3.5K Made This
βœ‚οΈ

Beginner Friendly Level

Perfect for those just starting their sewing journey, with clear instructions and simple techniques

⏱️

Slow & Steady

A 10-12 hour projectβ€”great for savoring the process over several sessions.

πŸ§₯

Layered Comfort

Perfect for cozy, stylish layering through changing seasons with versatile, mix-and-match potential.

About This Oversized Habitat Cardigan Crochet Pattern

The Habitat Cardigan is a beautifully designed oversized sweater that's constructed from a simple rectangle, making it accessible for beginners while still creating a sophisticated finished garment. The pattern uses a basic stitch repeat throughout, creating a lovely textured fabric that drapes elegantly. With ribbed collar and cuffs, plus a tush-extending back panel, this cardigan offers both style and coverage.

Oversized Habitat Cardigan Crochet Pattern crochet pattern - detailed view of completed project

This versatile pattern includes five sizes and can be easily customized to fit your body type by adjusting the rectangle measurements. The video tutorial and detailed photos guide you through every step of construction.

Why You'll Love This Oversized Habitat Cardigan Crochet Pattern

I absolutely love how this pattern transforms a simple rectangle into such a flattering, wearable piece! The construction method is geniusβ€”you're essentially working flat the entire time, which means no complicated shaping or increases to worry about. I'm always amazed at how the ribbed collar adds such a professional finish, and the fact that you can customize the fit by adjusting measurements means it truly works for every body type. The soft, drapey fabric created by the stitch pattern makes this cardigan incredibly comfortable to wear, and the oversized silhouette is both on-trend and forgiving. It's one of those projects where you'll be proud to tell everyone you made it yourself!

Oversized Habitat Cardigan Crochet Pattern step 1 - construction progress Oversized Habitat Cardigan Crochet Pattern step 2 - assembly progress Oversized Habitat Cardigan Crochet Pattern step 3 - details and accessories Oversized Habitat Cardigan Crochet Pattern step 4 - final assembly and finishing

Switch Things Up

I love how versatile this cardigan pattern is for customization! While the original uses Lion Brand Heartland in that beautiful Grand Canyon shade, you could easily switch to any soft weight 4 yarn in colors that match your wardrobe. Think cozy neutrals like cream, gray, or camel for everyday wear, or go bold with jewel tones like emerald or burgundy.

If you want to add visual interest, I'd suggest working the tush extension in a contrasting color or creating subtle stripes throughout the rectangle body. You could also experiment with the collar widthβ€”adding a few extra rows creates a more dramatic shawl collar that can be worn popped up or draped loosely.

For a lighter-weight version perfect for spring and summer layering, try using a cotton or bamboo blend yarn instead of the acrylic-wool blend. This creates a more breathable fabric while maintaining that beautiful drape. Just remember to check your gauge since different fiber contents behave differently!

I've also seen crafters add pockets to the front panels or work a decorative edging along the bottom hem and cuffs for extra flair. The beauty of this simple construction is that it's a blank canvas for your creativity!

Common Mistakes & How to Fix Them

βœ— Not checking gauge before starting can result in a cardigan that's too large or too small for your intended size βœ— Forgetting to place stitch markers for armhole openings before seaming can lead to having to redo seams or poorly fitted sleeves βœ— Working the wrong side as the right side when adding the collar creates a rough transition instead of smooth finish βœ— Seaming sleeves inside out instead of with wrong side facing creates visible seams that detract from the ribbed texture

Oversized Habitat Cardigan Crochet Pattern

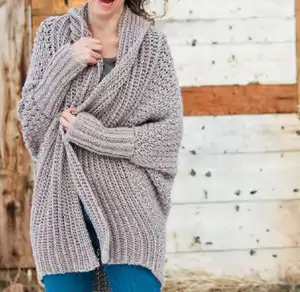
Create your own cozy, figure-flattering cardigan with this beginner-friendly pattern! This oversized sweater features beautiful drapey fabric and a unique construction from a simple rectangle. Made with soft yarn for comfortable everyday wear, this tush-covering cardigan will quickly become your go-to layer. The straightforward stitch pattern and easy assembly make it perfect for your first wearable crochet project.

Beginner Friendly 15-20 Hours

Materials Needed for Oversized Habitat Cardigan Crochet Pattern

β€” Main Fabric

  • 01
    Lion Brand Heartland yarn in Grand Canyon color (Weight 4/medium, 251 yards per skein)
  • 02
    6 to 8 skeins depending on size (approximately 852-1136 grams total)

β€” Tools Required

  • 01
    Size K (6.60 mm) crochet hook
  • 02
    Size J (6.00 mm) crochet hook
  • 03
    Tapestry needle
  • 04
    Stitch markers or safety pins
  • 05
    Scissors

Progress Tracker

0% Complete

β€” Rectangle Body of Sweater:

Foundation Row:

Chain 99 (105, 109, 113, 117)

Row 1:

Skip first 2 chain (counts as 1 sc), dc in next chain, *skip next chain, sc and dc in next chain; repeat from * until 2 chain remain, skip next chain, sc in last chain; turn. (97, 103, 107, 111, 115)

Row 2:

Chain 1 (counts as 1 sc), dc in first stitch, *skip next dc, sc and dc in next sc; repeat from * until 2 stitches remain, skip next dc, sc in turning chain; turn.

Rows 3-58 (64, 66, 66, 66):

Repeat Row 2 for 56 (62, 64, 64, 64) times total. This should end with a wrong side row.

Info:

Rectangle should measure approximately S/M: 38.5 x 22 inches, M/L: 41 x 25 inches, L/XL: 43 x 26 inches, XL/2XL: 44.5 x 26 inches, 2XL/3XL: 46 x 26 inches

β€” Seaming Rectangle:

Info:

Lay rectangle flat with wrong side facing up. Fold rectangle in half so foundation row and final row are touching. Right side should now be facing out with stripes running horizontally. Pin along side seams.

Step 1:

Place stitch marker 4.75 (5.5, 5.5, 6.25, 6.25) inches in from folded crease on each side for armhole opening.

Step 2:

Using tapestry needle and yarn, seam from corners to folded crease, stopping at stitch markers. Keep rows lined up on both sides.

Step 3:

Lay flat with last row at bottom and foundation chain at top. Place stitch marker in single crochet at intersection of bottom and collar edge on both sides.

β€” Tush Extension:

Info:

Work into bottom of sweater between stitch markers using larger hook with right side facing you.

Row 1:

Attach yarn into marked sc stitch, chain 1 (counts as 1 sc), dc in same sc, *skip next dc, sc and dc in next sc; repeat from * until 2 stitches remain before marker, skip next dc, sc in marked sc; turn.

Row 2:

Chain 1 (counts as 1 sc), dc in first stitch, *skip next dc, sc and dc in next sc; repeat from * until 2 stitches remain, skip next dc, sc in turning chain; turn.

Rows 3-13:

Repeat Row 2 eleven more times to create total of 13 rows. End with right side row. Do not fasten off.

β€” Adding Ribbed Collar:

Info:

Collar is worked along edge of shrug and tush extension back and forth in rows starting at bottom front corner, around back of neck, and returning to opposite bottom front corner.

Row 1:

Using larger hook with right side facing, chain 2, work hdc stitches evenly from bottom collar corner to opposite corner. Work hdc in each row of tush extension, then hdc in each stitch along collar edge, and again hdc in each row of opposite tush extension side; turn.

Row 2:

Chain 2, hdcflo in each hdc to end of row; turn.

Rows 3-24 (26, 26, 28, 28):

Repeat Row 2 for 22 (24, 24, 26, 26) more times to create total of 12 (13, 13, 14, 14) visible ribbing bumps. Fasten off.

β€” Sleeves:

Info:

Make 2 pieces using smaller hook. Sleeves are worked flat then seamed into tubes.

Foundation Row:

Chain 28 (32, 32, 32, 32)

Row 1:

Skip 2 chain, hdc in each chain; turn. (26, 30, 30, 30, 30)

Row 2:

Chain 2, hdcflo in each hdc; turn.

Rows 3-18 (20, 20, 22, 22):

Repeat Row 2 for 16 (18, 18, 20, 20) more times to create total of 9 (10, 10, 11, 11) visible ribbing bumps. Fasten off leaving 24 inch tail for seaming.

β€” Seaming Sleeves:

Info:

Lay sleeve rectangle with wrong side facing you and foundation chain oriented to top of rectangle.

Step 1:

Fold sleeve so foundation chain and final row are touching. Using tail and tapestry needle, seam by sewing through two vertical posts of each stitch in Row 1 and two back loops of each hdc in last row.

Info:

This seaming method hides seam within sleeve ribbing. Do not fasten off yarn. Do not turn sleeves inside out.

β€” Attaching Sleeves:

Info:

Turn main sweater inside out. Collar edge meeting sweater should look smooth on right side and rougher on wrong side.

Step 1:

Lay sweater and sleeve together and pin with stitch markers if desired. Using tail from seaming sleeve, use mattress stitch to join sleeve to sweater. Fasten off.

Step 2:

Repeat with second sleeve. Turn sweater right side out and enjoy!

Assembly Instructions

  • Fold the completed rectangle in half with wrong sides together and seam the sides, leaving armhole openings 4.75 to 6.25 inches from the fold depending on your size
  • Mark the single crochet stitches at the intersection of the bottom edge and collar on both sides before beginning the tush extension
  • Work the tush extension rows into the bottom edge between the marked stitches, creating additional length at the back of the cardigan
  • Add the ribbed collar by working evenly spaced half double crochet stitches around the entire front opening from bottom to bottom
  • Seam each sleeve into a tube using the special technique of sewing through vertical posts and back loops to hide the seam within ribbing
  • Attach sleeves to the cardigan body with the sweater turned inside out, using mattress stitch for an invisible seam
  • Turn the completed cardigan right side out and weave in all remaining yarn ends securely

Important Notes

  • πŸ’‘Check your gauge carefully before starting as this directly affects the final size and fit of your cardigan
  • πŸ’‘Use stitch markers liberally to mark armhole positions and collar attachment points to ensure accurate construction
  • πŸ’‘When seaming the rectangle, take care to line up the rows on both sides for a professional finish
  • πŸ’‘The collar should be worked with even spacing rather than focusing on exact stitch count for the smoothest appearance
  • πŸ’‘Pay attention to right side versus wrong side throughout construction, especially when adding the collar and attaching sleeves
  • πŸ’‘The pattern can be customized by adjusting rectangle measurements to accommodate different body proportions and heights
  • πŸ’‘Weave in ends as you go to make finishing easier and prevent them from working loose over time

The Habitat Cardigan pattern is designed to give you confidence in creating your first wearable crochet garment! This clever construction method proves that stunning, professional-looking cardigans don't require complicated techniques. The oversized, cozy silhouette flatters every body type, while the soft yarn and simple stitch pattern create a piece you'll reach for again and again. With detailed instructions, helpful photos, and a video tutorial, you'll have all the support you need to succeed. 🧢 Happy crocheting! 🧡✨

You ask,

we answer.

FAQs

What if my rectangle measurements don't match exactly?

Small variations of 1-2 inches are normal due to the stretchy nature of the stitch pattern and how the fabric is laid out to measure. These slight differences won't compromise the fit of your finished cardigan.

Can I use a different yarn weight for this pattern?

While the pattern is designed for weight 4 medium yarn, you can use different yarn weights by adjusting your hook size and checking your gauge. Be aware that this will change the final dimensions and yarn requirements.

How do I customize the cardigan for my height or body shape?

You can mix and match size instructions by following one size for width and another for height. For example, if you're tall and narrow, use S/M width instructions with M/L height instructions.

Why do the sleeves need to be seamed with wrong side facing out?

This special seaming technique through the vertical posts and back loops helps hide the seam within the ribbing texture, creating a more professional finish when the sleeve is turned right side out.

How much yarn do I need if I want to make a longer tush extension?

The pattern includes 6-8 skeins depending on size. If you want to add extra rows to the tush extension, plan for an additional skein to ensure you don't run out of yarn near the end.