🧶 Beautiful ✨ Detailed 💝 Adorable

Nordic Fox Wall Hanging Crochet Pattern

Nordic Fox Wall Hanging Crochet Pattern
4.6★ Rating
8-10 Hours Time Needed
2.5K Made This
✂️

Intermediate Level

Ideal for those with basic knitting experience, featuring slightly more advanced stitches and techniques to expand your skills.

⏱️

All-Day Adventure

Requires 8-10 hours, ideal for a full day of immersive knitting.

🏡

Cozy Accent

A warm touch for your space that transforms ordinary corners into inviting nooks filled with handmade charm.

About This Nordic Fox Wall Hanging Crochet Pattern

This beautiful Nordic Fox Wall Hanging pattern combines the elegance of Scandinavian design with the warmth of handmade crochet. The pattern features a charming fox character set against a textured geometric background created using spike stitch techniques. With its wooden rod hanging system, decorative feathers, and carefully crafted color palette of aqua, orange, cream, and earthy tones, this wall hanging brings a touch of woodland magic to any space.

Nordic Fox Wall Hanging Crochet Pattern crochet pattern - detailed view of completed project

The project includes detailed instructions for creating the textured base using extended single crochet stitches, assembling all fox components including ears, snout, tail, and paws, and finishing with handmade feathers and wooden bead accents for an authentic bohemian touch.

Why You'll Love This Nordic Fox Wall Hanging Crochet Pattern

I absolutely love this pattern because it's the perfect blend of functional home décor and creative expression. The spike stitch technique creates such beautiful texture and dimension that really makes the geometric background pop, and watching the fox character come to life as you assemble each piece is incredibly rewarding. I'm particularly drawn to the earthy Nordic color palette and how the wooden elements and handmade feathers add that authentic artisan touch. It's a project that looks complex and impressive but breaks down into manageable sections, making it satisfying to work through. Plus, the finished piece is something you'll be genuinely proud to display or gift to someone special who appreciates handcrafted art.

Nordic Fox Wall Hanging Crochet Pattern step 1 - construction progress Nordic Fox Wall Hanging Crochet Pattern step 2 - assembly progress Nordic Fox Wall Hanging Crochet Pattern step 3 - details and accessories Nordic Fox Wall Hanging Crochet Pattern step 4 - final assembly and finishing

Switch Things Up

I love how versatile this Nordic Fox Wall Hanging pattern can be with just a few creative tweaks! For a different seasonal look, I'd swap the aqua background for a deep forest green or winter white to give it a completely new vibe - perfect for holiday décor or year-round woodland charm.

If you want to make it more personalized, consider changing the fox to a different woodland creature like a bear, owl, or bunny by adjusting the color work chart while keeping the same geometric background pattern. You could even create a whole series of different animals using the same base technique!

For a modern twist, I'd experiment with a monochromatic color scheme using varying shades of gray, cream, and white for a minimalist Scandinavian aesthetic. Or go bold with jewel tones like emerald, sapphire, and gold for a luxurious boho look.

The feathers at the bottom offer another opportunity for customization - try using all neutral tones for understated elegance, or mix in metallic yarns for some sparkle. You could also adjust the length and fullness of the feathers to match your style preference, making them more dramatic or keeping them subtle and refined.

Common Mistakes & How to Fix Them

✗ Forgetting to change yarn colors at the correct rows when creating the fox design, which can distort the character's features and proportions ✗ Pulling the extended single crochet stitches too tight, causing the base to pucker and lose its flat, even texture ✗ Not using separate yarn balls for each color section, leading to tangled threads and difficulty managing color changes across rows ✗ Skipping the crab stitch edging or rushing through it, resulting in wavy, uneven edges that don't lay flat against the wall

Nordic Fox Wall Hanging Crochet Pattern

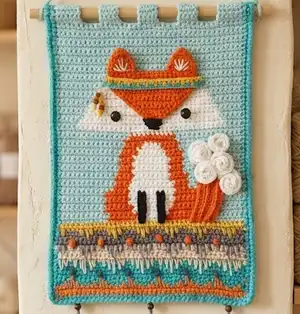
Create a stunning Nordic-inspired wall hanging featuring an adorable fox design with decorative feathers and wooden accents. This tapestry-style project combines traditional spike stitch techniques with colorful geometric patterns to bring a cozy, Scandinavian touch to any room. Perfect for intermediate crocheters looking to expand their skills with textured stitches and color work, this wall hanging measures approximately 24cm wide by 34cm tall and makes a beautiful handmade gift or home décor piece that captures the charm of woodland creatures and modern bohemian style.

Intermediate 8-10 Hours

Materials Needed for Nordic Fox Wall Hanging Crochet Pattern

— Main Fabric

  • 01
    Cotton yarn in worsted weight: bluish green, cream, gray, mustard, and light orange (tangerine) for the guard/base
  • 02
    Cotton yarn in worsted weight: aqua, white, and orange for the fox
  • 03
    Cotton yarn for details: black, orange, white, and navy blue

— Tools Required

  • 01
    Crochet hook 3mm
  • 02
    Crochet hook 3.5mm
  • 03
    Yarn needle
  • 04
    Scissors
  • 05
    2 safety eyes 12mm
  • 06
    Wooden rod 28cm (11 inches) long
  • 07
    Wooden beads
  • 08
    Stitch markers

Progress Tracker

0% Complete

— Base Guard (Geometric Background) :

Row 00 :

41 ch

Row 01-06 :

40 sc in bluish green, 1 ch turn

Row 07 :

In cream: *1 sc, 1 sc extending the strand to the previous row, 1 sc extending the strand to 2 previous rows, 1 sc extending the strand to 3 previous rows, 1 sc extending the strand to 2 previous rows, 1 sc extending the strand to the previous row* repeat until the end of the row, 1 ch turn

Row 08-10 :

40 sc in cream, 1 ch turn

Row 11 :

In gray: *1 sc, 1 sc extending the strand to the previous row, 1 sc extending the strand to 2 previous rows, 1 sc extending the strand to 3 previous rows, 1 sc extending the strand to 2 previous rows, 1 sc extending the strand to the previous row* repeat until the end of the row, 1 ch turn

Row 12-14 :

40 sc in gray, 1 ch turn

Row 15 :

In mustard: *2 sc, 1 sc extending the strand to the previous row, 1 sc extending the strand to 2 previous rows, 1 sc extending the strand to the previous row, 1 sc* repeat until the end of the row, 1 ch turn

Row 16 :

40 sc in mustard, 1 ch turn

Info :

Turn over and on the other side of the starting chain: *1 sc, 1 sc extending the strand to the previous row, 1 sc extending the strand to 2 previous rows, 1 sc extending the strand to 3 previous rows, 1 sc extending the strand to 2 previous rows, 1 sc extending the strand to the previous row* repeat until the end of the row in tangerine, 1 ch turn

Info :

Make a complete row of sc in tangerine

— Fox Design (Color Work Section) :

Row 17-18 :

11 sc aqua, 6 sc white, 6 sc orange, 6 sc white, 11 sc aqua, 1 ch turn

Row 19-20 :

10 sc aqua, 6 sc white, 8 sc orange, 6 sc white, 10 sc aqua, 1 ch turn

Row 21-24 :

10 sc aqua, 5 sc white, 10 sc orange, 5 sc white, 10 sc aqua, 1 ch turn

Row 25-26 :

12 sc aqua, 3 sc white, 10 sc orange, 3 sc white, 12 sc aqua, 1 ch turn

Row 27-28 :

12 sc aqua, 4 sc white, 8 sc orange, 4 sc white, 12 sc aqua, 1 ch turn

Row 29-33 :

13 sc aqua, 3 sc white, 8 sc orange, 3 sc white, 13 sc aqua, 1 ch turn

Row 34-35 :

13 sc aqua, 4 sc white, 6 sc orange, 4 sc white, 13 sc aqua, 1 ch turn

Row 36 :

14 sc aqua, 3 sc white, 6 sc orange, 3 sc white, 14 sc aqua, 1 ch turn

Row 37 :

14 sc aqua, 4 sc white, 4 sc orange, 4 sc white, 14 sc aqua, 1 ch turn

Row 38 :

14 sc aqua, 12 sc white, 14 sc aqua, 1 ch turn

Row 39 :

15 sc aqua, 10 sc white, 15 sc aqua, 1 ch turn

Row 40 :

15 sc aqua, 10 sc orange, 15 sc aqua, 1 ch turn

Row 41-42 :

4 sc aqua, 32 sc orange, 4 sc aqua, 1 ch turn

Row 43-44 :

5 sc aqua, 30 sc orange, 5 sc aqua, 1 ch turn

Row 45-46 :

6 sc aqua, 28 sc orange, 6 sc aqua, 1 ch turn

Row 47-48 :

7 sc aqua, 26 sc orange, 7 sc aqua, 1 ch turn

Row 49-50 :

8 sc aqua, 24 sc orange, 8 sc aqua, 1 ch turn

Row 51 :

9 sc aqua, 22 sc orange, 9 sc aqua, 1 ch turn

Row 52-53 :

10 sc aqua, 20 sc orange, 10 sc aqua, 1 ch turn

Row 54 :

12 sc aqua, 16 sc orange, 12 sc aqua, 1 ch turn

Row 55-65 :

40 sc aqua, 1 ch turn

— Grips to the Rod :

Info :

In aqua, in row 66: 6 sc back and forth, make 9 rows, leave a long thread to sew, cut the thread

Info :

Jump 4 stitches, 4 sc back and forth, make 9 rows, leave a long thread to sew, cut the thread (repeat 3 times)

Info :

Jump 4 stitches, 6 sc back and forth, make 9 rows, leave a long thread to sew

— Snout :

Row 1 :

Orange: 20 ch

Row 2 :

19 sc

Row 3 :

1 dec, 15 sc, 1 dec (17)

Row 4 :

1 dec, 13 sc, 1 dec (15)

Row 5 :

1 dec, 11 sc, 1 dec (13)

Row 6 :

1 dec, 9 sc, 1 dec (11)

Row 7 :

1 dec, 7 sc, 1 dec (9)

Row 8 :

1 dec, 5 sc, 1 dec (7)

Row 9 :

1 dec, 3 sc, 1 dec (5)

Row 10 :

1 dec, 1 sc, 1 dec (3)

Row 11 :

1 dec (1)

Info :

Finish with a complete round of sc all around

— Paws (Make 2) :

Row 1 :

Black: 8 ch

Row 2 :

From the 2nd ch: 7 sc

— Headband :

Row 1 :

Bluish green: 23 ch

Row 2 :

From the 2nd ch: 22 sc

Row 3 :

Mustard: *1 sc, 1 sc extending the strand to the previous row* repeat

— Ears (Make 2) :

Round 1 :

Orange: 6 sc in a magic ring

Round 2 :

*1 sc, 1 inc* repeat (9)

Round 3 :

9 sc (9)

Round 4 :

*2 sc, 1 inc* repeat (12)

Round 5 :

*3 sc, 1 inc* repeat (15)

Round 6 :

Flatten the two sides and join with 8 sc (8)

Info :

Embroider with white the lines in the ears

— Strip :

Info :

Aqua: 70 chains

— Tail :

Curl 1 - Row 1 :

Orange: 15 ch, White: 16 ch

Curl 1 - Row 2 :

White: from the 2nd ch 15 inc, Orange: 15 sc

Curl 2 - Row 1 :

Orange: 12 ch, White: 16 ch

Curl 2 - Row 2 :

White: from the 2nd ch 15 inc, Orange: 12 sc

Curl 3 - Row 1 :

Orange: 9 ch, White: 16 ch

Curl 3 - Row 2 :

White: from the 2nd ch 15 inc, Orange: 9 sc

Curl 4 (Make 2) - Row 1 :

White: 16 ch

Curl 4 (Make 2) - Row 2 :

White: from the 2nd ch 15 inc

— Edges :

Info :

Bluish green: Finish the bottom and laterals with a complete row of single crochet, followed by a complete row of crab stitch

— Feathers :

Step 1 :

Use double yarn as base

Step 2 :

Roll several turns of yarn around your fingers

Step 3 :

Cut one side to get yarns of the same length

Step 4 :

Use double yarns to make a thick feather

Step 5 :

Interlace the horizontal yarns, one above and one below the vertical thread, then adjust

Step 6 :

Alternate the yarn that is above to generate inverted knots

Step 7 :

Make 5 knots in gray

Step 8 :

Make 2 knots in tangerine and 4 in cream

Step 9 :

Comb the yarns and cut the edges

Step 10 :

Twist the excess end that will be tied to the tapestry and thread a wooden bead (final size approximately 9cm high x 6cm wide)

Info :

You can apply hair spray to keep the feather form

Assembly Instructions

  • Sew the snout from row 55 downward on the fox face, centering it on the orange section
  • Place safety eyes between rows 44 and 45, with 16 stitches between both eyes for proper spacing
  • Sew the ears above the snout on both sides of the head, positioning them symmetrically
  • Attach the headband across the top of the fox's head and thread wooden beads onto the sides
  • Embroider the nose with black yarn at the bottom point of the snout
  • Sew the paws on both sides of the white belly section of the fox
  • Attach the tail on the right side of the fox, sewing curl 1, 2, and 3 in order up to the edge, then complete with white curls by rolling and gluing or sewing them
  • Sew the upper grip ends by wrapping them around the wooden rod to create the hanging mechanism
  • Tie the handmade feathers to the bottom of the wall hanging, spacing them evenly
  • Thread the aqua strip through the rod ends to create the hanging loop
  • Embroider decorative dots in tangerine over the gray rows and navy blue over the bluish green rows on the geometric background

Important Notes

  • 💡Use separate yarn balls for each color section when working the fox design to avoid tangled threads behind your work
  • 💡Watch the video tutorial for extended single crochet (spike stitch) technique before starting the geometric background rows
  • 💡Stretch the piece downward after completing the crab stitch edging if the edges appear wavy to ensure they lay flat
  • 💡Keep consistent tension throughout, as gauge affects the final size (2 stitches and 2 rows per 1cm²)
  • 💡When making color changes, always leave the threads on the same side of the piece to use them on the next row
  • 💡Use stitch markers to track your position when working the detailed color work sections of the fox
  • 💡Pin all components in place before sewing to ensure proper positioning and symmetry

This enchanting Nordic Fox Wall Hanging pattern brings together the best of Scandinavian design and bohemian charm in one beautiful handmade piece. With its textured spike stitch background, adorable fox character, and handcrafted feather details, this pattern offers a satisfying mix of techniques that will enhance your crochet skills while creating stunning home décor. The earthy color palette and wooden accents make it perfect for modern nurseries, cozy living spaces, or as a thoughtful handmade gift. 🦊✨ Happy crocheting! 🧶

You ask,

we answer.

FAQs

What is spike stitch or extended single crochet, and is it difficult to learn?

Spike stitch (extended single crochet) involves inserting your hook into rows below the current row to create a textured, elongated stitch. It's not difficult once you understand the concept - the pattern includes a video tutorial link to help you master this technique before starting the project.

Do I need to use the tapestry crochet technique for the color changes?

No, the pattern specifically states that tapestry technique is not required. Instead, use a separate yarn ball for each color section that starts in a row, which keeps threads from tangling and makes color changes easier to manage.

Can I use different colors than those suggested in the pattern?

Absolutely! While the pattern suggests a Nordic-inspired palette of aqua, orange, cream, gray, mustard, and bluish green, you can customize the colors to match your home décor or personal preference. Just maintain good contrast between the fox and background.

How do I make the feathers, and are they necessary for the project?

The feathers are made using a macramé-style knotting technique with yarn. The pattern includes detailed step-by-step instructions with 10 steps. While they add authentic bohemian charm, you could skip them or use pre-made feathers if you prefer.

What size wooden rod do I need, and where can I find one?

You'll need a wooden rod that's 28cm (11 inches) long. These can be found at craft stores, online retailers, or you can use a wooden dowel cut to size from a hardware store. The diameter should be proportional to the weight of your wall hanging, typically 1/4 to 1/2 inch thick.

My edges are wavy after finishing - how do I fix this?

The pattern addresses this common issue. After completing the crab stitch edging, simply stretch the piece downward until the edges straighten. This is often due to tension variations and is easily corrected with gentle stretching and blocking.