About This Ninja Turtle Amigurumi Pattern
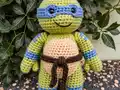
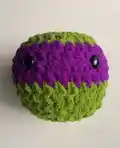
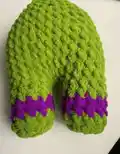
This Ninja Turtle pattern combines classic amigurumi techniques with character-specific details that bring these beloved heroes to life. The pattern uses chenille yarn for an extra soft and cuddly finish, perfect for both display and play. You'll work in continuous rounds to create the head with color-changing mask details, a sturdy body with attached legs, poseable arms with two construction options, and the iconic turtle shell with dimensional texture. The belly piece and waist strap complete the authentic look of these crime-fighting turtles.

What makes this pattern special is the flexibility to create all four turtles by simply changing the mask color. The detailed assembly instructions include tips for positioning arms in two different styles, giving you creative control over your turtle's pose.
Why You'll Love This Ninja Turtle Amigurumi Pattern
I absolutely love this pattern because it captures the essence of childhood nostalgia while being incredibly fun to make. There's something so satisfying about watching each turtle come to life as you add their signature colored mask - suddenly it's not just an amigurumi, it's Leonardo leading the team or Michelangelo ready to party. The chenille yarn makes these turtles irresistibly soft and huggable, which means they're perfect for gifting to kids or keeping for yourself as a collectible. I especially appreciate the two arm options - you can make them flat against the body for a classic look or have them stick out for more dynamic posing. The shell detail with the rolled edge creates such a professional finish that people won't believe you made it yourself. Plus, once you master one turtle, you'll want to make the whole team, and each one goes faster than the last.
Switch Things Up
I love customizing this Ninja Turtle pattern to create unique variations that go beyond the classic four turtles. For a fun twist, I've experimented with creating 'baby' versions by using a 5mm hook with the same pattern - they turn out adorably tiny at about 18cm tall, perfect as keychains or ornaments. You can also play with the mask style by making it wider (add extra rounds in the mask color) or adding fabric ribbons that flow behind the head for a more cartoon-accurate look.
Another variation I absolutely adore is making 'winter' themed turtles by adding tiny crocheted scarves, hats, or even little crochet weapons like swords and nunchucks to match each turtle's signature fighting style. I've also created female turtle characters by adding a small crocheted bow or flower accessory to the mask and using slightly different color palettes - maybe a mint green body or pastel mask colors.
For advanced crocheters, try adding surface crochet details to the shell to create the geometric panel patterns seen in the original cartoon, or embroider the belly with abs lines for extra character. You could even modify the facial area by embroidering a smile or creating an open mouth with felt. I've made seasonal versions too - Halloween turtles with tiny orange masks and little candy bags, or Christmas turtles with red and green masks holding mini presents. The possibilities are endless once you master the basic pattern!
Common Mistakes & How to Fix Them
✗ Not stuffing the head firmly enough before closing, which can cause the head to look deflated and lose its round shape
✗ Forgetting to attach safety eyes between rounds seven and eight before stuffing, making it impossible to secure them properly later
✗ Pulling the magic circle too tight at the beginning of each piece, making it difficult to work the increase rounds smoothly
✗ Not matching the color change rounds precisely when switching to mask color, resulting in uneven or crooked mask appearance
✗ Overstuffing the arms which makes them too rigid and difficult to position or sew onto the body properly
✗ Skipping the step to roll up the last row of half double crochet on the shell, missing the dimensional lip detail