🧢 Beautiful ✨ Detailed πŸ’ Adorable

Nemo Starfish Amigurumi Pattern

Nemo Starfish Amigurumi Pattern
4.0β˜… Rating
2-3 Hours Time Needed
1.2K Made This
βœ‚οΈ

Beginner Friendly Level

Perfect for those just starting their sewing journey, with clear instructions and simple techniques

⏱️

Bite-Sized Project

Complete in under 2 hoursβ€”quick, fun, and perfect for a little creative escape.

🐾

Pocket Pal

A mini friend to carry anywhere, providing comfort and companionship in a perfectly portable size.

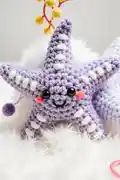
About This Nemo Starfish Amigurumi Pattern

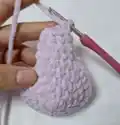
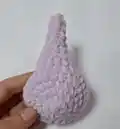
This delightful starfish pattern brings the ocean to your home with its cheerful purple color and sweet personality. The design features a carefully crafted belly and back that join together to form five perfectly shaped arms, each stuffed individually for a realistic sea creature look. With simple stitches and clear row-by-row instructions, you'll watch your starfish come to life as you work through each section.

Nemo Starfish Amigurumi Pattern crochet pattern - detailed view of completed project

The pattern includes helpful details like eye placement guidelines and embroidery suggestions for the mouth and decorative spikes. Whether you're creating a collection of ocean friends or making a special gift for someone who loves marine life, this starfish will bring smiles and coastal charm wherever it lands.

Why You'll Love This Nemo Starfish Amigurumi Pattern

I absolutely love this starfish pattern because it works up so quickly with super bulky yarn, making it perfect for those moments when you want to see fast results. The way the belly and back pieces come together to create the arms is genuinely satisfying, and watching each arm take shape feels like magic. I appreciate how the simple stitch combinations create such an adorable character without overwhelming beginners with complicated techniques. The customization possibilities are endless tooβ€”you can change colors, add patterns to the arms, or even create a whole family of starfish friends in different sizes and shades.

Nemo Starfish Amigurumi Pattern step 1 - construction progress Nemo Starfish Amigurumi Pattern step 2 - assembly progress Nemo Starfish Amigurumi Pattern step 3 - details and accessories Nemo Starfish Amigurumi Pattern step 4 - final assembly and finishing

Switch Things Up

I love how versatile this starfish pattern is for customization! You could easily transform this basic design into so many different variations. Try using variegated yarn for a multicolored ocean effect, or work with two colors and alternate them every few rows for striped arms. If you want to make it extra special, consider adding small beads or sequins to the tips of each arm for a sparkly underwater effect.

For a more textured look, you could work the belly piece in a contrasting color or even use a different stitch pattern like the bobble stitch to create dimension. I've experimented with adding small felt details like starfish spots or even creating a whole family with different sizes by using various yarn weights. You could also embroider names or initials on the belly to make personalized gifts.

Another fun idea is to attach a small loop to one arm and turn it into a keychain or bag charmβ€”perfect for beach lovers! The pattern also works beautifully as a stress ball if you stuff it extra firmly, or you could make it softer and floppier for a cuddly toy version. Don't be afraid to play with the embroidery details too; instead of just a mouth, you could add rosy cheeks, freckles, or even glasses for a quirky character twist!

Common Mistakes & How to Fix Them

βœ— Forgetting to count stitches after increase rounds can throw off the entire arm shape and symmetry of your starfish βœ— Not stuffing the arms firmly enough before closing them off results in floppy limbs that lose their characteristic starfish shape βœ— Placing safety eyes too close together or at the wrong row makes the face look unbalanced and affects overall cuteness βœ— Crocheting the belly and back pieces too tightly when joining them together can make arm assembly difficult and distorted

Nemo Starfish Amigurumi Pattern

Create your own adorable purple starfish inspired by Finding Nemo with this easy-to-follow crochet pattern. This charming five-armed sea creature features a plump belly, cute embroidered details, and safety eyes that bring personality to life. Perfect for ocean lovers and Disney fans alike, this starfish makes a wonderful gift or decorative piece. The pattern uses super bulky yarn for quick work and includes detailed instructions for creating each arm individually before stuffing.

Beginner Friendly 2-3 Hours

Materials Needed for Nemo Starfish Amigurumi Pattern

β€” Main Fabric

  • 01
    Super Bulky yarn (Category 6) in purple color
  • 02
    Fiberfill stuffing for shaping

β€” Tools Required

  • 01
    3.5mm (E) crochet hook
  • 02
    Plastic safety eyes (8mm)
  • 03
    Stitch marker
  • 04
    Sewing needle
  • 05
    Scissors
  • 06
    Hot glue gun
  • 07
    Pink and orange embroidery thread for details

Progress Tracker

0% Complete

β€” Starfish's Belly :

Row 1 :

5 SC in an MR (5)

Row 2 :

5 INC (10)

Row 3 :

10 INC (20)

Row 4 :

(SC, INC) 10 times (30)

Info :

Cut the yarn

β€” Starfish's Back :

Row 1 :

6 SC in an MR (6)

Row 2 :

6 INC (12)

Row 3 :

(SC, INC) 6 times (18)

Row 4 :

(2 SC, INC) 6 times (24)

Row 5 :

(3 SC, INC) 6 times (30)

Info :

From this row, crochet together the abdominal part to create the arms of the starfish

Row 6 :

6 SC (starfish's back), 6 SC (starfish's belly) (12)

Row 7 :

12 SC (12)

Row 8 :

(2 SC, DEC) 3 times (9)

Row 9 :

9 SC (9)

Row 10 :

2 SC, DEC, 3 SC, DEC (7)

Row 11 :

7 SC (7)

Row 12 :

DEC, SC, DEC, 2 SC (5)

Row 13 :

5 SC (5)

Info :

Cut the yarn and stuff this arm

Info :

Crochet the remaining 4 arms similarly following rows 6-13

β€” Finishing Details :

Eye Placement :

Attach the eyes between rows 3 and 4 of the back piece, with 4 stitches between them

Embroidery :

Embroider pink and orange details for the mouth and decorative spikes on the body

Final Step :

Fasten off all yarn ends and weave them securely into the piece

Assembly Instructions

  • Begin by completing the belly piece through Row 4, then set it aside while you work on the back piece
  • After completing Row 5 of the back, position the belly piece so the stitches align with the back piece for joining
  • Work Row 6 by crocheting through both the back and belly pieces simultaneously to create the first arm
  • Continue rows 7-13 to complete the first arm, stuffing it firmly with fiberfill before closing off
  • Repeat the arm-making process four more times, ensuring each arm is evenly spaced around the starfish body
  • Attach safety eyes between rows 3 and 4 of the back piece with exactly 4 stitches spacing between them
  • Use pink and orange embroidery thread to add the mouth and decorative spike details, then weave in all loose ends

Important Notes

  • πŸ’‘Use a stitch marker to track the beginning of each round and ensure accurate stitch counts
  • πŸ’‘Stuff each arm as you complete it rather than waiting until the end for better shaping control
  • πŸ’‘Make sure the belly and back pieces have the same number of stitches before joining them together
  • πŸ’‘Count your stitches carefully after each increase row to maintain the correct starfish proportions
  • πŸ’‘Hot glue gun is optional but helps secure safety eyes if making this for young children
  • πŸ’‘Test eye placement with pins before permanently attaching them to ensure a balanced facial expression

This adorable Nemo-inspired starfish pattern was designed to bring ocean magic into your hands with minimal effort and maximum cuteness! The clever construction method creates perfectly shaped arms that radiate from a plump center body, while the sweet embroidered details add personality and charm. Whether you're crafting for a Disney fan, decorating a beach-themed nursery, or simply love marine creatures, this little starfish friend will bring smiles and coastal vibes to any space. 🌊✨ Happy crocheting! πŸ§ΆπŸ’œ

You ask,

we answer.

FAQs

Can I use a different yarn weight for this pattern?

Yes, but using a different yarn weight will change the final size of your starfish. If you use lighter weight yarn with a smaller hook, you'll get a miniature version. Just make sure to adjust your hook size accordingly and use smaller safety eyes to match the new proportions.

How do I join the belly and back pieces together in Row 6?

After completing Row 5 of the back, align your belly piece next to it. Insert your hook through one stitch on the back piece and one stitch on the belly piece at the same time, then work your single crochet through both layers. Continue alternating 6 stitches from each piece to create the arm base.

What if my arms end up different sizes?

This usually happens due to tension variations. Make sure you're counting stitches carefully in each round and maintaining consistent tension throughout. Using a stitch marker helps track where each round begins, and checking your stitch count after each row prevents size discrepancies between arms.

Can I make the starfish in different colors?

Absolutely! While the pattern calls for purple, you can create your starfish in any color you like. Try orange for a Finding Nemo Patrick-inspired version, pink for a coral reef look, or even rainbow stripes for a whimsical twist. The pattern works beautifully with any super bulky yarn color.

When should I add the stuffing to each arm?

Stuff each arm immediately after completing Row 13 while the opening is still accessible. This makes it much easier to achieve firm, well-shaped arms. If you wait until all arms are crocheted, you'll struggle to stuff them through the small opening, resulting in lumpy or understuffed limbs.