๐Ÿงถ Beautiful โœจ Detailed ๐Ÿ’ Adorable

Mr. Pistachio the Dinosaur Amigurumi Pattern

Mr. Pistachio the Dinosaur Amigurumi Pattern
4.7โ˜… Rating
4-5 Hours Time Needed
1.7K Made This
โœ‚๏ธ

Beginner Friendly Level

Perfect for those just starting their sewing journey, with clear instructions and simple techniques

โฑ๏ธ

Weekend Treat

Takes 5-7 hours, making it an enjoyable project to finish over a couple of days.

๐Ÿงธ

Cute Companion

An adorable friend to cherish, handcrafted with love to bring comfort and joy for years to come.

About This Mr. Pistachio the Dinosaur Amigurumi Pattern

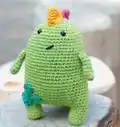
Mr. Pistachio is a delightfully different dinosaur who embraces what makes him unique. This pattern creates a plump, lime green character with colorful decorative spikes running down his back and a distinctive gradually widening tail. The design features simple construction with the legs, body, and head worked as one continuous piece, making assembly easier for beginners. With his sweet embroidered face and cheerful appearance, Mr. Pistachio reminds us that being different is something to celebrate.

Mr. Pistachio the Dinosaur Amigurumi Pattern crochet pattern - detailed view of completed project

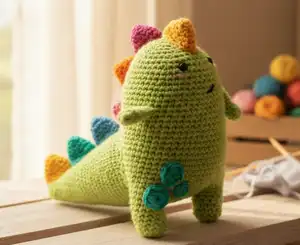
This pattern includes detailed instructions for creating Mr. Pistachio's distinctive features, including his unique tail that gradually increases in size and colorful decorative dots that add personality. The continuous construction method makes this project beginner-friendly while still creating an impressive finished piece.

Why You'll Love This Mr. Pistachio the Dinosaur Amigurumi Pattern

I absolutely love this pattern because it celebrates uniqueness and being different in the most adorable way possible. The story behind Mr. Pistachio resonates with me โ€“ he's not your typical dinosaur, and that's what makes him special. I enjoy how the pattern combines simple techniques with creative elements like the gradually widening tail and colorful spikes. The continuous construction from legs to body to head means less sewing and more crocheting, which I always appreciate. Plus, there's something incredibly satisfying about watching this quirky character come to life stitch by stitch, knowing he represents the beauty of being authentically yourself.

Mr. Pistachio the Dinosaur Amigurumi Pattern step 1 - construction progress Mr. Pistachio the Dinosaur Amigurumi Pattern step 2 - assembly progress Mr. Pistachio the Dinosaur Amigurumi Pattern step 3 - details and accessories Mr. Pistachio the Dinosaur Amigurumi Pattern step 4 - final assembly and finishing

Switch Things Up

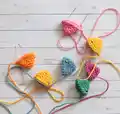
I love experimenting with this pattern to create different versions of Mr. Pistachio! One of my favorite modifications is changing up the spike colors to match different themes - imagine pastel spikes for a spring version, or red and green for a festive holiday dinosaur. You could also vary the number of spikes, adding more for a dramatic punk-rock look or fewer for a sleeker design.

I've tried making the tail even longer by continuing the increase pattern for a few more rounds, which creates a really impressive trailing effect. Another fun twist is adding small embroidered details like spots or stripes on the body instead of using separate dots. For a more advanced project, I sometimes add small felt pieces to create little accessories like a tiny backpack or scarf, referencing the story where Mr. Pistachio sets off on his adventure.

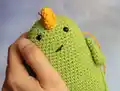
You could also experiment with the facial expression by changing the eye placement or embroidering different mouth shapes - a surprised look, sleepy eyes, or even a playful wink. I've even made versions using variegated yarn for the body, which creates a beautiful color-shifting effect that makes each Mr. Pistachio truly unique, just like the character himself!

Common Mistakes & How to Fix Them

โœ— Forgetting to stuff the legs before joining them together, which makes it difficult to fill them properly later โœ— Not counting stitches carefully when joining the legs with chains, leading to uneven body shaping and twisted construction โœ— Placing safety eyes too late in the process, making it hard to secure them properly between rounds 34-35 โœ— Stuffing the body too firmly or not firmly enough, affecting the characteristic plump pistachio shape that makes this design unique โœ— Missing the gradual increases in the tail rounds, which creates the distinctive widening effect from narrow to wide โœ— Forgetting to embroider the cheeks and mouth before finishing the head, which requires accessing the inside area

Mr. Pistachio the Dinosaur Amigurumi Pattern

Create your own adorable Mr. Pistachio, a whimsical dinosaur who discovered he looks more like a giant pistachio with colorful spikes! This charming amigurumi pattern tells the story of a unique dinosaur on a journey to find where he truly belongs. Perfect for crafters who love creating characters with personality, this pattern combines simple techniques with creative details to bring this lovable misfit to life. The finished piece features a plump body, cute little arms, a gradually widening tail, and colorful decorative spikes that make Mr. Pistachio truly one-of-a-kind.

Beginner Friendly 4-5 Hours

Materials Needed for Mr. Pistachio the Dinosaur Amigurumi Pattern

โ€” Main Fabric

  • 01
    Paintbox DK cotton lime green 429 (50 grams) - main body color
  • 02
    Paintbox DK cotton seville orange 419 (small amount, approximately 2 grams)
  • 03
    Paintbox DK cotton bubblegum pink 451 (small amount)
  • 04
    Paintbox DK cotton slate green 427 (small amount)
  • 05
    Paintbox DK cotton raspberry pink 444 (small amount)
  • 06
    Paintbox DK cotton dolphin blue 437 (small amount)
  • 07
    Paintbox DK cotton mustard yellow 424 (small amount)

โ€” Tools Required

  • 01
    Crochet hook 3.00 mm
  • 02
    Safety eyes 7 mm
  • 03
    Fiberfill stuffing
  • 04
    Tapestry needle
  • 05
    Scissors
  • 06
    Stitch markers (recommended)

Progress Tracker

0% Complete

โ€” LEGS, BODY AND HEAD :

First Leg :

Info :

Start with lime green colour and make a magic ring

Rnd 1 :

6 sc

Rnd 2 :

inc in all stitches (12)

Rnd 3-7 :

sc in all stitches (12)

Info :

Fasten off, leaving a long tail for sewing

Second leg and body :

Info :

Start with a magic ring

Rnd 1 :

6 sc

Rnd 2 :

inc all stitches (12)

Rnd 3-7 :

sc in all stitches (12)

Info :

Don't cut the yarn, we will join the legs

Rnd 8 :

after finishing the last sc of second leg, crochet 12 chains and connect another leg with slip stitch. Make a sc in same stitch and continue crocheting around two legs and chain. 12 sc second leg, 12 sc over the 12 ch, 12 sc first leg, 12 sc back side of the 12 ch = so you will have 48 sc

Rnd 9-31 :

48 sc (23 rnds)

Info :

Start stuffing legs and continue stuffing while you go

Rnd 32 :

6 sc, dec (42)

Rnd 33-34 :

sc in all stitches (42)

Rnd 35 :

5 sc, dec (36)

Rnd 36 :

sc in all stitches (36)

Infos :

Place safety eyes between 34-35 rounds and continue to stuffing. Embroider the cheeks and the mouth (see the photo)

Rnd 37 :

4 sc, dec (30)

Rnd 38 :

3 sc, dec (24)

Rnd 39 :

2 sc, dec (18)

Rnd 40 :

1 sc, dec (12)

Rnd 41 :

dec (6)

Info :

Leave a long tail, cut the yarn, weave the end

โ€” TAIL :

Info :

Start with lime green colour and make a magic ring

Rnd 1 :

6 sc

Rnd 2 :

sc in all stitches (6)

Rnd 3 :

inc, 1 sc (9)

Rnd 4 :

sc in all stitches (9)

Rnd 5 :

inc, 2 sc (12)

Rnd 6 :

sc in all stitches (12)

Rnd 7 :

inc, 3 sc (15)

Rnd 8 :

sc in all stitches (15)

Rnd 9 :

inc, 4 sc (18)

Rnd 10 :

sc in all stitches (18)

Rnd 11 :

inc, 5 sc (21)

Rnd 12 :

sc in all stitches (21)

Rnd 13 :

inc, 6 sc (24)

Rnd 14 :

sc in all stitches (24)

Rnd 15 :

inc, 7 sc (27)

Rnd 16 :

sc in all stitches (27)

Rnd 17 :

inc, 8 sc (30)

Rnd 18 :

sc in all stitches (30)

Rnd 19 :

inc, 9 sc (33)

Rnd 20 :

sc in all stitches (33)

Rnd 21 :

inc, 10 sc (36)

Rnd 22 :

sc in all stitches (36)

Rnd 23 :

inc, 11 sc (39)

Rnd 24 :

sc in all stitches (39)

Rnd 25 :

inc, 12 sc (42)

Rnd 26 :

inc, 13 sc (45)

Info :

Leave a long tail, cut the yarn, weave the end

โ€” ARMS :

Info :

Make 2

Info :

Start with a magic circle

Rnd 1 :

8 sc

Rnd 2-8 :

sc in all stitches (8)

Info :

Leave a long tail, cut the yarn, weave the end

โ€” SPIKES :

Info :

Make 7

Info :

Start with a magic ring

Rnd 1 :

5 sc

Rnd 2 :

sc in all stitches (5)

Rnd 3 :

inc (10)

Rnd 4 :

sc in all stitches (10)

Rnd 5 :

1 sc, inc (15)

Rnd 6 :

sc in all stitches (15)

Info :

Leave a long tail, cut the yarn, weave the end

โ€” DINOSAUR DOTS :

Info :

With slate green colour make a magic ring

1st dot :

6 sc in magic ring

2nd dot :

8 hdc in magic ring

3rd dot :

10 hdc in magic ring

Assembly Instructions

  • Sew the arms to the body between rounds 25-26 using the long tail left from crocheting
  • Attach the tail to the back of the body between the two legs using the long tail
  • Sew the 7 colorful spikes along the back as shown in the reference photo, spacing them evenly
  • Attach the decorative dots in various colors onto the body for added personality and charm

Important Notes

  • ๐Ÿ’กMake sure to stuff the legs before joining them together in round 8 to ensure proper filling
  • ๐Ÿ’กUse stitch markers to keep track of your rounds, especially during the long body section with 23 rounds
  • ๐Ÿ’กPlace safety eyes between rounds 34-35 before decreasing too much, as it becomes difficult to insert them later
  • ๐Ÿ’กThe tail gradually increases in width, creating a distinctive shape - follow the increase pattern carefully
  • ๐Ÿ’กDon't stuff the spikes too firmly; they should be slightly flexible to maintain their decorative appearance
  • ๐Ÿ’กEmbroider the facial features while you still have access to the inside of the head for knotting thread
  • ๐Ÿ’กUse different colors for the spikes and dots to create Mr. Pistachio's unique, playful character

This whimsical Mr. Pistachio pattern was designed to celebrate uniqueness and the beauty of being different. With his plump pistachio-shaped body, gradually widening tail, and cheerful colorful spikes, this little dinosaur reminds us that standing out is something special. The continuous construction method makes this pattern accessible for beginners while creating a character full of personality and charm. Join Mr. Pistachio on his adventure to find where he belongs! ๐Ÿฆ•๐Ÿฅœโœจ

You ask,

we answer.

FAQs

What size will the finished Mr. Pistachio be?

Using the recommended Paintbox DK cotton yarn and 3.00mm hook, Mr. Pistachio will measure approximately 15-18 cm tall depending on your tension and how firmly you stuff him.

Can I use different yarn weights for this pattern?

Yes, you can use different yarn weights, but adjust your hook size accordingly. Using thicker yarn will create a larger dinosaur, while thinner yarn will make a smaller version. Just ensure your stitches are tight enough that stuffing doesn't show through.

How do I join the legs without creating a gap?

When joining the legs in round 8, make sure to pull your chain stitches snugly and work your first single crochet into the same stitch as your slip stitch connection. This creates a seamless join.

What colors should I use for the spikes and dots?

The pattern suggests orange, pink, slate green, raspberry pink, blue, and yellow for variety. Feel free to use any colors you like - rainbow colors, pastels, or even matching shades for a coordinated look.

Do I need to stuff the tail and spikes?

The tail should be lightly stuffed to maintain its shape, but the spikes can remain unstuffed or very lightly stuffed so they stay flexible and decorative rather than rigid.

How do I embroider the face details?

Use embroidery floss or thin yarn in pink for rosy cheeks and black or dark color for the mouth. Simple French knots or small stitches work well for cheeks, and a curved line creates a sweet smile.