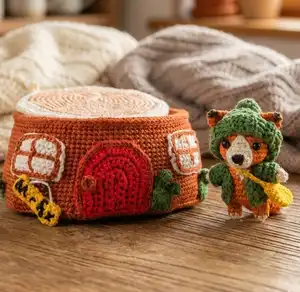
Create an enchanting woodland scene with this delightful two-part pattern featuring an adorable Mr. Fox character complete with charming accessories and his very own cozy tree stump house. This magical project combines intricate amigurumi techniques with creative home décor elements, perfect for crafters who love whimsical forest-themed creations. Watch as your handmade fox comes to life wearing a sweet jacket and hat, carrying his messenger bag, ready to settle into his mushroom-adorned tree stump home with functional roof and decorative windows.
Progress Tracker
0% Complete
— PART 1: Head and Body
HEAD
Round 1 :
with A 8 sc in a mr (8)
Round 3 :
(sc, inc) x 8 (24)
Rounds 4-5 :
sc around (24) - 2 rounds
Round 6 :
1 sc in 4 sts, inc in next 4 sts, 1 sc in 8 sts, inc in next 4 sts, 1 sc in last 4 sts (32)
Rounds 7-9 :
sc around (32) - 3 rounds
Round 10 :
(2 sc, dec) x 8 (24)
Round 11 :
(sc, dec) x 8 (16)
Info :
Stuff the head. You may need to stuff more before finishing Round 12
BODY
Info :
Continue with the body from where you stopped with the head
Round 13 :
(sc, inc) x 4 (12)
Round 14 :
(2 sc, inc) x 4 (16)
Info :
In Round 15, we will start the body and leave space for the arms. Refer to Picture 1B and Picture 1C
Round 15 :
1 sc in 3 sts; ch 2 and sk 3 sts; 1 sc in 5 sts; ch 2 and sk 3 sts; 1 sc in 2 sts (14 sts incl the 4 ch)
Info :
In Round 16, crochet in the BLO of the 4 chains (we will need the front loops to make the arms later) and in both loops of the rest of the stitches
Round 16 :
(6 sc, inc) x 2 (16)
Round 17 :
(3 sc, inc) x 4 (20)
Rounds 18-20 :
sc around (20) - 3 rounds
Info :
Stuff the body. Leave 7 stitches on either side for legs and mark with thread the middle six (3 at the front and 3 at the back) with thread. Make sure the spaces you leave for legs align with the spaces you left for the arms earlier. Refer to Picture 1D and Picture 1E
LEG 1
Info :
Continue with the 1st leg from where you stopped with the body
Round 1 :
1 sc until the 1st stitch marker. Insert hook in same stitch as last sc and in the stitch on the other side. Pictures 1F and 1G. 1 sc. Sc until the end of Round 1. You should have 7 sts
Rounds 2-3 :
sc around (7)
Info :
Change color - Natural
LEG 2
Info :
LEG 2 is made the same way as LEG 1. Join thread at the back of the fox and follow instructions for LEG 1. When you finish both legs, stuff lightly, finish off, and secure the stitches. Sew the 6 stitches between the legs
ARMS (x 2)
Infos :
The arms are made in the 2 chains and 3 skipped stitches we left earlier. Join Clementine to any one of the stitches you left for arms. Picture 1I. Crochet tight especially in the first round. The arms are not stuffed
Round 1 :
1 sc in each ch and st (5)
Rounds 2-4 :
sc around (5)
Info :
Change color - Natural
Info :
Fasten off, finish off, and secure the stitches
— PART 2: Tail, Ears, and Muzzle
TAIL
Round 1 :
with Natural 6 sc in a mr
Round 2 :
(sc, inc) x 3 (9)
Round 3 :
(2 sc, inc) x 3 (12)
Info :
Change color - Clementine
Rounds 4-6 :
sc around (12) - 3 rounds
Round 7 :
(2 sc, dec) x 3 (9)
Round 8 :
(sc, dec) x 3 (6)
Info :
Fasten off leaving a long tail for sewing
MUZZLE
Info :
Join rounds with a slip stitch and ch 1
Round 1 :
with Natural 8 sc in a mr (8)
Round 2 :
(sc, inc) x 4 (12)
Round 3 :
5 sl st, 1 hdc and 1 dc in next st, 1 dc and 1 hdc in next st, 5 sl st
Info :
Fasten off leaving a long tail for sewing and embroidery
EARS (x 2)
Info :
With Clementine, ch 6
Row 1 :
1 sc in 2nd ch from hook, sc until end of row; ch 1 and turn (5)
Row 2 :
dec, sc, dec; ch 1 and turn (3)
Row 3 :
sc in each; ch 1 and turn (3)
Row 4 :
sc3tog; ch 1 and turn (1)
Info :
Now go around the ear and sc in each row and stitch. 2 sc in each of the bottom corners and join with a sl st at the top. Your ending tail will be on top. Leaving a long tail for sewing, fasten off and weave in that top tail to bring it to one of the bottom corners of the ear. We will use that tail to sew the ears to the head
— PART 3: Jacket and Accessories
JACKET
Info :
With Jalapeno, ch 13
Row 1 :
2 sc in 2nd ch from hook, 2 sc in each st until end of row; ch 1 and turn (24)
Row 2 :
4 sc; ch 2 and sk 5 sts; 6 sc; ch 2 and sk 5 sts; 4 sc; ch 1 and turn (18 including the 4 chains)
Row 3 :
sc in each st and ch (in BLO of chains); ch 1 and turn (18)
Row 4 :
(2 sc, inc) x 6; turn but do not ch (24)
Row 5 :
sl st until the end of row
Info :
Fasten off and weave in the ends
SLEEVES (x 2)
Infos :
Earlier we left 2 chains and 5 stitches to make the sleeves. Additionally, on both sides where the chain meets a stitch, there is an extra space. Picture 3A Crochet in that space too. we will sc again the stitch where we joined to add a 10th st. make sure the sleeves are exactly 10 stitches in each round (total of 3). NOTE: I carried the beginning tail for 2 rounds, so I don't have to weave it in later. Picture 3B. Join Jalapeno to one of the chains and 1 sc in that chain
Round 1 :
1 sc in each ch, st and space (there should be 2 spaces in each side of the ch where it meets the 5 skipped sts); 1 sc in the same ch where you joined earlier (we already made 1 sc there); sl st to join and ch 1 (10)
Round 2 :
sc around; sl st to join and ch 1 (10)
Round 3 :
sc around; sl st to join (10)
Info :
NOTE: If the sleeves seem too short, add another round. Fasten off. It is hard to weave in the ends in the sleeves because they are so small. Instead carry the thread and weave in the end on the inside of the jacket. Pictures 3C and 3D
HAT
Back Piece
Info :
Leave a long beginning tail and ch 13 with Jalapeno
Row 1 :
1 sc in 2nd ch from hook; sc in each; ch 1 and turn (12)
Row 2 :
sc in each st; ch 1 and turn (12)
Row 3 :
sc, dec, 6 sc, dec, sc; ch 1 and turn (10)
Row 4 :
sc, dec, 4 sc, dec, sc; ch 1 and turn (8)
Row 5 :
sc, dec, 2 sc, dec, sc; ch 1 and turn (6)
Row 6 :
sc in each st; ch 1 and turn (6)
Row 7 :
sc, 2 dec, sc ch 1 and turn (4)
Row 8 :
2 dec; ch 1 and turn (2)
Row 9 :
sc in each st; ch 1 and turn (2)
Info :
Fasten off and weave in the end tail. Set aside
Front Piece
Info :
Leave a long beginning tail and ch 17 with Jalapeno
Row 1 :
1 sc in 2nd ch from hook; sc in each; ch 1 and turn (16)
Row 2 :
sc in each st; ch 1 and turn (16)
Row 3 :
sc, dec 10 sc dec, sc ch 1 and turn (14)
Row 4 :
sc, 2 dec; 4 sc; 2 dec, sc ch 1 and turn (10)
Row 5 :
10 sc; ch 1 and turn (10)
Row 6 :
sc, dec; 4 sc; dec, sc; ch 1 and turn (8)
Row 7 :
sc, dec; 2 sc; dec, sc; ch 1 and turn (6)
Row 8 :
sc, 2 dec, sc; ch 1 and turn (4)
Info :
Fasten off leaving a tail for sewing. Set aside
Brim
Rows 1-18 :
hdc in BLO; ch 2 and turn (3) - add more rows if it seems it won't fit around the hat
Info :
Fasten off leaving a tail for sewing
BAG
Round 1 :
4 sc, 3 sc in last ch; going around the ch 3 sc and 2 sc in last ch; sl st to join and ch 1 (12)
Rounds 2-3 :
sc around; sl st to join and ch 1
Round 4 :
sc around; sl st to join
Info :
Fasten off leaving a long tail for the handle. You may need to weave in a bit to get to the side to begin the handle
HANDLE :
ch 16 (place on fox to make sure it's not too long or too short; the length depends on your tension)
Info :
Fasten off and weave in the ends
Pom-Pom
Round 1 :
with Jalapeno 6 sc in a mr; sl st to join and ch 1 (6)
Round 2 :
6 inc; sl st to join and ch 1 (12)
Rounds 3-4 :
sc around; sl st to join and ch 1 (12)
Info :
Stuff well before finishing next round
Round 5 :
6 dec; sl st to join (6)
Info :
Fasten off leaving a tail for sewing
— Tree Stump House
BASE (x 2)
Info :
Join rounds with a slip stitch and chain 1
Round 1 :
with natural 8 sc in a mr (8)
Round 3 :
(sc, inc) x 8 (24)
Round 4 :
(2 sc, inc) x 8 (32)
Round 5 :
(3 sc, inc) x 8 (40)
Round 6 :
(4 sc, inc) x 8 (48)
Round 7 :
(5 sc, inc) x 8 (56)
Round 8 :
(6 sc, inc) x 8 (64)
Round 9 :
(7 sc, inc) x 8 (72)
Round 10 :
(8 sc, inc) x 8 (80)
Round 11 :
(9 sc, inc) x 8 (88)
Round 12 :
(10 sc, inc) x 8 (96)
Round 13 :
(11 sc, inc) x 8 (104)
Info :
After finishing the first circle, fasten off and weave in the ends. Trace the circle on a piece of plastic (yogurt container, for example). Do not fasten off thread from the second circle. We will continue with the walls from where we stopped in Round 13
— PART 1: Inside Wall
Infos :
We will now crochet through both circles. Put the second circle at the bottom and the first one at the top. Insert your hook through the BLO of the second circle (bottom base) and both loops of the first circle (top base). Picture 1C. NOTE: When halfway through Round 14, insert the plastic piece and continue crocheting until the end of the round
Round 14 :
1 sc in each st
Round 15 :
both loops, sc in each st (104)
Rounds 16-28 :
sc around (104) - 13 rounds
Info :
Fasten off and weave in the end. Now we will crochet in the front loop that we left earlier when working on Round 14 creating a second wall. We will begin the numbering with Round 14. Join rounds with a slip stitch
Round 14 (second wall) :
1 sc in each of the front loops (104)
Rounds 15-27 :
sc around (104)
Round 28 :
in BLO sc around (104)
Round 29 :
in both loops sc around (104)
Infos :
Make sure the second wall is as tall as the first one we made. Cut out a piece from a yogurt container as tall and as long as the walls. If you used Curio size 10 and a 1.5 mm hook, your plastic piece should be about 2 cm by 20 cm. Insert the piece between the two walls and sew Round 29 of the second wall to Round 28 of the 1st wall. In Round 30, crochet in the back loop of the outside wall (or 2nd wall) and in the front loops of the inside wall (the 1st wall)
Info :
Fasten off and secure the stitches. Insert hook in the front loop of Round 27 and join brown thread (the color you will use to make the tree stump). Picture 1I
Round 1 :
sc in each of the front loops; sl st to join and ch 1 (104)
Rounds 2-4 :
sc around; sl st to join and ch 1 (104)
Round 5 :
(12 sc, inc) x 8; sl st to join (112)
Info :
Fasten off and weave in the ends. Set the piece aside
— PART 2: Tree Stump
Info :
Join rounds with a slip stitch
Round 1 :
with brown 8 sc in a mr (8)
Round 3 :
(sc, inc) x 8 (24)
Round 4 :
(2 sc, inc) x 8 (32)
Round 5 :
(3 sc, inc) x 8 (40)
Round 6 :
(4 sc, inc) x 8 (48)
Round 7 :
(5 sc, inc) x 8 (56)
Round 8 :
(6 sc, inc) x 8 (64)
Round 9 :
(7 sc, inc) x 8 (72)
Round 10 :
(8 sc, inc) x 8 (80)
Round 11 :
(9 sc, inc) x 8 (88)
Round 12 :
(10 sc, inc) x 8 (96)
Round 13 :
(11 sc, inc) x 8 (104)
Round 14 :
(12 sc, inc) x 8 (112)
Round 15 :
(13 sc, inc) x 8 (120)
Round 16 :
(14 sc, inc) x 8 (128)
Round 17 :
(15 sc, inc) x 8 (136)
Round 18 :
(16 sc, inc) x 8; sl st to join and ch 2 (144)
Round 19 :
2 hdc; (12 sc, 2 hdc, 2 dc, 2 hdc) x 7; 12 sc, 2 hdc, 2 dc; sl st to join, ch 1 and turn (144)
Info :
Trace the shape on a cardboard or a piece of plastic and cut it out. We will place that at the bottom of the tree stump to keep it flat. Continue joining rounds. RS - when we ch 1 and turn, the RS will go inside the tree stump. WS - the WS will be the bottom of the tree stump
Round 20 :
in BLO sc around (144)
Round 21 :
in both loops (16 sc, dec) x 8 (136). Halfway through Round 21, insert the cutout cardboard/plastic inside and continue
Round 22 :
(15 sc, dec) x 8 (128)
Round 23 :
(14 sc, dec) x 8 (120)
Rounds 24-28 :
sc around - 5 rounds
Round 29 :
(13 sc, dec) x 8 (112)
Rounds 30-38 :
sc around (112) - 9 rounds
Info :
Insert the inside wall in the tree stump and stuff well. Since tree stumps are not smooth, do not worry about stuffing evenly. In Round 39, insert the hook in the BLO of the tree stump and the FLO of the inside wall. Picture 2G
Round 39 :
sl st around (112)
Info :
Fasten off and secure the stitches
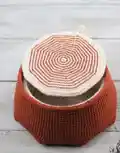
— PART 3: Roof
Infos :
Make 2 circles. After you make the first one, fasten off and weave in the ends. NOTE: The second circle will be used for the top. An option is to add tree rings. You can do it two ways - one is to crochet in the BLO of all the rounds and the other is to use the back stitch and sew them after you finish the second ring but before attaching the top part to the bottom. I chose to sew them. Instructions are on the next page. Join rounds with a slip stitch
Round 1 :
with natural 8 sc in a mr (8)
Round 3 :
(sc, inc) x 8 (24)
Round 4 :
(2 sc, inc) x 8 (32)
Round 5 :
(3 sc, inc) x 8 (40)
Round 6 :
(4 sc, inc) x 8 (48)
Round 7 :
(5 sc, inc) x 8 (56)
Round 8 :
(6 sc, inc) x 8 (64)
Round 9 :
(7 sc, inc) x 8 (72)
Round 10 :
(8 sc, inc) x 8 (80)
Round 11 :
(9 sc, inc) x 8 (88)
Round 12 :
(10 sc, inc) x 8 (96)
Round 13 :
(11 sc, inc) x 8 (104)
Round 14 :
(12 sc, inc) x 8 (112)
Infos :
NOTE: The roof needs to fit snug. If it doesn't seem big enough, add another round of increase (Round 15: (13 sc, inc) x 8 - 120 sts) and then it would be Round 16 where you sl st to connect the top and bottom (next page). Fasten off and weave in the ends of the first ring. Trace it on a piece of plastic or cardboard and cut it out. This will be inserted between the top and bottom later. The instructions for the second circle are on the next page. Do not fasten off. If you have decided to sew the rings using the back stitch, you need to do so now before crocheting the top and bottom together. I sewed rings in every space between rounds. You can choose to do every other space. When finished, hold both pieces together WS of both facing in and the RS of both facing out. The top piece (the one with the rings) will be at the bottom while crocheting. Crochet in the BLO of the tree ring piece and in the FLO of the other piece. When halfway through, place the plastic piece inside and continue
Round 15 :
sl st in 111 stitches
Info :
When you have 1 stitch left, ch 5. Crochet in the back bump of the chain. 1 sc in 2nd ch from hook and 1 sc in next 3 chains. The roof (lid) should fit snug on the trunk. Make sure that it fits well (it's not too small or too big) before securing your stitches. Sl st in the last st and fasten off. Secure the stitches
— PART 4: Outside Decor
DOOR
Info :
With Serrano (red), ch 5
Row 1 :
3 sc; 5 sc in last ch; going around the ch 3 sc; ch 1 and turn (11)
Row 2 :
3 sc; 5 inc; 3 sc; ch 1 and turn (16)
Row 3 :
3 sc; (sc, inc) x 5; 3 sc; ch 1 and turn (21)
Row 4 :
3 sc; (2 sc, inc) x 5; 3 sc; ch 1 and turn (26)
Row 5 :
3 sc; (3 sc, inc) x 5; 3 sc; ch 1 and turn (31)
Row 6 :
3 sc; (4 sc, inc) x 5; 3 sc; ch 1 but do not turn (36)
Info :
1 sc in each of the rows at the bottom of the door (11). Sl st to join to 1st st of Row 6. Fasten off. With Copper, sl st around the side and top of the door but not the bottom. Fasten off
DOORKNOB
Info :
With Copper, 5 sc in a mr. Sl st to join. Fasten off leaving a tail for sewing. Sew the doorknob on the door. I sewed it on the left side of the door
WINDOWS (x 2)
Info :
With Natural, ch 12
Row 1 :
10 hdc; ch 2 and turn (10)
Rows 2-3 :
hdc in each st; ch 2 and turn (10)
Row 4 :
hdc in each st (10)
Info :
Fasten off leaving a long tail for sewing. With Copper surface slip stitch all around the window. Then slip stitch in the middle making a line going from one side to the other and another from top to bottom
GRASS (make as many as you wish)
Infos :
I crocheted 12 pieces of grass. They are different lengths. Ch 7 (or however many you want)
Row 1 :
1 sc in 2nd ch from hook; 1 sc in 5 sts
Info :
Fasten off leaving a tail for sewing
MR. FOX'S SIGN
Row 1 :
10 fsc; ch 1 and turn (10)
Row 2 :
esc in each st; ch 1 and turn (10)
Row 3 :
esc in each st (10)
Info :
Fasten off and secure the stitches. With black sew Mr Fox on the sign. I just did straight lines. For the o I used clear tacky glue to create the circle shape. Add a string at the top. I used color Natural
FLOWERS (x 2)
Round 1 :
with Canary 10 sc in a mr; sl st to join and ch 2 (10)
Round 2 :
3 dc in 1st st and ch 2; sl st in next st; (sl st in next and ch 2, 3 dc in same st as last sl st; ch 2 and sl st in next) - repeat until you have 5 petals
Info :
Fasten off and tie a knot at the back
FLOWER STEMS (x 2)
1st stem :
ch 12 and fasten off leaving a tail for sewing
2nd stem :
ch 10 and fasten off leaving a tail for sewing
MUSHROOMS (x 3)
Info :
Join rounds with a slip stitch and ch 1
Large Mushroom
Round 1 :
with Natural 8 sc in a mr (8)
Round 3 :
(sc, inc) x 8 (24)
Round 4 :
(2 sc, inc) x 8 (32)
Info :
Fold in half and sc around the edge to close (Picture 4G). Inc in first and last and 1 sc in the 30 in the middle
Medium Mushroom
Round 1 :
with Natural 8 sc in a mr (8)
Round 3 :
(sc, inc) x 8 (24)
Info :
Fold in half and sc around the edge to close. Inc in first and last and 1 sc in the 10 in the middle
Small Mushroom
Round 1 :
6 sc in a mr (6)
Round 3 :
(sc, inc) x 6 (18)
Info :
Fold in half and sc around the edge to close. Inc in first and last and 1 sc in the 7 in the middle
This enchanting two-part pattern captures the magic of woodland creatures and their forest homes in miniature perfection. Mr. Fox comes to life with his detailed features and coordinated outfit, while his tree stump house offers endless opportunities for creative decoration. The combination of traditional amigurumi techniques with structural elements makes this an engaging project that results in a displayable work of art. Perfect for those who love storytelling through their handmade creations. 🦊🏡 Happy crocheting! 🧶✨