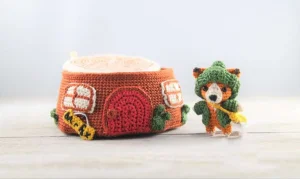
You're going to love creating this whimsical little world! This pattern brings to life a tiny fox and his very own cozy tree stump home, complete with a removable roof and tiny accessories. It's a project that rewards your patience with the most charming results imaginable. You'll find yourself completely immersed in the tiny details, from the fox's miniature jacket to the hand-stitched rings on the tree stump lid.
Progress Tracker
0% Complete
— 1. Fox Head :
Round 1 :
Using Color A, place 8 sc into a MR (8)
Round 2 :
Work 8 inc around (16)
Round 3 :
(sc, inc) repeat 8 times (24)
Round 4-5 :
sc in every st around (24)
Round 6 :
sc in next 4 st, inc in next 4 st, sc in next 8 st, inc in next 4 st, sc in last 4 st (32)
Round 7-9 :
sc in every st around (32)
Round 10 :
(2 sc, dec) repeat 8 times (24)
Round 11 :
(sc, dec) repeat 8 times (16)
Info :
Begin stuffing the head firmly now, adding more as you close the next round.
Round 12 :
Work 8 dec around (8)
— 2. Fox Body :
Round 13 :
Continue from head: (sc, inc) repeat 4 times (12)
Round 14 :
(2 sc, inc) repeat 4 times (16)
Round 15 :
sc in next 3 st, ch 2, sk 3 st, sc in next 5 st, ch 2, sk 3 st, sc in last 2 st (14)
Round 16 :
Working in BLO of the ch and both loops of other sts: (6 sc, inc) repeat 2 times (16)
Round 17 :
(3 sc, inc) repeat 4 times (20)
Round 18-20 :
sc in every st around (20)
Info :
Stuff the body. Mark the middle 6 stitches (3 front, 3 back) to separate the legs, leaving 7 stitches on each side for the leg openings.
— 3. Fox Legs :
Round 1 :
Work sc until the first marker. Join to the corresponding stitch on the opposite side and sc around the leg opening (7)
Round 2-3 :
sc in every st around (7)
Colour Change :
Switch to Natural thread.
Round 4 :
sc in every st around (7)
Info :
Fasten off and repeat for the second leg. Sew the gap between the legs closed.
— 4. Fox Arms :
Round 1 :
Join Color A to the arm opening. Work 1 sc in each of the 2 ch and 3 sk st (5)
Round 2-4 :
sc in every st around (5)
Colour Change :
Switch to Natural thread.
Round 5-6 :
sc in every st around (5)
Info :
Fasten off. Do not stuff the arms.
— 5. Fox Tail :
Round 1 :
Using Natural thread, 6 sc in MR (6)
Round 2 :
(sc, inc) repeat 3 times (9)
Round 3 :
(2 sc, inc) repeat 3 times (12)
Colour Change :
Switch to Color A.
Round 4-6 :
sc in every st around (12)
Round 7 :
(2 sc, dec) repeat 3 times (9)
Round 8 :
(sc, dec) repeat 3 times (6)
Info :
Stuff lightly and fasten off with a long tail for sewing.
— 6. Fox Muzzle :
Round 1 :
Using Natural thread, 8 sc in MR. Join with sl st and ch 1 (8)
Round 2 :
(sc, inc) repeat 4 times. Join with sl st and ch 1 (12)
Round 3 :
sl st in next 5 st, (hdc, dc) in next st, (dc, hdc) in next st, sl st in last 5 st (14)
— 7. Fox Ears :
Row 1 :
Using Color A, ch 6. sc in 2nd ch and across, ch 1, turn (5)
Row 2 :
dec, sc, dec, ch 1, turn (3)
Row 3 :
sc in each st, ch 1, turn (3)
Row 4 :
sc3tog, ch 1, turn (1)
Row 5 :
sc in the single st (1)
Info :
Work sc around the entire ear: 1 sc in each of the 4 side rows, 2 sc in bottom corners, and 1 sc in the 3 base st. Join at the top.
— 8. Fox Jacket :
Row 1 :
Using Jalapeno, ch 13. 2 sc in 2nd ch and each ch across, ch 1, turn (24)
Row 2 :
sc in 4, ch 2, sk 5, sc in 6, ch 2, sk 5, sc in 4, ch 1, turn (18)
Row 3 :
sc in every st and ch (in BLO of ch), ch 1, turn (18)
Row 4 :
(2 sc, inc) repeat 6 times, turn (24)
Row 5 :
sl st across the entire row. Fasten off.
— 9. Jacket Sleeves :
Round 1 :
Join Jalapeno to armhole. sc in each ch, st, and the extra side spaces to create a round of 10 st. Join, ch 1 (10)
Round 2-3 :
sc in every st around. Join, ch 1 (10)
Info :
Fasten off and weave in ends on the inside.
— 10. Fox Hat :
Back Piece Row 1 :
Using Jalapeno, ch 13. sc in 2nd ch and each ch across, ch 1, turn (12)
Back Piece Row 2 :
sc across, ch 1, turn (12)
Back Piece Row 3 :
sc, dec, 6 sc, dec, sc, ch 1, turn (10)
Back Piece Row 4 :
sc, dec, 4 sc, dec, sc, ch 1, turn (8)
Back Piece Row 5 :
sc, dec, 2 sc, dec, sc, ch 1, turn (6)
Back Piece Row 6 :
sc across, ch 1, turn (6)
Back Piece Row 7 :
sc, 2 dec, sc, ch 1, turn (4)
Back Piece Row 8 :
2 dec, ch 1, turn (2)
Back Piece Row 9-10 :
sc across, ch 1, turn (2)
Front Piece Row 1 :
Using Jalapeno, ch 17. sc in 2nd ch and across, ch 1, turn (16)
Front Piece Row 2 :
sc across, ch 1, turn (16)
Front Piece Row 3 :
sc, dec, 10 sc, dec, sc, ch 1, turn (14)
Front Piece Row 4 :
sc, 2 dec, 4 sc, 2 dec, sc, ch 1, turn (10)
Front Piece Row 5 :
sc across, ch 1, turn (10)
Front Piece Row 6 :
sc, dec, 4 sc, dec, sc, ch 1, turn (8)
Front Piece Row 7 :
sc, dec, 2 sc, dec, sc, ch 1, turn (6)
Front Piece Row 8 :
sc, 2 dec, sc, ch 1, turn (4)
Front Piece Row 9 :
2 dec (2)
Brim Row 1-18 :
ch 5. Working in BLO, hdc in 3 st, ch 2, turn. Repeat for 18 rows or until it fits the hat circumference.
Pom-Pom Round 1 :
6 sc in MR. Join, ch 1 (6)
Pom-Pom Round 2 :
6 inc. Join, ch 1 (12)
Pom-Pom Round 3-4 :
sc across. Join, ch 1 (12)
Pom-Pom Round 5 :
6 dec. Join (6)
— 11. Fox Bag :
Round 1 :
Using Canary, ch 6. sc in 4 st, 3 sc in last ch; turn to other side of ch, sc in 3 st, 2 sc in last ch. Join, ch 1 (12)
Round 2-3 :
sc around. Join, ch 1 (12)
Round 4 :
sc around. Join and fasten off.
Handle :
ch 16 (adjust based on your tension) and attach to the sides of the bag.
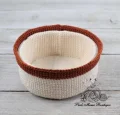
— 12. House Interior Base :
Round 1 :
Using Natural thread, 8 sc in MR. Join, ch 1 (8)
Round 2 :
8 inc. Join, ch 1 (16)
Round 3 :
(sc, inc) repeat 8 times. Join, ch 1 (24)
Round 4 :
(2 sc, inc) repeat 8 times. Join, ch 1 (32)
Round 5 :
(3 sc, inc) repeat 8 times. Join, ch 1 (40)
Round 6 :
(4 sc, inc) repeat 8 times. Join, ch 1 (48)
Round 7 :
(5 sc, inc) repeat 8 times. Join, ch 1 (56)
Round 8 :
(6 sc, inc) repeat 8 times. Join, ch 1 (64)
Round 9 :
(7 sc, inc) repeat 8 times. Join, ch 1 (72)
Round 10 :
(8 sc, inc) repeat 8 times. Join, ch 1 (80)
Round 11 :
(9 sc, inc) repeat 8 times. Join, ch 1 (88)
Round 12 :
(10 sc, inc) repeat 8 times. Join, ch 1 (96)
Round 13 :
(11 sc, inc) repeat 8 times. Join, ch 1 (104)
Info :
Make two circles. Fasten off the first. Keep the second on the hook to start the walls.
— 13. House Walls :
Round 14 :
Join the two circles by working 1 sc in each st, going through BLO of the bottom circle and both loops of the top (104)
Round 15 :
sc in every st around (104)
Round 16-28 :
sc in every st around for 13 rounds (104)
Second Wall Round 14 :
Join Natural thread to the FLO of Round 14. sc in each front loop (104)
Second Wall Round 15-27 :
sc in every st around (104)
Second Wall Round 28 :
sc in BLO around (104)
Second Wall Round 29 :
sc in every st around (104)
Round 30 Joining :
Insert plastic reinforcement between walls. sl st through the back loop of the outside wall and front loop of the inside wall to join.
Brown Rim Round 1 :
Join Copper thread to FLO of Round 27. sc in each loop, join, ch 1 (104)
Brown Rim Round 2-4 :
sc around. Join, ch 1 (104)
Brown Rim Round 5 :
(12 sc, inc) repeat 8 times. Join (112)
— 14. Tree Stump Exterior :
Round 1-18 :
Using Copper thread, follow increase pattern from House Base until you reach 144 st. Join, ch 2.
Round 19 :
2 hdc, (12 sc, 2 hdc, 2 dc, 2 hdc) repeat 7 times, then 12 sc, 2 hdc, 2 dc. Join, ch 1, turn (144)
Round 20 :
Working in BLO, sc in every st around (144)
Round 21 :
Insert cardboard base. (16 sc, dec) repeat 8 times (136)
Round 22 :
(15 sc, dec) repeat 8 times (128)
Round 23 :
(14 sc, dec) repeat 8 times (120)
Round 24-28 :
sc in every st around (120)
Round 29 :
(13 sc, dec) repeat 8 times (112)
Round 30-38 :
sc in every st around (112)
Round 39 :
Place the inside wall assembly into the stump. sl st through BLO of stump and FLO of inside wall to join (112)
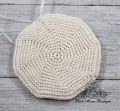
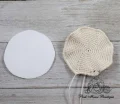
— 15. House Roof :
Round 1-14 :
Make two circles using Natural thread, following the House Base increase pattern until you have 112 st.
Info :
Embroider brown rings on one circle using backstitch between each round.
Round 15 :
Hold circles together. sl st through BLO of the ringed piece and FLO of the plain piece for 111 st. At last st, ch 5, sc in 2nd ch and next 3 ch to create a stem. sl st to last st and fasten off.
— 16. House Decor :
Door Row 1 :
Using Serrano, ch 5. sc in 3, 5 sc in last ch; turn, sc in 3, ch 1, turn (11)
Door Row 2 :
3 sc, 5 inc, 3 sc, ch 1, turn (16)
Door Row 3 :
3 sc, (sc, inc) x 5, 3 sc, ch 1, turn (21)
Door Row 4 :
3 sc, (2 sc, inc) x 5, 3 sc, ch 1, turn (26)
Door Row 5 :
3 sc, (3 sc, inc) x 5, 3 sc, ch 1, turn (31)
Door Row 6 :
3 sc, (4 sc, inc) x 5, 3 sc. Do not turn. sc across the bottom edge (36)
Windows Row 1-4 :
Using Natural, ch 12. hdc in 10 st, ch 2, turn. Repeat for 4 rows. Surface sl st Copper thread around edges and in a cross shape in the center.
Flowers :
Using Canary, 10 sc in MR. (3 dc in st, ch 2, sl st in next) repeat 5 times for petals.
Mushrooms :
Work 4 rounds of sc increases to create a small dome. Fold in half and sc the edge closed to create a crescent shape.
This Mr. Fox and his tree stump home are truly a labor of love. There’s something so incredibly satisfying about seeing all those tiny components—the little mushrooms, the hand-stitched sign, and the fox's dapper jacket—all come together into a complete miniature scene. It’s the kind of project that you’ll want to display proudly on your desk or shelf. I hope this pattern brings a little bit of forest magic into your home and that you enjoy every tiny, delicate stitch of the process. Happy crafting! 🧶 🦊 ✨