Create three adorable no-sew amigurumi friends with this comprehensive pattern bundle! Each design features a unique construction method that works from body to head, eliminating the need for complex assembly. Perfect for crafters who want to make quick, charming companions, these patterns include a cheerful striped bee with bobble stitch details, a sweet mouse with pink ears and a dimensional nose, and a lovable puppy dog with floppy ears. All three designs use super bulky yarn and simple techniques, making them accessible while still producing impressive results with personality and charm.
Progress Tracker
0% Complete
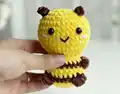
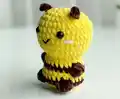
— BEE - Body to Head (No Sew) :
Row 1 :
Begin with Yellow yarn, 6 SC in an MR (6)
Row 3 :
(SC, INC) 6 times (18)
Row 4 :
(2 SC, INC) 6 times (24)
Row 5 :
Change to Brown yarn, 8 SC, BO, 6 SC, BO, 8 SC (24)
Row 6 :
Change to Yellow yarn, 8 SC, SC into the stitch's BO, 6 SC, SC into the stitch's BO, 8 SC (24)
Row 8 :
Change to Brown yarn, 6 SC, BO, 10 SC, BO, 6 SC (24)
Row 9 :
Change to Yellow yarn, 6 SC, SC into the stitch's BO, 10 SC, SC into the stitch's BO, 6 SC (24)
Row 10 :
(SC, DEC) 8 times (16)
Row 11 :
FLO, (SC, INC) 8 times (24)
Row 12 :
(SC, INC) 12 times (36)
Row 19 :
(2 SC, DEC) 9 times (27)
Row 20 :
(SC, DEC) 9 times (18)
Row 21 :
(SC, DEC) 6 times (12)
Info :
Weave in the yarn end and cut
— BEE - Beard :
Instructions :
Begin with brown, Pick up the yarn from row 19: 4CH, turn: 3SC, Cut the yarn
— BEE - Finishing Details :
Info :
Attach the eyes between rows 16 and 17
Info :
Use black yarn to embroider the mouth and pink yarn to embroider the cheeks
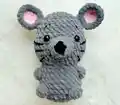
— MOUSE - Body to Head (No Sew) :
Row 1 :
Begin with Grey yarn, Join the new round with a slip stitch and chain 1, 6 SC in an MR (6)
Row 3 :
(SC, INC) 6 times (18)
Row 4 :
(2 SC, INC) 6 times (24)
Row 5 :
8 SC, BO, 6 SC, BO, 8 SC (24)
Row 8 :
6 SC, BO, 10 SC, BO, 6 SC (24)
Row 10 :
(SC, DEC) 8 times (16)
Row 11 :
FLO, 6SC, (3SC in one st) 4 times, 6SC (24)
Row 12 :
(SC, INC) 12 times (36)
Row 13 :
16SC, (BLO: 4SC), 16SC (36)
Row 14-15 :
15SC, (BLO: SC), 4SC, (BLO: SC), 15SC (36)
Row 16 :
(2SC, DEC) 4 times, (BLO: 2SC, DEC), (2SC, DEC) 4 times (30)
Row 20 :
(SC, DEC) 9 times (18)
Row 21 :
(SC, DEC) 6 times (12)
Info :
Weave in the yarn end and cut
— MOUSE - Ears (Make 2) :
Row 1 :
Begin with Pink yarn, Join the new round with a slip stitch and chain 1, 6SC in an MR (6)
Row 2 :
(SC, INC) 3 times (9)
Row 3 :
(2SC, INC) 3 times (12)
Row 4 :
Change to Grey yarn, (SC, INC) 6 times (18)
Info :
Attach the ear point straight from the arm going up with 3 SLST at R18-20
— MOUSE - Nose :
Row 1 :
Begin with Black yarn, Join the new round with a slip stitch and chain 1, 4SC in an MR (4)
Row 2 :
Change to Grey yarn, (SC, INC) 2 times (6)
Row 3 :
(2SC, INC) 2 times (8)
Row 4 :
(SC, INC) 4 times (12)
Info :
Attach the nose to the head with 12 SLST at BLO of R13-16
— MOUSE - Finishing Details :
Info :
Attach the eyes at R15-16, 6st apart. Sew the line as shown
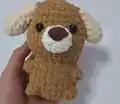
— PUPPY DOG - Ear (Make 2) :
Row 1 :
Use Skin yarn, 6 SC in an MR (6)
Row 5 :
(2 SC, DEC) 3 times (9)
Row 8 :
(SC, DEC) 3 times (6)
— PUPPY DOG - Body to Head (No Sew) :
Row 1 :
Begin with Brown yarn, 6 SC in an MR (6)
Row 3 :
(SC, INC) 6 times (18)
Row 4 :
(2 SC, INC) 6 times (24)
Row 5 :
8 SC, BO, 6 SC, BO, 8 SC (24)
Row 6 :
8 SC, SC into the stitch's BO, 6 SC, SC into the stitch's BO, 8 SC (24)
Row 8 :
6 SC, BO, 10 SC, BO, 6 SC (24)
Row 9 :
6 SC, SC into the stitch's BO, 10 SC, SC into the stitch's BO, 6 SC (24)
Row 10 :
(SC, DEC) 8 times (16)
Row 11 :
FLO, (SC, INC) 8 times (24)
Row 12 :
(SC, INC) 12 times (36)
Row 16 :
(2 SC, DEC) 9 times (27)
Row 20 :
2SC, DEC, fold the ears in half and crochet them together at the head 3SC, (DEC, 2SC) 2 times, DEC, SC, DEC, fold the ears in half and crochet them together at the head 3SC, DEC, 2 SC (21)
Row 21 :
(SC, DEC) 7 times (14)
Info :
Weave in the yarn end and cut
— PUPPY DOG - Nose :
Row 1 :
Use White yarn, Crochet 12 SLST from rows 14-16 in a circular shape as shown in photo
Row 2 :
Crochet 12SC crochet into the 12 slip stitches
Row 3 :
(SC, DEC) 4 times (8)
— PUPPY DOG - Finishing Details :
Info :
Attach the eyes at row 16
This charming trio of no-sew amigurumi patterns brings together three beloved animals in one delightful collection! Each design showcases the innovative body-to-head construction method that eliminates tedious assembly while creating adorable companions full of personality. The bee buzzes with cheerful stripes, the mouse squeaks with sweetness, and the puppy wags its way into your heart. Perfect for beginners wanting to explore amigurumi or experienced crocheters seeking quick, satisfying projects, these patterns prove that simple techniques can create impressive results. 🧶✨