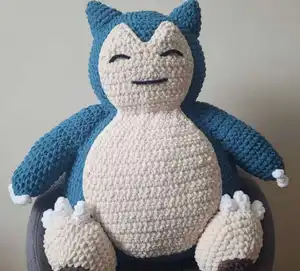
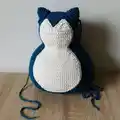
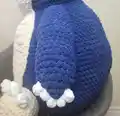
Create your very own oversized Snorlax plushie with this comprehensive amigurumi pattern! This cuddly Pokemon character stands approximately 26 inches tall and 28 inches wide, making it the perfect companion for naptime or display. Using super bulky Bernat Blanket yarn, you'll craft a soft, huggable friend that captures Snorlax's sleepy charm. This detailed pattern guides you through every step, from the rounded belly to the tiny claws, resulting in an impressive project that any Pokemon fan will treasure.
Progress Tracker
0% Complete
— Head :
Info :
Worked in continuous rounds - do not slip stitch/chain one to join rounds. Made in Lagoon or Lapis
Round 1 :
Make 6 sc in a magic ring (6)
Round 2 :
Increase in each stitch (12)
Round 3 :
(sc, inc) x 6 (18)
Round 4 :
sc, inc, (2 sc, inc) x 5, sc (24)
Round 5 :
(3 sc, inc) x 6 (30)
Round 6 :
2 sc, inc, (4 sc, inc) x 5, 2 sc (36)
Round 7 :
(5 sc, inc) x 6 (42)
Round 8 :
3 sc, inc, (6 sc, inc) x 5, 3 sc (48)
Round 9 :
(7 sc, inc) x 6 (54)
Round 10 :
sc in each stitch (54)
Round 11 :
4 sc, inc, (8 sc, inc) x 5, 4 sc (60)
Round 12 :
sc in each stitch (60)
Round 13 :
(14 sc, inc) x 4 (64)
Round 14-18 :
sc in each stitch (64)
Round 19 :
(14 sc, dec) x 4 (60)
Round 20 :
sc in each stitch (60)
Round 21 :
4 sc, dec, (8 sc, dec) x 5, 4 sc (54)
Round 22 :
sc in each stitch (54)
Round 23 :
(7 sc, dec) x 6 (54)
Info :
Fasten off. Add stuffing to the head. The increases from round 13 should make the head slightly oval-shaped
— Body :
Info :
Worked in an oval shape. Worked in continuous rounds - do not slip stitch/chain one to join. Made in Lagoon or Lapis
Round 1 :
Chain 18. Starting in the second chain from the hook: inc, 15 sc, make 3 sc in the last chain. Turn so you are working on the opposite side of the foundation chain. 16 sc. (36)
Round 2 :
inc, inc, 15 sc, inc, inc, inc, 15 sc, inc (42)
Round 3 :
sc, inc, sc, inc, 16 sc, inc, sc, inc, sc, inc, 16 sc, inc (48)
Round 4 :
2 sc, inc, 2 sc, inc, 17 sc, inc, 2 sc, inc, 2 sc, inc, 17 sc, inc (54)
Round 5 :
3 sc, inc, 3 sc, inc, 18 sc, inc, 3 sc, inc, 3 sc, inc, 18 sc, inc (60)
Round 6 :
4 sc, inc, 4 sc, inc, 19 sc, inc, 4 sc, inc, 4 sc, inc, 19 sc, inc (66)
Round 7 :
5 sc, inc, 5 sc, inc, 20 sc, inc, 5 sc, inc, 5 sc, inc, 20 sc, inc (72)
Round 8 :
4 sc, inc, (8 sc, inc) x 7, 4 sc (80)
Round 9 :
(9 sc, inc) x 8 (88)
Round 10 :
5 sc, inc, (10 sc, inc) x 7, 5 sc (96)
Round 11 :
sc in each stitch (96)
Round 12 :
(11 sc, inc) x 8 (104)
Round 13 :
sc in each stitch (104)
Round 14 :
6 sc, inc, (12 sc, inc) x 7, 6 sc (112)
Round 15-24 :
sc in each stitch (112)
Round 25 :
6 sc, dec, (12 sc, dec) x 7, 6 sc (104)
Round 26-29 :
sc in each stitch (104)
Round 30 :
(11 sc, dec) x 8 (96)
Round 31 :
sc in each stitch (96)
Round 32 :
5 sc, dec, (10 sc, dec) x 7, 5 sc (88)
Round 33 :
sc in each stitch (88)
Round 34 :
(9 sc, dec) x 8 (80)
Round 35 :
4 sc, dec, (8 sc, dec) x 7, 4 sc (72)
Round 36 :
sc in each stitch (72)
Round 37 :
(7 sc, dec) x 8 (64)
Round 38 :
sc in each stitch (64)
Round 39 :
3 sc, dec, (6 sc, dec) x 7, 3 sc (56)
Round 40 :
sc in each stitch (56)
Round 41 :
(5 sc, dec) x 8 (48)
Info :
Fasten off, leaving a very long tail to sew the body to the head. Add a LOT of stuffing to the body
— Ears :
Info :
Make two ears. Made in continuous rounds - do not slip stitch/chain one to join. Made in Lagoon or Lapis
Round 1 :
Make 6 sc in a magic ring (6)
Round 2 :
(sc, inc) x 3 (9)
Round 3 :
sc, inc, 2 sc, inc, 2 sc, inc, sc (12)
Round 4 :
sc, inc, 2 sc, inc, 2 sc, inc, 2 sc, inc, sc (16)
Round 5 :
(3 sc, inc) x 4 (20)
Round 6 :
2 sc, inc, 4 sc, inc, 4 sc, inc, 4 sc, inc, 2 sc (24)
Info :
Fasten off, leaving a long tail to sew to the head
— Arms :
Info :
Make two arms. Made in continuous rounds - do not slip stitch/chain one to join. Made in Lagoon or Lapis
Round 1 :
Make 6 sc in a magic ring (6)
Round 2 :
increase in each stitch (12)
Round 3 :
inc, inc, 3 sc, inc, inc, inc, 3 sc, inc (18)
Round 4 :
sc in each stitch (18)
Round 5 :
4 sc, inc, 8 sc, inc, 4 sc (20)
Round 6 :
9 sc, inc, 9 sc, inc (22)
Round 7-11 :
sc in each stitch (22)
Round 12 :
sc in each stitch, then chain one & turn to start working in rows (22)
Info :
Working in rows instead of rounds. Make sure you have already chained & turned
Row 13 :
16 sc, chain one & turn (16)
Row 14 :
dec, 12 sc, dec, chain one & turn (14)
Row 15 :
14 sc, chain one & turn (14)
Row 16 :
dec, 10 sc, dec, chain one & turn (12)
Row 17 :
12 sc, chain one & turn (12)
Row 18 :
dec, 8 sc, dec, chain one & turn (10)
Row 19 :
10 sc, chain one & turn (10)
Row 20 :
dec, 6 sc, dec, chain one & turn (8)
Row 21 :
8 sc, chain one & turn (8)
Row 22 :
dec, 4 sc, dec, chain one & turn (6)
Info :
Fasten off, leaving a long tail to sew to the sides of the body. Add stuffing to the bottom of the arm (the part that's in rows will be stuffed when the arm is sewed to the body)
— Feet :
Info :
Make two feet. Worked in continuous rounds - do not slip stitch/chain one to join. Made in Birch
Round 1 :
Chain 6. Starting in the second chain from the hook: inc, 3 sc, make 3 sc in the last chain. Turn so you are working on the opposite side of the foundation chain. 4 sc. (12)
Round 2 :
inc, inc, 3 sc, inc, inc, inc, 3 sc, inc (18)
Round 3 :
sc, inc, sc, inc, 4 sc, inc, sc, inc, sc, inc, 4 sc, inc (24)
Round 4 :
2 sc, inc, 2 sc, inc, 5 sc, inc, 2 sc, inc, 2 sc, inc, 5 sc, inc (30)
Round 5 :
3 sc, inc, 3 sc, inc, 6 sc, inc, 3 sc, inc, 3 sc, inc, 6 sc, inc (36)
Round 6 :
3 sc, inc, 4 sc, inc, 7 sc, inc, 4 sc, inc, 4 sc, inc, 7 sc, inc, sc (42)
Info :
Please note the beginning of this round does NOT have an error in it. Rounds shifted a bit
Round 7-8 :
sc in each stitch (42)
Round 9 :
4 sc, dec, 4 sc, dec, 7 sc, dec, 4 sc, dec, 4 sc, dec, 7 sc, dec (36)
Round 10 :
3 sc, dec, 3 sc, dec, 6 sc, dec, 3 sc, dec, 3 sc, dec, 6 sc, dec (30)
Round 11 :
2 sc, dec, 2 sc, dec, 5 sc, dec, 2 sc, dec, 2 sc, dec, 5 sc, dec (24)
Round 12 :
2 sc, dec, 4 sc, dec, 4 sc, dec, 4 sc, dec, 2 sc (20)
Info :
Fasten off, leaving a long tail to sew each of the feet to the body. Add stuffing to the feet
— Foot Pads :
Info :
Make two foot pads. Worked in joined rounds - slip stitch & chain one at the end of each round. Made in Taupe
Round 1 :
Make 8 hdc in a magic ring, slip stitch to the first stitch & chain one (8)
Round 2 :
Make a half double crochet increase in the same stitch as the slip stitch. Half double crochet increase in each of the next 7 stitches. Slip stitch to the first stitch (16)
Info :
Fasten off, leaving a tail to sew to the foot
— Belly Patch :
Info :
Worked in rows. Made in Birch
Row 1 :
Chain 13. Starting in the second chain from the hook: inc, 10 sc, inc, chain one & turn (14)
Row 2 :
inc, 12 sc, inc, chain one & turn (16)
Row 3 :
inc, 14 sc, inc, chain one & turn (18)
Row 4 :
inc, 16 sc, inc, chain one & turn (20)
Row 5 :
inc, 18 sc, inc, chain one & turn (22)
Row 6 :
inc, 20 sc, inc, chain one & turn (24)
Row 7-18 :
24 sc, chain one & turn (24)
Row 19 :
dec, 20 sc, dec, chain one & turn (22)
Row 20 :
22 sc, chain one & turn (22)
Row 21 :
dec, 18 sc, dec, chain one & turn (20)
Row 22 :
20 sc, chain one & turn (20)
Row 23 :
dec, 16 sc, dec, chain one & turn (18)
Row 24 :
dec, 14 sc, dec, chain one & turn (16)
Row 25 :
16 sc, chain one & turn (16)
Row 26 :
dec, 12 sc, dec, chain one & turn (14)
Row 27 :
dec, 10 sc, dec, chain one & turn (12)
Row 28 :
12 sc, chain one & turn (12)
Row 29 :
inc, 10 sc, inc, chain one & turn (14)
Row 30 :
inc, 12 sc, inc, chain one & turn (16)
Row 31-37 :
16 sc, chain one & turn (16)
Row 38 :
dec, 4 sc, dec. Place marker in the next stitch (the ninth stitch from row 37). Chain one & turn (6)
Row 39 :
6 sc, chain one & turn (6)
Row 40 :
dec, 2 sc, dec, chain one & turn (4)
Row 41 :
dec, dec, chain one & turn (2)
Info :
Fasten off. Attach yarn in the stitch that was marked in row 37, when making row 38 & continue
Row 43 :
dec, 4 sc, dec, chain one & turn (6)
Row 44 :
6 sc, chain one & turn (6)
Row 45 :
dec, 2 sc, dec, chain one & turn (4)
Row 46 :
dec, dec, chain one & turn (2)
Info :
Fasten off. Flip the belly patch over so that the right side of the piece is facing. Attach a new piece of yarn to the bottom left corner & sc a border around. Make 3 sc in row 42. Make 4 sc down the sides of the rows of the top piece. Dec over the next two stitches. Make 4 sc up the other side of the rows (on the second top piece) & make 3 sc in row 47. Then continue on down the other side of the piece. Make sure that you have an even number of stitches on both of the long sides of the piece. When finished crocheting the border, fasten off & leave a very long tail to sew the belly patch to the body
— Claws (Hands) :
Info :
Make 10 claws. Made in White
Option 1 :
Make a magic ring with 3 sc. Slip stitch to the first stitch (3)
Option 2 :
Chain 2. Make 3 sc in the second chain from the hook. Slip stitch to the first stitch (3)
Info :
Fasten off, leaving a tail to sew to the hands
— Claws (Feet) :
Info :
Make 6 claws. Worked in continuous rounds - do not slip stitch/chain one to join. Made in White
Round 1 :
Make a magic ring with 3 sc (3)
Round 2 :
inc, inc, inc (6)
Round 3 :
sc in each stitch (6)
Info :
Fasten off, leaving a tail to sew the claws to the feet
This giant Snorlax amigurumi pattern brings one of Pokemon's most beloved characters to life in spectacular oversized form! Standing at an impressive 26 inches tall, this cuddly companion uses super soft Bernat Blanket yarn to create the perfect naptime buddy. The detailed instructions guide you through creating every element from the signature belly patch to the tiniest claws, resulting in a showstopping piece that any Pokemon fan will absolutely adore. While this is a time-intensive project, the result is a museum-quality plushie that becomes a treasured part of your home. Get ready for the ultimate cozy crafting adventure! 🧶💙✨