๐Ÿงถ Beautiful โœจ Detailed ๐Ÿ’ Adorable

Minecraft Zombie Amigurumi Pattern

Minecraft Zombie Amigurumi Pattern
4.8โ˜… Rating
6-8 Hours Time Needed
3.3K Made This
โœ‚๏ธ

Intermediate Level

Ideal for those with basic knitting experience, featuring slightly more advanced stitches and techniques to expand your skills.

โฑ๏ธ

All-Day Adventure

Requires 8-10 hours, ideal for a full day of immersive knitting.

๐Ÿฐ

Whimsical Buddy

Playful characters full of personality, designed to spark imagination and become cherished playtime favorites.

About This Minecraft Zombie Amigurumi Pattern

This Minecraft Zombie pattern captures the blocky, pixelated aesthetic that makes Minecraft characters so recognizable and beloved. The pattern uses multiple yarn colors to create the characteristic zombie appearance with dark green hair and green skin. The cube-shaped head is achieved through careful stitch placement and color changes that mimic the game's iconic block design. The finished zombie features moveable arms attached with safety eyes for durability and play.

Minecraft Zombie Amigurumi Pattern crochet pattern - detailed view of completed project

This pattern includes detailed instructions for creating the zombie's distinctive features including the square head with color-blocked design, sturdy legs with flat soles, and properly proportioned body. The assembly technique ensures your zombie can stand independently and maintain its shape during play or display.

Why You'll Love This Minecraft Zombie Amigurumi Pattern

I absolutely love how this pattern brings a favorite video game character into the real world! The satisfaction of watching those color changes come together to form the recognizable Minecraft aesthetic is incredible. I enjoy how the cube-shaped head challenges traditional amigurumi techniques while still being achievable. The moveable arms add an interactive element that makes the finished piece perfect for both display and play. This pattern is rewarding because it combines gaming culture with handmade craft, creating something truly unique that Minecraft fans of all ages will treasure.

Minecraft Zombie Amigurumi Pattern step 1 - construction progress Minecraft Zombie Amigurumi Pattern step 2 - assembly progress Minecraft Zombie Amigurumi Pattern step 3 - details and accessories Minecraft Zombie Amigurumi Pattern step 4 - final assembly and finishing

Switch Things Up

I love experimenting with color variations when making Minecraft-inspired characters! Try creating a zombie villager by changing the shirt color to brown and adding a bit of gray to the head for that distinctive villager appearance. You could also make a baby zombie by working with a smaller hook size and fewer rounds in each section.

For a fun twist, consider adding embroidered details like stitches or patches to make your zombie look more worn and weathered. Some crafters like to add small tears or dirt marks using fabric paint for extra character. I've seen creators make entire zombie hordes by varying the clothing colors while keeping the green skin consistent.

If you want to make your zombie more interactive, try inserting wire into the arms and legs before stuffing to create fully poseable limbs. This works wonderfully for creating action poses or dioramas. You could also craft matching accessories like a pixelated pickaxe or sword using the same construction technique as the pattern's weapons.

For display purposes, I recommend creating a small Minecraft grass block base using green and brown yarn in a simple cube pattern. This gives your zombie the perfect stand and really completes the video game aesthetic when showcasing your finished creation!

Common Mistakes & How to Fix Them

โœ— Forgetting to work single crochet stitches in X-shape technique which causes visible stitch shifts and asymmetrical head design โœ— Not using stitch markers during color changes in the head section leading to misaligned facial features and incorrect placement โœ— Overstuffing the cube-shaped head which rounds out the corners and loses the authentic blocky Minecraft character appearance โœ— Failing to insert plastic piece in boot soles before stuffing causing rounded feet that won't allow zombie to stand properly

Minecraft Zombie Amigurumi Pattern

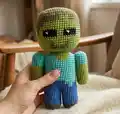
Bring the iconic Minecraft Zombie to life with this detailed crochet pattern! This cube-headed character features authentic game details including dark green hair, blocky arms and legs, and those distinctive black eyes. Perfect for Minecraft fans and gamers, this pattern creates a sturdy, poseable figure that stands on its own. The pattern uses simple color changes and basic amigurumi techniques to capture the pixelated charm of the beloved video game character.

Intermediate 6-8 Hours

Materials Needed for Minecraft Zombie Amigurumi Pattern

โ€” Main Fabric

  • 01
    Fine/4ply yarn Gazzal Jeans (50g/170m), green color (code 1151) for Zombie's head and hands
  • 02
    Fine/4ply yarn Gazzal Jeans (50g/170m), dark green color (code 1129) for Zombie's hair
  • 03
    Fine/4ply yarn YarnArt Jeans (50g/160m), turquoise color (code 33) for Zombie's shirt
  • 04
    Fine/4ply yarn YarnArt Jeans (50g/160m), navy blue color (code 16) for Zombie's pants
  • 05
    Fine/4ply yarn Gazzal Jeans (50g/170m), dark gray color (code 1140) for boots
  • 06
    Some black yarn for the eyes
  • 07
    Some white yarn for eye highlights

โ€” Tools Required

  • 01
    Crochet hook size 2.0 mm
  • 02
    Safety eyes for arms fastening
  • 03
    Tapestry needle for embroidery and sewing pieces
  • 04
    Scissors
  • 05
    Stitch marker or contrasting thread
  • 06
    Fiberfill or synthetic stuffing material
  • 07
    Thick plastic for boot soles
  • 08
    White embroidery thread for eye highlights (optional)

Progress Tracker

0% Complete

โ€” Head :

Infos :

Start in dark green color. Use X-shape or semi X-shape single crochet technique to prevent visible stitch shifts

Round 1 :

8 sc in a MR [8]

Round 2 :

(1 sc, 3in1) x 4 [16]

Round 3 :

2 sc, (3in1, 3 sc) x 3, 3in1, 1 sc [24]

Round 4 :

3 sc, (3in1, 5 sc) x 3, 3in1, 2 sc [32]

Round 5 :

4 sc, (3in1, 7 sc) x 3, 3in1, 3 sc [40]

Round 6 :

5 sc, (3in1, 9 sc) x 3, 3in1, 4 sc [48]

Round 7 :

6 sc, (3in1, 11 sc) x 3, 3in1, 5 sc [56]

Round 8 :

7 sc, (3in1, 13 sc) x 3, 3in1, 6 sc [64]

Round 9 :

BLO 64 sc [64]

Round 10 :

64 sc [64]

Info :

In the next rounds alternate dark green, green and black colors

Round 11-12 :

32 sc (dark green), 4 sc (green), 28 sc (dark green) [64]

Round 13-14 :

25 sc (dark green), 15 sc (green), 24 sc (dark green) [64]

Round 15-16 :

23 sc (dark green), 19 sc (green), 22 sc (dark green) [64]

Round 17-18 :

18 sc (dark green), 3 sc (green), 2 sc (dark green), 2 sc (green), 6 sc (black), 3 sc (green), 6 sc (black), 2 sc (green), 2 sc (dark green), 3 sc (green), 17 sc (dark green) [64]

Round 19 :

18 sc (dark green), 7 sc (green), 6 sc (black), 3 sc (green), 6 sc (black), 7 sc (green), 17 sc (dark green) [64]

Round 20-21 :

18 sc (dark green), 29 sc (green), 17 sc (dark green) [64]

Round 22-23 :

18 sc (dark green), 10 sc (green), 2 sc (dark green), 5 sc (green), 2 sc (dark green), 10 sc (green), 17 sc (dark green) [64]

Round 24 :

15 sc (dark green), 13 sc (green), 9 sc (dark green), 13 sc (green), 14 sc (dark green) [64]

Round 25 :

15 sc (dark green), 13 sc (green), 9 sc (dark green), 27 sc (green) [64]

Info :

Continue crocheting only in green color

Round 26 :

7 sc, (sc3tog, 13 sc) x 3, sc3tog, 6 sc [56]

Round 27 :

6 sc, (sc3tog, 11 sc) x 3, sc3tog, 5 sc [48]

Round 28 :

5 sc, (sc3tog, 9 sc) x 3, sc3tog, 4 sc [40]

Info :

Stuff the head tightly and evenly with fiberfill and continue

Round 29 :

4 sc, (sc3tog, 7 sc) x 3, sc3tog, 3 sc [32]

Round 30 :

3 sc, (sc3tog, 5 sc) x 3, sc3tog, 2 sc [24]

Round 31 :

2 sc, (sc3tog, 3 sc) x 3, sc3tog, 1 sc [16]

Round 32 :

1 sc, (sc3tog, 1 sc) x 3, sc3tog [8]

Info :

Sl st at the end, cut the yarn, pull off the hole to close and fasten off

โ€” Arms :

Infos :

Make 2 pieces. Crochet without palms in green color

Round 1 :

8 sc in a MR [8]

Round 2 :

(1 sc, 3in1) x 4 [16]

Round 3 :

BLO 16 sc [16]

Round 4-8 :

16 sc [16]

Round 9-13 :

16 sc [16]

Info :

Change color to turquoise

Round 14-19 :

16 sc [16]

Info :

Leave the yarn end about 40 cm long to finish the arm after fastening it to the body

โ€” Legs :

Infos :

Make 2 pieces. Start in dark gray color

Round 1 :

8 sc in a MR [8]

Round 2 :

(1 sc, 3in1) x 4 [16]

Round 3 :

2 sc, (3in1, 3 sc) x 3, 3in1, 1 sc [24]

Round 4 :

BLO 24 sc [24]

Round 5-6 :

24 sc [24]

Info :

To keep the soles flat, cut out a piece of thick plastic to fit the shape of the sole and put it inside. So after stuffing it will not be rounded

Info :

Change color to blue

Round 7 :

BLO 24 sc [24]

Round 8-15 :

24 sc [24]

Round 16 (First Leg) :

17 sc (short round), cut the yarn, leaving a long end for sewing

Info :

Crochet the second leg in the same way from Round 1 to Round 15

Round 16 (Second Leg) :

24 sc [24]

Info :

After the second leg is done, do not cut the yarn. From this point, continue to crochet the body

โ€” Body :

Info :

Place the legs and sew up 6 sc on the right and 6 sc on the left leg. Pay attention to how the square is located at the base of the legs. Sew the stitches together along the side of this square. After sewing, continue to crochet from the last stitch on the second leg. Work around both legs, making extra sc at the sewing points

Round 1 :

4 sc, 2 extra sc between the legs, 13 sc (blue), 2 sc (turquoise), 3 sc, 2 extra sc between the legs, 14 sc (blue) [40]

Round 2 :

19 sc (blue), 2 sc (turquoise), 19 sc (blue) [40]

Round 3-4 :

17 sc (blue), 6 sc (turquoise), 17 sc (blue) [40]

Info :

Change color to turquoise

Round 5 :

(work in back loops along blue stitch and in both loops along turquoise stitches): 40 sc [40]

Round 6-14 :

40 sc [40]

Round 15-16 :

24 sc (turquoise), 4 sc (green), 12 sc (turquoise) [40]

Round 17-18 :

22 sc (turquoise), 8 sc (green), 10 sc (turquoise) [40]

Round 19 :

6 sc (turquoise), move the marker of the round beginning into the last stitch and start a new round

Round 20 :

5 sc, sc3tog, 3 sc, sc3tog, 1 sc (turquoise), 10 sc (green), 1 sc, sc3tog, 3 sc, sc3tog, 5 sc (turquoise) [32]

Info :

Stuff the legs and body tightly with fiberfill, next crochet only in turquoise color

Round 21 :

4 sc, sc3tog, 1 sc, sc3tog, 10 sc, sc3tog, 1 sc, sc3tog, 4 sc [24]

Round 22 :

4 sc, sc3tog, 10 sc, sc3tog, 1 sl st. Cut the yarn, leaving a long end for sewing the head

โ€” Assembly :

Info :

Insert safety eyes into the body between rounds 18 and 19 symmetrically on both sides. Pass these eyes through the arms (move 2 rounds down from the edge). Pay attention that the arms after joining are placed correctly. Put washers on the legs of the eyes and stuff the body and arms tightly with fiberfill

Round 15 (Finish Arms) :

(1 sc, sc3tog) x 4 [8]

Info :

Sl st at the end, stuff the upper part tightly with fiberfill, pull off the hole to close and fasten off

Info :

Sew the head to the last round of the body around the perimeter

Optional Detail :

Embroider highlights in front of the eyes with white thread

Assembly Instructions

  • Insert safety eyes into the body between rounds 18 and 19, positioning them symmetrically on both sides of the body
  • Pass the safety eyes through the arms, moving 2 rounds down from the edge of each arm piece
  • Ensure arms are positioned correctly with the correct orientation after joining to the body
  • Secure washers onto the safety eye posts and stuff both body and arms tightly with fiberfill
  • Finish crocheting the arms at Round 15 with decreases, stuff the upper portion, then close the opening
  • Sew the completed head to the last round of the body, working around the entire perimeter for secure attachment
  • Optional: Embroider small white highlights in front of the black eyes using white embroidery thread for added character detail

Important Notes

  • ๐Ÿ’กUse X-shape or semi X-shape single crochet technique to prevent visible stitch shifts in the cube-shaped head
  • ๐Ÿ’กKeep stitch markers in place during color changes to ensure facial features align correctly on the head
  • ๐Ÿ’กInsert plastic piece into boot soles before stuffing to maintain flat bottoms that allow zombie to stand upright
  • ๐Ÿ’กStuff firmly but evenly throughout to maintain the blocky Minecraft aesthetic and prevent rounding of corners
  • ๐Ÿ’กPay careful attention to color placement during rounds 11-25 of the head to create accurate facial features
  • ๐Ÿ’กWhen sewing legs together for the body, align the square base properly to ensure symmetrical leg positioning
  • ๐Ÿ’กLeave adequate yarn tail length (40cm) on arms before attaching to allow for proper finishing after assembly

This charming Minecraft Zombie pattern captures the blocky magic of the beloved game character in huggable amigurumi form! With careful color changes and authentic details, you'll create a recognizable figure that Minecraft fans will instantly love. The pattern uses clever construction techniques to achieve that signature cube-shaped head and sturdy poseable body. Perfect for display or play, this zombie brings pixelated gaming nostalgia into the real world. ๐ŸงŸ๐ŸŽฎโœจ

You ask,

we answer.

FAQs

Why is the X-shape single crochet technique important for this pattern?

The X-shape or semi X-shape single crochet technique prevents visible stitch shifts that would make the cube-shaped head appear asymmetrical. This technique keeps the color-blocked facial features properly aligned and maintains the authentic Minecraft blocky appearance throughout the head construction.

Can I make the arms with palms like Steve's pattern?

While the pattern specifies making zombie arms without palms for simplicity, you can absolutely add the palm details from Steve's pattern if desired. This would make your zombie more detailed and give it defined hands, though the simplified version works perfectly well for the zombie character aesthetic.

What's the best way to keep track of color changes in the head?

Use stitch markers at the beginning of each round and count carefully as you work. It helps to have all your yarn colors prepared beforehand and to mark on the pattern which rounds you've completed. The color changes create the zombie's facial features, so accuracy is important for the final appearance.

Why do I need to insert plastic in the boot soles?

The plastic insert keeps the soles flat and prevents them from rounding out when stuffed. This is essential for the zombie to stand upright independently. Without the plastic support, the feet will be rounded and the figure won't balance properly, requiring it to lean against something for display.

Can I use different colors to make variant zombies?

Absolutely! While this pattern uses green for the classic Minecraft zombie, you could create variant zombies using different skin tone colors, or even make a zombie villager with appropriate color adjustments. Just maintain the same color blocking pattern for the facial features to keep the recognizable Minecraft character design.