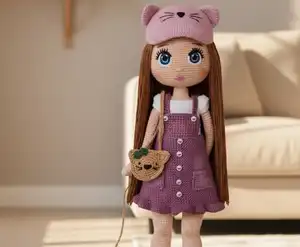
Create an enchanting 35cm Mimosa Baby doll with this detailed amigurumi pattern! This beautiful design features intricate eye embroidery, lifelike facial details, and a complete wardrobe including a charming dress, t-shirt, overalls, shoes, and adorable cat hat. Perfect for intermediate crocheters ready to challenge themselves with advanced techniques like detailed eye work, hair transplantation, and miniature clothing construction. Bring this sweet companion to life stitch by stitch!
Progress Tracker
0% Complete
— HEAD :
Row 1 :
6x into the magic ring (6)
Info :
When knitting the head, mark the heads of the rows with the marker
Rows 13-27 :
72x (15 rows)
Info :
Go to eye processing. After the eye embroidery is finished, the head will continue to be knitted
— EYE PROCESSING :
Infos :
Identifying eye locations: Align with the third increment loop of the head in the 12th row and place a marker between the 21st and 22nd rows with a pin. This is the midpoint between the two eyes. Make a mark with a pin by counting 6 sc to the right of the pin and 5 to the left of the pin. There are 11 sc between the points marked to process the pupils. Eye distance can be zoomed in and out optionally. The concept of tour will be used when processing the eye. The tour consists of two stages. In the first stage, basting is done by sinking into the folds of the frequent needles. In the second stage, the round is completed by going through all the basting stitches. Eye processing YouTube link: https://youtu.be/UUQV31Uj2nk
Step 1 :
Draw a circle with a flying pencil so that the diameter of the pupils corresponds to two single needles. Attach a single layer of black domino thread to the needle. Complete the first step by basting the circumference of the circle from the multiples of the frequent needles. In the second stage, complete the tour by passing from the outside to the inside under each of the stitches you have worked on
Step 2 :
Remove the needle from the upper part of the eye and pass under the opposite stitches to fill the pupil. Process horizontally all the way down, taking care not to overlap the threads while embroidering. If you could not provide an oval image to the pupil, try to get the correct shape by sinking around it a few times
Step 3 :
Draw the iris of the eye in a circle, leaving a single needle around the pupil. Starting from the upper part of the eye with dark blue thread, embroider around the iris by basting from the fold of the loops. Complete the round by passing under each of the stitches you have embroidered from the outside to the inside
Step 4 :
Process one more round into the iris
Step 5 :
Embroider the upper half of the iris with another round of dark blue thread. The remaining half will be embroidered with light blue thread
Step 6 :
With a double layer of light blue thread, embroider the half part under the pupil. The width and length of the iris is 4 sc. Process the other iris in the same way
Step 7 :
To embroider the white part of the eye, draw a circle starting from the bottom row of the inner part of the eye and ending at the highest point of the outer part of the eye. The part of the circle on the nose side of the eye should be the width of a single needle, expand a little more towards the outer part, and taper a little more towards the top
Step 8 :
Complete the first step by basting around the circle you have drawn, starting from the top. At the end of the first stage, remove the needle from the starting point and complete the tour by doing the second stage
Step 9 :
Do one more round in the same way
Step 10 :
Since the upper white part of the eye is full, start the new round from the untreated area and process one more round. If there are 3 rounds of processing on the white part, but there are still empty spaces, one more round can be made or the empty spaces can be retouched
Step 11 :
A round will be made with the same technique between the blue and white part of the eye with the black rope. Process the other eye in the same way
Lower Lash Line Step 1 :
Sink into the second row from the bottom of the outer part of the eye. Baste up to the corner of the eye. Complete the tour by sinking in from the eye spring and leaving the starting point and embroidering over the basting stitches
Lower Lash Line Step 2 :
Do one more round, starting from the top row of the lower lash line and up to the corner of the eye
Eyelash Step 1 :
Come out from the upper row of the lower line of the eyelash and sink into the root of the eyelash. Repeat the same action on the same eyelash
Eyelash Step 2 :
Determine the places of the other eyelashes. First, a small eyelash will be processed by sinking further than the point you have determined. Then, insert the needle under the small eyelash and exit from the point you have determined and sink into the root of the eyelash. Complete the other eyelashes with this technique
Eye Shimmer :
Attach two layers of white thread to the quilt needle. Process both eyes in the same way as in the pictures. Eye processing is finished
— HEAD CONTINUED :
Row 31 :
2x, a, (10x,a)*5, 8x (66)
Row 32 :
5x, a, (9x,a)*5, 4x (60)
Row 34 :
2x, a, (7x,a)*5, 5x (48)
Row 35 :
5x, a, (6x,a)*5, x (42)
Row 38 :
2x, a, (5x,a)*5, 3x (36)
Info :
Fill the head. While filling the head, fill it as round as possible without disturbing its form. If you fill to the sides after the filling process is finished, the head will be more rounded
Row 41 :
(x,a)*8, sl st (16)
Info :
Head done, cut the rope
— FACIAL DETAILS :
Nose :
It will be embroidered by leaving two single needles spaced, two rows below the eye, coinciding with the middle level of the two eyes. Separate the yarn into layers. Process the nose by sinking in and out 4-5 times
Eyebrow :
Embroider the eyebrows one row above the lashes, leaving 9 single needles with a width of 5 sc between the two eyebrows
Lips :
Determine the place of the lip with pins, leaving 3 single needles down the nose, and 3 frequent needles. Attach the thread to the needle in two layers. To embroider the lip, the triangle shape will be created. Enter through the neck space and exit from the designated point on the left. Dive into the middle of the lip in the upper row and exit from the determined point on the right. To form the other side of the triangle, sink to the upper point and exit the neck space. Enter from the left of the lip and enter from the right and exit the neck cavity. Lip processing YouTube link: https://youtu.be/Q3ZyjkKUoHQ
Lip Round 1 :
Lip shaping will be created by wrapping the triangle. Insert the needle under the thread and exit from the top to embroider. Starting from the top left edge, loop the rope 5 times. Take care not to overlap the yarn and to keep it regularly side by side. Do the same to the right side of the upper lip. Complete the round by wrapping the bottom edge 6-7 times
Lip Round 2 :
In the second round, if you make 3-4 loops on the outer lips and the loops on the lips towards the middle part, it will stop. Intensity of 4 to the lower lip, middle of the lower lip. Lip fullness can be increased upon request
Lip Line :
Make the lip line by following the images. Submerge by skipping one single needle on the sides
— ARM :
Info :
Start with skin color. The arms will not be filled with fibers
Row 1 :
6x into the magic ring (6)
Row 3 :
2x, v, 4x, v, 2x (12)
Row 4 :
3x, v, 5x, v, 2x (14)
Row 9 :
4x, a, 6x, a, x (13)
Rows 11-36 :
12x, sl st, done break the thread (26 rows)
Info :
Knit the other arm in the same way
— FOOT RECIPE :
Info :
Start with tan yarn. The two feet will be knitted with the same recipe and the right and left legs will be continued with separate recipes
Row 1 :
9ch check. Starting from 2ch, into the first loop 2x, 6x, into the same loop 3x, 7x (18)
Row 11 :
3x, 7ch and skip 9x, 8x
Row 12 :
3x, 7x on 7 chain, 8x (18)
Info :
It will continue with the heel part
Row 14 :
6a, the heel is over, leave a long rope to collect the heel and break the rope (6)
Info :
Gather the needle and 6 sc needles from the flo loops, tighten them well, knot the thread inside the foot and hide it. The foot is over, the leg will be passed. Knit the other foot in the same way
— LEFT LEG RECIPE :
Infos :
Right and left leg nomenclature represents the right and left legs of the baby. If this is not taken care of, the legs may fall out. The recipe is the same until the knee cap on the right and left legs; The fact that the calf of the right leg protrudes to the right and the calf of the left leg to the left is completely related to the filling. While filling, try to obtain the form in the visuals by checking the image by putting the leg a little farther. The shape of the legs depends on the regularity of the filling, and it is absolutely necessary to fill in every 5-6 rows. While filling, the left foot and leg should always be filled to the left of the leg, creating a protruding image on the calf and carefully filling
Row 1 :
We turn the back of the foot and pull the 7th loop, attach the thread to the 4th loop, 4x on the chain, one sc in the gap between the front part and the sole, 9x in the front, one sc in the gap between the front part and the sole, 3x on the chain (18). This will be the top of the line
Row 2 :
4x, a, float 7x, a, 3x (16)
Info :
Fill without disturbing the form of the foot
Info :
Fill the wrist. Pay attention to the prewritten tips in leg filling
Info :
Fill the leg. When we turn the toe to ourselves, the right part of the left leg will be the calf (blue arrow side) and this side will be protruded. Always add more filling to the protruding part. Keep the leg away and check the image frequently
Info :
The side indicated by the arrow should be filled more oval and the other side should be left more vertical. More filling should be done on the arrow side
Row 24 :
5x, a, x, a, 13x (21)
Row 26 :
4x, a, x, a, 12x (19)
Row 27 :
5x, a, 5x, 4v, 3x (22). The 27th row is the 4v kneecap. If there is a shift in the raises due to the hand difference, you can scroll the knee raises. Change the head of the line accordingly and continue with the recipe
Row 30 :
4x, v, x, v, 11x (20)
Row 34 :
6x, v, x, v, 12x (23)
Row 45 :
4x with tan, 24x with white thread (28). White rope is used for the leg part of the shorts
Row 47 :
4x, sl st, finish, break the thread. Left leg done
— RIGHT LEG RECIPE :
Info :
When filling, the right foot and leg should always be filled to the right of the leg to create a protruding image on the calf. The right leg is knitted with the same recipe as the left leg until the 26th row. The difference in appearance in the two lower legs is all about filling
Row 1 :
We turn the back of the foot and pull the 7th loop, attach the thread to the 4th loop, 4x on the chain, one sc in the gap between the front part and the sole, 9x in the front, one sc in the gap between the front part and the sole, 3x on the chain (18). This will be the top of the line
Row 2 :
4x, a, float 7x, a, 3x (16)
Info :
Fill the wrist. When we turn the toe to ourselves, the left part of the right leg will be the calf (blue arrow side) and this side will be protruded. Always add more filling to the protruding part. Keep the leg away and check the image frequently. Proceed by making a filling in 4-5 rows
Row 12 :
3x, v, 15x (20)< /p>
Info :
The side indicated by the arrow should be filled more oval and the other side should be left more vertical. More filling should be done on the arrow side
Row 24 :
5x, a, x, a, 13x (21)
Row 26 :
4x, a, x, a, 12x (19)
Row 27 :
5x, a, 7x, 4v, x (22). The 27th row is the 4v kneecap. If there is a shift in the raises due to the hand difference, you can scroll the knee raises. Change the head of the line accordingly and continue with the recipe
Row 30 :
4x, v, x, v, 11x (20)
Row 34 :
7x, v, x, v, 11x (23)
Row 45 :
23x with nude, 5x with white thread (28). White rope is used for the leg part of the shorts
Row 47 :
23x, do not break the rope, it will continue to the body. Right leg done
— BODY DESCRIPTION :
Infos :
Feet will be bent inward and legs will be turned towards each other (crooked). If the desired crookedness is not achieved even though you have combined the legs according to the recipe due to the hand difference, combine the legs by aligning them at the desired skewness. Continue with the white thread. Baby's shorts are made
Row 1 :
Continue from the right leg, pull 4 ch, sink into the first loop next to the sl st loop on the left leg, and make 14 frequent crochets, an increase, 13 frequent crochets on the left leg. Switch to the right leg and make 13 frequent crochets, one increase, 14 frequent crochets. Do 4x on Zn (66). This will be the headland
Info :
Fill the baby's body and leg joints well. If this area is not filled well, the legs and hips will look frail
Row 8 :
15x, a, 31x, a, 16x (64)
Row 9 :
14x, a, 31x, a, 15x (62)
Row 10 :
13x, a, 31x, a, 14x (60)
Row 11 :
12x, a, 31x, a, 13x (58)
Row 12 :
11x, a, 31x, a, 12x (56)
Row 13 :
10x, a, 31x, a, 11x (54)
Row 14 :
9x, a, 31x, a, 10x (52)
Row 15 :
8x, a, 31x, a, 9x (50)
Row 16 :
7x, a, 31x, a, 8x (48)
Row 17 :
6x, a, 31x, a, 7x (46)
Row 18 :
5x, a, 31x, a, 6x (44)
Row 19 :
4x, a, 31x, a, 5x (42)
Row 20 :
3x, a, 31x, a, 4x, shorts over, continue with skin color (40)
Info :
For a good view of the hips and hips, push the fiber towards the hips. Be careful not to leave any unfilled spaces
Rows 21-41 :
40x (21 rows)
Info :
At this time, arm joining will be started. Align the ends of the arms to face the body. The remaining thread at the end of the arms should remain under the arm. If there is a slip due to hand difference, align the arms according to yourself, arrange the loop of the round head accordingly and continue knitting according to the recipe
Row 42 :
12x, sinking arm and body together 3x, 17x, sinking arm and body together 3x, 5x (40)
Row 43 :
12x,9x on arm, 17x, 9x on arm, 5x (52)
Row 44 :
10x, a, 9x, a, 13x, a, 9x, a, 3x (48)
Row 45 :
10x, a, 7x, a, 13x, a, 7x, a, 3x (44)
Row 46 :
9x, a, 2x, m, 2x, a, 11x, a, 2x, m, 2x, a, 2x (36)
Row 47 :
7x, a, 2x, m, 2x, a, 7x, a, 2x, m, 2x, a (28)
Info :
Cut the wires to be put on the arms about 3 cm longer than the arm. Prepare by taping. The end of the wire should be bent in half and taped. Fill in without disturbing the form of the body. Place the wires on the arms
Row 48 :
a, 3x, a, 2x, m, 2x, a, 3x, a, 2x, m, 2x
Row 54 :
2x, sl st, body done. Let go of the head. Lightly pad the gut and shoulders
Sewing the Head to the Body :
Fold the wire you cut about 35 cm long and tape the ends. Putting half on the body and half on the head; Sew head and body together
— HAIR TRANSPLANT :
Hair Transplantation Technique :
The hair rope is wrapped in a book so that the length of a hair strand is around 50 cm and the hair is prepared (When the hair is folded, it will be around 25 cm). The hair is transplanted with the technique shown in the photos. Double layers of rope will be used in hair transplantation
Facial Hair Transplantation :
The hair on the forehead will be planted eight rows above the eyebrow. Find the midpoint on the forehead, aligned with the nose. From the middle point, draw the forehead line with a flying pen by counting 6 frequent needles to the right and left. Plant 11-12 strands of hair on the forehead. Align the sides of the face from under the eyes; nine on the right between the eye and the hair; hair is planted on the left side, leaving ten frequent needles in between. Straight planting is done in vertical lines up to the highest point of the eyebrow. Afterwards, the hair is attached by sliding towards the forehead like a ladder. 10 hair transplants were performed on the vertical lines on the side of the face. 8 hair strands were attached by scrolling
Hair Transplant on the Nape :
Create the nape line by drawing straight on the back of the head. Beginning from the right of the head, enter the line and exit from the upper row to perform the hair transplantation
Planting of the Midline :
When the hair is divided and tied in the middle, double-sided hair will be planted from the forehead to the nape in order to maintain the image. Take the middle line from the middle to the magic ring; Draw straight from the magic ring to the neck. The point to be considered in this part is that when planting hair on both sides, it is done by sinking it through the same hole. Create the midline by planting the left side first, then the right side
Hair Transplantation to the Empty Parts :
look for a frequent needle sow by skipping rows. Plant more frequently, skipping two rows at the top. At the end of the planting, comb the hair with your hands and cut the trim so that they are all the same length. Lightly color the cheeks, under the eyebrows, above the nose and knees with dry crayons
— T-SHIRT :
Info :
Start with the white rope
Row 1 :
40ch, starting chain 2 5x, v, 8hdcv, v, 9x, v, 8hdcv, v, 5x, back. It means that an increase will be made by making a handrail with the hdcv in the 1st row
Row 3 :
1ch, 6x, v, 16hdc, v, 11x, v, 16hdc, v, 6x, back
Row 5 :
1ch, 7x, v, 5hdc, 3hdca, 5hdc, v, 13x, v, 5hdc, 3hdca, 5hdc, v,7x,back
Row 6 :
1ch, 9x, 3ch and skip 13hdc, 17x, 3ch and skip 13hdc, 9x, reverse
Row 7 :
1ch, 3x, v, 5x, a multiple of 3 chains 3x, 17x, a multiple of 3 chains 3x, 5x v, 3x, back (41). Make 3x using a multiple of 3 chains. Frequent needle for the sleeve end of the other kata t-shirt will be passed
Row 9 :
1ch, 4x, v, 31x, v, 4x go back (43)
Rows 10-14 :
1ch, 43x, back (5 rows)
Row 15 :
1ch, 5x, v, 31x, v, 5x, back (45)
Rows 16-22 :
1ch, 45x, back (7 rows)
Row 23 :
1ch, 45x, turning the side of the shirt without breaking the thread to make the buttonholes of the shirt; 1ch, 6x, 7ch (1st buttonhole), 7x, 7ch (2nd buttonhole), 7x, 7ch (3rd buttonhole), 2x, sl st, break the thread
Collar :
Attach the rope to the other side of the tshirt from the collar and make 22x, sl st, break the rope. If the t-shirt is narrow when it is dressed, a few rows can be knitted on 22x
Right Sleeve :
When you turn the back of the t-shirt, start with the arm on the right. Attach the string to the junction of the body and arm parting on the back of the t-shirt. 1ch, to the junction of the arm and body x, 13x on the arm, x where the arm and body meet, 3x on the chain we pulled while knitting the body, sl st, break the thread (18)
Left Sleeve :
Attach the string to the junction of the body and arm parting on the back of the t-shirt. 1ch, x to the junction of the arm and the body, 3x to the chain we pulled while knitting the body of the dress, x to the junction of the arm and body, 13x to the arm, sl st, break the thread (18)
Info :
The t-shirt is finished, sew the buttons
— SALOPET (OVERALLS) :
Info :
Start with the purple yarn. In the salopette, the reverse direction of the knitting will be used
Row 1 :
Pull 59ch, do 52x starting from 8ch, break the rope. The 7ch left at the beginning of the chain will be buttonhole. In order for the baby to be dressed comfortably, Up to the 16th row, the rope will be cut off and reattached to the beginning of the row. Walk the remaining threads that we cut at the beginning and end of the row in knitting. Knit these frequent needles more tightly so that the frequent needles that you are guiding the yarns do not look wider
Row 2 :
Attach the thread to the first loop (Insert the buttonhole side) 1ch, 52x, break the thread
Row 3 :
Attach the yarn to the first loop. 1ch, 52x, break the string
Row 4 :
Attach the yarn to the first loop. 1ch, x, v, 10x, v, 26x, v, 10x, v, x break the thread (56)
Row 5-6 :
Attach the yarn to the first loop. 1ch, 56x, break the string (2 rows)
Row 7 :
Attach the yarn to the first loop. 1ch, 13x, v, 28x, v, 13x break the thread (58)
Row 8 :
Attach the yarn to the first loop. 1ch, 58x, break the string
Row 9 :
Attach the yarn to the first loop. 1ch, x, v, 54x, v, x break the thread (60)
Row 10 :
Attach the yarn to the first loop. 1ch, 60x, break the thread
Row 11 :
Attach the yarn to the first loop. 1ch, 14x, v, 30x, v, 14x, break the thread (62)
Row 12 :
Attach the yarn to the first loop. 1ch, 62x, break the thread
Row 13 :
Attach the yarn to the first loop. 1ch, x, v, 58x, v, x break the thread (64)
Row 14 :
Attach the yarn to the first loop. 1ch, 15x, v, 32x, v, 15x, break the thread (66)
Row 15 :
Attach the yarn to the first loop. 1ch, x, v, 62x, v, x break the thread (68)
Row 16 :
Attach the yarn to the first loop. Merge the row by doing 1ch, 68x, sl st. After this row, the rope will be continued without breaking. Due to the hand difference in knitting, if the baby's size is different, even if you try the salopette, the recipe can be continued by breaking a few more rows of yarn. Since the reverse direction of the knitting will be used, the frequent needles will be knitted in reverse. Rows will be knitted counterclockwise by inserting the crochet from the inside of the knitting
Row 18 :
1ch, 17x, v, 33x, v, 16x, sl st (70)
Rows 19-21 :
1ch, 70x, sl st (3 rows)
Row 22 :
1ch, 18x, v, 34x, v, 16x,sl st (72)
Rows 23-25 :
1ch, 72x, sl st (3 rows)
Row 26 :
1ch, 19x, v, 36x, v, 15x, sl st (74)
Row 27-30 :
1ch, 74x, sl st (4 rows)
Info :
The ruffle of the salopette will be made
Row 31 :
1ch, flodan 74v, sl st (148)
Rows 32-33 :
1ch, 148x, sl st, break thread (2 rows). The skirt part of the salolet is finished. Skirt length can be changed upon request
Front Part :
Start counting from the non buttonhole side of the salopette and insert the thread into the 21st frequent needle
Rows 1-8 :
1ch, 14x, go back (8 rows)
Row 9 :
1ch, skip a single crochet 11x, skip a single crochet and sl st, break the thread
Hangers :
Attach the thread to the first loop of the buttonhole side of the salopette; Pull 1 ch and start from the first loop on the side, pull 4 sl st, 33 ch (hanger). From the 2nd chain, make 32hdc on the hanger and knit into the next loop with sl st. Salopete 12 sl st, next to the front piece 8x, in front of the front piece v, 10x, v, next to the front piece 8x, salope 13 sl st, 33ch (hanger), 2. From the chain, 32hdc, sl st, sew into the next loop, make 6sl st. Turning to the side, do 15x until the middle parting, because the edge of the salopette made by breaking the rope is not regular, close it by making a sl st. Since the other edge is uniform, frequent needles are not used. The length of the straps can be adjusted according to the baby and the number of chains can be changed. Sew so that the ends of the straps are under the corners of the front piece
Pockets :
Row 1: Pull 9ch, 8x starting from chain 2, back. Row 2-3: 1ch, 8x, back (2 rows). Row 4: 1ch, 1x skip, 7x, go back. Row 5: 1ch, 7x, go back. Row 6: 1ch, 1x skip, 6x back. Row 7: 1ch, 6x, back. Row 8: 1ch, skip 1x, 5x, done. Leave thread for sewing. Knit the other pocket
Info :
Sew the front buttons of the salopette and the button on the back. Starting to count the pockets from the flo at the hem, sew 7 rows on top of each other, leaving 11 single needles. Dry crayon on front piece, pocket and pocket tops. Wear it by rubbing it with your finger and lightly touching it
— SHOE :
Info :
Start with the white rope
Row 1 :
Take 8ch. From 2ch on the same stitch 2hdc, 5hdc, in the same stitch 5hdc, 5hdc, in the same stitch 3hdc, sl st (20hdc)
Row 2 :
1ch, 2hdcv, 5hdc, 5hdcv, 5hdc, 3hdcv, sl st (30hdc)
Row 3 :
1ch, (hdc,hdcv)*2, 5hdc, (hdc,hdcv)*5, 5hdc, (hdc,hdcv)*3, sl st (40hdc)
Row 4 :
1ch, after making 40 sl sts from the block, sink to the beginning of the row with sl st
Row 5 :
2ch, 4th row sl st loops made 40DC, sl st, break the thread
Row 6 :
Attach the green thread to the first block of the sl st made in the 4th row. 2ch, 40DC, sl st
Row 7 :
1ch, make 40x, s by sinking the blo of the white thread and the green thread together
Row 8 :
1ch, 12x, 4hdc, hdca, 2hdc, hdca, 2hdc, hdca, 4hdc, 10x, sl st (37)
Row 9 :
1ch, 12x, hdc, 2hdca, hdc, 2hdca, hdc, 2hdca, hdc, 9x, sl st (31)
Row 10 :
1ch, 11x, a, 8x, a, 8x, sl st (29)
Row 11 :
1ch, 9x, hdc, 6hdca, hdc, 6x, sl st (23)
Row 12 :
1ch, 12x, ''same loop hdc, DC'', 2DCv, ''same loop DC, hdc'', 7x, sl st. The tongue part of the shoe is made. The tongue should come in the middle of the shoe. If slips occur due to hand difference, tongue Scroll the section accordingly and continue with the tariff
Row 13 :
After making 1ch, 27sl st, sink into the beginning of the row with sl st, break the rope
Row 14 :
Attach the white thread to the first flo loop of the 3rd row of the sole and knit 40 sl st
Info :
The shoe is finished, knit the other shoe. Attach the laces as in the picture
— SOCKS :
Info :
Start with the Alize diva white thread. Knit 24 loops on the bottle
Rows 1-11 :
Knit 24 stitches straight (11 rows)
Row 12 :
Knit 2 knits, 1 knit, 20 knits, 1 raises, 2 knits
Rows 13-21 :
Knit 26 stitches straight (9 rows)
Row 22 :
Finish the knit by cutting 26 stitches
Info :
Sew the cone. When dressed on the leg, the narrow part will be downwards
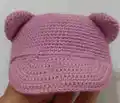
— CAT HAT :
Info :
Start with lilac yarn. Knit with 2.20mm crochet. The hat will be spiral knit
Row 1 :
6x into the magic ring (6)
Info :
When knitting the hat, mark the heads of the rows with the marker
Rows 15-25 :
84x (11 rows)
Row 26 :
84x, making sl stfinish and break the thread
Brim of the Hat :
Starting to count from the loop next to the sl st loop made at the end of the hat, attach the thread to the blo of the 37th loop
Row 1 :
1ch, 2v from blo, 7x, 2v, back (15)
Row 2 :
1ch, v, 13x, v, back (17)
Row 3 :
1ch, 3v, x, v, 7x, v, x, 3v, back (25)
Row 4 :
1ch, v, 23x, v, back (27)
Row 5 :
1ch, v, 4x, v, 15x, v, 4x, v, back (31)
Row 6 :
1ch, v, 29x, v, back (33)
Row 7 :
1ch, v, 4x, v, x, v, 3x, v, 9x, v, 3x, v, x, v, 4x, v (41)
Row 8 :
1ch, v, 39x, v, back (43)
Row 9 :
1ch, v, 9x, v, 21x, v, 9x, v, back (47)
Row 10 :
1ch, v, 45x, v, back (49)
Row 11 :
1ch, 49x, sl st, break thread
Info :
Sew the sides of the trench in such a way that it corresponds to 11 frequent crochets by taking a block loop from the hat and a loop from the trench. Attach the floss to the sl st loop on the back of the hat. Finish by making 25 sl sts over the hat, 47 sl sts over the visor, and 25 sl sts over the hat, starting from the side loop to the brim
Ear Row 1 :
Do 6x into sh (6)
Ear Row 6 :
(5x, v)*3 (21)
Info :
Fold the ear in half and take it from opposing frequent needles and assemble it by making 11x. Knit the other ear in the same way. Sew diagonally, starting from the top of the 7th row, counting the lower parts of the ears from the sides of the trench to the top. It is sewn so that the distance from one end of the ear to the other is 8 rows
Embroidery of the Hat :
Determine the cat's nose in the middle of the hat by counting 4 rows above the visor. Create the sides of the nose triangle by attaching a double layer of domino thread to the needle. Fill in the middle part. Ensure the fullness of the nose by performing the same operations once again. Finally, embroider the nose 2-3 times on the flat edge of the triangle. Embroider the mustache with a single layer of thread
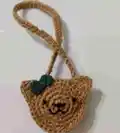
— BAG :
Row 1 :
8x into the magic ring (8)
Row 4 :
x,v,(2x,v)*7,x (32)
Info :
The side of the bag will be done. While removing the edge loops, crochet from the reverse side of the knitting into the frequent needle. We insert. We go to the reverse side of the knitting by inserting the needle through the frequent needle next to it. We take the loop with our crochet and get out of the hole where we inserted the crochet, and we remove the loops formed in the crochet once. We continue by entering the next sinking from the point where we left in the first single needle
Row 7 :
1ch, Do 32x with the technique described above, sl st. Knit the other side in the same way
Info :
Ears will be made on the front of the bag
Bag Ear Row 1 :
1ch, 4x from blo, back
Bag Ear Row 2 :
1ch, skip 1x 3x, go back
Bag Ear Row 3 :
1ch, skip 1x 2x, go back
Bag Ear Row 4 :
1ch, 1x skip x, done, break the string
2nd Ear :
Attach the thread to the block of the 7th loop, counting from the side of the first ear. Knit the second ear in the same way as the first ear. There should be 6 frequent needles between the two ears
Info :
After the ears are finished, pull them into the first block loop of the row and start from the side loop until the ear. 3x to the side of the ear, 3x to the tip of the ear, 6 s between the ears to the side of the ear 3x, 3x to the tip, 10 sl st, zn the end of the row by shifting the glaze. Processing stage on the hat on the front of the bag. With a needle that connects the two sides, start the faces right and sew up to the blos of the loops
Handle of the Bag :
Pull 61ch, start from 2 chains and do 60x. To sew the handle to the bag, leave a long rope and break it off. Sew to the bag so that the sleeve ends are inside the bag
This exquisite Mimosa Baby doll pattern represents the pinnacle of amigurumi artistry, combining advanced embroidery techniques with detailed construction to create a truly lifelike companion. From the realistic embroidered eyes complete with pupils, irises, and eyelashes, to the carefully shaped legs with defined calves and knees, every element has been thoughtfully designed. The complete wardrobe of coordinating pieces adds endless play and display possibilities. This pattern challenges you to master new techniques while creating an heirloom-quality piece that will be treasured for generations. 🧶 Happy crocheting! 🧵✨