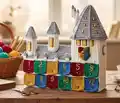
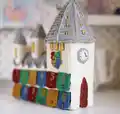
Transform your holiday season into pure magic with this enchanting Hogwarts Castle Advent Calendar crochet pattern! This incredible project features 12 hidden doors for gifts and surprises, complete with secret rooms perfect for storing sweets and treasures. Standing at an impressive 24.5x7.5x27 cm, this castle brings the wizarding world to life with intricate details including embroidered windows, a working clock, the iconic house crest, and multiple towers. Whether you're a Harry Potter fan or simply love creating spectacular seasonal decorations, this pattern guides you through crafting your very own piece of magical architecture that will become a cherished family heirloom for years to come.
Progress Tracker
0% Complete
— WALLS AND FLOOR (Yarn A) :
Round 1 :
25 loops, turning, 24sc (starting from the 2nd loop from the hook) (24l)
Round 2 :
1 loop, turning, 22sc, [inc]x2 (26l)
Round 3 :
1 loop, turning, inc, 25sc (27l)
Round 4 :
1 loop, turning, 25sc, [inc]x2 (29l)
Round 5 :
1 loop, turning, inc, 28sc (30l)
Round 6 :
1 loop, turning, 28sc, [inc]x2 (32l)
Round 7 :
1 loop, turning, inc, 31sc (33l)
Round 8 :
1 loop, turning, 31sc, [inc]x2 (35l)
Round 9 :
1 loop, turning, inc, 34sc (36l)
Round 10 :
1 loop, turning, 34sc, [inc]x2 (38l)
Round 11 :
1 loop, turning, inc, 37sc (39l)
Round 12 :
1 loop, turning, 37sc, dec (38l)
Round 13 :
1 loop, turning, [dec]x2, 34sc (36l)
Round 14 :
1 loop, turning, 34sc, dec (35l)
Round 15 :
1 loop, turning, [dec]x2, 31sc (33l)
Round 16 :
1 loop, turning, 31sc, dec (32l)
Round 17 :
1 loop, turning, [dec]x2, 28sc (30l)
Round 18 :
1 loop, turning, 28sc, dec (29l)
Round 19 :
1 loop, turning, [dec]x2, 25sc (27l)
Round 20 :
1 loop, turning, 25sc, dec (26l)
Round 21 :
1 loop, turning, [dec]x2, 22sc (24l)
Round 22 :
21 loops, turning, 44sc (44l) (see photos 1, 2)
Round 23 :
21 loops, turning, 64sc (64l) (see photos 3, 4)
Round 24-73 :
1 loop, turning, 64sc (64l) (see photos 5, 6)
Round 74 :
1 loop, turning, 44sc – don't crochet this row to the end (44l)
Round 75 :
23 loops, turning, 66sc (66l) (see photos 7-9)
Round 76-98 :
1 loop, turning, 66sc (66l)
Round 99 :
1 loop, turning, 46sc – don't crochet this row to the end (46l)
Round 100-122 :
1 loop, turning, 46sc (46l) (see photo 10)
Round 123 :
1 loop, turning, 22sc – don't crochet this row to the end (22l)
Round 124-169 :
1 loop, turning, 22sc (22l) (see photo 11)
Info :
Cut and fix the thread, leaving a very long end for sewing. Turn over the detail to the front side (see photo 12)
Infos :
Make the embroidery with mouline threads. Embroider big window with a satin stitch with yellow color on the side wall (see photos 13-17). Embroider the frame on the window with brown thread (see photo 18). Embroider 3 small windows on the tower (see photos 19-21). Embroider the door with a satin stitch with brown color on the side wall (see photos 22-24). Embroider 8 windows on the back wall (see photos 25-27)
— CLOCK (Yarn A) :
Round 1 :
2 loops, 6sc in 2nd loop from hook (amigurumi ring) (6l)
Round 3 :
[sc, inc]x6 (18l)
Info :
Change the thread to Yarn B. To get a beautiful line when changing color in the next round crochet the sc in this way - half of the sc with white thread, and the other half with grey (Yarn A + Yarn B), see photo 28
Round 4 :
[2sc, inc]x6 (Yarn A + Yarn B) (24l)
Info :
Next crochet with Yarn B only, cut the Yarn A
Round 5 :
[3sc, inc]x6 (30l)
Infos :
Cut and fix the thread leaving a long end for sewing. Embroider the hands and dial with black threads floss (see photo 29). Sew a clock above the door (see photo 30)
— HOUSE CREST :
Info :
Crochet the house crest with 1.75 mm hook along rows. Use video help to crochet rounds 6, 12, 13 and 20. Watch this tutorial: https://www.youtube.com/watch?v=4sNAL5z9bWg
Round 1 (Yarn C) :
3 loops, turning, 2sc (starting from the 2nd loop from the hook) (2l)
Round 2 :
4 loops, turning, 4sc, inc (6l) (see photos 31, 32)
Round 3 :
1 loop, turning, dec, 4sc (5l)
Round 4 :
1 loop, turning, 3sc, dec (4l)
Round 5 :
1 loop, turning, 4sc (4l)
Info :
Change the thread to Yarn D. To get a beautiful line when changing color in the next round crochet the sc in this way - half of the sc with burgundy thread, and the other half with green (Yarn C + Yarn D), see photos 33-35
Round 6 :
1 loop, turning, 4sc (Yarn C + Yarn D) (4l)
Info :
Next crochet with Yarn D only
Round 7 (Yarn D) :
1 loop, turning, 4sc (4l)
Round 8 :
1 loop, turning, 3sc, inc (5l)
Round 9 :
1 loop, turning, inc, 4sc (6l)
Round 10 :
1 loop, turning, 4sc, dec (5l)
Round 11 :
1 loop, turning, 2sc (2l) – don't crochet this row to the end
Info :
In the next row turn the direction as shown on photo 36. Add Yarn C and crochet part of the sc in this way - half of the sc with burgundy thread, and the other half with yellow (Yarn C + Yarn E) and then half of the sc with green thread, and the other half with blue (Yarn D + Yarn F) (see photos 37-42)
Round 12 :
5sc (Yarn C + Yarn E), 5sc (Yarn D + Yarn F) (10l) Don't cut Yarn C and Yarn D
Round 13 :
1 loop, turning, 5sc (Yarn F), 5sc (Yarn E) (10l) (see photos 43, 44)
Round 14 :
1 loop, turning, inc, 4sc (Yarn E), 4sc, inc (Yarn F) (12l) (see photo 45)
Round 15 :
1 loop, turning, 6sc (Yarn F), 6sc (Yarn E) (12l)
Round 16 :
1 loop, turning, 2 sl st, 4sc (Yarn E), 4sc (Yarn F) – don't crochet this row to the end
Round 17 :
1 loop, turning, 4sc (Yarn F), 4sc (Yarn E) (8l)
Round 18 :
1 loop, turning, [dec]x2 (Yarn E), [dec]x2 (Yarn F) (4l)
Round 19 :
1 loop, turning, dec (Yarn F), dec (Yarn E) (2l)
Round 20 :
1 loop, turning, dec. Change the thread to golden mouline threads (see photo 46)
Info :
Next crochet the detail around the perimeter in a counter-clockwise direction from the point Start using jacquard technique for changing color (see photos 47, 48) – 10sc (Yarn F + golden mouline threads), 11sc (Yarn D + golden mouline threads), 11sc (Yarn C + golden mouline threads), 10sc, sl st in the 1st dec (Yarn E + golden mouline threads) (43l)
Infos :
Embroider and fix the lines with golden mouline threads (see photos 49-51). Steam the house crest with an iron
— SQUARE (Golden mouline threads) :
Info :
Crochet the square with 1.5 mm hook along rows
Round 1 :
4 loops, turning, 3sc (starting from the 2nd loop from the hook) (3l)
Round 2-3 :
1 loop, turning, 3sc (3l)
Info :
Next crochet the detail around the perimeter in a counter-clockwise direction (see photos 52, 53)
Round 4 :
3sc down, 3sc straight, 3sc up, 3sc straight (12l)
Infos :
Cut and fix the thread leaving a long end for sewing. Embroider the letter H with black floss threads in the middle. Sew the square to the center of the house crest (see photos 54-56). Sew the house crest to the castle (see photo 57)
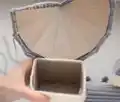
— ASSEMBLAGE AND CARDBOARD FRAME :
Info :
Sew the walls and floor as shown on photos 58-66. Tip: To get a beautiful seam, you must constantly insert the needle from the inside to the outside direction
Infos :
Below is a drawing of the castle inner frame, which must be cut out of cardboard. Press the fold lines with the back of the needle using a ruler (see photos 67-69). Insert the partitions 1 and 2 and glue the frame with Moment superglue (see photos 70-72). Glue the tower in the same way (see photos 73-76). Glue partitions 3 to the frame (see photos 77, 78)
— PARTITIONS, 2 pcs (Yarn A) :
Info :
Crochet the partitions with 1.75 mm hook along rows
Round 1 :
5 loops, turning, 4sc (starting from the 2nd loop from the hook) (4l)
Round 2-72 :
1 loop, turning, 4sc (4l)
Infos :
Cut and fix the thread leaving a long end for sewing (see photo 79). Place the frame inside the castle and sew the details, as shown on photos 80-82. Sew on the partitions (see photos 83-87)
— CROSSBAR (Yarn A) :
Info :
Crochet crossbar with a hook 1.5 mm. You need to divide the thread in half! At the beginning leave the long end of the thread, it will be needed for sewing
Round 1 :
2 loops, 4sc in 2nd loop from hook (amigurumi ring) (4l)
Infos :
Cut and fix the thread, leaving a long end for sewing. Cut off a piece of wire approximately 18 cm (7.1 inches) long (see photo 88). Pull wire through the crossbar (see photo 89). Use a needle to make 2 holes in the frame (see photos 90, 91). Pull the sewing threads and wire through the holes (see photo 92). Bend the ends of wire and wrap electrical tape around it to prevent end from protruding out (see photos 93-96). Sew the crossbar to the walls, trim and fasten the thread (see photos 97-99)
— DOORS, 12 pcs :
Info :
The doors are crocheted with 1.75 mm hook using Yarn C, D, E, F (3 doors of each color)
Round 1 :
11 loops, turning, 10sc (starting from the 2nd loop from the hook) (10l)
Round 2 :
1 loop, turning, 4sc, skip 2 stitches, crochet 2 loops, 4sc (10l)
Info :
After this row we got the hole for the bead (see photos 100-102)
Round 3-10 :
1 loop, turning, 10sc (10l)
Info :
Next crochet the door around the perimeter in a counter-clockwise direction from the point Start (see photo 103) – [9sc, inc]x3 (Yarn C/D/E/F), 9sc, inc (Yarn C/D/E/F + Yarn A) (44l). To get a beautiful line when changing color in this round crochet part of the sc in this way - half of the sc with burgundy thread, and the other half with white (see photos 104, 105)
Infos :
Use the picture provided to embroider the numbers on the doors. Add brightness on the screen to maximum, enlarge or reduce the picture so that the size of the letter will be approx. 2 cm (0.8 inches) high. Attach a water soluble cross stitch canvas on it and circle the picture with a pencil (see photos 106, 107). Fix the canvas to the door with the needle for cutting (see photo 108). Use 4 threads of golden metalized threads mouline and embroider the outline of the number using the seam backstitch (see photo 109). Then embroider the inside of the number with fill stitches (see photo 110). Rinse the embroidery under running water and gently peel off the canvas with your fingers (see photo 111)
Info :
Cut door inner frame from cardboard as shown in drawing. Glue the cardboard to the wrong side of the door (see photos 112, 113)
Infos :
Sew the doors to the castle (see photos 114-117). Sew the beads to the partitions under the door's holes with golden thread floss (see photos 118-120)
— ROOF (Yarn B) :
Round 1 :
49 loops, turning, 48sc (starting from the 2nd loop from the hook) (48l)
Round 2-36 :
1 loop, turning, 48sc only through back loops (48l)
Infos :
Cut and fix the thread, leaving a long end for sewing. Cut roof inner frame from cardboard as shown in drawing. Glue the cardboard to the crocheted roof (see photos 121, 122). Sew two sides of the roof to the walls (see photos 123, 124). Glue neodymium magnets on the edge of the roof and on the ceiling (pre-try them so that they are well magnetized when closing, see photos 125, 126)
— PEAKS, 5 pcs :
Info :
Crochet the peaks with a hook 1.5 mm. You need to divide the thread in half!
Round 1 :
2 loops, 4sc in 2nd loop from hook (amigurumi ring) (4l)
Round 2 :
[sc, inc]x2 (6l)
Round 3 :
[2sc, inc]x2 (8l)
Round 4 :
[3sc, inc]x2 (10l)
Round 5 :
[4sc, inc]x2 (12l)
Round 6 :
[5sc, inc]x2 (14l) Change the thread to Yarn A
Info :
To get a beautiful line when changing color in the next round crochet the sc in this way - half of the sc with grey thread, and the other half with white (Yarn B + Yarn A), see photo 127
Round 7 :
5sc, skip 2 stitches, 5sc, skip 2 stitches (Yarn B + Yarn A) (10l)
Info :
Next crochet with Yarn A only
Round 11 :
2sc – don't crochet this round to the end
Infos :
Cut and fix the thread, leaving a long end for sewing. Sew the peaks to the roof (see photos 128, 129)
— SMALL TOWER, 2 pcs (Yarn A) :
Round 1 :
11 loops, turning, 10sc (starting from the 2nd loop from the hook) (10l)
Round 2 :
1 loop, turning, 8sc, [inc]x2 (12l)
Round 3 :
1 loop, turning, 12sc (12l)
Round 4 :
1 loop, turning, 10sc, [inc]x2 (14l)
Round 5 :
1 loop, turning, 14sc (14l)
Round 6 :
1 loop, turning, 12sc, [inc]x2 (16l)
Round 7-13 :
1 loop, turning, 16sc (16l)
Round 14 :
1 loop, turning, 12sc, [dec]x2 (14l)
Round 15 :
1 loop, turning, 14sc (14l)
Round 16 :
1 loop, turning, 10sc, [dec]x2 (12l)
Round 17 :
1 loop, turning, 12sc (12l)
Round 18 :
1 loop, turning, 8sc, [dec]x2 (10l)
Round 19-25 :
1 loop, turning, 10sc (10l)
Infos :
Cut and fix the thread, leaving a long end for sewing. Embroider the window with yellow and brown threads floss (see photos 130-132). Cut small tower and roof inner frame from cardboard as shown in drawing. Glue the frame and place it inside the tower. Sew the detail as shown on photos 135, 136
— SMALL TOWER ROOF (Yarn B) :
Info :
The roof is crocheted from four sectors, crochet all rows only through back loops!
SECTOR, 4 pcs - Round 1 :
9 loops, turning, 8sc (starting from the 2nd loop from the hook) (8l)
Round 2 :
1 loop, turning, 8sc (8l)
Round 3 :
1 loop, dec, 4sc, dec (6l)
Round 4 :
1 loop, turning, 6sc (6l)
Round 5 :
1 loop, dec, 2sc, dec (4l)
Round 6 :
1 loop, turning, 4sc (4l)
Round 7 :
1 loop, [dec]x2 (2l)
Round 8-9 :
1 loop, turning, 2sc (2l)
Round 10 :
1 loop, dec (1l)
Infos :
Cut and fix the thread, leaving a long end for sewing. Join all 4 sectors with 11sc using a hook (see photos 137-141). Pass the thread through 4 loops at the top of the tower using a yarn needle. Tighten and secure (see photo 142). Join the 1st and 4th sectors with 11sc using a hook (see photo 143). Glue the frame and place it inside the roof (see photos 144-147). Sew the roof to the tower (see photos 148, 149). Sew the towers to the castle (see photo 150)
— TOWER's ROOF (Yarn B) :
Info :
The roof is crocheted from eight sectors, crochet all rows only through back loops!
SECTOR, 8 pcs - Round 1 :
15 loops, turning, 14sc (starting from the 2nd loop from the hook) (14l)
Round 2 :
1 loop, turning, 14sc (14l)
Round 3 :
1 loop, dec, 10sc, dec (12l)
Round 4-5 :
1 loop, turning, 12sc (12l)
Round 6 :
1 loop, dec, 8sc, dec (10l)
Round 7-11 :
1 loop, turning, 10sc (10l)
Round 12 :
1 loop, dec, 6sc, dec (8l)
Round 13-17 :
1 loop, turning, 8sc (8l)
Round 18 :
1 loop, dec, 4sc, dec (6l)
Round 19-23 :
1 loop, turning, 6sc (6l)
Round 24 :
1 loop, dec, 2sc, dec (4l)
Round 25-26 :
1 loop, turning, 4sc (4l)
Round 27 :
1 loop, [dec]x2 (2l)
Round 28-29 :
1 loop, turning, 2sc (2l)
Round 30 :
1 loop, dec (1l)
Infos :
Cut and fix the thread, leaving a long end for sewing. Join all 8 sectors with 31sc using a hook (see photos 151-156). Crochet the open edges of the roof with 31sc using a hook as shown on photos 157-160 (right edge with 31sc from top to bottom on the wrong side, left edge with 31sc from top to bottom on the front side). Pass the thread through 8 loops at the top of the tower using a yarn needle. Tighten and secure (see photos 161, 162). Embroider small windows with yellow and brown threads floss (see photos 163-165). Cut tower's roof inner frame from cardboard as shown in drawing (see photo 166). Glue the cardboard to the crocheted roof. Sew the roof to the walls of the tower at four points (see photos 167-172). Glue neodymium magnets as shown on photos 173, 174 (pre-try them so that they are well magnetized when closing)
— TRIPLE TOWER :
Info :
Crochet triple tower with a hook 1.5 mm. You need to divide the thread in half! The tower is crocheted from three details
Detail 1, 2 pcs (Yarn A) - Round 1 :
2 loops, 4sc in 2nd loop from hook (amigurumi ring) (4l)
Round 3 :
8sc only through back loops (8l)
Round 4-10 :
8sc (8l) Change the thread to Yarn B
Info :
To get a beautiful line when changing color in the next round crochet the sc in this way - half of the sc with white thread, and the other half with grey (Yarn A + Yarn B)
Round 11 :
8sc (Yarn A + Yarn B) (8l)
Info :
Next cut the yarn A and continue crocheting with yarn B only! Cut a small figure out of cardboard as shown on photo 175. Fold it in half and place inside the detail (see photo 176)
Round 13 :
[2sc, dec]x2 (6l)
Round 15 :
[sc, dec]x2 (4l)
Info :
Trim the thread. Pass the thread through all the loops using a yarn needle. Tighten and secure (see photo 177)
Detail 2, 1 pc (Yarn A) - Round 1 :
2 loops, 3sc in 2nd loop from hook (amigurumi ring) (3l)
Round 3 :
sc, inc, 2sc (5l)
Round 4 :
2sc, inc, 2sc (6l)
Round 5 :
3sc, inc, 2sc (7l)
Round 6 :
4sc, inc, 2sc (8l)
Round 7-16 :
8sc (8l) Change the thread to Yarn B
Info :
To get a beautiful line when changing color in the next round crochet the sc in this way - half of the sc with white thread, and the other half with grey (Yarn A + Yarn B)
Round 17 :
8sc (Yarn A + Yarn B) (8l)
Info :
Next cut the yarn A, leaving a long end for sewing and continue crocheting with yarn B only! Cut a small figure out of cardboard as shown on photo 178. Fold it in half and place inside the detail
Round 19 :
[2sc, dec]x2 (6l)
Round 21 :
[sc, dec]x2 (4l)
Infos :
Trim the thread. Pass the thread through all the loops using a yarn needle. Tighten and secure. Sew all details together as shown on photo 179. Sew triple tower to the roof (see photo 180)
This magnificent Hogwarts Castle Advent Calendar pattern brings the wizarding world into your home with incredible attention to detail and functionality. Designed by Angelina Taranina, it combines advanced crochet techniques with embroidery, cardboard engineering, and magnetic closures to create a stunning holiday centerpiece. The 12 working doors with embroidered golden numbers, the complete four-house crest, multiple architectural towers, and hidden compartments make this more than just a decoration—it's an interactive experience that will delight Harry Potter fans of all ages. Perfect for creating new family traditions, this castle becomes a treasured heirloom passed down through generations. 🏰✨🧶