🧢 Beautiful ✨ Detailed πŸ’ Adorable

Mimic Chest Amigurumi Pattern

Mimic Chest Amigurumi Pattern
4.6β˜… Rating
12-15 Hours Time Needed
2.1K Made This
βœ‚οΈ

Advanced Level

Designed for experienced knitters, these patterns involve intricate designs and complex techniques to challenge and inspire.

⏱️

Slow & Steady

A 10-12 hour projectβ€”great for savoring the process over several sessions.

🧸

Whimsical Buddy

Playful characters full of personality, designed to spark imagination and become cherished playtime favorites.

About This Mimic Chest Amigurumi Pattern

This Mimic Chest pattern is an incredibly detailed project that combines traditional amigurumi techniques with structural elements like plastic canvas reinforcement. The pattern creates a functional chest with a hinged lid that opens to reveal a monstrous mouth complete with detailed teeth, a poseable tongue, and an eyeball that cleverly hides behind a decorative keyhole. Each component is carefully constructed and assembled to create a three-dimensional treasure chest that captures the whimsical danger of the classic tabletop gaming monster.

Mimic Chest Amigurumi Pattern crochet pattern - detailed view of completed project

The finished piece features multiple color options for customization, optional wire or button mechanisms for the eye reveal, and sturdy construction that allows the chest to actually open and close. It's both a decorative display piece and a functional container for small treasures.

Why You'll Love This Mimic Chest Amigurumi Pattern

I absolutely love this pattern because it combines so many creative elements into one amazing project! The engineering behind the hinged lid and the clever eyeball reveal mechanism makes this feel like you're building something magical rather than just crocheting. I'm especially fond of how the pattern includes options for both wire and button closures, so you can customize it to your skill level and preferences. The attention to detail in the mouth construction with individual teeth and a poseable tongue brings so much personality to the finished piece. Plus, using plastic canvas for structural support means your finished mimic will be sturdy enough to actually use as a trinket box, not just a decoration. It's challenging enough to keep experienced crocheters engaged but the instructions are clear and methodical.

Mimic Chest Amigurumi Pattern step 1 - construction progress Mimic Chest Amigurumi Pattern step 2 - assembly progress Mimic Chest Amigurumi Pattern step 3 - details and accessories Mimic Chest Amigurumi Pattern step 4 - final assembly and finishing

Switch Things Up

I absolutely love experimenting with different color combinations for this mimic chest! While the pattern suggests traditional brown and gold for that classic treasure chest look, I've found that going with darker jewel tones like deep purple and silver creates a more mysterious, enchanted feel. You could even make it look like a frost-covered ice chest using white and light blue yarns.

The eye color is another fun place to get creative - I've made versions with green glowing eyes for an undead vibe, or bright yellow for a more cartoonish friendly monster. If you're making this for a specific tabletop gaming campaign, consider matching the colors to your dungeon's theme!

I also discovered that adding small details like embroidered runes or symbols on the chest sides really personalizes each piece. You can use surface crochet or simple embroidery to add these magical-looking markings. Some makers have even added tiny crocheted coins or gems spilling out of the mouth for extra flair.

For the mechanism, I personally prefer the wire option because I love being able to pose the eye at different angles - sometimes having it peek slightly open is more menacing than fully revealed! But if you're making this as a gift for a child, definitely go with the button closure for safety. You can make the buttons decorative by using fancy metal ones that look like old chest hardware.

Common Mistakes & How to Fix Them

βœ— Pulling slip stitches too tight during border rounds which warps the rectangular chest pieces and distorts their shape βœ— Forgetting to leave long tails for sewing assembly which makes it difficult to securely attach pieces later βœ— Not using plastic canvas reinforcement resulting in a floppy chest that doesn't hold its shape properly βœ— Skipping the invisible finish technique on the eyeball causing visible yarn tails and unprofessional looking seams βœ— Misjudging the curve needed for the top piece when attaching plastic canvas leading to warped lid construction βœ— Sewing through wrong loops during assembly creating weak connections that pull apart with use and handling

Mimic Chest Amigurumi Pattern

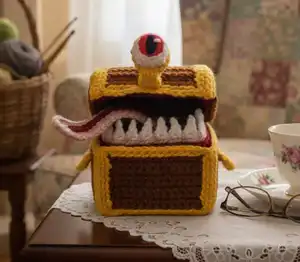
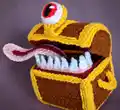
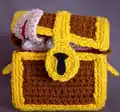
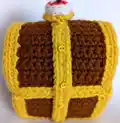
Create your own adorable treasure chest with a mischievous twist! This detailed Mimic Chest pattern brings the classic fantasy creature to life with its signature toothy grin and watchful eye. Perfect for gamers and fantasy lovers, this project features intricate construction including a hinged lid, detailed mouth with teeth and tongue, and a clever eyeball mechanism that flips up from a decorative keyhole. With optional wire or button closures and plastic canvas reinforcement, you'll craft a sturdy, poseable piece that's both functional and fun.

Advanced 12-15 Hours

Materials Needed for Mimic Chest Amigurumi Pattern

β€” Main Fabric

  • 01
    Worsted Weight (4) yarn in Brown or Black - approximately 50 yards for chest body
  • 02
    Worsted Weight (4) yarn in Gold or Silver - approximately 40 yards for decorative trim
  • 03
    Worsted Weight (4) yarn in Dark Red or Green - approximately 62 yards for mouth interior
  • 04
    Worsted Weight (4) yarn in Pink or Purple - approximately 11 yards for tongue detail
  • 05
    Worsted Weight (4) yarn in White - scrap amount for teeth
  • 06
    Worsted Weight (4) yarn in Black - scrap amount for eye pupil

β€” Tools Required

  • 01
    3.75mm (F) crochet hook
  • 02
    Pinch of polyester stuffing for eyeball only
  • 03
    7-count plastic canvas (1 sheet) - optional but recommended
  • 04
    Sewing thread in any color for canvas attachment
  • 05
    Small buttons for eye mechanism (optional alternative to wire)
  • 06
    10-14g wire for eye mechanism (optional alternative to buttons)
  • 07
    Yarn needle for sewing and weaving in ends
  • 08
    Scissors
  • 09
    Safety pins or stitch markers for assembly
  • 10
    Hair tie or piece of yarn for holding curved shape during assembly

Progress Tracker

0% Complete

β€” Short Side (Make 2) :

Start with Chest :

Ch10

r1 :

sc across (9) - Ch1, turn

r2-8 :

sc across (9)

Info :

Finish off, turn, reattach at corner with Trim (BLO). Insert hook, pull up loop, ch1 to start (ch1 counts as the first slst of r9a). Ch2 at the corners count as one space (Increases land in these)

r9a :

BLO: slst around, ch2 at corners (38)

r9b :

BLO: sc around, inc in ch2 spaces (42)

Info :

Finish off, leave a Trim tail for sewing

β€” Long Side (Make 2) :

Start with Chest :

Ch13

r1 :

sc across (12) - Ch1, turn

r2-8 :

sc across (12)

Info :

Finish off, turn, reattach at corner with Trim (BLO). Insert hook, pull up loop, ch1 to start (ch1 counts as the first slst of r9a)

r9a :

BLO: slst around, ch2 at corners (44)

r9b :

BLO: sc around, inc in ch2 spaces (48)

Info :

Finish off, leave a tail for sewing

β€” Bottom (Make 1) :

Start with Chest :

Ch13

r1 :

sc across (12) - Ch1, turn

r2-9 :

sc across (12)

Info :

Finish off, turn, reattach at corner with Trim (BLO). Insert hook, pull up loop, ch1 to start (ch1 counts as the first slst of r10a)

r10a :

BLO: slst around, ch2 at corners (46)

r10b :

BLO: sc around, inc in ch2 spaces (50)

Info :

Finish off, leave a tail for sewing. Mark this piece so you remember it's the bottom (it's very similar to the long sides)

β€” Top Side (Make 2) :

Start with Chest :

3sc in magic ring (3) - ch1, turn

r2 :

*inc* (6) - ch1, turn

r3 :

*1sc, inc* (9) - ch1, turn

r4 :

*2sc, inc* (12) - ch1, turn

r5 :

*3sc, inc* (15)

Info :

Turn, reattach with Trim. Use a long starter tail to do r6a. Then, use the master strand to do 6b without turning

r6a :

BLO slst across (15)

r6b :

BLO *4sc, inc* (18)

Info :

Finish off, leave a tail for sewing

β€” Top (Make 1) :

Start with Chest :

Ch13

r1 :

sc across (12) - Ch1, turn

r2-16 :

sc across (12)

Info :

Finish off, reattach at corner with Trim (BLO). Insert hook, pull up loop, ch1 to start (ch1 counts as the first slst of r9a)

r17a :

BLO: slst around, ch2 at corners (60)

r17b :

BLO: sc around, inc in ch2 spaces (64)

Info :

Finish off, leave a tail for sewing

β€” Handles (Make 2) :

Start with Trim :

Ch 8 - Start in second ch from hook

r1 :

2sc, inc, inc, inc, 2sc (10)

Info :

Finish off, leave a tail for sewing

β€” Mouth Top (Make 1) :

Start with Mouth :

Ch14

r1 :

sc across (13)

r2-15 :

sc across (13)

Info :

Finish off. Reattach and work along raw edge (There's no row of slst's, and you don't have to keep it clean because it's the same color)

Sides r1 :

Sc across (15) - ch1, turn

Sides r2 :

Dec, dec, dec, 3sc, dec, dec, dec (9) - ch1, turn

Sides r3 :

Dec, dec, 1sc, dec, dec (5) - ch1, turn

Sides r4 :

Dec, 1sc, dec (3)

Info :

Finish off. Repeat Sides r1-4 on the other raw edge. The shape will curl like a boat, to fit inside the top. Leave one tail for sewing

β€” Mouth Bottom (Make 1) :

Start with Mouth :

Ch5 - Start in third chain from hook

r1 :

2sc, {3sc} in last ch, continue around other side of ch, 2sc, {3sc} in ch2 space (10)

r2 :

2sc, inc, inc, inc, 2sc, inc, inc, inc (16)

r3 :

3sc, inc, inc, 1sc, inc, inc, 3sc, inc, inc, 1sc, inc, inc (24)

r4 :

4sc, inc, inc, 3sc, inc, inc, 5sc, inc, inc, 3sc, inc, inc, 1sc (32)

r5 :

5sc, inc, inc, 5sc, inc, inc, 7sc, inc, inc, 5sc, inc, inc, 2sc (40)

r6-9 :

sc around (40)

r10 :

6sc, inc, inc, 7sc, inc, inc, 9sc, inc, inc, 7sc, inc, inc, 3sc (48)

r11-15 :

sc around (48)

Info :

If you find your mouth bucket is too short or tall to fit in the chest, feel free to add or remove a round of sc's

r16 BLO :

11hdc, {1hdc, ch1, 1hdc}, 9hdc, {1hdc, ch1, 1hdc}, 13hdc, {1hdc, ch1, 1hdc}, 9hdc, {1hdc, ch1, 1hdc}, 2hdc

Info :

The ch1's of r16 are the corners. Finish off, leave a tail for sewing. This piece is wrong-side-out, so when you look inside you see the right side

β€” Long Brace (Make 1) :

Make with Trim :

Ch32 - Start in second ch from hook

r1 :

30sc, {1sc, ch1, 1sc, ch1, 1sc} in last ch, Continue along other side of chain: 30sc

Info :

Finish off, leave a tail for sewing. Optional: If you want to use wire to flip the eye up (instead of a button), cut a short piece of wire and bend it to fit the shape. On r1, start sc'ing around wire at about 18 sc in. Continue sc'ing around the wire to the same spot on the other side. Bend two short prongs out at 90Β° to plug into the top. Trim excess

β€” Keyhole (Make 1) :

Make with Trim :

6sc in magic ring (6)

r2 :

*inc* (12)

r3 :

*1sc, inc* (18)

Info :

Finish off, leave a tail for sewing. Optional: If you want a button to flip the eye up (instead of wire), make a small secure loop (the size of your button) when weaving tails. With black, embroider a keyhole (It's okay if it's messy on the back. We're going to cover it up with the eyeball)

β€” Eyeball (Make 1) :

Start with Mouth :

5sc in magic ring (5)

r2 :

*inc* (10)

Info :

Cut yarn, pull tail through. Do an invisible finish. Change to white, leave a starting tail to embroider shine

r3a :

BLO slst around (10)

r3b :

*1sc, inc* - work through BLO of both colors (15)

Info :

Finish off, leave a tail to sew to keyhole. With a strand of black, embroider a slit pupil, 3 passes. Use white tail to embroider a shine over it, 1 pass. Knot and trim tails. Sew to back of Keyhole. Sew through BLO of White, into the back bars of Trim. Stuff before closing (This is the only piece with stuffing)

β€” Teeth (Make 1) :

Start with White :

Ch 22 - Start in second ch from hook. Stitches [in brackets] are worked back down that chain

r1 :

slst, *[ch3, slst, 1sc], slst in next, slst in next*

Info :

Finish off. Change to Tongue. Work r2 across other side as shown

r2 :

*BLO slst, slst, sc*, slst, slst, slst (22)

Info :

The sc's here are worked around the entire piece, going between the teeth (They do not occupy a loop of the starting chain. Do not skip or miss a ch for the next slst). Finish off, leave a tail for sewing

β€” Tongue (Make 1) :

Make with Tongue :

Ch32 - Start in second ch from hook

r1 :

30sc, {1sc, ch2, 1sc} in last ch, Continue along other side of chain: 30sc - ch1, turn

r2 :

31sc, {4sc} in ch2 space, Continue along other side of chain: 31sc

Info :

Finish off, leave a Tongue tail for sewing. With Mouth, reattach in center at bottom. Slst going through the tongue. Work up to the tip. Finish off

Assembly Instructions

  • For bottom assembly, attach 7-count plastic canvas to the back of every chest piece using sewing thread. Trace pieces over canvas staying within back bars for seam allowance.
  • Lay bottom pieces out in formation (2 short sides 20x16 holes, 2 long sides 25x16 holes, 1 bottom 25x18 holes). Use safety pins to hold together while sewing BLO to BLO with whip stitch.
  • For top assembly, attach plastic canvas to top pieces (2 semi-circle top sides 17 wide x 8 tall, 1 top 25x26 holes). Use hair tie to hold curved shape while sewing the bent top piece.
  • Pin mouth boat into top of chest. Sew together through BLO to back bars or BLO to plastic canvas. Sew up sides going through BLO to BLO.
  • Sit mouth bucket inside box, mush and flatten the bottom pressing it into box. Sew through BLO to back bars or BLO to plastic canvas.
  • Center teeth strip and pin in place. Sew to mouth bucket through BLO of gums to BLO of mouth. Mark back center of mouth and sew tongue in, then push back inside.
  • Line up top with a long side using safety pins. Sew BLO to BLO on one hinged side. Pin long brace over chest with slight overhang and sew through back bars. If using wire, plug bent ends between fabric and plastic. Sew keyhole/eyeball to end of brace so keyhole flips up to reveal eyeball. If using buttons, mark where loop lands and sew button, then add 4-6 decorative buttons along brace.

Important Notes

  • πŸ’‘Keep slip stitches loose during border rounds to prevent warping and drawstring effect on rectangular pieces
  • πŸ’‘Always leave long tails for sewing assembly as specified in the pattern for secure attachment
  • πŸ’‘Plastic canvas reinforcement is optional but highly recommended for structural integrity and shape retention
  • πŸ’‘Use invisible finish technique on eyeball piece for professional looking seamless appearance
  • πŸ’‘When bending plastic canvas for curved top, use hair tie to hold shape during sewing process
  • πŸ’‘Only the eyeball piece requires stuffing - do not overstuff other components
  • πŸ’‘Mark bottom piece clearly to distinguish it from similar long side pieces during assembly

This incredible Mimic Chest pattern brings tabletop gaming magic to life with its clever engineering and whimsical details! From the hinged lid mechanism to the hidden eyeball reveal, every element has been carefully designed to create a functional treasure chest with personality. The optional wire or button closures give you flexibility, while the plastic canvas support ensures your mimic will be sturdy enough for actual use. Whether displayed with the eye watching suspiciously or tucked away behind the decorative keyhole, this project is sure to delight fantasy fans and showcase your advanced crochet skills. 🧢 Happy crocheting, and watch out for hungry treasure chests! 🧡✨

You ask,

we answer.

FAQs

Is the plastic canvas absolutely necessary for this pattern?

While optional, plastic canvas is highly recommended for structural support. Without it, your mimic chest will be softer and may not hold its shape as well, especially when opening and closing the lid. The flexible version works best for the curved top piece.

Should I use wire or buttons for the eyeball flip mechanism?

Both options work great! Wire creates a more poseable eye that stays in position when flipped up, while buttons are safer for children and easier to work with. The pattern includes instructions for both methods, so choose based on your preference and intended use.

How do I keep my slip stitches loose enough during the border rounds?

Try using a slightly larger hook just for the slip stitch rounds, or consciously leave extra yarn between stitches. The key is catching only a single loop rather than working deeply into the fabric. If pieces start curling or puckering, your slip stitches are too tight.

Can I adjust the size of the mouth bucket if it doesn't fit?

Yes! The pattern specifically mentions you can add or remove rounds of single crochet in the mouth bottom piece (between rounds 11-15) to adjust the height. Test fit as you go to ensure proper sizing.

What's the invisible finish technique mentioned for the eyeball?

The pattern includes detailed instructions with the eyeball section showing how to skip the first stitch, insert your hook under loops from the back, and pull the tail through for a seamless finish. This eliminates the visible gap that typically appears when fastening off in the round.

How do I attach the curved top piece with plastic canvas?

Start by sewing one short edge down first, then use a hair tie or yarn piece to hold the plastic in a curved bend while sewing the rest. When bent this way, the seemingly short plastic piece will perfectly match the curved fabric top.