🧢 Beautiful ✨ Detailed πŸ’ Adorable

Adrian Pants Knitting Pattern

Adrian Pants Knitting Pattern
4.3β˜… Rating
12-18 Hours Time Needed
2.9K Made This
βœ‚οΈ

Intermediate Level

Ideal for those with basic knitting experience, featuring slightly more advanced stitches and techniques to expand your skills.

⏱️

Slow & Steady

A 10-12 hour projectβ€”great for savoring the process over several sessions.

πŸ§₯

Layered Comfort

Perfect for cozy, stylish layering through changing seasons with versatile, mix-and-match potential.

About This Adrian Pants Knitting Pattern

The Adrian Pants pattern is a delightful knitting project that combines simplicity with charming design elements. These pants are worked seamlessly from the top down, beginning with a folded elastic waistband that provides comfort and flexibility for growing children. The pattern incorporates German short rows to create extra fabric in the back, ensuring a better fit and comfortable wear. The striped color pattern adds visual interest while keeping the knitting engaging and fun throughout the project.

Adrian Pants Knitting Pattern crochet pattern - detailed view of completed project

With detailed instructions for gusset shaping and gradual leg decreases, these pants are engineered for both style and practicality. The ribbed cuffs add a professional finishing touch while allowing for adjustment as children grow.

Why You'll Love This Adrian Pants Knitting Pattern

I absolutely love this pattern because it transforms simple techniques into a truly wearable garment that children will actually want to wear. The top-down construction means you can try them on as you go and adjust the length perfectly for your little one. I find the stripe pattern keeps the knitting interesting without being complicated, and there's something deeply satisfying about creating a complete garment that's both functional and adorable. The elastic waistband makes these pants practical for active kids, and the customizable leg length means you can adapt them as your child grows. Most of all, I love how this pattern teaches valuable shaping techniques like short rows and gussets in a practical, real-world application.

Adrian Pants Knitting Pattern step 1 - construction progress Adrian Pants Knitting Pattern step 2 - assembly progress Adrian Pants Knitting Pattern step 3 - details and accessories Adrian Pants Knitting Pattern step 4 - final assembly and finishing

Switch Things Up

I love experimenting with this pattern to create unique variations that reflect different styles and seasons. For a more neutral look, I often swap the bold stripes for subtle tone-on-tone colors or create an ombre effect by gradually shifting between shades of the same color family. Sometimes I'll add a small colorwork motif on the back pocket area or incorporate a simple Fair Isle band around the cuffs for extra visual interest.

For summer versions, I use cotton or bamboo blend sport weight yarns that are cooler and more breathable, perfect for warm weather play. In winter, I reach for soft merino or wool blends that provide extra warmth. I've also experimented with the cuff length - making them extra long so they can be rolled up for a trendy look, or keeping them short and fitted for a cleaner silhouette.

Another fun variation is to work the waistband in a contrasting color for a pop of unexpected color, or to add a simple i-cord drawstring threaded through the waistband for adjustability and style. For special occasions, I've been known to add tiny embroidered details or duplicate stitch patterns after the pants are complete. The beauty of this pattern is that it's a perfect canvas for your creativity while remaining practical and wearable!

Common Mistakes & How to Fix Them

βœ— Forgetting to leave a gap in the waistband hem for threading elastic - mark this spot with a safety pin before knitting down βœ— Not maintaining consistent tension during German short rows which can create uneven fabric - practice on a swatch first to master the technique βœ— Missing marker placements for gusset increases causing misshapen crotch area - use locking stitch markers that won't accidentally slip off the needles βœ— Decreasing too quickly on the legs resulting in pants that are too tight - measure against existing pants and adjust decrease frequency if needed βœ— Not weaving in stripe color changes securely causing ends to poke through after washing - weave ends diagonally through several stitches of matching color

Adrian Pants Knitting Pattern

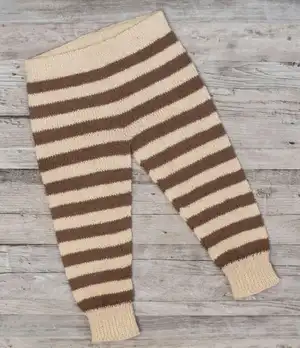
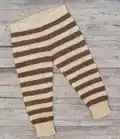
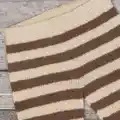
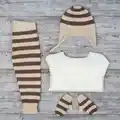
Create these adorable striped pants perfect for little ones with this straightforward top-down knitting pattern. The Adrian Pants feature a comfortable elastic waistband, charming two-color stripes, and practical ribbed cuffs. Designed with thoughtful details like gusset shaping and short row back shaping for the perfect fit, these pants are both functional and stylish. Available in five sizes ranging from 6-12 months up to 7-8 years, this versatile pattern makes a wonderful addition to any child's handmade wardrobe. The combination of stockinette stitch body and ribbed cuffs creates pants that are cozy, stretchy, and ready for active play.

Intermediate 12-18 Hours

Materials Needed for Adrian Pants Knitting Pattern

β€” Main Fabric

  • 01
    Sport weight yarn in Color A: 190-350 meters (210-390 yards) depending on size
  • 02
    Sport weight yarn in Color B: 140-220 meters (160-240 yards) depending on size
  • 03
    Suggested yarn: Wool4You Capella in colors 260 and 264 or similar sport weight yarn

β€” Tools Required

  • 01
    3 mm (US 2.5) circular needles: 40 cm (16 inches)
  • 02
    3 mm (US 2.5) double-pointed needles (DPNs)
  • 03
    3.5 mm (US 4) circular needles: 40 cm (16 inches)
  • 04
    3.5 mm (US 4) circular needles: 60 cm (24 inches)
  • 05
    3.5 mm (US 4) double-pointed needles (DPNs)
  • 06
    Stitch markers
  • 07
    Stitch holder
  • 08
    Tapestry needle
  • 09
    Scissors
  • 10
    30 mm elastic: 46-58 cm (18-22.75 inches) depending on size

Progress Tracker

0% Complete

β€” BODY

Setup :

With needle 3 mm (US 2.5) and color A, cast on 112 (119) 126 (133) 140 stitches. Place marker, join to work in the round.

Waistband Part 1 :

Work stockinette stitch in the round until work measures 3 (3) 3.5 (3.5) 3.5 cm / 1.25 (1.25) 1.5 (1.5) 1.5 inches.

Next Round :

Purl all stitches.

Waistband Part 2 :

Work stitches in the round for another 3 (3) 3.5 (3.5) 3.5 cm / 1.25 (1.25) 1.5 (1.5) 1.5 inches.

Knit Hem Down :

Following round, fold work at purled round and knit cast on edge together with live stitches by working needle knitwise into live stitch then into associated cast on stitch, pull yarn through both stitches. Remember to leave small gap to thread elastic.

Info :

If this is too complicated, knit this round and sew down hem later, but knitting down gives neater look.

Increase Round :

With needle 3.5 mm (US 4) work one round while increasing as follows: knit 7, INC1. Repeat to end of round. You have 128 (136) 144 (152) 160 stitches on needle.

β€” Short Row Shaping for Back

Info :

Working short rows adds fabric in back of piece to allow for better fit. Use German short rows as described or use preferred short row technique.

Row 1 (RS) :

Knit 6 stitches past marker, turn work.

Row 2 (WS) :

German short row, purl 6 stitches past marker, turn work.

Row 3 (RS) :

German short row, knit 6 stitches past last turning point, turn work.

Row 4 (WS) :

German short row, purl 6 stitches past last turning point, turn work.

Repeat :

Repeat row 3 and 4 until you have turned a total of seven times on each side of marker in back.

Info :

When work is turned with yarn in front, slip 1 stitch purlwise. Bring working yarn over needle to back, pull tightly until stitch falls to back of work and 2 legs are on needle. These two legs are double stitch (DS) and counted as one stitch.

Stripe Pattern :

Start stripe pattern with 7 rounds of each color.

Continue Body :

Continue in round with stripe pattern until work measures approximately 15 (16) 17 (18) 19 cm / 6 (6.25) 6.75 (7) 7.5 inches center front. Place marker center front.

β€” Gusset

Info :

You will now increase on each side of marker both in front and back to create gusset. Increase at both markers as follows.

Round 1 :

M1R, knit 1, slip marker, knit 1, M1L.

Round 2 :

No increase. Knit all stitches.

Round 3 :

M1R, knit 2, slip marker, knit 2, M1L.

Round 4 :

No increase. Knit all stitches.

Round 5 :

M1R, knit 3, slip marker, knit 3, M1L.

Round 6 :

No increase. Knit all stitches.

Round 7 :

M1R, knit 4, slip marker, knit 4, M1L. You have 144 (152) 160 (168) 176 stitches on needle.

β€” LEGS

Setup :

Slip half of stitches from marker to marker on stitch holder. You have 72 (76) 80 (84) 88 stitches on needle.

Join :

Place marker and join to work remaining stitches in round while continuing stripe pattern.

Leg Decrease :

ssk, slip marker, knit 1, k2tog.

Decrease Frequency :

Work leg decrease every 2 (2) 2.5 (3) 3 cm / 0.75 (0.75) 1 (1.25) 1.25 inches, a total of 10 (11) 12 (13) 14 times. This should leave 52 (54) 56 (58) 60 stitches on needle.

Continue Leg :

Continue working in round until leg measures 22 (27) 33 (39) 45 cm / 8.75 (10.75) 13 (15.5) 17.75 inches.

β€” Cuff

Setup Round :

With needle 3 mm (US 2.5) and color A, knit one round.

Ribbing :

Work 1x1 rib (knit 1, purl 1) until rib measures approximately 6-10 cm / 2.5-4 inches.

Finish :

Bind off in pattern.

β€” Second Leg

Complete :

Knit other leg the same way and weave in all ends.

Assembly Instructions

  • Thread elastic through the waistband casing using a safety pin, adjusting to fit child's waist comfortably with about 2 cm overlap
  • Secure elastic ends together by overlapping and sewing firmly with needle and thread or by stitching through both layers multiple times
  • Close the small gap left in the waistband hem by mattress stitching or whip stitching the opening closed
  • Weave in all remaining yarn ends by running them diagonally through several stitches of the same color on the wrong side
  • Block the finished pants gently by dampening and laying flat to dry for professional appearance and even stitches
  • Check that all stripe color changes are secure and tidy up any loose ends that may have worked free

Important Notes

  • πŸ’‘Gauge is critical for proper fit - always knit a swatch and measure carefully before starting the pants body
  • πŸ’‘When working German short rows, maintain even tension to avoid gaps or holes in the fabric
  • πŸ’‘The stripe pattern uses 7 rounds of each color - keep track with a row counter or tally marks
  • πŸ’‘Stitch markers are essential for tracking gusset increases and leg decreases - use different colors for different positions
  • πŸ’‘Try the pants on your child as you knit to check length and adjust if needed before binding off
  • πŸ’‘The cuff length is flexible - make it longer for pants that can be rolled up as the child grows
  • πŸ’‘Wash and block your finished pants before wearing to even out stitches and set the shape properly

The Adrian Pants pattern is a wonderful introduction to garment knitting for children, combining classic techniques with modern construction methods. These striped pants showcase how thoughtful design details like gusset shaping and short row techniques create comfortable, well-fitting handmade clothing. The customizable leg length and adjustable waistband mean these pants will be worn and loved for seasons to come. Perfect for gifting or building a handmade wardrobe, this pattern proves that knitted pants can be both practical and absolutely adorable. Happy knitting! 🧢✨

You ask,

we answer.

FAQs

Can I adjust the leg length if my child is between sizes?

Absolutely! The pattern is very flexible with leg length. Simply continue knitting in the round with your stripe pattern until the leg reaches your desired length before starting the cuff. You can also try the pants on as you go since they're worked top-down.

What if I've never done German short rows before?

The pattern includes detailed instructions for German short rows, but you can use any short row technique you're comfortable with, such as wrap and turn. The goal is simply to add extra fabric to the back of the pants for better fit.

Can I make these pants in a solid color instead of stripes?

Yes! You can easily work the entire pants in one color. Just use Color A for the entire body and legs, or choose any sport weight yarn you love. The pattern will work exactly the same way.

How much stretch should the elastic have in the waistband?

The elastic should be comfortable but snug enough to hold the pants up. Measure around your child's waist and subtract about 2-3 cm for proper tension. The knitted fabric will add some give as well.

Do I need to use circular needles or can I use straight needles?

Circular needles are required for this pattern since the pants are worked in the round from top to bottom. This construction method eliminates side seams and creates a more comfortable garment. You'll need both 40 cm and 60 cm circular needles in the specified sizes.