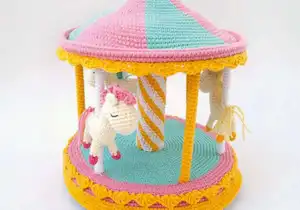
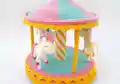
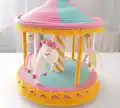
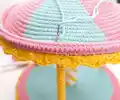
Create an enchanting spinning carousel complete with three adorable horses that actually rotates! This detailed pattern guides you through crocheting a fully functional merry-go-round with a striped central post, decorative scalloped roof, and charming crocheted horses. Perfect for nursery decor or as a magical gift, this intricate project combines crochet artistry with structural craftsmanship to bring childhood wonder to life.
Progress Tracker
0% Complete
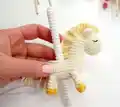
— Horses (Make 3):
Horse Muzzle:
Round 3:
(1 sc, inc)*6=18 sc
Rounds 4-6:
3 rounds of 18 sc. Finish with sl st, leave long end, set aside
Horse Body:
Round 1:
Chain 7. Work 3 sc in second loop from hook, 4 sc along chain, 3 sc in last loop. Turn and crochet along bottom side of chain 4 sc=14 sc around
Round 2:
inc*3, 4 sc, inc*3, 4 sc=20 sc
Round 3:
(1 sc, inc)*3, 4 sc, (1 sc, inc)*3, 4 sc=26 sc
Round 4:
(1 sc, inc, 1 sc)*3, 4 sc, (1 sc, inc, 1 sc)*3, 4 sc=32 sc
Rounds 5-8:
4 rounds of 32 sc
Rounds 10-12:
Do not continue round, go to first st after marker and work spiral rounds of 14 sc. Sc 3 rounds up for neck
Info:
Thread yarn end from muzzle into needle and sew to neck center, joining 2 sc of neck and 2 sc of muzzle
Round 13:
Work around both parts 28 sc
Round 14:
Make decrease at junction of neck with muzzle on both sides=26 sc
Round 15:
Make 1 more decrease on both sides in same place=24 sc
Round 17:
(2 sc, dec)*6=18 sc. Stuff neck and muzzle
Round 18:
(1 sc, dec)*6=12 sc
Round 19:
Dec every st until opening closes, adding fiberfill as needed. Cut yarn, hide end. Stuff body and sew opening on back
Horse Legs (Make 4):
Round 1:
With colored yarn: 6 sc in AR
Round 2:
1 round of 6 sc with colored yarn
Rounds 3-6:
4 rounds of 6 sc with ivory yarn. Finish with sl st, leave long end. Do not stuff
Horse Ears (Make 2):
Row 2:
Do not make turning ch, insert hook right into second st=3 sc
Row 3:
Do not make turning ch, insert hook right into second st=2 sc
Row 4:
Do not make turning ch, insert hook right into second st=1 sc. Leave long end
Info:
Thread yarn end into needle, sew together 2 corners of triangle. Sew ear to horse head. Repeat for second ear
Horse Mane:
Info:
Use yarn lighter than hooves. Attach yarn to forehead, crochet 3 ch and 2 dc in same point. Crochet along neck working 3 dc from each point, inserting hook under posts along imaginary line. At end, crochet 2 dc and 3 ch, finish with sl st. Cut and hide end
Horse Tail:
Info:
Cut 4 pieces of yarn 10cm each. Fasten one thread at a time to back of horse
Horse Eyes:
Info:
Embroider eyes with thin black yarn
Info:
Crochet 2 more horses in other colors
— Carousel Frame Assembly:
Info:
Glue 5 plastic sleeves together with tape, or cut cardboard tube/plastic pipe to 28mm diameter and 17.5cm length
Info:
Glue 4 beads on one wooden circle at equal distances apart
Info:
Glue 4 more beads between them on other side of circle
Info:
Insert screw into hole, fix with nut on reverse side applying superglue drop under nut
Info:
Put washers on screw in this order: large, small, large
Info:
Put second wooden circle on screw. Check it spins freely without touching beads while beads prevent it from falling sideways
— Carousel Base:
Round 1:
With turquoise yarn: Chain 12, sl st in 1st loop
Round 2:
(1 sc, inc)*6=18 sc
Round 3:
1 sc, inc, (2 sc, inc)*5, 1 sc=24 sc
Round 4:
(3 sc, inc)*6=30 sc
Round 5:
2 sc, inc, (4 sc, inc)*5, 2 sc=36 sc
Round 6:
(5 sc, inc)*6=42 sc
Round 7:
3 sc, inc, (6 sc, inc)*5, 3 sc=48 sc
Round 8:
(7 sc, inc)*6=54 sc
Round 9:
4 sc, inc, (8 sc, inc)*5, 4 sc=60 sc
Round 10:
(9 sc, inc)*6=66 sc
Round 11:
5 sc, inc, (10 sc, inc)*5, 5 sc=72 sc
Round 12:
(11 sc, inc)*6=78 sc
Round 13:
6 sc, inc, (12 sc, inc)*5, 6 sc=84 sc
Round 14:
(13 sc, inc)*6=90 sc
Round 15:
7 sc, inc, (14 sc, inc)*5, 7 sc=96 sc
Round 16:
(15 sc, inc)*6=102 sc
Round 17:
8 sc, inc, (16 sc, inc)*5, 8 sc=108 sc
Round 18:
(17 sc, inc)*6=114 sc
Round 19:
9 sc, inc, (18 sc, inc)*5, 9 sc=120 sc
Round 20:
(19 sc, inc)*6=126 sc
Round 21:
10 sc, inc, (20 sc, inc)*5, 10 sc=132 sc
Info:
Change to pink yarn and continue to edge of wooden circle. May need more or fewer rounds depending on gauge
Round 22:
(21 sc, inc)*6=138 sc
Round 23:
11 sc, inc, (22 sc, inc)*5, 11 sc=144 sc
Round 24:
(23 sc, inc)*6=150 sc
Round 25:
12 sc, inc, (24 sc, inc)*5, 12 sc=156 sc. Finish with sl st, do not fasten off
Round 26:
156 sc through back loops
Rounds 27-31:
5 rounds of 156 sc through both loops. Finish with sl st, cut yarn
Base Scalloped Edge:
Info:
Join yellow yarn to round 25, work through front loops: skip 2 st, (3 dc, 1 ch, 3 dc) in third st, skip 2 st, 1 sc in 6th st. Repeat around. Cut yarn and fix end
Info:
Join yellow yarn to end of last pink round and sc in pink st capturing ch loop on top of yellow corners. At corner points crochet 2 sc in 1 st creating (5 sc, inc)* pattern until end of round
Info:
Crochet 3 more rounds without inc
Info:
Put crocheted canvas on base, gluing to plywood around screw by about half the radius
Info:
Tighten 2 nuts leaving 1-2mm gap between floor and lower nut so top circle can rotate. Glue nuts with superglue
— Central Post:
Info:
Chain length necessary to wrap around pipe (24 loops for standard pipe). Calculate stripe pattern: for 2 yellow and 3 white sc need 25 sc per round, but for spiral need 1 loop less=24. Adjust pattern based on your chain count (multiple of pattern minus 1)
Info:
Crochet 2 yellow sc, 3 white sc, changing colors by leaving second yellow sc incomplete (2 loops on hook), finish yellow st with white yarn and continue with white
Info:
Due to missing one loop, stripes will shift and spiral. Crochet as high as pipe, insert pipe inside. Cut yarn and hide ends
Info:
Glue lower edge of pipe to base with glue gun, avoiding screw and nuts. Also sew bottom of pipe to base using white and yellow yarn alternately
— Carousel Roof:
Info:
Crochet with fishing line for structure. Clamp fishing line skein with hairpin to prevent tangling. Melt fishing line tip with lighter to form ball at end
Round 1:
With pink yarn: 6 sc in AR
Round 2:
inc*6=12 sc. From round 2 onward, apply fishing line to previous round and crochet over it
Round 3:
(1 sc, inc)*6=18 sc
Round 4:
Join turquoise yarn: (pink 2 sc, inc, turq 2 sc, inc)*3=24 sc
Round 5:
(pink 3 sc, inc, turq 3 sc, inc)*3=30 sc
Round 6:
(pink 4 sc, inc, turq 4 sc, inc)*3=36 sc
Round 7:
(pink 5 sc, inc, turq 5 sc, inc)*3=42 sc
Round 8:
(pink 6 sc, inc, turq 6 sc, inc)*3=48 sc
Info:
Pull fishing line tighter at beginning for conical shape. Farther from middle, let line lie looser for flatter edges. Stitches should hold line tightly without being too loose
Round 9:
(pink 7 sc, inc, turq 7 sc, inc)*3=54 sc
Round 10:
(pink 8 sc, inc, turq 8 sc, inc)*3=60 sc
Round 11:
(pink 9 sc, inc, turq 9 sc, inc)*3=66 sc
Round 12:
(pink 10 sc, inc, turq 10 sc, inc)*3=72 sc
Round 13:
(pink 11 sc, inc, turq 11 sc, inc)*3=78 sc
Round 14:
(pink 12 sc, inc, turq 12 sc, inc)*3=84 sc
Round 15:
(pink 13 sc, inc, turq 13 sc, inc)*3=90 sc
Round 16:
(pink 14 sc, inc, turq 14 sc, inc)*3=96 sc
Round 17:
(pink 15 sc, inc, turq 15 sc, inc)*3=102 sc
Round 18:
(pink 16 sc, inc, turq 16 sc, inc)*3=108 sc
Round 19:
(pink 17 sc, inc, turq 17 sc, inc)*3=114 sc
Round 20:
(pink 18 sc, inc, turq 18 sc, inc)*3=120 sc
Round 21:
(pink 19 sc, inc, turq 19 sc, inc)*3=126 sc
Round 22:
(pink 20 sc, inc, turq 20 sc, inc)*3=132 sc
Round 23:
(pink 21 sc, inc, turq 21 sc, inc)*3=138 sc
Round 24:
(pink 22 sc, inc, turq 22 sc, inc)*3=144 sc
Round 25:
(pink 23 sc, inc, turq 23 sc, inc)*3=150 sc
Round 26:
(pink 24 sc, inc, turq 24 sc, inc)*3=156 sc
Round 27:
(pink 25 sc, inc, turq 25 sc, inc)*3=162 sc
Info:
Cut fishing line, melt end and quickly press to crocheting to glue it to yarn. Crochet few more sc to close end, finish with sl st. Cut turquoise yarn, leave pink. Roof diameter should approximately equal base (may have more or fewer rows)
Info:
Turn work wrong side toward you, crochet with pink yarn in opposite direction through back loops of last round. Add new fishing line
Round 28:
(26 sc, inc)*6=168 sc
Rounds 29-31:
3 rounds of 168 sc with fishing line through both loops. Finish with sl st. Cut line, melt and glue end. Leave long yarn end
Info:
Fold pink side in half and sew with yarn end, forming thick edge of roof
Roof Scalloped Edge:
Info:
Turn work right side toward you. Join yellow yarn to round 27, sl st around through front loops
Info:
Crochet scallops through yellow sl st: skip 2 loops, 5 dc in 3rd loop, skip 2 loops, 1 sc in 6th loop. Repeat all around. Cut yarn and fix end
Central Post Top:
Round 1:
With yellow yarn: 6 sc in AR
Round 3:
(1 sc, inc)*6=18 sc
Round 4:
(2 sc, inc)*6=24 sc
Rounds 5-6:
2 rounds of 24 sc, leave long end
Info:
Stuff post tightly (upper half) and sew yellow part on top, stuffing it tightly too
Info:
Glue roof to post with glue gun so contact reaches plastic pipe—yellow top and upper edge of pipe completely glued for rigid join
— Support Columns:
Horse Support Sticks (Make 3):
Info:
Measure 15cm manicure sticks. Before cutting sharp ends, insert stick into horse body
Info:
Cut off all sharp ends with pruner. Adjust sticks so bottom length of all is 4cm
Bottom Part:
With white yarn: 8 sc in AR and sc spiral rounds without inc 4cm up. Finish with sl st, leave long end
Top Part:
Crochet upper part of stick in same way
Info:
Sew to horse body with yarn end. Repeat with all horses
Yellow Support Columns (Make 3):
Info:
Cut ends off 3 more sticks to exact same length as horse sticks
Info:
With yellow yarn: 8 sc in AR and sc spiral rounds without inc to full stick length. Insert stick inside, sew opening with yarn end, leave long end
— Final Assembly:
Info:
Distribute yellow columns evenly at edge of roof with yarn end down. Sew upper end of column with yarn matching roof color, not yellow
Info:
Fix lower end of yellow columns with pins
Info:
Distribute white columns with horses between yellow ones, fix with pins
Info:
Sew upper ends of white columns with yarn matching roof color
Info:
Neatly sew lower ends of all columns, lifting non-glued edge of base if necessary
Info:
After sewing all posts to base, glue base to plywood to very edge and to end of upper circle
This spectacular Merry-Go-Round pattern brings the magic of vintage carousels into your home with a fully functional rotating design! Combining engineering precision with traditional crochet artistry, you'll create three adorable horses with flowing manes, a striped central post, and a fishing-line reinforced roof with decorative scallops. The carousel actually spins on a clever ball-bearing system, making it both a stunning display piece and an interactive treasure. Perfect for nursery decor or as an heirloom gift that will be cherished for generations. 🎠✨