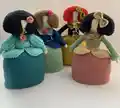
Create an enchanting Menina doll inspired by classical art with this detailed crochet pattern. This elegant Ladies in Waiting figure features a stunning layered dress with customizable colors, intricate hair styling, and authentic period details including decorative sleeves and collar options. Perfect for experienced crocheters ready to craft a sophisticated decorative piece that celebrates historical fashion and artistic heritage.
Progress Tracker
0% Complete
— Arms :
Info :
Make both the same with flesh color
Row 1 :
4 sc in a magic ring
Info :
Cut the thread and close. Leave aside until later
— Body :
Info :
With the color chosen for the body, make 28 chains and close with a sl.st
Info :
Cut the thread and weave in the loose ends. With the flesh color, on top of the last row make a row of slip stitches
Info :
On the next row join the arms to the body. Make single crochets in the back loop BLO of the slip stitch on the previous row
Row 14 :
2sc, 1 dec, 3sc, take one arm and make 6sc around the top (leave loose strand at bottom), 3sc, 1 dec, 4sc, 1 dec, 3sc, take other arm and work 6sc (leave strand at bottom), 3sc, 1 dec, 2sc (36 sts)
Info :
With a darning needle sew the hole inside the arms using the attached strand
Row 15 :
(4sc, 1 dec) x 6 (30 sts)
Row 16 :
(3sc, 1 dec) x 6 (24 sts)
Row 17 :
1sc, 1 dec, 1sc, 2 dec, 1sc, 1 dec, 2sc, 1 dec, 1sc, 2 dec, 1sc, 1 dec, 1sc (16 sts)
Row 18 :
1sc, 1 dec, 2sc, 1 dec, 2sc, 1 dec, 2sc, 1 dec, 1sc (12 sts)
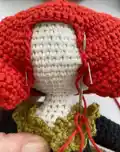
— Head :
Row 1 :
1 inc in every stitch (24 sts)
Row 2 :
(3sc, 1 inc) x 6 (30 st)
Row 3 :
(1 inc, 4sc) x 6 (36 sts)
Row 4 :
2sc, 1 inc, (5sc, 1 inc) x 5, 3sc (42 sts)
Row 5 :
(6sc, 1 inc) x 6 (48 sts)
Row 15 :
(6sc, 1 dec) x 6 (42 sts)
Row 16 :
2sc, 1 dec, (5sc and 1 dec) x 5, 3sc (36 sts)
Row 17 :
(4sc, 1 dec) x 6 (30 sts)
Row 18 :
(3sc, 1 dec) x 6 (24 sts)
Row 19 :
(2sc and 1 dec) x 6 (18 sts)
Row 20 :
(1sc and 1 dec) x 6 (12 sts)
Info :
Cut the yarn and close the head. Fill the body and sew closed along the bottom
— Skirt :
Info :
Use a color different from the body. Make 30 ch and close the loop with a sl.st. Leave a long strand to sew the skirt to the body
Row 3 :
5sc, 6 inc, 9sc, 6 inc, 4sc (42 sts)
Row 4 :
5sc, 1 inc, 2sc, 1 inc, 4sc, 1 inc, 2sc, 1 inc, 9sc, 1 inc, 2sc, 1 inc, 4sc, 1 inc, 2sc, 1 inc, 4sc (50 sts)
Row 5 :
5sc, 1 inc, 4sc, 1 inc, 4sc, 1 inc, 4sc, 1 inc, 9sc, 1 inc, 4sc, 1 inc, 4sc, 1 inc, 4sc, 1 inc, 4sc (58 sts)
Row 6 :
7sc, 1 inc, 4sc, 1 inc, 4sc, 1 inc, 4sc, 1 inc, 13sc, 1 inc, 4sc, 1 inc, 4sc, 1 inc, 4sc, 1 inc, 6sc (66 sts)
Row 7 :
11sc, 1 inc, 3sc, 1 inc, 2sc, 1 inc, 3sc, 1 inc, 21sc, 1 inc, 3sc, 1 inc, 2sc, 1 inc, 3sc, 1 inc, 10sc (74 sts)
Row 8 :
14sc, 1 inc, 3sc, 1 inc, 7sc, 1 inc, 3sc, 1 inc, 13sc, 1 inc, 3sc, 1 inc, 7sc, 1 inc, 3sc, 1 inc, 13sc (82 sts)
Info :
Now place this part of the skirt on a piece cardboard and draw round the outline. Trim and leave until later
Info :
Cut the yarn and weave in the loose ends
— Overskirt :
Info :
If making in two colors, use same color as body. If making in three colors, use a third color. Make 32ch. Leave a long strand to sew on to the body. Finish all rows with 1ch and turn. From the 2nd ch from the hook
Row 3 :
5sc, 6 inc, 9sc, 6 inc, 5sc (43 sts)
Row 4 :
5sc, 1 inc, 2sc, 1 inc, 4sc, 1 inc, 2sc, 1 inc, 9sc, 1 inc, 2sc, 1 inc, 4sc, 1 inc, 2sc, 1 inc, 5sc (51 sts)
Row 5 :
5sc, 1 inc, 4sc, 1 inc, 4sc, 1 inc, 4sc, 1 inc, 9sc, 1 inc, 4sc, 1 inc, 4sc, 1 inc, 4sc, 1 inc, 5sc (59 sts)
Row 6 :
7sc, 1 inc, 4sc, 1 inc, 4sc, 1 inc, 4sc, 1 inc, 13sc, 1 inc, 4sc, 1 inc, 4sc, 1 inc, 4sc, 1 inc, 7sc (67 sts)
Row 7 :
11sc, 1 inc, 12sc, 1 inc, 18sc, 1 inc, 12sc, 1 inc, 11sc (71 sts)
Row 8 :
14sc, 1 inc, 10sc, 1 inc, 20sc, 1 inc, 10sc, 1 inc, 14sc (75sts)
Rows 9 to 11 :
skip the 1st stitch then make a single crochet in every stitch of the row until the last and finish with a sl.st
Info :
Cut the yarn and weave in the loose thread. Now start at one end and work a row of crab stitch. If making in two colors, work a row of sl.sts on the row of starting chains
— Dress Base :
Info :
In a magic circle make 6 sc
Row 2 :
(1sc, 1 inc) x 6 (18 sts)
Row 3 :
(2sc, 1 inc) x 6 (24 sts)
Row 4 :
(3sc, 1 inc) x 6 (30 sts)
Row 5 :
5sc, 6 inc, 9sc, 6 inc, 4sc (42 sts)
Row 6 :
5sc, 1 inc, 2sc, 1 inc, 4sc, 1 inc, 2sc, 1 inc, 9sc, 1 inc, 2sc, 1 inc, 4sc, 1 inc, 2sc, 1 inc, 4sc (50 sts)
Row 7 :
5sc, 1 inc, 4sc, 1 inc, 4sc, 1 inc, 4sc, 1 inc, 9sc, 1 inc, 4sc, 1 inc, 4sc, 1 inc, 4sc, 1 inc, 4sc (58 sts)
Row 8 :
7sc, inc, 4sc, 1 inc, 4sc, 1 inc, 4sc, 1 inc, 13sc, 1 inc, 4sc, 1 inc, 4sc, 1 inc, 4sc, 1 inc, 6sc (66 sts)
Row 9 :
11sc, 1 inc, 3sc, 1 inc, 2sc, 1 inc, 3sc, 1 inc, 21sc, 1 inc, 3sc, 1 inc, 2sc, 1 inc, 3sc, 1 inc, 10sc (74 sts)
Row 10 :
14sc, 1 inc, 3sc, 1 inc, 7sc, 1 inc, 3sc, 1 inc, 13sc, 1 inc, 3sc, 1 inc, 7sc, 1 inc, 3sc, 1 inc, 13sc (82 sts)
Row 11 :
10sc, 4hdc, 1 inc (hdc), 3hdc, 1 inc (hdc), 7hdc, 1 inc (hdc), 3hdc, 1 inc (sc), 20sc, 1 inc (sc), 3hdc, 1 inc (hdc), 7hdc, 1 inc (hdc), 3hdc, 1 inc (hdc), 4hdc, 10sc (90sts)
Info :
Cut the yarn and weave in the loose ends. Lightly iron the base. Adjust the size of the cardboard to the base. The crochet base must be wider than the cardboard so you can sew it to the skirt easily. Pour some white glue onto the cardboard and stick to the base. Let dry
— Hair :
Info :
The first 8 rows are worked in a spiral, end them by making 1 sl.st, 1ch turn and work in the other direction. The rest of the rows will end with 1ch and turn. In magic circle make 6sc
Row 1 :
6 inc, 1ch and turn (12 sts)
Row 2 :
(1sc, 1 inc) x 6 (18 sts)
Row 3 :
(2sc, 1 inc) x 6 (24 sts)
Row 4 :
(3sc, 1 inc) x 6 (30 sts)
Row 5 :
(4sc, 1 inc) x 6 (36 sts)
Row 6 :
(5sc, 1 inc) x 6 (42 sts)
Row 7 :
(6sc, 1 inc) x 6 (48 sts)
Row 8 :
10sc (1 inc, 1sc) x 6, 11sc, (1 inc, 1sc) x 6, 3sc (60sts)
Row 9 :
54sc The 6 unworked stitches will form the fringe
Row 10 :
1sc, 1 inc, 50sc, 1 inc, 1sc (56sts)
Row 12 :
1sc, 1 inc, 52sc, 1 inc, 1sc (58 sts)
Row 14 :
1sc, 1 inc, 48sc, 1 sl.st (7 stitches remaining) turn
Row 15 :
Skip the 1st sl.st and make 42sc, 1sl.st (8 stitches remaining) turn
Row 16 :
skip the 1st sl.st and make 48sc, now work the sl.st that was skipped on the previous row, 1 inc, 1sc
Row 17 :
60sc and work the sl.st skipped on the previous row
Row 18 :
1sc, 1 inc, 48sc, 1sl.st Turn (9 stitches remaining)
Row 19 :
skip the 1st sl.st and work 40sc, 1sl.st (10 stitches remaining)
Row 20 :
skip the 1st sl.st, 48sc, now work the sl.st that was skipped on the previous row, 1 inc, 1sc
Row 21 :
62sc now work the sl.st that was skipped on the previous row
Row 22 :
1sc, 1inc, 58sc, 1 inc, 1sc
Row 24 :
3 double decs, (2sc, 1 dec) x 11, 2sc, 3 double decs (41 sts)
Row 25 :
1 double decs, (1sc, 1 dec) x 11, 2sc, 1 double decs
Info :
Cut the yarn and weave in loose ends
— Lady in Waiting Type A - Sleeve :
Info :
With the color of yarn used for the body make 10ch and close the circle with a sl.st
Row 5 :
(3sc, 1 dec) x 4 (16 sts)
Row 7 :
(2sc, 1 dec) x 4 (12sts)
Info :
Cut the yarn and weave in the starting thread. The thread at the end will be used to attach the sleeve to the body
— Lady in Waiting Type A - Lace for the Neckline :
Row 3 :
(1sc, 1dc, 1sc in the same stitch, 1sl.st in the next stitch) repeat until the end of the row
Info :
Now with slip stitches position yourself at the height of the initial chain and make: 3ch, skip 1ch and sl.st into the next stitch. Repeat until all the chain is covered. Weave in one of the loose ends, the other one will be use to sew it onto the body
— Lady in Waiting Type A - Bow :
Info :
10 ch (The last 3 count as 1dc). Work 5 rows each with 7dc. Cut the yarn and weave in the ends. Wind a strand of yarn two or three times around the middle of the loop to shape it. Use the same strand to sew it onto the hair
— Lady in Waiting Type B - Sleeve :
Info :
Make two the same. Make 16 chains and starting in the 2nd chain from the hook: Make 15sc, 1ch and turn
1st :
15sc flo, 1ch and turn
2nd :
15sc blo, 1ch and turn
Info :
Repeat these 2 rows 18 times. Along one side make 20sc, 1 sl.st. Close into a circle by making 1sc onto the 1st sl.st of the row and working on this chain make 20sc around the sleeve
Info :
Make 10 dec. Work 5 rows of single crochets on these 10 stitches. Cut the yarn and weave in the ends. Sew up the side of the sleeve. Using the starting yarn slightly gather the top of the sleeve. Leave until later
— Lady in Waiting Type B - Collar :
Info :
Make 39 chains. Starting in the 2nd chain from the hook: Work 38sc
Row 1 :
12sc, 3sc in th same stitch, 12sc, 3sc in the same stitch, 12sc (42 sts)
Row 3 :
13sc, 3sc in the same stitch, 14sc, 3sc in the same stitch, 13sc (46 sts)
Info :
Close and weave in the loose ends. Keep the starting thread to sew onto the body
— Flower :
Info :
Using a colour that will stand out on the colour of the dress and the hair make 15ch
Pattern :
Skip a chain and in the next make 1sc, 1hdc, 1sc. Repeat 7 times. Roll up the petals and make a few stitches at the back to hold them together
This enchanting Menina pattern celebrates the elegance of classical Spanish court figures through the art of crochet. With two distinct styling options and customizable color combinations, each Menina becomes a unique decorative masterpiece that stands proudly on display. The pattern combines structural innovation with traditional techniques, using a cardboard base and internal support to create a stable, museum-quality piece. Whether you choose the romantic Type A with its delicate lace neckline or the sophisticated Type B with ribbed sleeves, you'll create an heirloom-worthy figure that brings historical artistry into your home. 🎨 Happy crocheting! 🧶✨