🧶 Beautiful ✨ Detailed 💝 Adorable

Mel the Snowman Amigurumi Pattern

Mel the Snowman Amigurumi Pattern
4.1★ Rating
2-3 Hours Time Needed
3.9K Made This
✂️

Beginner Friendly Level

Perfect for those just starting their sewing journey, with clear instructions and simple techniques

⏱️

Weekend Treat

Takes 5-7 hours, making it an enjoyable project to finish over a couple of days.

❄️

Winter Warmth

Cozy layers for chilly nights that combine practical warmth with beautiful, intricate stitch patterns.

About This Mel the Snowman Amigurumi Pattern

Mel the Snowman is a wonderfully compact amigurumi project that packs a ton of personality into just 6 inches of crocheted charm. The head and body are worked together in one continuous piece — starting from the very top of the head and tapering down into the rounded body — which keeps things clean and beginner-friendly. The accessories, including the hat, carrot nose, branch arms, buttons, and fringe scarf, are all crafted separately and then sewn on to bring Mel fully to life.

Mel the Snowman Amigurumi Pattern crochet pattern - detailed view of completed project

Each little detail has been thoughtfully designed so that even newer crocheters can achieve a polished, professional-looking finish. The pattern uses simple increases and decreases throughout, making it a satisfying and confidence-building project from start to finish.

Why You'll Love This Mel the Snowman Amigurumi Pattern

I absolutely love this pattern because Mel just has so much personality packed into such a small, huggable form. I love how the head and body flow seamlessly into one piece — it keeps the work moving quickly and there's something so satisfying about watching that little snowman shape come together round by round. The fringed scarf is one of my favorite details; it adds such a playful, lived-in feel that makes Mel look like he just came in from the cold. I also love that you can customize him — swap the crocheted buttons for safety eyes for that shiny coal look, or change up his scarf color to make him uniquely yours. Every time I finish one of these, I want to make another.

Mel the Snowman Amigurumi Pattern step 1 - construction progress Mel the Snowman Amigurumi Pattern step 2 - assembly progress Mel the Snowman Amigurumi Pattern step 3 - details and accessories Mel the Snowman Amigurumi Pattern step 4 - final assembly and finishing

Switch Things Up

I honestly think Mel is one of those patterns you can make over and over again without it ever getting old — and here's why I love switching things up with him. I've tried making Mel in a dusty blue yarn instead of the classic white and he honestly looks like he belongs in a Scandinavian Christmas market. I've also swapped the red wine scarf for a deep forest green and it completely transformed the vibe. One time I added a tiny crochet snowflake to his hat brim using leftover grey yarn and I was so pleased with how it turned out. Instead of the crocheted buttons I once used actual vintage coat buttons I had in my sewing tin — the texture contrast was gorgeous. I've even tried making a mini version of Mel using fingering weight yarn and a 2mm hook and it came out the tiniest, most precious little thing. You could also experiment with the nose color — a pale yellow gives a slightly more vintage, aged-carrot feel that I actually love. Another idea I've played with is making Mel's arms longer and wiring them so they're posable — it makes him look like he's waving and it's adorable. I also tried embroidering a tiny smile below the nose with black yarn and it added so much expression to his little face. The bottom line is that Mel is a blank canvas and every version I've made has ended up finding a very happy home. 🧶

Common Mistakes & How to Fix Them

✗ Losing stitch count during increases — always use a stitch marker at the start of each round to stay on track. ✗ Stuffing the head too late — add toy stuffing gradually as you go after the decreases begin, not all at once at the end. ✗ Skipping the back loop only rounds on the body base — working in BLO on round 38 creates the flat bottom edge, so don't skip it. ✗ Sewing the arms too high on the body — they should be attached across rounds 26 and 27, not near the neck or too low. ✗ Making the scarf fringe too tight — keep your chain stitches loose so the fringe hangs naturally and doesn't pucker. ✗ Pulling the adjustable ring too tight before completing the first round — leave a little slack so all stitches sit evenly before closing.

Mel the Snowman Amigurumi Pattern

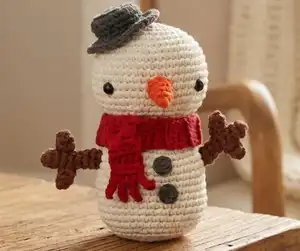
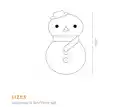
Get ready to bring a little winter magic to your crochet hook with Mel the Snowman — a charming, chubby amigurumi designed by Ilaria Caliri for Paintbox Yarns. Standing at a sweet 6 inches tall, Mel comes complete with his tiny top hat, a cozy red fringed scarf, a little carrot nose, and adorable twig-like arms that make him absolutely irresistible. This pattern works the head and body in one seamless piece, which means less sewing and more crocheting — exactly the way we like it. Whether you're making him as a holiday decoration, a handmade gift, or just a fun weekend project, Mel is guaranteed to melt hearts (not snow). Grab your cotton yarn and let's get stitching!

Beginner Friendly 2-3 Hours

Materials Needed for Mel the Snowman Amigurumi Pattern

— Main Fabric

  • 01
    Paintbox Yarns Cotton Aran in Champagne White (A) — 1 x 1.8oz/50g ball
  • 02
    Paintbox Yarns Cotton Aran in Granite Grey (B) — 1 x 1.8oz/50g ball
  • 03
    Paintbox Yarns Cotton Aran in Blood Orange (C) — 1 x 1.8oz/50g ball
  • 04
    Paintbox Yarns Cotton Aran in Coffee Bean (D) — 1 x 1.8oz/50g ball
  • 05
    Paintbox Yarns Cotton Aran in Red Wine (E) — 1 x 1.8oz/50g ball

— Tools Required

  • 01
    US E/4 (3.5mm) crochet hook
  • 02
    Pair of 3/8in (9mm) safety eyes
  • 03
    Tapestry needle
  • 04
    Pins
  • 05
    Stitch markers
  • 06
    Toy stuffing / fiberfill
  • 07
    Scissors

Progress Tracker

0% Complete

— Head and Body :

Infos :

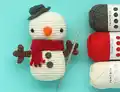
Using US E/4 (3.5mm) crochet hook and yarn A (Champagne White), make an adjustable ring. Head and body are worked in one continuous piece starting from the top of the head.

Round 1 :

6 sc in adjustable ring (6)

Round 2 :

Inc in each st around (12)

Round 3 :

(Inc, 1 sc) x 6 (18)

Round 4 :

(Inc, 2 sc) x 6 (24)

Round 5 :

(Inc, 3 sc) x 6 (30)

Round 6 :

(Inc, 4 sc) x 6 (36)

Round 7 :

(Inc, 5 sc) x 6 (42)

Round 8 :

(Inc, 6 sc) x 6 (48)

Rounds 9–15 :

1 sc in each st around (48)

Round 16 :

(Dec, 6 sc) x 6 (42)

Round 17 :

(Dec, 5 sc) x 6 (36)

Round 18 :

(Dec, 1 sc) x 12 (24)

Info :

Add safety eyes between rounds 13 and 14, approximately 12 sts apart. Begin adding toy stuffing to the head and continue stuffing as you go.

Round 19 :

1 sc in each st around (24)

Round 20 :

(Inc, 7 sc) x 3 (27)

Round 21 :

(Inc, 8 sc) x 3 (30)

Round 22 :

(Inc, 9 sc) x 3 (33)

Round 23 :

(Inc, 10 sc) x 3 (36)

Round 24 :

(Inc, 11 sc) x 3 (39)

Round 25 :

(Inc, 12 sc) x 3 (42)

Rounds 26–35 :

1 sc in each st around (42)

Round 36 :

(Dec, 5 sc) x 6 (36)

Round 37 :

Sl st in each st around (36)

Round 38 :

Sc BLO in each st around (36)

Round 39 :

Dec x 18 (18)

Round 40 :

(Dec, 1 sc) x 6 (12)

Round 41 :

Dec x 6 (6)

Info :

Fasten off, leave a tail. Use a tapestry needle to pick up all front loops from the last round and pull tight to close. Weave in end.

— Hat :

Info :

Using US E/4 (3.5mm) crochet hook and yarn B (Granite Grey), make an adjustable ring.

Round 1 :

6 sc in adjustable ring (6)

Round 2 :

Inc in each st around (12)

Round 3 :

(Inc, 1 sc) x 6 (18)

Round 4 :

Sc BLO in each st around (18)

Rounds 5–7 :

1 sc in each st around (18)

Round 8 :

Working in BLO: Inc in each st around (36)

Round 9 :

1 sc in each st around (36)

Info :

Fasten off, leave a tail for sewing.

— Nose :

Info :

Using US E/4 (3.5mm) crochet hook and yarn C (Blood Orange), make an adjustable ring.

Round 1 :

4 sc in adjustable ring (4)

Round 2 :

(Inc, 3 sc) x 1 (5)

Round 3 :

(Inc, 4 sc) x 1 (6)

Round 4 :

(Inc, 5 sc) x 1 (7)

Round 5 :

(Inc, 6 sc) x 1 (8)

Info :

Fasten off, leave a tail for sewing. Add a small amount of toy stuffing before closing.

— Arms (Make 2) :

Info :

Each arm is made of one main part and two short pieces. All worked with yarn D (Coffee Bean) and US E/4 (3.5mm) crochet hook.

Main Part (Make 2) :

Make an adjustable ring.

Round 1 :

6 sc in adjustable ring (6)

Rounds 2–8 :

1 sc in each st around (6)

Info :

Fasten off, leave a tail for sewing.

Short Pieces (Make 4) :

Make an adjustable ring.

Round 1 :

6 sc in adjustable ring (6)

Rounds 2–3 :

1 sc in each st around (6)

Info :

Fasten off, leave a tail for sewing. Sew 2 short pieces onto each main arm part to form branch-like fingers.

— Buttons (Make 2) :

Info :

Using US E/4 (3.5mm) crochet hook and yarn B (Granite Grey), make an adjustable ring.

Round 1 :

5 sc in adjustable ring (5)

Info :

Fasten off, leave a tail for sewing.

— Scarf :

Info :

Using US E/4 (3.5mm) crochet hook and yarn E (Red Wine), leave a long starting tail for sewing. Chain 6.

Row 1 :

Skip 2 ch from hook, hdc in each of next 4 ch, turn (4)

Rows 2–28 :

Ch 2, 4 hdc BLO, turn (4)

Row 29 (Fringe) :

[Ch 4, skip first ch from hook, sl st in each of next 3 ch, sl st in next st of row] x 4 — creates 4 fringes

Info :

Fasten off and weave in all ends.

Assembly Instructions

  • Use sewing pins to mark the position of all pieces on the body before sewing anything permanently in place.
  • Sew the hat onto the top of the head in your preferred angle — slightly tilted to one side gives Mel extra personality.
  • Sew the carrot nose centered between and just below the safety eyes.
  • Sew the arms to the sides of the body, aligning them with rounds 26 and 27.
  • Sew both short branch pieces onto each main arm to create Mel's twig-like fingers, then attach arms to body.
  • Sew the two crocheted buttons to the front center of the body, spacing them evenly.
  • Wrap the scarf around Mel's neck, fold the fringe side to the front, and stitch in place using the long starting tail.

Important Notes

  • 💡Place a stitch marker at the beginning of every round — it's very easy to lose your place during the long body section
  • 💡Start adding toy stuffing gradually from round 16 onward; don't wait until the end or the shape won't hold properly
  • 💡Round 38 is worked in BLO only — this creates the clean flat bottom edge for Mel to stand on, so don't skip it
  • 💡The gauge is 17 sts and 19 rows per 4 inches using a US E/4 hook — check your tension before starting to ensure correct sizing
  • 💡Paintbox Yarns Cotton Aran is the recommended yarn; substituting a different fiber weight may affect the finished size and look

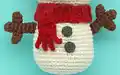
Mel the Snowman is one of those patterns that just fills you with holiday joy from the very first magic ring. He's compact, creative, and comes together surprisingly fast — making him the perfect handmade gift or festive decoration to display with pride. From his chunky little carrot nose to the sweet fringed scarf wrapped around his neck, every detail was designed with love. Whether you make one or a whole snowy family of them, Mel is sure to become a seasonal favorite you return to year after year. 🧶 Happy crocheting! ❄️🧵✨

You ask,

we answer.

FAQs

What size will Mel be when finished?

Mel stands approximately 6 inches (15cm) tall when completed using the recommended yarn and hook size.

Can I use a different yarn than Paintbox Yarns Cotton Aran?

You can use any Aran/worsted weight yarn, but keep in mind that the finished size and look may vary. The pattern is designed specifically for Paintbox Yarns Cotton Aran.

Is this pattern suitable for a complete beginner?

Yes! This pattern is rated as beginner friendly. As long as you know how to make a magic ring, single crochet, increase, and decrease, you have all the skills needed to make Mel.

Do I need to stuff the arms and hat too?

The arms and hat do not require stuffing — only the head and body need toy stuffing. The nose gets just a tiny bit of stuffing before closing.

Can I use safety eyes for Mel's buttons too?

Absolutely! The pattern actually suggests this as a fun alternative — using safety eyes for the coat buttons gives a shiny, coal-like finish that looks adorable.

How do I prevent the scarf fringe from looking too stiff?

Keep your chain stitches for the fringe (Row 29) nice and loose. Tight chains will make the fringe curl or pucker rather than hang naturally.