🧢 Beautiful ✨ Detailed πŸ’ Adorable

Mascot Eagle Ravenna Amigurumi Pattern

Mascot Eagle Ravenna Amigurumi Pattern
4.4β˜… Rating
12-15 Hours Time Needed
3.2K Made This
βœ‚οΈ

Advanced Level

Designed for experienced knitters, these patterns involve intricate designs and complex techniques to challenge and inspire.

⏱️

Slow & Steady

A 10-12 hour projectβ€”great for savoring the process over several sessions.

πŸ¦…

Charming Critter

Delightful animal designs with sweet details that capture the essence of your favorite woodland and farmyard friends.

About This Mascot Eagle Ravenna Amigurumi Pattern

This Eagle Ravenna pattern brings magical house spirit to life with extraordinary attention to detail. Featuring posable wire-supported wings, embroidered facial features, and authentic accessories including a silver diadem and house crest, this eagle stands as a tribute to wisdom and creativity. The pattern incorporates advanced techniques like color changes, wire armature construction, and detailed embroidery work that create a truly spectacular finished piece worthy of display.

Mascot Eagle Ravenna Amigurumi Pattern crochet pattern - detailed view of completed project

With special feather texturing techniques and carefully designed proportions, this eagle captures the majestic essence of the Ravenclaw mascot. The removable scarf and crest add versatility while the structured wings give dimension and character to your handcrafted creation.

Why You'll Love This Mascot Eagle Ravenna Amigurumi Pattern

I absolutely love this pattern because it combines so many advanced crochet techniques into one spectacular project that feels like a true masterpiece when completed. The way the wire-supported wings create authentic pose-ability makes this eagle come alive in your hands, and the attention to detail in the embroidered features and house crest adds such depth to the character. Every step builds anticipation as you watch this majestic bird take shape, from the carefully shaded beak to the metallic diadem crown. The pattern challenges your skills while providing clear guidance through complex color work and structural elements that result in a stunning display piece you'll treasure forever.

Mascot Eagle Ravenna Amigurumi Pattern step 1 - construction progress Mascot Eagle Ravenna Amigurumi Pattern step 2 - assembly progress Mascot Eagle Ravenna Amigurumi Pattern step 3 - details and accessories Mascot Eagle Ravenna Amigurumi Pattern step 4 - final assembly and finishing

Switch Things Up

I absolutely love experimenting with different colorways to create unique house mascots beyond the traditional Ravenclaw blue and bronze scheme. You could easily transform this eagle pattern into a patriotic symbol using red, white, and blue yarns, or create a stunning golden eagle by using various shades of yellow, tan, and brown throughout the body and wings.

For a more whimsical approach, I've been thinking about working this pattern in pastel colors for a softer, nursery-friendly version, or even trying variegated yarns that would give the feathers an iridescent quality. The wire wing structure would work beautifully with sparkly or metallic yarns if you want to create a truly magical effect for fantasy-themed displays.

Another variation I'm excited about is adjusting the size by using bulkier yarn and a larger hook, which would create an impressive statement piece perfect for themed rooms or convention displays. You could also experiment with the accessories by designing different house crests or creating seasonal scarves with various stripe patterns and colors to match different occasions throughout the year.

Common Mistakes & How to Fix Them

βœ— Not crocheting tightly enough causing filler to show through the stitches, especially in the head and body sections requiring smaller hook size βœ— Forgetting to install safety eyes before fully closing the head rounds, making it impossible to properly position eyes between rounds thirteen and fourteen βœ— Cutting wire too short for wings without adding extra two centimeters on each side for wrapping ends causing unstable wing structure βœ— Skipping the head shaping step which creates lack of definition and results in round appearance instead of realistic bird-like facial contours βœ— Not using enough pins when positioning wings and accessories before final sewing leading to misaligned or crooked placement on finished piece

Mascot Eagle Ravenna Amigurumi Pattern

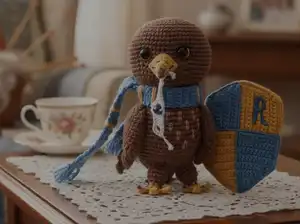
Create your own majestic eagle mascot with this detailed amigurumi pattern featuring authentic details like feathered wings, house crest, and diadem. Perfect for Harry Potter fans and bird lovers alike, this pattern guides you through crafting a beautiful eagle with realistic features including posable wings supported by wire, embroidered details, and removable accessories. Transform simple yarn into an impressive mascot that captures the wisdom and elegance of Ravenclaw house with carefully designed proportions and charming character.

Advanced 12-15 Hours

Materials Needed for Mascot Eagle Ravenna Amigurumi Pattern

β€” Main Fabric

  • 01
    Brown yarn YarnArt Jeans 70 Brown Sport weight
  • 02
    Bronze cotton yarn YarnArt Jeans 35 Orange Sport weight
  • 03
    Blue yarn YarnArt Jeans 16 Blue Sport weight
  • 04
    Cacao yarn YarnArt Jeans 71 Cacao Sport weight
  • 05
    Blue floss thread Gamma 3119 or DMC 311 equivalent
  • 06
    Black floss thread
  • 07
    Orange floss thread Gamma 3248 or DMC 728 equivalent
  • 08
    Silver metallized floss thread Gamma 0420 or DMC 310 equivalent

β€” Tools Required

  • 01
    Crochet hook 1.75mm
  • 02
    Crochet hook 1.5mm
  • 03
    Aluminum wire diameter 0.95mm
  • 04
    Black safety eyes 9mm
  • 05
    Teddy joints with cotter pin T-shaped 25x2.00mm, shim 3x20mm, disk 10mm
  • 06
    Blue bead 8mm
  • 07
    Stuffing filler
  • 08
    Needle for sewing
  • 09
    Scissors
  • 10
    Round-nose pliers
  • 11
    Pins and stitch markers
  • 12
    Transparent glue Moment Gel
  • 13
    Water soluble canvas
  • 14
    Needle comb
  • 15
    Paint brush
  • 16
    Black nail polish or fabric paint

Progress Tracker

0% Complete

β€” Beak :

Round 1 :

4 sc in MR (4)

Round 2 :

4 sc (4)

Round 3 :

1 sc, inc x 2, 1 sc (6)

Round 4 :

1 sc, inc, 1 sc, inc, 1 sc, 1 sc in the last sc of round 2 grabbing (8)

Round 5 :

2 sc, inc, 1 sc, inc, 1 sc, inc, 1 sc (11)

Round 6 :

2 sc, 2 ch, 1 sc in chain, 7 sc, 2 ch, 1 sc in chain, 2 sc, 2 sl st

Info :

Embroider mouth and nostrils with black floss. Optionally shade beak tip with diluted black paint using brush for realistic effect
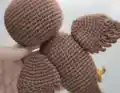
β€” Head :

Round 1 :

12 sc in 5 ch on both sides of chain (12)

Round 2 :

(1 sc, inc) x 6 (18)

Round 3 :

1 sc, inc, (2 sc, inc) x 5, 1 sc (24)

Round 4 :

(3 sc, inc) x 6 (30)

Round 5 :

2 sc, inc, (4 sc, inc) x 5, 2 sc (36)

Round 6 :

(5 sc, inc) x 6 (42)

Round 7 :

3 sc, inc, (6 sc, inc) x 5, 3 sc (48)

Round 8 :

(7 sc, inc) x 6 (54)

Round 9-13 :

54 sc in each round (54)

Round 14 :

10 sc, 2 ch, skip 2 st, 8 sc, skip 2 st, 2 ch, 32 sc (54)

Round 15 :

10 sc, dec, inc, 6 sc, inc, dec, 32 sc (54)

Round 16 :

9 sc, dec, 1 sc, inc, 6 sc, inc, dec, 32 sc (54)

Round 17 :

9 sc, dec, 1 sc, inc, 7 sc, inc, dec, 31 sc (54)

Round 18 :

54 sc in each round (54)

Round 19 :

5 sc, inc, 23 sc, inc, 24 sc (56)

Info :

Install black safety eyes 9mm in the holes created in round 14

Round 20 :

(5 sc, dec) x 8 (48)

Round 21 :

2 sc, dec, (4 sc, dec) x 7, 2 sc (40)

Round 22 :

(3 sc, dec) x 8 (32)

Round 23 :

1 sc, dec, (2 sc, dec) x 7, 1 sc (24)

Info :

Insert cotter pin into shim and install to head

Round 24 :

(1 sc, dec) x 8 (16)

Round 25 :

dec x 8 (8)

Round 26 :

dec x 4, close the round (4)

Infos :

Create head shaping by inserting needle at point f, exit at point c, insert at point d, exit at point f and knot. Repeat with second yarn from point g to b to a to g. Tighten lightly and secure. Embroider orange iris and black eyelid with floss. Install and sew beak with pins

β€” Feet :

Round 1 :

6 sc in MR, close round with sl st (6)

Round 2 :

2 ch, 1 sc to 2nd loop from hook, 2 sl st through back loop, 3 sc in 4 ch, sl st, 3 sc in 4 ch, sl st, 3 sc in 4 ch, 2 sl st. Make sl st to front loop, 6 sc through front loop, close round

Info :

Join brown yarn over back claw

Round 3 :

6 sc (6)

Round 4 :

inc x 6 (12)

Round 5-7 :

12 sc in each round, close round (12)

Infos :

Draw claws carefully with black paint. Make second foot repeating all steps. Hang pin in 10 sc of last round for right foot and in 7 sc for left foot

β€” Body :

Round 1 :

16 sc in 7 ch on both sides of chain (16)

Round 2 :

(1 sc, inc) x 8 (24)

Round 3 :

(3 sc, inc) x 6 (30)

Round 4 :

2 sc, inc, (4 sc, inc) x 5, 2 sc (36)

Round 5-6 :

36 sc in each round (36)

Round 7 :

(5 sc, inc) x 6 (42)

Round 8 :

5 sc, feather, 3 sc, feather, 3 sc, feather, 3 sc, feather, 24 sc (42)

Round 9 :

5 sc, feather, 3 sc, feather, 3 sc, feather, 3 sc, feather, 24 sc (42)

Round 10 :

7 sc, feather, 3 sc, feather, 3 sc, feather, 26 sc (42)

Round 11 :

7 sc, feather, 3 sc, feather, 3 sc, feather, 26 sc (42)

Round 12 :

9 sc, feather, 3 sc, feather, 28 sc (42)

Round 13 :

9 sc, feather, 3 sc, feather, 28 sc (42)

Round 14 :

11 sc, feather, 30 sc (42)

Round 15 :

11 sc, feather, 30 sc (42)

Info :

Place cotter pin in center of chain. Inside body put disk on cotter pin and tighten ends

Round 16 :

5 sc, dec, 4 sc, dec, 4 sc, dec, 7 sc, inc, 5 sc, inc, 3 sc (42)

Round 17 :

42 sc (42)

Round 18 :

4 sc, dec, 4 sc, dec, 4 sc, dec, 6 sc, inc, 6 sc, inc, 6 sc, inc, 3 sc (42)

Round 19 :

42 sc (42)

Round 20 :

3 sc, dec, 3 sc, dec, 3 sc, dec, 7 sc, inc, 7 sc, inc, 7 sc, inc, 3 sc (42)

Round 21 :

6 sc grabbing loops of right foot from inside starting with pinned sc, 4 sc, 6 sc grabbing loops of left foot from inside starting with pinned sc, 26 sc (42)

Round 22 :

Crochet feet on other side for remaining loops, (5 sc, dec) x 6 (36)

Round 23 :

(1 sc, dec) x 7, 9 sc, (1 sc, dec) x 2 (27)

Round 24 :

3 sc, dc4tog, 20 sc (24)

Round 25 :

1 sc, dc5tog, 17 sc

Round 26 :

dc5tog, 13 sc

Round 27 :

dc5tog, 2 sc, sl st

Round 28 :

1 sc, 1 dc, 1 tr, 1 dc, 1 sc, close row with sl st

Info :

Join cacao yarn. Make inc, 1 sc, 1 dc, 1 tr, 1 dc, 1 sc, turning, 3 ch, (2 sl st to chain from 2nd loop from hook, 1 sl st) x 5. Fill body completely and secure yarn

β€” Wings :

Round 1 :

6 sc in MR (6)

Round 2 :

inc x 6 (12)

Round 3 :

(3 sc, inc) x 3 (15)

Round 4 :

2 sc, inc, (4 sc, inc) x 2, 2 sc (18)

Round 5 :

(5 sc, inc) x 3 (21)

Round 6 :

3 sc, inc, (6 sc, inc) x 2, 3 sc (24)

Round 7 :

(7 sc, inc) x 3 (27)

Round 8-9 :

27 sc in each round (27)

Round 10 :

2 dc, 2 tr, 2 tr shell, 2 tr, 2 dc, 18 sc (28)

Round 11 :

2 dc, 6 tr, 2 dc, 18 sc (28)

Left Wing Round 12 :

4 sc, sl st. 3 ch, 2 sc to chain, 1 sl st to wing. 8 ch, 1 sl st, 2 sc, 4 dc, 1 sl st to wing. 7 ch, 1 sl st, 2 sc, 3 dc, 1 sl st to wing. 6 ch, 2 sc, 3 dc, 1 sl st to wing. 5 ch, 3 sc, 1 dc, 1 sl st to wing. 4 ch, 1 sl st, 2 sc, 1 sl st to wing. 2 ch, 1 sc to chain, 1 sl st to wing

Right Wing Round 12 :

19 sc, sl st. 2 ch, 1 sc to chain, 1 sl st to wing. 4 ch, 1 sl st, 2 sc, 1 sl st to wing. 5 ch, 3 sc, 1 dc, 1 sl st to wing. 6 ch, 2 sc, 3 dc, 1 sl st to wing. 7 ch, 1 sl st, 2 sc, 3 dc, 1 sl st to wing. 8 ch, 1 sl st, 2 sc, 4 dc, 1 sl st to wing. 3 ch, 2 sc to chain, 1 sl st to wing

Infos :

Step 8 loops away from cacao feathers and place pins. Insert wire into body at pin locations. Measure wing from pin to first feather corner adding 2cm each side for wrapping. Wrap wire with brown yarn and glue. Attach wings to wire. Thread brown yarn through double crochets and sew wings to body where wires are installed

β€” Diadem :

Round 1 :

19 ch, turning

Round 2 :

1 sl st, 3 ch, 2 dc, 2 tr, 1 ch, 1 sl st with bead, 1 ch, 2 tr, 2 dc, 3 ch, 1 sl st, turning

Round 3 :

7 sl st, 1 ch, 1 sl st in chain, 2 ch, 1 sl st in chain, 8 sl st

β€” House Crest :

Bronze Yarn Round 1 :

10 ch, turning, 9 sc (9)

Round 2 :

1 ch, turning, 9 sc (9)

Round 3 :

1 ch, turning, 8 sc, inc (10)

Round 4 :

1 ch, turning, 10 sc (10)

Round 5 :

1 ch, turning, 9 sc, inc (11)

Round 6 :

1 ch, turning, 11 sc (11)

Round 7 :

1 ch, turning, 10 sc, inc (12)

Round 8-9 :

1 ch, turning, 12 sc (12)

Info :

Change to blue yarn. Crochet half sc with bronze and half with blue for clean color transition. Continue with blue only without cutting bronze

Blue Yarn Round 11-14 :

1 ch, turning, 12 sc (12)

Round 15 :

1 ch, turning, 10 sc, dec (11)

Round 16 :

1 ch, turning, 11 sc (11)

Round 17 :

1 ch, turning, 9 sc, dec (10)

Round 18 :

1 ch, turning, 10 sc (10)

Round 19 :

1 ch, turning, 8 sc, dec (9)

Round 20 :

1 ch, turning, 9 sl st (9)

Round 21 :

10 sc blue plus bronze, 10 sc bronze plus blue, change direction (20)

Round 22 :

1 ch, turning, 10 sc blue, 10 sc bronze (20)

Round 23 :

1 ch, turning, 10 sc bronze, 10 sc blue (20)

Round 24 :

1 ch, turning, 10 sc blue, 10 sc bronze (20)

Round 25 :

1 ch, turning, 10 sc bronze, 10 sc blue (20)

Round 26 :

1 ch, turning, 10 sc blue, 10 sc bronze (20)

Round 27 :

1 ch, turning, 10 sc bronze, 10 sc blue (20)

Round 28 :

1 ch, turning, dec, 8 sc blue, 8 sc, dec bronze (18)

Round 29 :

1 ch, turning, dec, 7 sc bronze, 7 sc, dec blue (16)

Round 30 :

1 ch, turning, dec, 6 sc blue, 6 sc, dec bronze (14)

Round 31 :

1 ch, turning, dec, 5 sc bronze, 5 sc, dec blue (12)

Round 32 :

1 ch, turning, dec, 4 sc blue, 4 sc, dec bronze (10)

Round 33 :

1 ch, turning, dec, 3 sc bronze, 3 sc, dec blue (8)

Round 34 :

1 ch, turning, dec, 2 sc blue, 2 sc, dec bronze (6)

Round 35 :

1 ch, turning, dec, sc bronze, sc, dec blue (4)

Round 36 :

1 ch, turning, dec blue, dec bronze (2)

Round 37 :

1 ch, turning, dec. Crochet around perimeter counterclockwise: 16 sc blue, 19 sc bronze, 19 sc blue, 16 sc, sl st in 1st dec bronze (71)
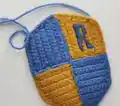
Infos :

Embroider lines with blue yarn and fix with blue floss thread. Attach water soluble canvas and trace letter R approximately 2.5cm high. Embroider letter outline with orange floss using backstitch then fill with fill stitches. Rinse under water and remove canvas. Pin crest to surface and join bronze yarn from both sides

β€” Scarf :

Round 1 :

5 ch, turning, 4 sc (4)

Round 2-100 :

1 ch, turning, 4 sc (4)

Infos :

Mark stripe locations with pins by folding scarf 2-3-4 times. Thread bronze yarn into needle and make two wrapping turns at each pin location stepping back two rows between turns. Cut 8 strands of blue yarn 6cm long for fringe and attach at both ends

Assembly Instructions

  • Attach the completed head to the body by securing the cotter pin through the joint system, ensuring the disk is properly tightened inside the body
  • Install the wire armature through the body at marked pin locations, measuring approximately 5cm from pin to wing corner and adding 2cm on each side
  • Wrap the wire completely with brown yarn using transparent glue to secure, then slide the completed wings onto the wire frame
  • Sew the wings securely to the body where the wires are installed, threading brown yarn through the double crochet stitches for stability
  • Position and sew the house crest to the eagle's chest area using the bronze yarn tails attached during crest completion
  • Place the silver diadem on the eagle's head between the eyes, adjusting for proper fit and securing with small stitches
  • Drape the blue and bronze striped scarf around the eagle's neck, arranging it naturally with the fringed ends hanging down

Important Notes

  • πŸ’‘Use plenty of pins throughout assembly especially when positioning wings and accessories to ensure proper alignment before permanent sewing
  • πŸ’‘Crochet tightly enough so stuffing does not show through stitches or use a smaller hook size if needed
  • πŸ’‘The feather technique requires grabbing cacao yarn mid-stitch then completing with brown yarn for realistic texture effect
  • πŸ’‘Head shaping with yarn threading is critical for achieving bird-like facial contours rather than round appearance
  • πŸ’‘When working with wire, always add extra length for wrapping ends securely to prevent sharp edges
  • πŸ’‘Install safety eyes between rounds thirteen and fourteen before closing head completely as specified in pattern
  • πŸ’‘Water soluble canvas must be rinsed thoroughly under running water to completely remove after embroidering the letter

This magnificent Eagle Ravenna pattern was designed to capture the wisdom and elegance of house mascot tradition through intricate crochet work and detailed embellishments. Combining advanced techniques like wire armature construction, color-change feathering, and delicate embroidery, this pattern creates a truly spectacular display piece that showcases your crochet mastery. The posable wings, removable accessories, and authentic details make this eagle a treasured creation worthy of any collection. Happy crocheting and may wisdom guide your stitches! πŸ¦…βœ¨

You ask,

we answer.

FAQs

Can I make this eagle without using wire for the wings?

Yes, you can make the eagle without wire, but the wings will not be posable and will hang down naturally. The wire armature gives the wings structure and allows you to position them in spread or folded positions for display.

What if I cannot find the exact YarnArt Jeans yarn colors specified?

You can substitute with any sport weight cotton or cotton-acrylic blend yarn in similar colors. Just make sure to crochet tightly enough that stuffing doesn't show through, and adjust your hook size accordingly.

How do I create the feather effect on the body?

The feather technique involves inserting your hook, grabbing the cacao accent yarn, pulling it through, then grabbing your main brown yarn to complete the single crochet stitch. This creates a textured dot that mimics feather patterns.

Is the head shaping step really necessary?

Yes, the head shaping is essential for creating realistic bird-like facial contours. Without it, the head will appear perfectly round rather than having the defined brow and beak area that gives the eagle its characteristic appearance.

Can I make the accessories removable?

The scarf is naturally removable as it drapes around the neck. The diadem can be lightly tacked with a few stitches for removal if desired. The house crest is meant to be permanently sewn on for stability.

What should I do if the water soluble canvas won't dissolve completely?

Soak the embroidered area in lukewarm water for several minutes and gently rub with your fingers. If stubborn bits remain, continue soaking and the canvas will eventually dissolve completely without damaging your embroidery work.