About This Margaret Textured Crochet Square Pattern
This textured block is perfect for making heirloom blankets, elegant throw pillows, or stunning tote bags that will instantly become treasured family keepsakes.
Ideal for those with basic crocheting experience, featuring slightly more advanced stitches and techniques to expand your skills.
Fits nicely into a free afternoon — 2 to 5 hours of focused, enjoyable crocheting.
A warm touch for your space that transforms ordinary corners into inviting nooks filled with handmade charm.
This textured block is perfect for making heirloom blankets, elegant throw pillows, or stunning tote bags that will instantly become treasured family keepsakes.
I absolutely adore how this pattern plays with dimension! Working stitches into the third loops and behind previous rounds creates this incredible 3D effect that you just have to touch. It kept me completely hooked from the very first round, and seeing the colors interact across the different layers was pure joy.
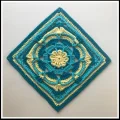


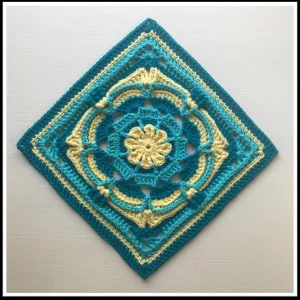
When I first saw the Margaret Square, I was completely captivated by how the layers of texture seem to bloom right off the fabric. Designing or working through a pattern like this always reminds me of why I fell in love with crochet in the first place—it is pure magic how a simple strand of yarn can transform into such an intricate, dimensional masterpiece.
For my version, I decided to play around with a vintage-inspired palette. I used a soft cream for the center flower to really make those petals pop, and then transitioned into deep forest greens and muted rust tones for the outer rounds. The way the post stitches catch the light is absolutely stunning!
If you are looking to make a full blanket, I highly recommend mixing up the color placements across different squares. It keeps the project incredibly engaging because every single square feels like a brand-new adventure. Just be sure to block your finished squares so they join together seamlessly!
Welcome to your next favorite crochet project! The Margaret Square is an absolute dream for anyone who loves rich textures, intricate post stitches, and beautiful depth. Named in honor of a special person who touched my crafting journey, this square is like a love letter to the art of crochet. You will love how the layers build upon each other to create a gorgeous, blooming floral center that transitions beautifully into a classic square shape. Grab your favorite hook and let us make something truly special together!
Form a magic circle to begin. Work a ch 5, which represents your first dc and a ch 2 space. Inside the ring, repeat [1 dc, ch 1, 1 dc, ch 2] 7 times. Complete the round with 1 dc and ch 1, then finish with an invisible join into the 4th chain of your starting chain before fastening off. (16 dc, 8 ch-1 sp, 8 ch-2 sp)
Attach your yarn in any ch 2 space. Work *(3 dc) directly into the ch 2 space, make 1 FPdc around the next dc, ch 1, skip the ch 1 space, and work 1 FPdc around the following dc*. Repeat this entire sequence from * to * 7 more times. Secure with an invisible join to the second dc of the round, then fasten off. (24 dc, 16 FPdc, 8 ch-1 sp)
Start in any ch 1 space from Round 1. Fold your current work forward so you can work behind Round 2. Work *1 dc in that ch 1 space of Round 1, ch 3, then skip to the next ch 1 space of Round 1*. Repeat this sequence from * to * 7 more times. Secure with an invisible join to the first chain of the round and fasten off. (8 dc, 8 ch-3 sp)
Join your yarn in any ch 3 space. Work *(3 dc) in the ch 3 space, ch 1, skip the next stitch, and work 1 dc in the following ch 3 space*. Repeat this pattern from * to * 7 more times. Complete the round with an invisible join to the second dc, then fasten off. (32 dc, 8 ch-1 sp)
Begin in the first dc after any ch 1 space. Work *1 sc in each of the next 4 stitches, then work 1 tr down into the ch 1 space of Round 2, skipping the ch 1 space of the current round*. Repeat this sequence from * to * 7 more times. Secure with an invisible join to the second sc of the round, then fasten off. (32 sc, 8 tr)
Join your yarn in the second sc of any 4-stitch group. Work *1 BLdc in each of the next 3 stitches, then work (1 dc, ch 3, 1 dc) into both the tr and the 3LP of that stitch, followed by 1 BLdc in the next stitch*. Repeat this sequence from * to * 7 more times. Secure with an invisible join to the second dc of the round and fasten off. (16 dc, 32 BLdc, 8 ch-3 sp)
Start in any ch 3 space. Work *(6 tr) into the ch 3 space, ch 1, skip to the next ch 3 space, and work 1 tr in the next ch 3 space*. Repeat this pattern from * to * 7 more times. Secure with an invisible join to the second tr of the round, then fasten off. (56 tr, 8 ch-1 sp)
Join your yarn in the second tr of any 7-stitch group. Repeat the following sequence: *[(2 dc) in the BL and 3LP of the next tr; 1 dc in the BL and 3LP of the next tr] 3 times, then ch 1, skip the ch 1 space, and work 1 dc in the BL and 3LP of the next tr*. Repeat from * to * 7 more times. Secure with an invisible join to the second dc and fasten off. (80 BLdc, 8 ch-1 sp)
Start in the second BLdc after any ch 1 space. Work *1 dc in both the BL and 3LP of each of the next 9 stitches. Working in front of Round 8, work (1 tr, ch 2, 1 tr) into the ch 1 space of Round 7, then skip the ch 1 space of Round 8, and work 1 dc in both the BL and 3LP of the next dc*. Repeat from * to * 7 more times. Secure with an invisible join to the second dc and fasten off. (80 BLdc, 16 tr, 8 ch-2 sp)
Attach yarn in any ch 2 space. Work *(2 dtr, ch 2, 2 dtr) in the ch 2 space, skip the next stitch, then work 1 BPtr around each of the next 2 stitches, 1 BPdc around each of the next 2 stitches, and 1 BPhdc around each of the next 6 stitches. Ch 1, skip 1 stitch, then work ([1 puff, ch 1] 2 times, and 1 puff) all into the next ch 2 space. Ch 1, skip 1 stitch, work 1 BPhdc around each of the next 6 stitches, 1 BPdc around each of the next 2 stitches, and 1 BPtr around each of the next 2 stitches, then skip the last stitch*. Repeat from * to * 3 more times. Secure with an invisible join to the second dtr, then fasten off. (48 BPhdc, 16 BPdc, 16 BPtr, 16 dtr, 12 puff, 16 ch-1 sp, 4 ch-2 corner sp)
Begin in any ch 2 corner space. Work *(2 dc, ch 2, 2 dc) in the corner space, then work 1 dc in the 3LP of each of the next 5 stitches, 1 hdc in the 3LP of each of the next 4 stitches, and 1 sc in the 3LP of each of the next 2 stitches. Ch 1, skip the next stitch and the ch 1 space, then work [(1 FPdc, ch 1) 2 times around the puff stitch] 3 times. Skip the next ch 1 space and the next stitch, then work 1 sc in the 3LP of each of the next 2 stitches, 1 hdc in the 3LP of each of the next 4 stitches, and 1 dc in the 3LP of each of the next 5 stitches*. Repeat from * to * 3 more times. Secure with an invisible join to the second dc, then fasten off. (16 sc, 32 hdc, 24 FPdc, 56 dc, 28 ch-1 sp, 4 ch-2 corner sp)
Start in any ch 2 corner space. Work *(2 tr, ch 2, 3 tr) in the corner space, ch 1, skip 4 stitches, then work 1 dc in each of the next 9 stitches. Repeat [1 FPhdc around the next (FPdc, ch 1, FPdc) group] 3 times. Work 1 dc in each of the next 9 stitches, ch 1, skip 4 stitches, then work 1 tr in the corner space*. Repeat from * to * 3 more times. Secure with an invisible join to the second tr of the round, then fasten off. (12 FPhdc, 72 dc, 24 tr, 8 ch-1 sp, 4 ch-2 corner sp)
Join yarn in any ch 2 corner space. Work *(2 dc, ch 2, 2 dc) in the corner space, then work 1 BPdc around each of the next 3 stitches, 1 dc in the next ch 1 space, 1 BPdc around each of the next 9 stitches, 1 BPhdc around each of the next 3 stitches, 1 BPdc around each of the next 9 stitches, 1 dc in the next ch 1 space, and 1 BPdc around each of the next 3 stitches*. Repeat from * to * 3 more times. Secure with an invisible join to the second dc of the round, then fasten off. (24 dc, 96 BPdc, 12 BPhdc, 4 ch-2 corner sp)
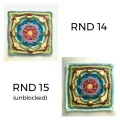
Attach yarn in any ch 2 corner space. Work *(1 sc, ch 2, 1 sc) in the corner space, then work 1 sc in each of the next 33 stitches*. Repeat from * to * 3 more times. Secure with an invisible join to the first single crochet of the round, then fasten off. (140 sc, 4 ch-2 corner sp)
Start in any ch 2 corner space. Work *(2 dc, ch 2, 2 dc) in the corner space, then work 1 BLdc in each of the next 35 stitches*. Repeat from * to * 3 more times. Secure with an invisible join to the second dc, then fasten off. (16 dc, 140 BLdc, 4 ch-2 corner sp)
I hope you have the absolute best time bringing this beautiful square to life! There is something so incredibly soothing about watching these intricate layers unfold stitch by stitch. Whether you turn your finished squares into a cozy heirloom blanket, a gorgeous tote bag, or a statement pillow, I know it is going to turn out absolutely stunning. Do not forget to share your finished masterpieces with our wonderful crafting community—we all love to see your unique color choices! Happy crocheting, my lovely friends! 🧶✨
Yes, you absolutely can! Acrylic yarn works beautifully, but keep in mind that cotton provides crisper stitch definition for the intricate post stitches, and acrylic will require extra care during steam blocking.
Don't worry, a little bit of curling is completely normal because of the dense post stitches and loop manipulations. Once you complete the final rounds and block your square, it will lay perfectly flat.
The third loop is located directly behind and slightly below the standard back loop. Tilting your work slightly forward will help you spot this loop clearly.
Absolutely! The flat single crochet border on Round 14 and the back loop double crochet on Round 15 make it incredibly easy to join multiple squares using a whipstitch or a slip stitch join.
