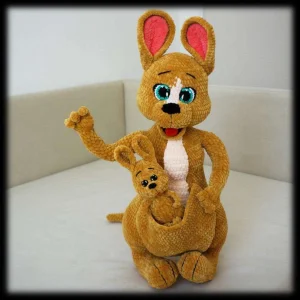
There is something so heartwarming about a mama kangaroo carrying her little joey. This project lets you create that special bond in plush form. You'll love working with the soft velvet yarn—it makes the finished toy incredibly huggable. It's a substantial project, but seeing that tiny baby peek out of the pouch is worth every single stitch. You'll learn some great shaping techniques along the way that really bring these characters to life.
Progress Tracker
0% Complete
— 1. Mama Kangaroo - Legs :
Round 1 :
Using the 3.5mm hook and brown yarn, ch 21. In the 2nd ch from hook, 2 sc. Then 9 sc, 9 hdc, 4 hdc in the last ch. Turn to work on the bottom of the chain: 9 hdc, 9 sc, 2 sc in the first ch (44)
Round 2 :
2 inc, 9 sc, 9 hdc, 4 inc using hdc, 9 hdc, 9 sc, 2 inc (52)
Round 3 :
(1 sc, 1 inc)*2, 9 sc, 9 hdc, (1 hdc, 1 inc using hdc)*4, 9 hdc, 9 sc, (1 sc, 1 inc)*2 (60)
Round 4 :
60 sl st around (60)
Round 5 :
60 sc in blo (60)
Round 9 :
Switch to 3.0mm hook: 24 sc, (1 sc, 1 dec)*4, 24 sc (56)
Round 10 :
24 sc, 4 dec, 24 sc (52)
Info :
Verify your stitch placement: there should be 18 stitches on the heel portion and 34 stitches on the toe portion. Use the 3.5mm hook for all following rounds unless noted.
Info :
Begin stuffing the foot firmly at this point.
Round 13 :
(5 sc, 1 inc)*3 (21)
Round 14 :
(6 sc, 1 inc)*3 (24)
Round 15 :
(3 sc, 1 inc)*6 (30)
Round 16 :
(4 sc, 1 inc)*6 (36)
Info :
Ensure your working thread is centered at the back so the following increases align with the front of the leg.
Round 17 :
15 sc, 2 inc, 19 sc (38)
Round 18 :
15 sc, (1 sc, 1 inc)*2, 19 sc (40)
Round 19 :
12 sc, (1 sc, 1 inc)*6, 16 sc (46)
Info :
Fasten off and stuff. Repeat for the second leg.
— 2. Mama Kangaroo - Tail :
Round 1 :
Using brown yarn, 6 sc in mr (6)
Round 9 :
8 sc, 1 inc (10)
Round 11 :
9 sc, 1 inc (11)
Round 13 :
10 sc, 1 inc (12)
Round 15 :
11 sc, 1 inc (13)
Round 17 :
12 sc, 1 inc (14)
Round 19 :
13 sc, 1 inc (15)
Round 21 :
14 sc, 1 inc (16)
Round 23 :
15 sc, 1 inc (17)
Round 25 :
16 sc, 1 inc (18)
Round 27 :
17 sc, 1 inc (19)
Round 29 :
18 sc, 1 inc (20)
Round 31 :
19 sc, 1 inc (21)
Round 33 :
20 sc, 1 inc (22)
Round 35 :
21 sc, 1 inc (23)
Round 37 :
22 sc, 1 inc (24)
Round 39 :
23 sc, 1 inc (25)
Round 41 :
24 sc, 1 inc (26)
Info :
Fasten off. Stuff as you work every few centimeters.
— 3. Mama Kangaroo - Crotch :
Round 3 :
(1 sc, 1 inc)*8 (24)
Round 4 :
(2 sc, 1 inc)*8 (32)
Round 5 :
(3 sc, 1 inc)*8 (40)
Round 6 :
(4 sc, 1 inc)*8 (48)
Info :
Keep the yarn attached to continue into the body.
— 4. Mama Kangaroo - Body :
Info :
Sew the legs to the crotch piece using matching thread. Join 8 stitches on each side. Ensure the working thread is at the back.
Round 7-9 :
108 sc around the joined piece (108)
Round 10 :
32 sc, (1 sc, 1 dec)*6, 16 sc, (1 sc, 1 dec)*6, 24 sc (96)
Info :
Mark 10 stitches on the tail and sew it to the back of the body using cotton thread.
Round 11 :
96 + 26 (from tail) - 10 (sewn) - 10 (sewn) = 102 sc around (102)
Round 12 :
6 sc, 1 dec, (11 sc, 1 dec)*3, 55 sc (98)
Round 13 :
5 sc, 1 dec, (10 sc, 1 dec)*3, 55 sc (94)
Round 14 :
4 sc, 1 dec, (9 sc, 1 dec)*3, 55 sc (90)
Round 15 :
(13 sc, 1 dec)*6 (84)
Round 16 :
(12 sc, 1 dec)*6 (78)
Round 17 :
(11 sc, 1 dec)*6 (72)
Round 18 :
(10 sc, 1 dec)*6 (66)
Round 19 :
(9 sc, 1 dec)*6 (60)
Round 32 :
35 sc, (1 sc, 1 inc)*10, 5 sc (70)
Round 37 :
Switch to 3.0mm hook: 29 sc, 13 sc on left arm, 2 sc, (1 sc, 1 dec)*10, 2 sc, 13 sc on right arm, 1 sc (80)
Round 38 :
28 sc, (3 sc, 1 dec)*3, 22 sc, (1 dec, 3 sc)*3 (74)
Round 39 :
28 sc, (2 sc, 1 dec)*3, 22 sc, (1 dec, 2 sc)*3 (68)
Round 40 :
28 sc, (1 sc, 1 dec)*3, (6 sc, 1 dec)*2, 6 sc, (1 dec, 1 sc)*3 (60)
Round 41 :
(13 sc, 1 dec)*4 (56)
Round 42 :
(5 sc, 1 dec)*8 (48)
Round 43 :
(4 sc, 1 dec)*8 (40)
Round 44 :
(3 sc, 1 dec)*8 (32)
Round 45 :
(2 sc, 1 dec)*8 (24)
— 5. Mama Kangaroo - Head :
Round 46 :
Switch back to 3.5mm hook: 24 sc around (24)
Round 47 :
(2 sc, 1 inc)*8 (32)
Round 48 :
(3 sc, 1 inc)*8 (40)
Round 49 :
(4 sc, 1 inc)*8 (48)
Round 50 :
(5 sc, 1 inc)*8 (56)
Round 51 :
(6 sc, 1 inc)*8 (64)
Round 52 :
(7 sc, 1 inc)*8 (72)
Round 53 :
(8 sc, 1 inc)*8 (80)
Round 58 :
Switch to 3.0mm hook: 38 sc, (1 sc, 1 dec)*14 (66)
Round 59 :
Using brown: (1 sc, 1 dec)*2, 26 sc, (1 sc, 1 dec)*3, 9 sc. Switch to light powder: 4 sc. Switch to brown: 9 sc, 1 sc, 1 dec (60)
Round 60-63 :
Brown: 45 sc. Light powder: 4 sc. Brown: 11 sc (60)
Round 64 :
Brown: 46 sc. Light powder: 2 sc. Brown: 12 sc (60)
Round 65 :
Brown: 47 sc. Light powder: 1 sc. Brown: 12 sc (60)
Round 66 :
Continue in brown only: (8 sc, 1 dec)*6 (54)
Round 67 :
(7 sc, 1 dec)*6 (48)
Round 68 :
(6 sc, 1 dec)*6 (42)
Round 69 :
(5 sc, 1 dec)*6 (36)
Round 70 :
(4 sc, 1 dec)*6 (30)
Round 71 :
(3 sc, 1 dec)*6 (24)
Round 72 :
(2 sc, 1 dec)*6 (18)
Round 73 :
(1 sc, 1 dec)*6 (12)
Info :
Cinch the remaining stitches closed and weave in the end.
— 6. Mama Kangaroo - Belly :
Row 1 :
Using light powder yarn and 3.5mm hook, ch 5. Start in 2nd ch: 4 sc (4)
Row 2-4 :
Turn, ch 1, 4 sc (4)
Row 5 :
Turn, ch 1, 2 inc, 1 sc (6)
Row 6 :
Turn, ch 1, 1 inc, 2 sc, 1 inc, 1 sc (8)
Row 7-13 :
Turn, ch 1, 7 sc (8)
Row 14 :
Turn, ch 1, 1 dec, 2 sc, 1 dec, 1 sc (6)
Row 15 :
Turn, ch 1, 2 dec, 1 sc (4)
Row 16 :
Turn, ch 1, 2 inc, 1 sc (6)
Row 17 :
Turn, ch 1, 1 inc, 2 sc, 1 inc, 1 sc (8)
Row 18-19 :
Turn, ch 1, 7 sc (8)
Row 20 :
Turn, ch 1, 1 inc, 4 sc, 1 inc, 1 sc (10)
Row 21-22 :
Turn, ch 1, 9 sc (10)
Row 23 :
Turn, ch 1, 1 inc, 6 sc, 1 inc, 1 sc (12)
Row 24-25 :
Turn, ch 1, 11 sc (12)
Row 26 :
Turn, ch 1, 1 inc, 8 sc, 1 inc, 1 sc (14)
Row 27-37 :
Turn, ch 1, 13 sc (14)
Row 38 :
Turn, ch 1, 1 dec, 8 sc, 1 dec, 1 sc (12)
Row 39-40 :
Turn, ch 1, 11 sc (12)
Row 41 :
Turn, ch 1, 1 dec, 6 sc, 1 dec, 1 sc (10)
Row 42-43 :
Turn, ch 1, 9 sc (10)
Row 44 :
Turn, ch 1, 1 dec, 4 sc, 1 dec, 1 sc (8)
Row 45-70 :
Turn, ch 1, 7 sc (8)
Row 71 :
Turn, ch 1, 1 dec, 2 sc, 1 dec, 1 sc (6)
Row 72-74 :
Turn, ch 1, 5 sc (6)
Row 75 :
Turn, ch 1, 2 dec, 1 sc (4)
Row 76-78 :
Turn, ch 1, 3 sc (4)
Row 79 :
Turn, ch 1, 2 dec (2)
Row 80-82 :
Turn, ch 1, 1 sc (2)
Info :
Fasten off and sew to the chest of the mama.
— 7. Mama Kangaroo - Bag (Pouch) :
Row 1 :
Using brown yarn, ch 51. Start in 2nd ch: 50 sc (50)
Row 2-9 :
Turn, ch 1, 49 sc (50)
Row 10 :
Turn, ch 1, 1 dec, 44 sc, 1 dec, 1 sc (48)
Row 11 :
Turn, ch 1, 1 dec, 42 sc, 1 dec, 1 sc (46)
Row 12 :
Turn, ch 1, 1 dec, 40 sc, 1 dec, 1 sc (44)
Row 13 :
Turn, ch 1, 1 dec, 38 sc, 1 dec, 1 sc (42)
Row 14 :
Turn, ch 1, 1 dec, 36 sc, 1 dec, 1 sc (40)
Row 15 :
Turn, ch 1, 1 dec, 34 sc, 1 dec, 1 sc (38)
Row 16 :
Turn, ch 1, 1 dec, 32 sc, 1 dec, 1 sc (36)
Row 17 :
Turn, ch 1, 1 dec, 30 sc, 1 dec, 1 sc (34)
Row 18 :
Turn, ch 1, 1 dec, 28 sc, 1 dec, 1 sc (32)
Row 19 :
Turn, ch 1, 1 dec, 26 sc, 1 dec, 1 sc (30)
Row 20 :
Turn, ch 1, 1 dec, 24 sc, 1 dec, 1 sc (28)
Row 21 :
Turn, ch 1, 1 dec, 22 sc, 1 dec, 1 sc (26)
Row 22 :
Turn, ch 1, 1 dec, 20 sc, 1 dec, 1 sc (24)
Row 23 :
Turn, ch 1, 1 dec, 18 sc, 1 dec, 1 sc (22)
Row 24 :
Turn, ch 1, 1 dec, 16 sc, 1 dec, 1 sc (20)
Row 25 :
Turn, ch 1, 1 dec, 14 sc, 1 dec, 1 sc (18)
Row 26 :
Turn, ch 1, 1 dec, 12 sc, 1 dec, 1 sc (16)
Row 27 :
Turn, ch 1, 1 dec, 10 sc, 1 dec, 1 sc (14)
Row 28 :
Turn, ch 1, 1 dec, 8 sc, 1 dec, 1 sc (12)
Row 29 :
Turn, ch 1, 1 dec, 6 sc, 1 dec, 1 sc (10)
Row 30 :
Turn, ch 1, 1 dec, 4 sc, 1 dec, 1 sc (8)
Info :
Fasten off and sew to the mama's body, leaving the top open for the pouch.
— 8. Mama Kangaroo - Hands :
Round 1 :
Using brown yarn, ch 6. Start in 2nd ch: 5 sc (5)
Round 2 :
ch 6, start in 2nd ch: 5 sc (5)
Round 3 :
ch 6, start in 2nd ch: 5 sc (5)
Round 4 :
Crochet 8 sc along the base edge of these three fingers (8)
Round 5 :
Join in a circle: 8 sc in flo, turn, 8 sc in flo on the other side (16)
Round 6 :
(2 sc, 1 dec)*4 (12)
Round 7 :
(4 sc, 1 dec)*2 (10)
Info :
Twist two 100cm wires together and insert into the hand. Stuff lightly.
Round 12 :
(4 sc, 1 inc)*2 (12)
Round 17 :
(5 sc, 1 inc)*2 (14)
Round 22 :
(6 sc, 1 inc)*2 (16)
Info :
Fasten off. Make two arms total.
— 9. Mama Kangaroo - Eyes (Left) :
Round 1 :
Using 1.5mm hook and black cotton yarn, 8 sc in mr (8)
Round 3 :
Switch to emerald yarn: (1 sc, 1 inc)*6, 1 sc, 1 sl st (24)
Round 4 :
Using black sewing thread in blo: ch 1, 22 sl st (22)
Round 5 :
Using white yarn in blo: start in 7th st from marker, ch 1, 9 sc, 1 sl st
Round 6 :
Using black thread in blo: start in 6th st from marker, ch 1, 4 sl st, 1 inc using sc, 1 inc using hdc, 1 inc using dc, 1 inc using hdc, 1 inc using sc, 5 sl st
— 10. Mama Kangaroo - Eyes (Right) :
Round 1-5 :
Repeat steps for the left eye identically.
Round 6 :
Using black thread in blo: start in 2nd st from marker, ch 1, 2 sl st, 1 inc using sc, 1 inc using hdc, 1 inc using dc, 1 inc using hdc, 1 inc using sc, 7 sl st
— 11. Mama Kangaroo - Muzzle & Nose :
Upper Muzzle Round 1 :
Using brown yarn, ch 7. 2 sc in 2nd ch, 4 sc, 4 sc in last ch. Turn: 4 sc, 2 sc in first ch (16)
Upper Muzzle Round 2 :
Brown: 2 inc. Light powder: 4 sc. Brown: 4 inc, 4 sc, 2 inc (24)
Upper Muzzle Round 3 :
Brown: (1 sc, 1 inc)*2. Light powder: 4 sc. Brown: (1 sc, 1 inc)*4, 4 sc, (1 sc, 1 inc)*2 (32)
Upper Muzzle Round 4-5 :
Brown: 6 sc. Light powder: 4 sc. Brown: 22 sc (32)
Nose Round 1 :
Using black yarn, ch 5. 2 sc in 2nd ch, 2 sc, 4 sc in last ch. Turn: 2 sc, 2 sc in first ch (12)
— 12. Baby Kangaroo - Body & Head :
Round 1 :
Using brown yarn and 3.5mm hook, 8 sc in mr (8)
Round 3 :
(1 sc, 1 inc)*8 (24)
Round 6 :
(6 sc, 1 dec)*3 (21)
Round 7 :
(5 sc, 1 dec)*3 (18)
Round 8 :
(4 sc, 1 dec)*3 (15)
Round 9 :
(3 sc, 1 dec)*3 (12)
Round 10 :
(1 sc, 1 dec)*4 (8)
Round 12 :
(1 sc, 1 inc)*8 (24)
Round 13 :
(2 sc, 1 inc)*8 (32)
Round 15 :
(1 sc, 1 dec)*8, 8 sc (24)
Round 18 :
(1 sc, 1 dec)*8 (16)
— 13. Baby Kangaroo - Legs :
Round 1 :
ch 7, 2 sc in 2nd ch, 4 sc, 4 sc in last ch. Turn: 4 sc, 2 sc in first ch (16)
Info :
Sew 6 stitches together using matching thread, leaving a ring of 4 stitches at the top.
I hope you have the best time bringing this mama and baby pair to life! There is something so satisfying about finishing a large-scale project like this. Whether you're making it as a special nursery gift or just to add to your own collection, this kangaroo duo is sure to be a favorite. Don't forget to share your finished photos—I'd love to see the personalities you give them through the facial sculpting! Happy crocheting, and enjoy every stitch of this cozy adventure. 🧶🦘✨