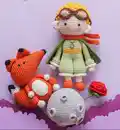
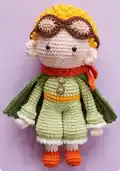
Bring the beloved Little Prince to life with this enchanting crochet pattern! Create the iconic character complete with his golden hair, aviator goggles, green cape, and orange scarf. This pattern also includes his companion fox with its beautiful tri-colored tail, plus a charming planet with rings. Perfect for fans of the classic tale, this detailed amigurumi set captures the magic and wonder of the story in soft, huggable form.
Progress Tracker
0% Complete
— Prince's Hair (yarn E) :
Round 1 :
sc 6 into a magic loop (6)
Round 2 :
(sc 1, Double Tr) 6x (12)
Round 4 :
[sc 1, Double Tr] 12x - use your middle finger to push the Double Tr to the front (24)
Round 5 :
[sc 1, inc] 12x (36)
Round 6 :
[sc 1, Double Tr] 18x (36)
Round 7 :
[sc 2, inc] 12x (48)
Round 8 :
[sc 1, Double Tr] 24x (48)
Round 10 :
[Double Tr, sc 1] 24x (48)
Round 12-15 :
Repeat rnd 8-11 (4 rnds) (48)
Round 16-18 :
Repeat rnd 8-10 (3 rnds) - you can crochet the head first, if the hair is too big for the head, do not need to crochet rnd 17-18 or 15-18 (depend on your hands) (48)
Info :
Break the yarn, leave a long thread to sew later
— Prince's Head (yarn D) :
Round 1 :
sc 6 into a magic loop (6)
Round 3 :
[sc 1, inc] 6x (18)
Round 4 :
sc 1, inc, [sc 2, inc] 5x, sc 1 (24)
Round 5 :
[sc 3, inc] 6x (30)
Round 6 :
sc 2, inc, [sc 4, inc] 5x, sc 2 (36)
Round 7 :
[sc 5, inc] 6x (42)
Round 8 :
sc 3, inc, [sc 6, inc] 5x, sc 3 (48)
Round 9 :
[sc 7, inc] 6x (54)
Round 10-21 :
sc 54 (12 rnds), insert eyes between rnd 17&18, you can add/deduct 1 rnd to fit the hair (54)
Round 22 :
[sc 7, dec] 6x (48)
Round 23 :
[sc 6, dec] 6x (42)
Round 24 :
[sc 5, dec] 6x (36)
Round 25 :
[sc 4, dec] 6x (30)
Round 26 :
[sc 3, dec] 6x, stuff firmly (24)
Round 27 :
[sc 2, dec] 6x (18)
Info :
Break the yarn, leave a long thread to sew later
— Prince's Arms (yarn D, X2) :
Round 1 :
sc 6 in a magic loop (6)
Round 2 :
[sc 1, inc] 3x (9)
Round 3 :
sc 4, Bobble, sc 4 (9)
Round 4-5 :
sc 9 (2 rnds), change to yarn A (9)
Round 6 :
(blo) inc 9 (18)
Round 7-8 :
sc 18 (2 rnds) (18)
Round 10-23 :
sc 9 (14 rnds) (9)
Info :
Break the yarn with a long rest, stuff slightly, use the tapestry needle to sew 2 edges together. Join yarn B on rnd 6, crochet (sc 1, ch 2, sc 1) 9x, break the yarn, hide the remaining yarn
— Pants (yarn A) :
Round 1 :
ch 30, slst on the 1st ch to form a ring, sc 30 (30)
Round 2-3 :
sc 30 (2 rnds) (30)
Round 4 :
sc 15, slst on the 1st sc (15)
Round 5 :
[sc 2, inc] 5x (20)
Round 6-7 :
sc 20 (2 rnds) (20)
Round 8 :
[sc 3, inc] 5x (25)
Round 9-10 :
sc 25 (2 rnds) (25)
Round 11 :
[sc 4, inc] 5x (30)
Round 12-13 :
sc 30 (2 rnds) (30)
Round 14 :
dec 15, break yarn A, change to yarn B (15)
Round 15 :
(blo) (sc 1, ch 2, sc 1) 15x (60)
Info :
Break the yarn, hide the remaining yarn. Join yarn A on rnd 3, repeat rnd 4-15 to make the second pant's leg
— Prince's Legs (yarn C, X2) :
Round 1 :
ch 6, start on the 2nd stitch from the hook, sc 4, (sc 3), continue to crochet on the other side of the foundation chain, sc 3, inc 1 (12)
Round 2 :
inc 1, sc 3, inc 3, sc 3, inc 2 (18)
Round 3-4 :
sc 18 (2 rnds) (18)
Round 5 :
sc 5, dec 4, sc 5, start stuffing (14)
Round 6 :
sc 3, dec 4, sc 3, change to yarn D (10)
Round 7-21 :
sc 10 (15 rnds), stuff firmly (10)
Info :
Break the yarn for the 1st leg, crochet the 2nd leg the same way but do not break the yarn, continue to crochet sc 5, join with the last st of the 1st leg with slst 1, and continue to crochet the body
Round 22 :
sc 10 (on the 1st leg), sc 10 (on the 2nd leg) (20)
Round 23 :
[sc 3, inc] 5x (25)
Round 24 :
[sc 4, inc] 5x (30)
Info :
Break the yarn, we will crochet the body and the pants together from this rnd. Put the legs onto the pants, hold 2 pieces together and with yarn A, we will crochet on 2 edges together
Round 25 :
sc 30, change to yarn E (30)
Round 26-27 :
sc 30 (2 rnds), break yarn E, change to yarn A (30)
Round 28-31 :
sc 30 (4 rnds) (30)
Round 32 :
[sc 3, dec] 6x (24)
Round 33 :
sc 24, stuff firmly (24)
Round 34 :
[sc 2, dec] 6x (18)
Info :
Break the yarn, leave a long thread to sew later
— Aviator Goggles (yarn F) :
Round 1 :
ch 4, start on the 2nd stitch from the hook, sc 2, (sc 3), continue to crochet on the other side of the foundation chain, sc 1, inc (8)
Round 2 :
inc, sc 1, inc 3, sc 1, inc 2, break yarn F, change to yarn G (14)
Round 3 :
hdc 1, hdc inc, hdc 1, [hdc 1, hdc inc] 3x, hdc 1, [hdc 1, hdc inc] 2x (20)
Info :
Break the yarn, make the 2nd piece the same way but do not break the yarn, continue to crochet 3 ch, and join with the 1st piece with slst 1. Continue to crochet: slst 9, ch 33, sc 32, slst 11, slst 3 on the ch-3, slst 11, ch 33, sc 32, slst 9, slst 3 on the ch-3. Break the yarn, hide the remaining yarn
— Ears (yarn D, X2) :
Round 1 :
sc 6 into a magic loop (6)
Info :
Break the yarn, leave a long thread to sew later, use tapestry needle to sew 2 edges together
— Scarf (yarn C) :
Round 1 :
ch 63, start on the 3rd stitch from the hook, *sc 1, ch 1, skip 1 st*, repeat ** until 1 remaining st, sc on this last st, turn (60)
Round 2 :
ch 1, *sc 1 into the chain-space, ch 1, skip 1 st*, repeat ** until 1 remaining st, sc on this last st (60)
Info :
Break the yarn, hide the remaining yarn
— Cape (yarn H) :
Round 1 :
ch 27, start on the 2nd ch from the hook, sc 8, hdc 9, dc 9, turn (26)
Round 2 :
ch 1, slst 26, turn (26)
Round 3 :
ch 1, sc 8, hdc 9, dc 9, turn (26)
Round 4-27 :
Repeat [rnd 2-3] 12 more times (24 rnds) (26)
Round 28 :
ch 1, slst 26 (26)
Info :
Do not break the yarn, continue to crochet 15 chs, break the yarn. Join yarn H on the opposite side, continue to crochet 15 chs, break the yarn
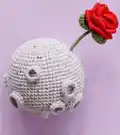
— Planet (yarn J) :
Round 1-9 :
Repeat rnd 1-9 of the Prince's Head (54)
Round 10 :
sc 4, inc, [sc 8, inc] 5x, sc 4 (60)
Round 11 :
[sc 9, inc] 6x (66)
Round 12-24 :
sc 66 (13 rnds) (66)
Round 25 :
[sc 9, dec] 6x (60)
Round 26 :
[sc 8, dec] 6x (54)
Round 27-32 :
Repeat rnd 20-25 of the Prince's Head, stuff firmly (18)
Round 33 :
[sc 1, dec] 6x (12)
Info :
Break the yarn, weave in the last 6 sts, hide the remaining yarn
— Rings on Planet: Size S (yarn J, X3) :
Round 1 :
ch 12, slst on the 1st ch to form a ring, sc 12, slst on the 1st sc (12)
Info :
Break the yarn, leave a long thread to sew later
— Rings on Planet: Size M (yarn J, X2) :
Round 1 :
ch 16, slst on the 1st ch to form a ring, sc 16, slst on the 1st sc (16)
Info :
Break the yarn, leave a long thread to sew later
— Rings on Planet: Size L (yarn J) :
Round 1 :
ch 20, slst on the 1st ch to form a ring, sc 20, slst on the 1st sc (20)
Info :
Break the yarn, leave a long thread to sew later. Use tapestry needle to sew the rings to the planet
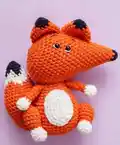
— Fox's Head (yarn I) :
Round 1 :
sc 4 into a magic loop (4)
Round 2 :
sc 1, inc 2, sc 1 (6)
Round 3 :
sc 2, inc 2, sc 2, change to yarn C (8)
Round 4 :
sc 3, inc 2, sc 3 (10)
Round 5 :
sc 4, inc 2, sc 4 (12)
Round 6 :
sc 5, inc 2, sc 5 (14)
Round 7 :
sc 6, inc 2, sc 6 (16)
Round 8 :
sc 7, inc 2, sc 7 (18)
Round 9 :
sc 8, inc 2, sc 8 (20)
Round 10 :
sc 9, inc 2, sc 9 (22)
Round 11 :
sc 10, inc 2, sc 10 (24)
Round 12 :
sc 11, inc 2, sc 11 (26)
Round 13 :
sc 12, inc 2, sc 12 (28)
Round 14 :
sc 13, inc 2, sc 13 (30)
Round 15 :
sc 14, inc 2, sc 14 (32)
Round 16 :
sc 15, inc 2, sc 15 (34)
Round 17 :
sc 16, inc 2, sc 16 (36)
Round 18 :
sc 17, inc 2, sc 17 (38)
Round 19 :
sc 18, inc 2, sc 18 (40)
Round 20 :
sc 19, inc 2, sc 19 (42)
Round 21-26 :
sc 42 (6 rnds), insert the 1st eye between rnd 19&20, the 2nd eye between rnd 22&23 (42)
Round 27 :
[sc 5, dec] 6x (36)
Round 28 :
[sc 4, dec] 6x (30)
Round 29 :
[sc 3, dec] 6x, stuff firmly (24)
Round 30 :
[sc 2, dec] 6x (18)
Round 31 :
[sc 1, dec] 6x (12)
Info :
Break the yarn, hide the remaining yarn
— Fox's Ears (yarn I, X2) :
Round 1 :
sc 3 into a magic loop (3)
Round 3 :
[sc 1, inc] 3x, change to yarn C (9)
Round 4 :
[sc 2, inc] 3x (12)
Round 5 :
[sc 3, inc] 3x (15)
Round 6 :
[sc 4, inc] 3x (18)
Round 7 :
[sc 5, inc] 3x (21)
Info :
Break the yarn with a long rest, use the tapestry needle to sew 2 edges together
— Fox's Tail (yarn I) :
Info :
We will change the yarn color as the letter color changes. Yarn I: black letter, Yarn B: blue letter, Yarn C: orange letter
Round 1 :
sc 6 into a magic loop (6)
Round 2 :
[sc 1, inc] 3x (9)
Round 3 :
[sc 2, inc] 3x (12)
Round 4 :
[sc 2, sc 1, inc] 3x (15)
Round 5 :
[sc 1, sc 3, inc] 3x (18)
Round 6-7 :
sc 18 (2 rnds) (18)
Round 8 :
[sc 1, inc, sc 2, inc, sc 1] 3x (24)
Round 9 :
[sc 2, sc 5, sc] 3x (24)
Round 10-11 :
sc 24 (2 rnds) (24)
Round 12 :
[sc 3, inc] 6x (30)
Round 13-15 :
sc 30 (3 rnds) (30)
Round 16 :
[sc 3, dec] 6x (24)
Round 17-19 :
sc 24 (3 rnds) (24)
Round 20 :
[sc 2, dec] 6x (18)
Round 21-22 :
sc 18 (2 rnds), stuff firmly (18)
Round 23 :
[sc 1, dec] 6x (12)
Info :
Break the yarn, weave in the last 6 sts, leave a long thread to sew later
— Fox's Body (yarn C) :
Round 1 :
sc 6 into a magic loop (6)
Round 3 :
[sc 1, inc] 6x (18)
Round 4 :
[sc 2, inc] 6x (24)
Round 5 :
[sc 3, inc] 6x (30)
Round 6 :
[sc 4, inc] 6x (36)
Round 7-11 :
sc 36 (5 rnds) (36)
Round 12 :
[sc 4, dec] 6x (30)
Round 13-14 :
sc 30 (2 rnds) (30)
Round 15 :
[sc 3, dec] 6x (24)
Round 16-17 :
sc 24 (2 rnds) (24)
Round 18 :
[sc 2, dec] 6x (18)
Round 19-20 :
sc 18 (2 rnds) (18)
— Fox's Belly (yarn B) :
Round 1 :
ch 6, start on the 2nd stitch from the hook, sc 4, (sc 3), continue to crochet on the other side of the foundation chain, sc 3, inc 1 (12)
Round 2 :
inc 1, sc 3, inc 3, sc 3, inc 2 (18)
Round 3 :
sc 1, inc, sc 3, [sc 1, inc] 3x, sc 3, [sc 1, inc] 2x (24)
Round 4 :
sc 2, inc, sc 3, [sc 2, inc] 3x, sc 3, [sc 2, inc] 2x, slst on the 1st sc (30)
Info :
Break the yarn, leave a long thread to sew later
— Fox's Arms (yarn B, X2) :
Round 1 :
sc 6 into a magic loop (6)
Round 4 :
dec 6, change to yarn C (6)
Round 5-10 :
sc 6 (6 rnds) (6)
Info :
Break the yarn, leave a long thread to sew later, do not stuff, sew 2 edges together
— Fox's Legs (yarn B, X2) :
Round 1 :
ch 4, start on the 2nd stitch from the hook, sc 2, (sc 3), continue to crochet on the other side of the foundation chain, sc 1, inc 1 (8)
Round 2 :
inc 1, sc 1, inc 3, sc 1, inc 2 (14)
Round 4 :
sc 3, dec 4, sc 3 (10)
Round 5 :
sc 3, dec 2, sc 3, change to yarn C (8)
Round 6 :
sc 3, inc 2, sc 3 (10)
Round 7 :
sc 4, inc 2, sc 4 (12)
Round 8-11 :
sc 12 (4 rnds), stuff firmly (12)
Info :
Break the yarn, weave in the last 6 sts, leave a long thread to sew later
— Leaves (yarn H) :
Round 1 :
[ch 8, start on the 2nd st from the hook, sc 7] 3x, slst on the 1st ch (21)
Round 2 :
[sc 1, hdc 1, dc 3, hdc 1, inc on the last ch, continue to crochet on the other side, hdc 1, dc 3, hdc 1, sc 1] 3x (42)
Info :
Break the yarn, leave a long thread (50cm) to sew later
— Rose (yarn K) :
Round 1 :
ch 28, start on the 4th st from the hook, (dc 2), ch 1, skip 1 st, (dc 3), ch 1, skip 1 st, repeat ** till the end, turn (52)
Round 2 :
ch 2, dc 1, (dc 2), dc 1, ch 2, sc 1, repeat ** till the end (117)
Info :
Break the yarn, leave a long thread to sew later
This enchanting Little Prince pattern was lovingly designed to bring Antoine de Saint-Exupéry's timeless character to life in adorable amigurumi form! The comprehensive pattern includes the Little Prince with his iconic golden curls and accessories, plus his devoted fox companion with a gorgeous tri-colored tail, and even a miniature planet with rings. Perfect for fans of the beloved story, this pattern combines advanced techniques with charming details to create a truly magical display piece. 🧶✨ Happy crocheting! 🌟