๐Ÿงถ Beautiful โœจ Detailed ๐Ÿ’ Adorable

Little Monkey Joe Amigurumi Pattern

Little Monkey Joe Amigurumi Pattern
4.5โ˜… Rating
8-10 Hours Time Needed
3.8K Made This
โœ‚๏ธ

Intermediate Level

Ideal for those with basic knitting experience, featuring slightly more advanced stitches and techniques to expand your skills.

โฑ๏ธ

All-Day Adventure

Requires 8-10 hours, ideal for a full day of immersive knitting.

๐Ÿฐ

Whimsical Buddy

Playful characters full of personality, designed to spark imagination and become cherished playtime favorites.

About This Little Monkey Joe Amigurumi Pattern

This Little Monkey Joe pattern brings together traditional amigurumi construction with creative details that make him truly special. The pattern features a unique hoodie design with ear holes, a belly patch pocket, and charming embroidered facial features including nose holes, eyebrows, and a sweet smile. Joe's bobble stitch fingers and toes add realistic texture, while his long tail gives him extra monkey character. The color-changing technique creates a natural-looking face patch that mimics a real monkey's coloring.

Little Monkey Joe Amigurumi Pattern crochet pattern - detailed view of completed project

Working with Rainbow Bamboo yarn creates a soft, huggable finish perfect for children and collectors alike. The pattern includes detailed assembly instructions and helpful photos to guide you through attaching ears, creating facial features, and positioning all components for the best results.

Why You'll Love This Little Monkey Joe Amigurumi Pattern

I absolutely love this pattern because it combines so many satisfying techniques into one adorable project! The bobble stitches create those precious little fingers and toes that give Joe so much character and charm. I find the color-changing rounds really rewarding to work - watching that face patch develop feels like magic every time. The hoodie detail is what really makes this pattern special; it's such a creative touch that transforms a simple monkey into a personality-packed friend. Plus, the embroidery work adds that final personal touch that brings Joe's sweet expression to life. This is one of those patterns where every step builds anticipation for the finished result!

Little Monkey Joe Amigurumi Pattern step 1 - construction progress Little Monkey Joe Amigurumi Pattern step 2 - assembly progress Little Monkey Joe Amigurumi Pattern step 3 - details and accessories Little Monkey Joe Amigurumi Pattern step 4 - final assembly and finishing

Switch Things Up

I love how versatile this Little Monkey Joe pattern is for creative customization! You can easily switch up the color palette to create different monkey personalities - try grey and white for a classic look, or go bold with bright colors for a playful twist. The hoodie is perfect for experimenting with stripes, color blocking, or even adding small embroidered details like initials or stars.

Consider making seasonal versions by changing the jumper color - pastels for spring, orange for autumn, or festive red and green for Christmas. You could also add accessories like a tiny crocheted scarf, hat, or even a small backpack to give Joe extra character.

For a unique touch, I sometimes embroider different facial expressions to create various moods - sleepy eyes, surprised eyebrows, or a big smile. The belly patch pocket is another great area for personalization; try different shapes or add a small embroidered design.

If you're making Joe for a baby, skip the safety eyes and embroider them instead for safety. You can also adjust the limb lengths by adding or removing rounds to create a lankier or more compact monkey friend. The possibilities are endless, and each variation creates a completely unique character!

Common Mistakes & How to Fix Them

โœ— Not using stitch markers during color changes can lead to misaligned face patches and uneven color transitions between rounds โœ— Stuffing the tail or upper limbs too firmly creates stiffness instead of the natural floppy movement that makes the monkey poseable โœ— Placing safety eyes before completing all head rounds makes it difficult to achieve proper facial proportions and expression โœ— Forgetting to crochet limbs into the body at specified rounds results in awkward positioning and limbs that don't align properly โœ— Skipping the pin-placement step before sewing pieces together leads to crooked ears, misaligned hoodie, and asymmetrical features โœ— Working bobble stitches too loosely creates fingers and toes that lack definition and don't stand out from the main fabric

Little Monkey Joe Amigurumi Pattern

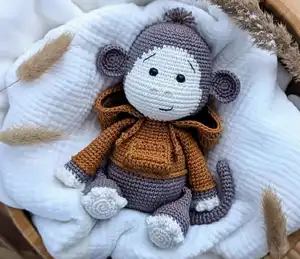
Create your own adorable Little Monkey Joe with this detailed amigurumi pattern! This charming monkey stands approximately 21 cm tall and features expressive facial details, a playful hoodie with belly patch pocket, and delightful bobble stitch fingers and toes. Perfect for crocheters who love creating personality-filled plush toys, Joe combines classic amigurumi techniques with unique touches like color-changing rounds and decorative embroidery. Whether you're making him as a cuddly companion or a special handmade gift, this pattern guides you through every step with clear instructions and helpful tips.

Intermediate 8-10 Hours

Materials Needed for Little Monkey Joe Amigurumi Pattern

โ€” Main Fabric

  • 01
    Rainbow Bamboo by Hobbii in Bronze (red-brown) or Mushroom (brown), approximately 44g
  • 02
    Rainbow Bamboo by Hobbii in Natural White (creme), approximately 14g
  • 03
    Rainbow Bamboo by Hobbii in Ginger (rust-brown) or Warm Light Gray (light gray), approximately 33g for jumper
  • 04
    Black sewing or embroidery thread for eyebrows and mouth details

โ€” Tools Required

  • 01
    Crochet hook 2.5mm (size B-1 or C-2)
  • 02
    Safety eyes 8mm diameter in black
  • 03
    Darning needle with blunt tip
  • 04
    Sewing or embroidery needle (pointed with large eyelet)
  • 05
    Stitch marker
  • 06
    Fiberfill stuffing
  • 07
    Scissors
  • 08
    Pins for attaching and positioning pieces

Progress Tracker

0% Complete

โ€” Head (Bronze/Mushroom and Natural White):

Round 1:

MR 5 sc (5 st)

Round 2:

inc x 5 (10 st)

Round 3:

inc x 10 (20 st)

Round 4:

(1 sc, inc) x 10 (30 st)

Round 5-6:

30 sc (30 st) - 2 rounds

Round 7:

(1 sc, inc) x 15 (45 st)

Round 8:

45 sc (45 st) - 1 round

Round 9:

(3 sc, inc) x 11, 1 sc (56 st)

Round 10-11:

56 sc (56 st) - 2 rounds

Round 12:

D 25 sc, L 6 sc, D 25 sc (56 st)

Round 13:

D 23 sc, L 10 sc, D 23 sc (56 st)

Round 14:

D 22 sc, L 12 sc, D 22 sc (56 st)

Round 15-16:

D 21 sc, L 14 sc, D 21 sc (56 st) - 2 rounds

Round 17:

D ((6 sc, inc) x 2, 6 sc), L 16 sc, D (6 sc, (6 sc, inc) x 2) (60 st)

Round 18-21:

D 22 sc, L 16 sc, D 22 sc (60 st) - 4 rounds

Round 22:

D 21 sc, L (3 sc, inc x 12, 3 sc), D 21 sc (72 st)

Info:

Insert security eyes (8mm diameter) - orientate towards color change

Round 23-29:

D 21 sc, L 30 sc, D 21 sc (72 st) - 7 rounds

Round 30:

D (dec x 10, 1 sc), L dec x 15, D (1 sc, dec x 10) (37 st)

Round 31:

D 11 sc, L 15 sc, D 11 sc (37 st)

Round 32:

D (dec, 9 sc), L 15 sc, D (9 sc, dec) (35 st)

Round 33:

D dec x 5, L ((1 sc, dec) x 2, 3 sc, (dec, 1 sc) x 2), D dec x 5 (21 st)

Info:

Fasten off with slip stitch. Stuff head with fiber fill ensuring good shape
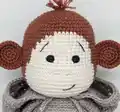
โ€” Facial Features:

Nose Holes:

Embroider between round 23-24 with face color thread. Insert needle from inside between stitch 14-15, embroider horizontal stitch 3 sc length, wrap thread 8x around, secure. Repeat for second nose hole with 1 sc distance

Hair:

Thread 3 strands (10 cm length) through center MR, knot, cut at 1.5 cm, fan out

Eye Lids:

Embroider from upper eye halfway down with face color, then continue to lower eye

Mouth:

Embroider with embroidery thread centered 4 rounds below nose holes, slanted over 4 sc length and 1 round high

Eyebrows:

Embroider with embroidery thread 1 round above eye, slanted over 2-2.5 sc length and 3 rounds high
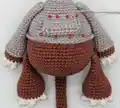
โ€” Ears (Make 2 in Bronze/Mushroom):

Round 1:

MR 6 sc (6 st)

Round 2:

inc x 6 (12 st)

Round 3:

(1 sc, inc) x 6 (18 st)

Round 4:

(2 sc, inc) x 6 (24 st)

Round 5:

1 ch, turn and crochet 22 sc back

Info:

Sew ears to head between round 17-22 with 4 sc distance to face

โ€” Tail (Bronze/Mushroom):

Round 1:

MR 6 sc (6 st)

Round 2:

(1 sc, inc) x 3 (9 st)

Round 3-40:

9 sc (9 st) - 38 rounds

Info:

Do not stuff. Fold opening together and crochet 4 sc across

โ€” Legs (Make 1 Left, 1 Right in Natural White and Bronze/Mushroom):

Round 1:

MR 6 sc (6 st)

Round 2:

inc x 6 (12 st)

Round 3:

(1 sc, inc) x 6 (18 st)

Round 4:

(2 sc, inc) x 6 (24 st)

Round 5 Left Leg:

2 sc, 4 x BO, 2 sc, 4 x BO, 2 sc, 4 x BO, 13 sc, 5 x BO, 1 sc (24 st)

Round 5 Right Leg:

13 sc, 4 x BO, 2 sc, 4 x BO, 2 sc, 4 x BO, 3 sc, 5 x BO (24 st)

Round 6:

23 sc in Natural White, color change to Bronze/Mushroom, 1 sc (24 st)

Round 7:

(7 sc, inc) x 3 (27 st)

Round 8-9:

27 sc (27 st) - 2 rounds

Round 10:

(7 sc, dec) x 3 (24 st)

Round 11:

24 sc (24 st)

Round 12:

(2 sc, dec) x 6 (18 st)

Info:

Stuff the foot with fiber fill

Round 13:

18 sc (18 st)

Round 14:

(4 sc, dec) x 3 (15 st)

Round 15-16:

15 sc (15 st) - 2 rounds

Round 17:

(3 sc, dec) x 3 (12 st)

Round 18-19:

12 sc (12 st) - 2 rounds

Round 20:

(2 sc, dec) x 3 (9 st)

Round 21 Left Leg:

9 sc (9 st)

Round 21 Right Leg:

6 sc, round not crocheted till end

Info:

Do not stuff upper leg. Fold opening together and crochet 4 sc across

โ€” Arms (Make 1 Left, 1 Right in Natural White, Bronze/Mushroom, and Ginger/Warm Light Gray):

Round 1:

MR 6 sc (6 st)

Round 2:

inc x 6 (12 st)

Round 3:

(1 sc, inc) x 6 (18 st)

Round 4 Left Arm:

1 sc, 4 x BO, 1 sc, 4 x BO, 1 sc, 4 x BO, 9 sc, 5 x BO, 2 sc (18 st)

Round 4 Right Arm:

9 sc, 4 x BO, 1 sc, 4 x BO, 1 sc, 4 x BO, 3 sc, 5 x BO (18 st)

Round 5:

17 sc in Natural White, color change to Bronze/Mushroom, 1 sc (18 st)

Round 6-8:

18 sc (18 st) - 3 rounds

Round 9:

Color change to Ginger/Warm Light Gray. 18 sc flo (18 st)

Round 10:

18 sc blo of round 8 (18 st) - creates sleeve ribbing

Round 11-13:

18 sc (18 st) - 3 rounds

Round 14:

(4 sc, dec) x 3 (15 st)

Info:

Stuff hand with fiber fill

Round 15-18:

15 sc (15 st) - 4 rounds

Round 19:

(3 sc, dec) x 3 (12 st)

Round 20-22:

12 sc (12 st) - 3 rounds

Round 23:

(2 sc, dec) x 3 (9 st)

Round 24-27:

9 sc (9 st) - 4 rounds

Round 28:

2 sc, round not crocheted till end

Info:

Do not stuff upper arm. Fold opening together and crochet 4 sc across

โ€” Body (Bronze/Mushroom and Ginger/Warm Light Gray):

Round 1:

MR 6 sc (6 st)

Round 2:

inc x 6 (12 st)

Round 3:

(1 sc, inc) x 6 (18 st)

Round 4:

1 sc, inc (2 sc, inc) x 5, 1 sc (24 st)

Round 5:

(3 sc, inc) x 6 (30 st)

Round 6:

2 sc, inc (4 sc, inc) x 5, 2 sc (36 st)

Round 7:

(5 sc, inc) x 6 (42 st)

Round 8:

3 sc, inc (6 sc, inc) x 5, 3 sc (48 st)

Round 9:

(7 sc, inc) x 6 (54 st)

Round 10:

4 sc, inc, (8 sc, inc) x 5, 4 sc (60 st)

Round 11:

54 sc, crochet in tail with 4 sc, 2 sc (60 st)

Round 12-13:

60 sc (60 st) - 3 rounds

Round 14:

9 sc, crochet in right leg with 4 sc, 26 sc, crochet in left leg with 4 sc, 17 sc (60 st)

Round 15-17:

60 sc (60 st) - 3 rounds

Round 18:

18 sc, (dec, 1 sc) x 3, (1 sc, dec) x 3, 24 sc (54 st)

Round 19:

50 sc, do not crochet round till end. Color change to Ginger/Warm Light Gray

Round 20:

54 sc flo of round 19 (54 st)

Round 21:

54 sc blo of round 19 (54 st) - creates jumper ribbing

Round 22-25:

54 sc (54 st) - 4 rounds

Round 26:

(7 sc, dec) x 6 (48 st)

Round 27:

48 sc (48 st)

Round 28:

3 sc, dec, (6 sc, dec) x 5, 3 sc (42 st)

Round 29:

42 sc (42 st)

Round 30:

(5 sc, dec) x 6 (36 st)

Round 31:

36 sc (36 st)

Round 32:

2 sc, dec, (4 sc, dec) x 5, 2 sc (30 st)

Round 33:

8 sc, crochet in right arm with 4 sc, 10 sc, crochet in left arm with 4 sc, 4 sc (30 st)

Round 34:

(3 sc, dec) x 6 (24 st)

Round 35:

(6 sc, dec) x 3 (21 st)

Info:

Finish with slip stitch. Stuff body with fiber fill
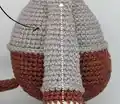
โ€” Belly Patch Pocket (Ginger/Warm Light Gray):

Row 1:

12 ch, 1 tch

Row 2:

12 sc, 1 tch (12 st)

Row 3:

dec, 8 sc, dec, 1 tch (10 st)

Row 4:

dec, 6 sc, dec, 1 tch (8 st)

Row 5-9:

8 sc, 1 tch (8 st) - 5 rows

Row 10:

8 sc

Info:

Crochet around edge (approx. 44 sc) with 3 sc in each corner. Sew to jumper centered above ribbing to round 29

โ€” Hoodie (Ginger/Warm Light Gray):

Round 1:

MR 8 sc (8 st)

Round 2:

hdc inc x 8 (16 st)

Round 3:

(1 hdc, inc) x 8 (24 st)

Round 4:

(2 hdc, inc) x 8 (32 st)

Round 5:

(3 hdc, inc) x 8 (40 st)

Round 6:

(4 hdc, inc) x 8 (48 st)

Round 7:

(5 hdc, inc) x 8 (56 st)

Round 8:

(6 hdc, inc) x 8 (64 st)

Round 9-10:

64 hdc (64 st) - 2 rounds

Round 11:

64 hdc, 1 tch (64 st) - turn and start working in rows

Row 12:

59 hdc, 1 tch (59 st)

Row 13:

11 hdc, 6 ch (skip 6 st for ear hole), 25 hdc, 6 ch (skip 6 st for ear hole), 11 hdc, 1 tch (59 st)

Row 14:

59 hdc, 1 tch (59 st)

Row 15:

59 hdc (59 st)

Info:

Crochet along inner edge (approx. 20 sc). Pin hoodie to head leaving 4 sc opening at front, then sew to head and body

โ€” Hoodie Chords (Make 2 in Ginger/Warm Light Gray):

Instructions:

Work double chain with 16 st. Make knot at beginning. Sew both chords at each side of hoodie

Assembly Instructions

  • Attach ears to head between rounds 17-22 with a 4 sc distance from the face, using pins to position correctly before sewing
  • Embroider all facial features including nose holes, eyebrows, mouth, and eye lids following the detailed instructions before attaching head to body
  • Crochet tail into body at round 11, ensuring it's positioned at the back center of the monkey
  • Attach legs to body at round 14, making sure the large bobble stitches (toes) point inward and legs are 26 sc apart front and back
  • Sew belly patch pocket to jumper centered above the ribbing extending to round 29, securing top and bottom edges
  • Attach arms to body at round 33 ensuring thumbs point inward and arms are parallel to legs with proper spacing
  • Pin hoodie to head leaving a 4 sc opening at the front, sew hoodie to head, then attach completed head to body using hoodie yarn tail

Important Notes

  • ๐Ÿ’กUse invisible decrease technique throughout for smoother shaping and professional-looking decreases
  • ๐Ÿ’กWork in continuous rounds and use stitch markers to track round beginnings, especially during color changes
  • ๐Ÿ’กStop crocheting before pulling through last loops when changing colors for nearly invisible color transitions
  • ๐Ÿ’กDo not stuff tail or upper portions of arms and legs to maintain natural floppy movement
  • ๐Ÿ’กBobble stitches require 4 yarn overs for fingers/toes and 5 for thumbs - work them firmly for clear definition
  • ๐Ÿ’กPin all pieces before sewing to ensure proper alignment and symmetry throughout the monkey
  • ๐Ÿ’กAdjust stitch counts slightly if needed to ensure arms align parallel with legs based on your tension

Little Monkey Joe is the perfect companion for crochet enthusiasts ready to expand their amigurumi skills! This pattern combines fundamental techniques with creative embellishments like bobble stitch details, color-changing rounds, and charming embroidered features. The adorable hoodie with belly pocket gives Joe extra personality that sets him apart from typical monkey patterns. Whether gifting to a child or adding to your handmade collection, this 21 cm monkey brings joy through every stitch. Happy crocheting and enjoy watching your little friend come to life! ๐Ÿต๐Ÿงถ

You ask,

we answer.

FAQs

What size will my monkey be if I use a different yarn weight?

The pattern creates a monkey approximately 21 cm (8.3 inches) when using Rainbow Bamboo yarn with a 2.5mm hook. If you use heavier yarn with a larger hook, your monkey will be bigger, while lighter yarn creates a smaller version. The size depends on your yarn choice and personal crochet tension.

What are bobble stitches and how do I make them?

Bobble stitches create the fingers and toes on this monkey. To make them: yarn over, insert hook and pull up loop, yarn over again and pull up another loop - repeat for 4 times total (5 times for thumbs). Then pull through all loops at once. The pattern includes detailed explanations and references for this technique.

Do I need to stuff the entire monkey including limbs and tail?

No! Only stuff the head, hands, feet, and body with fiberfill. Do NOT stuff the tail, upper arms, or upper legs - leaving these unstuffed creates natural movement and allows the limbs to pose and drape naturally for a more realistic appearance.

When should I insert the safety eyes?

Insert the 8mm safety eyes after completing round 22 of the head, before continuing to round 23. The pattern indicates they should be placed between rounds 13-14 on the face patch, orientating their position according to the color change for proper facial proportions.

How do I make the color changes look seamless?

Stop before pulling through the last two loops on your hook, drop the old color, place new color on hook, and use it to complete the stitch. This technique creates nearly invisible color transitions. The pattern also suggests cutting and knotting thread ends every 2-3 rounds for cleaner work.

Can I make this monkey without the hoodie?

Yes, you can skip the hoodie, belly patch pocket, and hoodie chords if you prefer a simpler monkey. Just complete the body through round 35, stuff it, and sew the head directly to the body. However, the hoodie adds significant character and charm to the finished piece.