🧢 Beautiful ✨ Detailed πŸ’ Adorable

Little Husky Dog Amigurumi Pattern

Little Husky Dog Amigurumi Pattern
4.3β˜… Rating
4-5 Hours Time Needed
3.8K Made This
βœ‚οΈ

Intermediate Level

Ideal for those with basic knitting experience, featuring slightly more advanced stitches and techniques to expand your skills.

⏱️

Weekend Treat

Takes 5-7 hours, making it an enjoyable project to finish over a couple of days.

🐾

Charming Critter

Delightful animal designs with sweet details that capture the essence of your favorite woodland and farmyard friends.

About This Little Husky Dog Amigurumi Pattern

This Little Husky pattern brings together the best of amigurumi craftsmanship with realistic color changes that create the iconic husky facial markings. Working with plush velvet or chenille yarn gives your finished piece that extra soft, cuddly quality that makes it irresistible to touch. The pattern includes detailed instructions for creating all seven components, from the distinctively marked head to the fluffy tail, with clear guidance on color transitions and assembly.

Little Husky Dog Amigurumi Pattern crochet pattern - detailed view of completed project

The finished husky measures approximately 11cm in height and 19cm in length when using the recommended materials, creating a perfectly palm-sized companion. You can easily adjust the final size by choosing different yarn weights and corresponding hook sizes.

Why You'll Love This Little Husky Dog Amigurumi Pattern

I absolutely love this pattern because it captures the spirit of huskies so perfectly in miniature form! The color work might seem intimidating at first, but the way the white and gray come together to create those distinctive facial markings is so rewarding. I find the process of watching the husky's personality emerge as you assemble the pieces incredibly satisfying. The combination of plush yarn and careful shaping creates a finished piece that's not just cute but also wonderfully tactile. Plus, working with the continuous spiral technique means fewer ends to weave in, which I always appreciate!

Little Husky Dog Amigurumi Pattern step 1 - construction progress Little Husky Dog Amigurumi Pattern step 2 - assembly progress Little Husky Dog Amigurumi Pattern step 3 - details and accessories Little Husky Dog Amigurumi Pattern step 4 - final assembly and finishing

Switch Things Up

I absolutely love customizing this little husky pattern to create different looks and personalities! One of my favorite modifications is changing the facial expressions by adjusting where I place the safety eyes - positioning them slightly closer or farther apart can completely transform the husky's character from sweet and innocent to playful and mischievous.

I've also experimented with adding small details like a tiny collar made from embroidery thread or a small bow between the ears for a more feminine touch. For those who want a more realistic approach, I sometimes use embroidered details instead of safety eyes and nose, which gives a softer, more handmade appearance that's perfect for baby gifts.

Another fun variation I enjoy is adjusting the ear positions - by sewing them slightly more to the sides or more upright on top, you can create different breed characteristics or moods. I've even tried making the tail more curved or fluffy by adjusting the stuffing technique.

Color-wise, the possibilities are endless! I've created versions in brown and cream for a different husky coloring, solid white for a Samoyed-inspired pup, and even experimented with fun, non-realistic colors like pastel blues and pinks for a kawaii aesthetic. Each color combination brings out a completely different personality in the finished piece, making this pattern incredibly versatile and fun to return to again and again!

Common Mistakes & How to Fix Them

βœ— Losing track of rounds during color changes - use a stitch marker at the beginning of each round to stay on track βœ— Making the increases and decreases for the face too tight or too loose - maintain consistent tension to achieve the proper rounded shape βœ— Placing the safety eyes incorrectly before stuffing - always position and secure them between rounds 10 and 11 with exactly 7 stitches between them βœ— Overstuffing or understuffing the body parts - stuff firmly but not so tight that the fabric stretches or shows gaps between stitches βœ— Forgetting to change colors at the specified stitches in the head rounds - mark your color change points before you start the round

Little Husky Dog Amigurumi Pattern

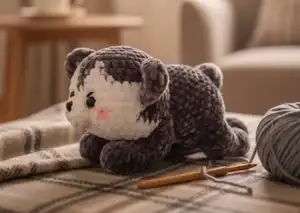
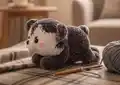
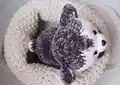
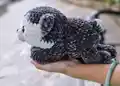
Create your very own adorable Little Husky companion with this comprehensive amigurumi pattern! This charming design features realistic color work with gray and white yarn to capture the distinctive husky markings, including those beautiful facial patterns and perky ears. Perfect for dog lovers and amigurumi enthusiasts alike, this pattern guides you through creating a sweet 11cm tall husky that's full of personality. The finished pup includes detailed features like expressive safety eyes, a cute muzzle, and a fluffy tail. Whether you're making it as a gift or adding to your collection, this little husky will steal hearts!

Intermediate 4-5 Hours

Materials Needed for Little Husky Dog Amigurumi Pattern

β€” Main Fabric

  • 01
    Plush/Velvet/Chenille yarn in Gray color (approximately 120m or 1.2 skeins)
  • 02
    Plush/Velvet/Chenille yarn in White color (approximately 40m or 0.5 skein)
  • 03
    Recommended yarn types: Himalaya Velvet, Himalaya Dolphin Baby, YarnArt Dolce, or Premier Parfait Chunky

β€” Tools Required

  • 01
    Crochet hook 4mm
  • 02
    Safety eyes 14mm
  • 03
    Safety nose 8mm
  • 04
    Polyester fiberfill stuffing
  • 05
    Tapestry needle (white and black)
  • 06
    Scissors
  • 07
    Pins
  • 08
    Stitch marker

Progress Tracker

0% Complete

β€” HEAD :

Info :

Start with Gray yarn

Round 1 :

MR 8sc (8)

Round 2 :

8 inc (16)

Round 3 :

(1 sc, inc) x 8 times (24)

Round 4 :

1 sc, inc, (2 sc, inc) x 7 times, 1 sc (32)

Round 5 :

(3 sc, inc) x 8 times (40)

Info :

Use both Gray yarn and White yarn

Round 6 :

Gray 16 sc, White 2 sc, Gray 4 sc, White 2 sc, Gray 16 sc (40)

Round 7 :

Gray 15 sc, White 4 sc, Gray 2 sc, White 4 sc, Gray 15 sc (40)

Round 8 :

Gray 14 sc, White 5 sc, Gray 2 sc, White 5 sc, Gray 14 sc (40)

Info :

Use White yarn, and cut Gray yarn

Round 9 :

Gray 10 sc, White 6 inc, 8 sc, 6 inc, Gray 10 sc (52)

Round 10-11 :

Gray 10 sc, White 32 sc, Gray 10 sc (52)

Info :

Insert the safety eyes between rounds 10 and 11, the distance between 2 eyes is 7 sts

Round 12 :

Gray 10 sc, White 6 dec, 8 sc, 6 dec, Gray 10 sc (40)

Info :

Start stuffing the head

Round 13 :

(8 sc, dec) x 4 times (36)

Round 14 :

36 sc (36)

Round 15 :

(4 sc, dec) x 6 times (30)

Round 16 :

(3 sc, dec) x 6 times (24)

Info :

Stuff the head firmly with fiberfill

Round 17 :

12 dec (12)

Round 18 :

6 dec (6)

Info :

Fasten off, leaving a long tail for sewing. Weave the yarn tail through the front loops of the last round and pull it tight to close the hole. Hide the yarn tail inside the head

β€” MUZZLE :

Info :

Use White yarn

Round 1 :

MR 6 sc (6)

Round 2 :

(1 sc, inc) x 3 times (9)

Round 3 :

6 sc, 3 inc, slst (12)

Info :

Fasten off, leaving a long tail for sewing

β€” BODY :

Info :

Use Gray yarn

Round 1 :

MR 8 sc (8)

Round 2 :

8 inc (16)

Round 3 :

(1 sc, inc) x 8 times (24)

Round 4 :

(1 sc, inc, 1 sc) x 8 times (32)

Round 5 :

(3 sc, inc) x 8 times (40)

Round 6-10 :

40 sc (40)

Round 11 :

(3 sc, dec) x 8 times (32)

Round 12-14 :

32 sc (32)

Round 15 :

(14 sc, dec) x 2 times (30)

Round 16 :

30 sc, slst (30)

Info :

Fasten off, leaving a long tail for sewing. Stuff the body firmly with fiberfill

β€” ARMS/LEGS (Make 4) :

Info :

Use Gray yarn

Round 1 :

MR 6 sc (6)

Round 2 :

6 inc (12)

Round 3-12 :

4 sc, inc, 5 sc, dec (12)

Round 13 :

6 sc, slst (6)

Info :

Stuff the arms/legs firmly with fiberfill. Flatten the opening of the arm/leg and work the next round through both layers to close. Fasten off, leaving a long tail for sewing

β€” EARS (Make 2) :

Info :

Start with Gray yarn. Use both Gray yarn and White yarn

Round 1 :

MR 6 sc (6)

Round 2 :

(1 sc, inc) x 3 times (9)

Round 3 :

Gray (2 sc, inc) x 2 times, White sc, Gray sc, inc (12)

Round 4 :

Gray 7 sc, White 3 sc, Gray 2 sc (12)

Round 5 :

Gray 3 sc, inc, 3 sc, White inc, 3 sc, Gray inc (15)

Round 6 :

7 sc, slst (7)

Info :

Do not stuff the ears. Flatten the opening of the ear and work the next round through both layers to close. Fasten off, leaving a long tail for sewing

β€” TAIL :

Info :

Start with White yarn

Round 1 :

MR 6 sc (6)

Round 2 :

(1 sc, inc) x 3 times (9)

Round 3 :

(2 sc, inc) x 3 times (12)

Round 4-5 :

12 sc (12)

Info :

Change to Gray yarn, and cut White yarn. Fasten off, leaving a long tail for sewing. Stuff the tail lightly with fiberfill

Assembly Instructions

  • Sew the muzzle to the head between the eyes, then attach the safety nose to the center of the muzzle (you can also embroider the nose with yarn)
  • Create eye sockets by gently pushing the area around the eyes to add depth and dimension to the face
  • Embroider the eyelashes using white and black yarn to add character and expression to your husky
  • Sew the ears to the head between rounds 4 and 8, with a distance of 8 stitches between the two ears
  • Attach the body to the head by placing both on a flat surface, using pins to mark placement, then sew one stitch on the body to one stitch on the head
  • Sew the legs to round 6 of the body with a distance of 10 stitches between the two legs
  • Attach the arms to rounds 12-15 of the body, positioning them slightly forward on the sides
  • Sew the tail to the back of the body at the appropriate position to complete your little husky

Important Notes

  • πŸ’‘Work in a continuous spiral unless otherwise stated and use a stitch marker to mark the beginning of each round
  • πŸ’‘The finished size will be approximately 11cm height and 19cm length when using the specified materials, but will vary with different yarn weights
  • πŸ’‘Change colors in the last single crochet of the round by wrapping the new yarn around the hook and pulling through
  • πŸ’‘Pay special attention to color changes in the head rounds to achieve the distinctive husky facial markings
  • πŸ’‘Flatten the opening of arms, legs, ears, and tail and work through both layers to close them properly
  • πŸ’‘Use pins to position all parts before sewing to ensure proper placement and symmetry
  • πŸ’‘Stuff the head and body firmly, but stuff the tail only lightly to maintain its natural shape

This charming Little Husky pattern brings the beloved Siberian breed to life in adorable miniature form! With careful attention to the distinctive gray and white markings that make huskies so recognizable, this pattern creates a companion full of personality and charm. The combination of plush yarn and detailed assembly instructions ensures your finished husky will be both cuddly and display-worthy. Perfect for dog lovers, gift-giving, or adding to your amigurumi collection! 🐺🧢✨

You ask,

we answer.

FAQs

Can I use different colors to make other dog breeds?

Absolutely! While this pattern is designed for a husky's gray and white coloring, you can easily adapt it to create other breeds by changing the color combinations. Try brown and white for a corgi, black and tan for a German Shepherd, or solid colors for breeds like golden retrievers.

What if I don't have plush or velvet yarn?

You can use regular worsted weight yarn, but the texture and finished size will differ. Plush yarn creates that soft, cuddly feel characteristic of this pattern. If using regular yarn, the finished piece will be smaller and have a more traditional amigurumi texture.

How do I manage the color changes in the head without creating gaps?

Change colors in the last stitch before you need the new color by wrapping the new yarn through the final pull-through of the previous stitch. Keep both yarns on the wrong side and carry the unused color loosely behind your work to avoid puckering.

Can I make the husky larger or smaller?

Yes! Use a larger hook and thicker yarn to make a bigger husky, or a smaller hook and thinner yarn for a miniature version. Just ensure your hook size matches your yarn weight, and adjust your eye and nose safety pieces accordingly.

Do I need to stuff all the parts?

The head, body, arms, and legs should be stuffed firmly for proper shape and structure. However, the ears should not be stuffed at all, and the tail should only be lightly stuffed to maintain a natural, fluffy appearance.

How do I create the eye sockets mentioned in the assembly?

After securing the safety eyes, use your fingers to gently push and shape the area around each eye from the inside, creating a slight indentation. This adds dimension and makes the eyes appear more realistic and expressive.