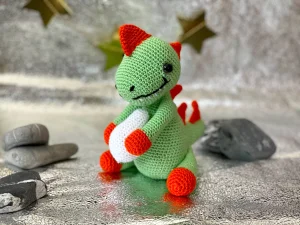
Meet your new favorite prehistoric pal! This little green dinosaur is the perfect size for hugging and comes with his very own little egg to protect. You'll love seeing his personality come to life as you stitch those bright orange spikes and cute little feet. It's a wonderful project for anyone who loves whimsical creatures and wants to make something truly special for a nursery or a bookshelf. He has such a sturdy, sitting pose that makes him look great wherever you place him.
Progress Tracker
0% Complete
— 1. Head :
Round 1 :
Start with Green yarn and work 8 sc into a magic ring (8)
Round 2 :
Work 4 x (1 sc, 1 inc) around (12)
Round 3 :
Work 12 x (1 sc, 1 inc) around (24)
Round 4 :
Work 8 x (2 sc, 1 inc) around (32)
Round 5 :
Work 8 x (3 sc, 1 inc) around (40)
Round 6 :
sc in every st around (40)
Round 7 :
sc in every st around (40)
Round 8 :
sc in every st around (40)
Round 9 :
sc in every st around (40)
Round 10 :
sc in every st around (40)
Round 11 :
sc in every st around (40)
Round 12 :
sc in every st around (40)
Round 13 :
sc in every st around (40)
Round 14 :
sc in every st around (40)
Round 15 :
Work 20 x (1 sc, 1 inc) around (60)
Round 16 :
sc in every st around (60)
Round 17 :
sc in every st around (60)
Round 18 :
sc in every st around (60)
Round 19 :
sc in every st around (60)
Round 20 :
sc in every st around (60)
Round 21 :
sc in every st around (60)
Round 22 :
sc in every st around (60)
Info :
Place safety eyes between Rounds 18 and 19, leaving a gap of 18 stitches between them.
Round 23 :
Work 6 x (8 sc, 1 dec) around (54)
Round 24 :
Work 6 x (7 sc, 1 dec) around (48)
Round 25 :
Work 6 x (6 sc, 1 dec) around (42)
Round 26 :
Work 6 x (5 sc, 1 dec) around (36)
Round 27 :
Work 6 x (4 sc, 1 dec) around (30)
Round 28 :
Work 6 x (3 sc, 1 dec) around (24)
Round 29 :
Work 6 x (2 sc, 1 dec) around (18)
Round 30 :
Work 6 x (1 sc, 1 dec) around (12)
Round 31 :
6 x dec around, then FO (6)
— 2. Body :
Round 1 :
Using Green yarn, make 6 sc in a magic ring (6)
Round 2 :
6 x inc around (12)
Round 3 :
6 x (1 sc, 1 inc) around (18)
Round 4 :
6 x (2 sc, 1 inc) around (24)
Round 5 :
6 x (3 sc, 1 inc) around (30)
Round 6 :
6 x (4 sc, 1 inc) around (36)
Round 7 :
6 x (5 sc, 1 inc) around (42)
Round 8 :
6 x (6 sc, 1 inc) around (48)
Round 9 :
6 x (7 sc, 1 inc) around (54)
Round 10 :
sc in every st around (54)
Round 11 :
sc in every st around (54)
Round 12 :
sc in every st around (54)
Round 13 :
sc in every st around (54)
Round 14 :
sc in every st around (54)
Round 15 :
6 x (7 sc, 1 dec) around (48)
Round 16 :
sc in every st around (48)
Round 17 :
sc in every st around (48)
Round 18 :
sc in every st around (48)
Round 19 :
sc in every st around (48)
Round 20 :
sc in every st around (48)
Round 21 :
6 x (6 sc, 1 dec) around (42)
Round 22 :
sc in every st around (42)
Round 23 :
sc in every st around (42)
Round 24 :
sc in every st around (42)
Round 25 :
sc in every st around (42)
Round 26 :
sc in every st around (42)
Round 27 :
6 x (5 sc, 1 dec) around (36)
Round 28 :
sc in every st around (36)
Round 29 :
sc in every st around (36)
Round 30 :
sc in every st around (36)
Round 31 :
6 x (4 sc, 1 dec) around (30)
Round 32 :
sc in every st around (30)
Round 33 :
6 x (3 sc, 1 dec) around (24)
Round 34 :
sc in every st around (24)
Round 35 :
sc in every st around (24)
Round 36 :
sc in every st around (24)
Round 37 :
6 x (2 sc, 1 dec) around (18)
Round 38 :
sc in every st around (18)
Round 39 :
sc in every st around (18)
Round 40 :
sc in every st around (18)
Round 41 :
sc in every st around (18)
Info :
Stuff the body firmly as you work. FO and leave a long tail for sewing to the head.
— 3. Tail :
Round 1 :
Using Green, work 6 sc into a magic ring (6)
Round 2 :
Work 4 inc and 2 sc around (10)
Round 3 :
Work 2 inc and 8 sc around (12)
Round 4 :
sc in every st around (12)
Round 5 :
6 x (1 sc, 1 inc) around (18)
Round 6 :
sc in every st around (18)
Round 7 :
sc in every st around (18)
Round 8 :
sc in every st around (18)
Round 9 :
6 x (2 sc, 1 inc) around (24)
Round 10 :
sc in every st around (24)
Round 11 :
sc in every st around (24)
Round 12 :
sc in every st around (24)
Round 13 :
sc in every st around (24)
Round 14 :
sc in every st around (24)
Round 15 :
6 x (3 sc, 1 inc) around (30)
Round 16 :
sc in every st around (30)
Round 17 :
sc in every st around (30)
Round 18 :
sc in every st around (30)
Round 19 :
sc in every st around (30)
Round 20 :
sc in every st around (30)
Round 21 :
6 x (4 sc, 1 inc) around (36)
Round 22 :
sc in every st around (36)
Round 23 :
sc in every st around (36)
Round 24 :
6 x (5 sc, 1 inc) around (42)
Round 25 :
sc in every st around (42)
Info :
FO and leave a long tail. Fill the tail firmly with stuffing.
— 4. Arms (Make 2) :
Round 1 :
With Orange yarn, 6 sc in a magic ring (6)
Round 2 :
6 x inc around (12)
Round 3 :
4 x (2 sc, 1 inc) around (16)
Round 4 :
sc in every st around (16)
Round 5 :
sc in every st around (16)
Round 6 :
sc in every st around (16)
Round 7 :
4 x (2 sc, 1 dec) around (12)
Round 8 :
Switch to Green yarn and sc around (12)
Round 9-25 :
sc in every st around for 17 more rounds (12)
Round 26 :
Stuff the bottom lightly, flatten the opening, and sc through both layers to close (6)
Info :
FO and leave a long thread for sewing.
— 5. Legs (Make 2) :
Round 1 :
With Orange yarn, 6 sc in a magic ring (6)
Round 2 :
6 x inc around (12)
Round 3 :
6 x (1 sc, 1 inc) around (18)
Round 4 :
sc in every st around (18)
Round 5 :
sc in every st around (18)
Round 6 :
sc in every st around (18)
Round 7 :
Switch to Green yarn and sc around (18)
Round 8-22 :
sc in every st around for 15 more rounds (18)
Round 23 :
Fill the bottom section, flatten the top edge, and sc through both layers to close (9)
Info :
FO and leave a long tail for assembly.
— 6. Back Spikes (Make 5) :
Round 1 :
With Orange yarn, 6 sc in a magic ring (6)
Round 2 :
sc in every st around (6)
Round 3 :
2 x (2 sc, 1 inc) around (8)
Round 4 :
sc in every st around (8)
Round 5 :
2 x (3 sc, 1 inc) around (10)
Round 6 :
2 x (4 sc, 1 inc) around (12)
Round 7 :
2 x (5 sc, 1 inc) around (14)
Round 8 :
2 x (6 sc, 1 inc) around (16)
Round 9 :
2 x (7 sc, 1 inc) around (18)
Info :
FO and leave a long tail to attach to the body.
— 7. Egg :
Round 1 :
Using White yarn, 6 sc in a magic ring (6)
Round 2 :
6 x inc around (12)
Round 3 :
sc in every st around (12)
Round 4 :
sc in every st around (12)
Round 5 :
2 x (5 sc, 1 inc) around (14)
Round 6 :
2 x (6 sc, 1 inc) around (16)
Round 7 :
2 x (7 sc, 1 inc) around (18)
Round 8 :
3 x (5 sc, 1 inc) around (21)
Round 9 :
sc in every st around (21)
Round 10 :
sc in every st around (21)
Round 11 :
6 x (4 sc, 1 inc) around (30)
Round 12 :
sc in every st around (30)
Round 13 :
6 x (5 sc, 1 inc) around (36)
Round 14 :
sc in every st around (36)
Round 15 :
sc in every st around (36)
Round 16 :
sc in every st around (36)
Round 17 :
6 x (5 sc, 1 dec) around (30)
Round 18 :
sc in every st around (30)
Round 19 :
6 x (4 sc, 1 dec) around (24)
Round 20 :
sc in every st around (24)
Round 21 :
6 x (3 sc, 1 dec) around (18)
Round 22 :
sc in every st around (18)
Round 23 :
6 x (2 sc, 1 dec) around (12)
Round 24 :
6 x dec around, then FO and weave in the end (6)
I hope you have as much fun making this little dinosaur as I did! There's something so rewarding about seeing all those separate pieces come together into a chubby, friendly prehistoric friend. Whether he's guarding his egg on a shelf or becoming a child's new best friend, he's sure to bring a smile to everyone's face. Don't forget to share your finished dinos with the community—I'd love to see what colors you choose for your spikes! Happy crocheting, and enjoy every stitch of your new creation! 🧶✨🦖