🧢 Beautiful ✨ Detailed πŸ’ Adorable

Lily the Piglet Amigurumi Pattern

Lily the Piglet Amigurumi Pattern
4.7β˜… Rating
4-5 Hours Time Needed
2.9K Made This
βœ‚οΈ

Intermediate Level

Ideal for those with basic knitting experience, featuring slightly more advanced stitches and techniques to expand your skills.

⏱️

Weekend Treat

Takes 5-7 hours, making it an enjoyable project to finish over a couple of days.

🐾

Charming Critter

Delightful animal design with sweet details that capture the essence of this lovable little piglet, from her rosy snout to her curly tail.

About This Lily the Piglet Amigurumi Pattern

Lily the Piglet is a beautifully designed amigurumi pattern created by Kristi Tullus that results in an adorable 26cm seated piglet with jointed arms and legs for posability. The pattern uses two shades of pink yarn β€” light pink for the body and dark pink for the hooves, ears, and muzzle β€” creating a gorgeous two-tone effect that gives Lily her signature charm. Every detail has been thoughtfully included, from the sculpted back-post stitch muzzle to the yarn-shaped hooves and the embroidered nostrils.

Lily the Piglet Amigurumi Pattern crochet pattern - detailed view of completed project

This pattern is perfect for crocheters who want to level up their amigurumi skills with techniques like plastic doll joints, color changes, and back post single crochet. It's the kind of make that you'll be proud to display on a shelf or gift to someone who loves handmade treasures.

Why You'll Love This Lily the Piglet Amigurumi Pattern

I absolutely fell in love with Lily the moment I started working on her round little head β€” there's something so satisfying about watching those pink rounds stack up into the most perfectly chubby piglet face. I love how the two-tone pink color scheme feels soft and classic without being boring, and the dark pink hooves add just the right amount of contrast. The jointed limbs are one of my favorite parts β€” being able to pose her little arms and legs makes her feel so alive and playful on a shelf. I always find myself smiling while embroidering those tiny nostrils, because that's the moment she really starts to look like herself. If you love projects that have real character and a handful of satisfying techniques to master, this one is going to be so rewarding for you.

Lily the Piglet Amigurumi Pattern step 1 - construction progress Lily the Piglet Amigurumi Pattern step 2 - assembly progress Lily the Piglet Amigurumi Pattern step 3 - details and accessories Lily the Piglet Amigurumi Pattern step 4 - final assembly and finishing

Switch Things Up

I've made a lot of amigurumi over the years, but something about Lily the Piglet kept pulling me back to my hook every single session. I love how the two-tone pink palette feels so soft and nostalgic β€” it reminds me of the kind of stuffed animals that live on shelves for decades and never go out of style. Working those back post single crochet stitches on the muzzle was honestly one of the most satisfying moments in the whole pattern for me, because you can really feel the texture building under your fingers. I decided to try the plastic doll joints for Lily's arms and legs and honestly it changed everything β€” being able to pose her little limbs makes her look so expressive and alive. I remember stuffing her big round head and thinking it couldn't possibly get cuter, and then I attached the tiny dark pink ears and completely changed my mind. The embroidered nostrils are such a small detail but they make such a huge difference β€” that's the moment Lily stopped being a crochet project and started being a real little pig. I always tell people that the secret to a great amigurumi is in the shaping, and this pattern really delivers on that with the yarn-sculpted hooves and the eye-indenting technique. If you're someone who loves working with two colors but finds color changes fiddly, this is actually a gentle introduction because the transitions are clean and well-placed. I'd suggest making the muzzle and ears before attaching the head to the body so you can hide all your yarn tails neatly β€” it's a little tip that makes the finish so much cleaner. Whether you're gifting Lily or keeping her for yourself, I promise this is the kind of make you'll look back on and feel really proud of. 🐷

Common Mistakes & How to Fix Them

βœ— Forgetting to place the stitch marker at round 16 between stitches 24 and 25 β€” this marker is essential for correctly positioning the safety eyes, so don't skip it or you'll end up with off-center eyes. βœ— Installing safety eyes too early or too late β€” the pattern specifies attaching them after round 24 between rows 16 and 17 with 10 stitches between them, so wait for the right moment before locking the washers. βœ— Not stuffing firmly enough as you go β€” with amigurumi this size, it's very hard to add stuffing later once the opening is too small, so keep adding small amounts of fiberfill every few rounds. βœ— Skipping the back post single crochet rounds on the muzzle β€” the bpsc round creates that lovely raised ridge that gives the muzzle its realistic round shape, so make sure you're working around the post and not into the top loops. βœ— Attaching the joints without checking the stem direction β€” the joint stem must face straight toward the body before locking it in place, otherwise the limbs won't sit or move correctly once assembled. βœ— Not leaving a long enough yarn tail when fastening off pieces meant to be sewn β€” you'll need a generous tail for whip stitch or mattress stitch, so always leave at least 20-25cm before cutting.

Lily the Piglet Amigurumi Pattern

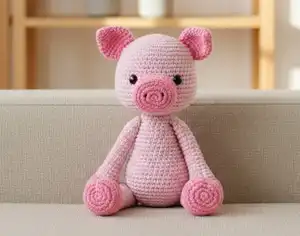
Get ready to fall head over heels for Lily the Piglet β€” the sweetest little crochet companion you'll ever make! This pattern walks you through every single step of bringing this rosy, round-bellied piglet to life, from her chubby little hooves to her floppy dark pink ears. Whether you're making her as a gift for someone special or keeping her all to yourself, Lily is the kind of project that feels like a warm hug from start to finish. She stands about 26cm tall and is crocheted using a soft cotton-acrylic blend in light and dark pink β€” totally huggable and absolutely irresistible. The pattern includes detailed instructions for jointed arms and legs, a sculpted muzzle, embroidered nostrils, and a curly little tail that makes her personality shine through every stitch.

Intermediate 4-5 Hours

Materials Needed for Lily the Piglet Amigurumi Pattern

β€” Main Fabric

  • 01
    Light pink sport weight yarn β€” approximately 55g (180m), used for the head, body, arms, legs, and tail (e.g. Alize Cotton Gold in light pink)
  • 02
    Dark pink sport weight yarn β€” approximately 20g (66m), used for the hooves, ears, and muzzle (e.g. Alize Cotton Gold in dark pink)

β€” Tools Required

  • 01
    2.50mm–3.00mm crochet hook (US size 2/C – 3/D)
  • 02
    9mm (3/8") safety eyes (x2)
  • 03
    Two 20mm (4/5") plastic doll joints
  • 04
    Two 15mm (3/5") plastic doll joints
  • 05
    Polyester fiberfill / stuffing
  • 06
    Black or dark brown embroidery floss
  • 07
    Yarn needle
  • 08
    Scissors
  • 09
    Stitch marker

Progress Tracker

0% Complete

β€” Head :

Info :

Work with light pink yarn.

Round 1 :

mr, sc 6 (6)

Round 2 :

inc x 6 (12)

Round 3 :

(sc, inc) x 6 (18)

Round 4 :

(inc, sc 2) x 6 (24)

Round 5 :

(sc 3, inc) x 6 (30)

Round 6 :

sc, inc, (sc 4, inc) x 5, sc 3 (36)

Round 7 :

(sc 5, inc) x 6 (42)

Round 8 :

sc 2, inc, (sc 6, inc) x 5, sc 4 (48)

Round 9 :

(sc 7, inc) x 6 (54)

Round 10-15 :

sc in each st (54)

Info :

On round 16, place a stitch marker between stitches 24 and 25 (around the loops on top of the 25th stitch). This marks the center of the face and will be used as a guide when placing the eyes.

Round 16-17 :

sc in each st (54)

Round 18 :

sc 11, inc, (sc 2, inc) x 2, sc 13, inc, (sc 2, inc) x 2, sc 16 (60)

Round 19-21 :

sc in each st (60)

Round 22 :

sc 3, dec, (sc 8, dec) x 5, sc 5 (54)

Round 23 :

(sc 7, dec) x 6 (48)

Round 24 :

sc 2, dec, (sc 6, dec) x 5, sc 4 (42)

Info :

Attach safety eyes to either side of the stitch marker, between rows 16 and 17, leaving 10 stitches (count 9 holes) between them. Begin stuffing the head and keep adding fiberfill after every few rounds, stuffing firmly.

Round 25 :

(sc 5, dec) x 6 (36)

Round 26 :

sc, dec, (sc 4, dec) x 5, sc 3 (30)

Round 27 :

(sc 3, dec) x 6 (24)

Round 28 :

(dec, sc 2) x 6 (18)

Info :

Sl st in next stitch. Cut yarn leaving a long tail for sewing and fasten off. Stuff the head firmly before closing.

β€” Muzzle :

Info :

Work with dark pink yarn.

Round 1 :

mr, sc 6 (6)

Round 2 :

(inc3 x 2, sc) x 2 (14)

Round 3 :

sc 2, inc x 3, sc 4, inc x 3, sc 2 (20)

Round 4 :

sc 3, inc x 3, sc 7, inc x 3, sc 4 (26)

Round 5 :

bpsc in each st (26)

Round 6-7 :

sc in each st (26)

Info :

Sl st in next stitch. Cut yarn leaving a long tail for sewing and fasten off. Stuff the muzzle firmly and sew it to the head, placing it just below round 15. Embroider nostrils with black or dark brown embroidery floss, making a couple of short vertical stitches to either side of round 2. Use yarn to shape the head by inserting the needle from the bottom of the head up next to each eye and drawing slightly tight, then knotting the tails together.

β€” Ears (make 2) :

Info :

Work with dark pink yarn.

Round 1 :

mr, sc 6 (6)

Round 2 :

sc in each st (6)

Round 3 :

(inc, sc) x 3 (9)

Round 4 :

(sc 2, inc) x 3 (12)

Round 5 :

sc, inc, (sc 3, inc) x 2, sc 2 (15)

Round 6 :

(sc 4, inc) x 3 (18)

Round 7-9 :

sc in each st (18)

Round 10 :

(dec, sc) x 6 (12)

Info :

Sl st in next stitch. Cut yarn leaving a long tail for sewing and fasten off. Flatten the ears and sew them to the head, placing each ear just below round 6.

β€” Arms (make 2) :

Info :

Begin with dark pink yarn.

Round 1 :

mr, sc 7 (7)

Round 2 :

inc x 7 (14)

Round 3 :

(sc, inc) x 7 (21)

Round 4 :

sc in each st BLO (21)

Round 5 :

sc 7, dec, (sc, dec) x 2, sc 6 (18)

Round 6 :

sc 4, dec, sc 7, dec, sc 3 (16)

Round 7 :

sc 8, dec, sc 6 (15)

Info :

Sc in next stitch and count it as the end of the round from now on. Switch to light pink yarn.

Round 8 :

sc in each st (15)

Round 9 :

sc 7, dec, sc 6 (14)

Info :

Stuff firmly. Turn the arm so the end of the round is at the back. Make a long vertical stitch along the front of the hoof with light pink yarn from round 7 straight down, draw very tight and knot the yarn ends together to shape the hoof. Continue adding fiberfill every few rounds.

Round 10 :

sc in each st (14)

Round 11 :

sc 7, dec, sc 5 (13)

Round 12 :

sc in each st (13)

Round 13 :

sc 7, dec, sc 4 (12)

Round 14 :

sc in each st (12)

Round 15 :

sc 7, dec, sc 3 (11)

Round 16-23 :

sc in each st (11)

Info :

On the left arm only, sc in next 6 stitches and count the last sc as the new end of round. Attach the 15mm joint between rounds 22 and 23, placing it so the stem faces straight toward the body.

Round 24 :

sc 5, dec x 3 (8)

Round 25 :

dec x 2, leave rest of sts unworked (6)

Info :

Finish stuffing. Cut yarn leaving a long tail and fasten off. Pick up all remaining stitches and close the opening.

β€” Legs (make 2) :

Info :

Begin with dark pink yarn.

Round 1 :

mr, sc 6 (6)

Round 2 :

inc x 6 (12)

Round 3 :

(sc, inc) x 6 (18)

Round 4 :

(inc, sc 2) x 6 (24)

Round 5 :

sc in each st BLO (24)

Round 6 :

sc 8, dec, (sc, dec) x 2, sc 8 (21)

Round 7 :

sc 5, dec, sc 8, dec, sc 4 (19)

Round 8 :

sc 9, dec, sc 8 (18)

Info :

Sc in next stitch and count it as the end of the round from now on. Switch to light pink yarn.

Round 9 :

sc in each st (18)

Round 10 :

sc 8, dec, sc 8 (17)

Info :

Stuff firmly. Turn the leg so the end of the round is at the back. Make a long vertical stitch along the front of the hoof with light pink yarn from round 8 straight down, draw very tight and knot ends together to shape the hoof. Continue adding fiberfill every few rounds.

Round 11 :

sc in each st (17)

Round 12 :

sc 3, dec, sc 8, dec, sc 2 (15)

Round 13 :

sc in each st (15)

Round 14 :

sc 7, dec, sc 6 (14)

Round 15 :

sc in each st (14)

Round 16 :

sc 7, dec, sc 5 (13)

Round 17-28 :

sc in each st (13)

Info :

On the left leg only, sc in next 7 stitches and count the last sc as the new end of round. Attach the 20mm joint between rounds 27 and 28, placing it so the stem faces straight toward the body.

Round 29 :

sc 9, dec, sc 2 (12)

Round 30 :

sc 2, dec x 5 (7)

Round 31 :

sc, dec, leave rest of sts unworked (6)

Info :

Finish stuffing. Cut yarn leaving a long tail and fasten off. Pick up all remaining stitches and close the opening.

β€” Body :

Info :

Work with light pink yarn.

Round 1 :

mr, sc 6 (6)

Round 2 :

inc x 6 (12)

Round 3 :

(sc, inc) x 6 (18)

Round 4 :

(inc, sc 2) x 6 (24)

Round 5 :

(sc 3, inc) x 6 (30)

Round 6 :

sc, inc, (sc 4, inc) x 5, sc 3 (36)

Round 7 :

(sc 5, inc) x 6 (42)

Round 8-14 :

sc in each st (42)

Info :

Turn the body so the last stitch of round 14 is at the center of the back. Attach the legs to either side of the body between rounds 8 and 9.

Round 15 :

sc 9, dec, sc 5, dec, sc 6, dec, sc 5, dec, sc 9 (38)

Round 16 :

sc 18, dec, sc 18 (37) (note: one extra sc absorbed β€” work as written)

Round 17 :

(sc 11, dec) x 2, sc 11 (35)

Round 18 :

sc 4, dec, sc 24, dec, sc 3 (33)

Info :

Begin stuffing the body. Keep adding fiberfill after every few rounds, stuffing firmly.

Round 19 :

sc 16, dec, sc 15 (32)

Round 20 :

dec, sc 30 (31)

Round 21 :

sc 7, dec, sc 14, dec, sc 6 (29)

Round 22 :

sc 14, dec, sc 13 (28)

Round 23 :

sc 10, dec, sc 6, dec, sc 8 (26)

Round 24 :

(dec, sc 11) x 2 (24)

Round 25 :

sc 6, dec, sc 9, dec, sc 5 (22)

Round 26 :

sc 9, dec, sc 2, dec, sc 7 (20)

Round 27 :

dec, sc 18 (19)

Round 28 :

sc 9, dec, sc 8 (18)

Round 29 :

sc in each st (18)

Info :

Sl st in next stitch. Cut yarn and fasten off. Attach the arms to either side of the body between rows 24 and 25. Finish stuffing the body. Sew the head to the body.

β€” Tail :

Info :

Work with light pink yarn.

Row 1 :

ch 11, starting in 2nd ch from hook, work 2 sc in each ch into the back loops of the chain (20)

Info :

Cut yarn leaving a long tail for sewing and fasten off. Sew the tail to the body just above round 9.

Assembly Instructions

  • Sew the muzzle to the head with whip stitch, placing it just below round 15, then stuff it firmly before closing.
  • Embroider the nostrils onto the muzzle using black or dark brown embroidery floss with short vertical stitches on either side of round 2.
  • Use yarn to shape the head by drawing a stitch from the bottom of the head up next to each safety eye and pulling gently to indent the eyes, then knot the tails securely.
  • Flatten the ears and sew them to the head, placing each ear just below round 6, pushing it flat and stitching through both layers.
  • Turn the finished body so the last stitch of round 14 is at the center of the back, then attach the jointed legs to either side between rounds 8 and 9.
  • Attach the jointed arms to either side of the body between rounds 24 and 25 once the body is finished.
  • Sew the head to the body using whip stitch or mattress stitch, adding a little extra stuffing before fully closing the seam, then sew the curly tail just above round 9 at the back.

Important Notes

  • πŸ’‘Always work in a continuous spiral β€” do not join rounds or turn your work unless the pattern explicitly tells you to
  • πŸ’‘Place a stitch marker at the beginning or end of each round so you never lose your place, especially during the long straight sections
  • πŸ’‘Work all stitches through both loops unless the pattern specifies back loops only (BLO) β€” missing a BLO round will affect the shape of the hooves
  • πŸ’‘Sew the muzzle and ears onto the head and finish all embroidery before attaching the head to the body so you can hide yarn tails neatly inside
  • πŸ’‘When installing plastic doll joints, double-check that the stem is pointing straight toward the body before locking the washer β€” repositioning after locking is not possible
  • πŸ’‘If using buttons and thread instead of joints, use very strong thread such as cotton embroidery floss doubled or nylon sewing thread to ensure the limbs hold up under tension

Lily the Piglet is one of those patterns that stays with you long after you've finished the last stitch β€” she's just that cute. Designed by Kristi Tullus with incredible attention to detail, every round of this pattern builds toward a little pig with so much character and personality that it's hard to believe she came from a ball of yarn. Whether you're making her for a baby shower, a birthday gift, or simply because you deserve a new desk companion, Lily is guaranteed to bring smiles wherever she sits. 🐷 Happy crocheting! 🧢✨

You ask,

we answer.

FAQs

What yarn weight does this pattern use?

The pattern uses sport weight yarn (also called fine weight / weight 2). The designer used Alize Cotton Gold, a cotton-acrylic blend. You'll need approximately 55g of light pink and 20g of dark pink.

What hook size should I use?

The pattern recommends a 2.50mm to 3.00mm crochet hook (US size 2/C to 3/D). Choose based on your personal tension β€” tighter crocheters may prefer the larger end of the range.

What size will Lily be when finished?

When crocheted with sport weight cotton-acrylic yarn and a 2.50mm hook, Lily measures approximately 26cm (about 10ΒΌ inches) from head to toe in a seated position.

Can I use safety eyes instead of plastic doll joints for the arms and legs?

Yes! The pattern offers several options for attaching the limbs β€” plastic doll joints, cotter pin joints, buttons and thread, or even just thread. Plastic doll joints are recommended for durability and ease of installation, but buttons with strong thread work very well too.

Is this pattern suitable for making a toy for a young child?

You can adapt it for young children by replacing safety eyes and plastic joints with embroidered alternatives, since safety eyes and small parts pose a choking hazard. Always use embroidered eyes and sewn-on limbs for toys intended for children under 3.

What does BLO mean in the pattern?

BLO stands for Back Loops Only. Instead of inserting your hook through both loops on top of a stitch as usual, you only work through the back loop. This creates a visible ridge and is used in this pattern to shape the hooves on the arms and legs.

How do I shape the hooves?

After stuffing the hoof firmly and turning it so the end of the round is at the back, cut a length of light pink yarn and thread it on a needle. Insert it from the top straight down to just above round 1, come back up through the opening, pull the stitch very tight to create a defined hoof shape, and knot the yarn ends together.