๐Ÿงถ Beautiful โœจ Detailed ๐Ÿ’ Adorable

Lighthouse Stacking Toy Crochet Pattern

Lighthouse Stacking Toy Crochet Pattern
4.7โ˜… Rating
8-10 Hours Time Needed
3.2K Made This
โœ‚๏ธ

Intermediate Level

Ideal for those with basic knitting experience, featuring slightly more advanced stitches and techniques to expand your skills.

โฑ๏ธ

All-Day Adventure

Requires 8-10 hours, ideal for a full day of immersive knitting.

๐Ÿงธ

Cute Companion

An adorable friend to cherish, handcrafted with love to bring comfort and joy for years to come.

About This Lighthouse Stacking Toy Crochet Pattern

This lighthouse stacking toy pattern creates a functional and decorative piece that children will love. The design features multiple stackable rings that fit onto a central pole, making it perfect for teaching colors and developing hand-eye coordination. Each component is carefully structured with clear increases and decreases to create the perfect shape, while the sturdy base ensures stability during play.

Lighthouse Stacking Toy Crochet Pattern crochet pattern - detailed view of completed project

The pattern includes detailed instructions for creating a two-part weighted base, three graduated rings, a decorative top section with yellow accent, and a charming pointed roof. Small details like the door and windows add personality to this coastal-inspired toy.

Why You'll Love This Lighthouse Stacking Toy Crochet Pattern

I absolutely love this pattern because it combines creativity with functionality in such a wonderful way! The stacking element makes it both a toy and a learning tool, which I find incredibly rewarding to create. I'm particularly fond of how the color changes between red and white create that classic lighthouse aesthetic, and the ability to customize the colors means you can match any nursery theme. The satisfaction of seeing each ring fit perfectly onto the pole is truly delightful, and knowing that this handmade toy will help a child develop their motor skills makes every stitch worthwhile.

Lighthouse Stacking Toy Crochet Pattern step 1 - construction progress Lighthouse Stacking Toy Crochet Pattern step 2 - assembly progress Lighthouse Stacking Toy Crochet Pattern step 3 - details and accessories Lighthouse Stacking Toy Crochet Pattern step 4 - final assembly and finishing

Switch Things Up

I love experimenting with color combinations on this lighthouse pattern! Instead of the classic red and white stripes, I've created coastal-themed versions using navy blue and cream for a sophisticated nautical look, or turquoise and sandy beige for a beach cottage vibe.

For a rainbow learning toy, I sometimes make each ring a different bright color to help toddlers learn color names while they play. Another fun variation I enjoy is adding small embroidered details like a tiny flag on top of the roof or stitching seagulls onto the rings.

I've also experimented with the base by adding weight - tucking a few small washers or a bean bag inside before closing makes it even more stable. For older children, I sometimes include numbers on the rings using surface crochet or felt appliques to teach counting and sequencing.

The windows and door offer great customization opportunities too - I've made versions with yellow windows to look like lights are on inside, or added small curtains using embroidery floss. You could even personalize it with the child's initial on the door!

Common Mistakes & How to Fix Them

โœ— Not stuffing the base firmly enough which can cause the lighthouse to tip over when rings are stacked โœ— Missing the front loop only and back loop only instructions which creates the decorative ridges and proper ring structure โœ— Forgetting to leave long tails for sewing which makes assembly difficult and connections less secure โœ— Skipping the stitch count verification at the end of each round leading to misshapen rings that won't stack properly

Lighthouse Stacking Toy Crochet Pattern

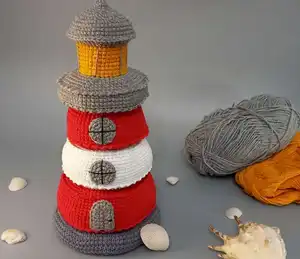
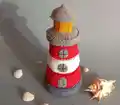
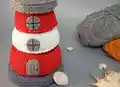
Create this charming lighthouse stacking toy that combines fun and learning for children! This delightful crochet project features a sturdy base, a tall white pole, and three colorful rings in red and white that stack perfectly. The lighthouse is topped with a grey roof and includes adorable details like a door and three windows. Perfect for nursery decor or as an educational toy, this pattern brings coastal charm to any space while helping little ones develop motor skills through play.

Intermediate 8-10 Hours

Materials Needed for Lighthouse Stacking Toy Crochet Pattern

โ€” Main Fabric

  • 01
    Alize Cotton Gold in White (color 55)
  • 02
    Alize Cotton Gold in Light Grey (color 200)
  • 03
    Alize Cotton Gold in Red (color 56)
  • 04
    Alize Cotton Gold in Yellow (color 216)

โ€” Tools Required

  • 01
    3 mm crochet hook
  • 02
    Fiberfill for stuffing
  • 03
    Tapestry needle for sewing
  • 04
    Scissors
  • 05
    Stitch markers (recommended)

Progress Tracker

0% Complete

โ€” BASE (make 2 parts) :

Info :

Start with grey color

Round 1 :

6 sc in MR (6)

Round 2 :

6 inc (12)

Round 3 :

(1 sc; inc)*6 (18)

Round 4 :

(2 sc; inc)*6 (24)

Round 5 :

(3 sc; inc)*6 (30)

Round 6 :

FLO (4 sc; inc)*6 (36)

Round 7 :

(5 sc; inc)*6 (42)

Round 8 :

3 sc; inc; (6 sc; inc)*5; 3 sc (48)

Round 9 :

(7 sc; inc)*6 (54)

Round 10 :

4 sc; inc; (8 sc; inc)*5; 4 sc (60)

Round 11 :

FLO (9 sc; inc)*6 (66)

Round 12 :

5 sc; inc; (10 sc; inc)*5; 5 sc (72)

Round 13 :

(11 sc; inc)*6 (78)

Round 14 :

6 sc; inc; (12 sc; inc)*5; 6 sc (84)

Round 15 :

(13 sc; inc)*6 (90)

Round 16-17 :

90 sc (90) cut the yarn, leave a long tail for sewing

โ€” POLE :

Info :

Crochet with white color, fill with stuffing as you go

Round 1 :

6 sc in MR (6)

Round 2 :

6 inc (12)

Round 3 :

(1 sc; inc)*6 (18)

Round 4 :

(2 sc; inc)*6 (24)

Round 5-49 :

24 sc (24)

Round 50 :

(3 sc; inc)*6 (30)

Info :

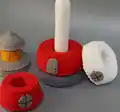
Sew the pole with the part of the base (in round 5) like in the pictures. Then sew two parts of the base together in back loops of rounds 6 and 11. Fill with stuffing as you go. After that sew edges of two parts of base in round 17.

โ€” LARGE RING :

Info :

Crochet with red color

Round 1 :

36 ch, sl st in 1st ch (36) continue to work in rounds

Round 2-11 :

1 ch; 36 sc; sl st (36) turn the work inside out and continue in rounds

Round 12 :

BLO (5 sc; inc)*6 (42)

Round 13 :

3 sc; inc; (6 sc; inc)*5; 3 sc (48)

Round 14 :

(7 sc; inc)*6 (54)

Round 15 :

4 sc; inc; (8 sc; inc)*5; 4 sc (60)

Round 16 :

(9 sc; inc)*6 (66)

Round 17 :

5 sc; inc; (10 sc; inc)*5; 5 sc (72)

Round 18 :

(11 sc; inc)*6 (78)

Round 19 :

6 sc; inc; (12 sc; inc)*5; 6 sc (84)

Round 20 :

(13 sc; inc)*6 (90)

Round 21 :

BLO (13 sc; dec)*6 (84)

Round 22-25 :

84 sc (84)

Round 26 :

6 sc; dec; (12 sc; dec)*5; 6 sc (78)

Round 27-30 :

78 sc (78)

Round 31 :

BLO (11 sc; dec)*6 (72)

Round 32 :

5 sc; dec; (10 sc; dec)*5; 5 sc (66)

Round 33 :

(9 sc; dec)*6 (60)

Round 34 :

4 sc; dec; (8 sc; dec)*5; 4 sc (54)

Round 35 :

(7 sc; dec)*6 (48)

Round 36 :

3 sc; dec; (6 sc; dec)*5; 3 sc (42)

Round 37 :

(5 sc; dec)*6 (36) fill with stuffing, cut the yarn, leave a tail for sewing. Sew round 37 with round 1.

Info :

There are two ways to make pretty edges of the rings - in rounds 21 and 31 in the front loops make slip stitch round or reverse crochet (crab stitch) round. R 21: (1 rev;skip 1 sc)*45 (45) or R 21: 90 sl st (90). R 31: (1 rev;skip 1 sc)*39 (39) or R 31: 78 sl st (78)

โ€” MIDDLE RING :

Info :

Crochet with white color

Round 1 :

36 ch, sl st in 1st ch (36) continue to work in rounds

Round 2-11 :

1 ch; 36 sc; sl st (36) turn the work inside out and continue in rounds

Round 12 :

BLO (5 sc; inc)*6 (42)

Round 13 :

3 sc; inc; (6 sc; inc)*5; 3 sc (48)

Round 14 :

(7 sc; inc)*6 (54)

Round 15 :

4 sc; inc; (8 sc; inc)*5; 4 sc (60)

Round 16 :

(9 sc; inc)*6 (66)

Round 17 :

5 sc; inc; (10 sc; inc)*5; 5 sc (72)

Round 18 :

(11 sc; inc)*6 (78)

Round 19 :

BLO (11 sc; dec)*6 (72)

Round 20-23 :

72 sc (72)

Round 24 :

5 sc; dec; (10 sc; dec)*5; 5 sc (66)

Round 25-28 :

66 sc (66)

Round 29 :

BLO (9 sc; dec)*6 (60)

Round 30 :

4 sc; dec; (8 sc; dec)*5; 4 sc (54)

Round 31 :

(7 sc; dec)*6 (48)

Round 32 :

3 sc; dec; (6sc; dec)*5; 3 sc (42)

Round 33 :

(5 sc; dec)*6 (36) fill with stuffing, cut the yarn, leave a tail for sewing. Sew round 33 with round 1.

Info :

In rounds 19/29 in the front loops make slip stitch round (78slst/66slst) or reverse crochet (crab stitch) round (39 rev/33 rev)

โ€” SMALL RING :

Info :

Crochet with red color

Round 1 :

36 ch, sl st in 1st ch (36) continue to work in rounds

Round 2-11 :

1 ch; 36 sc; sl st (36) turn the work inside out and continue in rounds

Round 12 :

BLO (5 sc; inc)*6 (42)

Round 13 :

3 sc; inc; (6 sc; inc)*5; 3 sc (48)

Round 14 :

(7 sc; inc)*6 (54)

Round 15 :

4 sc; inc; (8 sc; inc)*5; 4 sc (60)

Round 16 :

(9 sc; inc)*6 (66)

Round 17 :

BLO (9 sc; dec)*6 (60)

Round 18-21 :

60 sc (60)

Round 22 :

4 sc; dec; (8 sc; dec)*5; 4 sc (54)

Round 23-26 :

54 sc (54)

Round 27 :

BLO (7 sc; dec)*6 (48)

Round 28 :

3 sc; dec; (6sc; dec)*5; 3 sc (42)

Round 29 :

(5 sc; dec)*6 (36) fill with stuffing, cut the yarn, leave a tail for sewing. Sew round 29 with round 1.

Info :

In rounds 17/27 in the front loops make slip stitch round (66slst/48slst) or reverse crochet (crab stitch) round (33 rev/24 rev)

โ€” TOP :

Info :

Crochet with grey color

Round 1 :

6 sc in MR (6)

Round 2 :

6 inc (12)

Round 3 :

(1 sc; inc)*6 (18)

Round 4 :

(2 sc; inc)*6 (24)

Round 5 :

(3 sc; inc)*6 (30)

Round 6 :

(4 sc; inc)*6 (36)

Round 7-14 :

1 ch; 36 sc; sl st (36) turn the work inside out and continue in rounds

Round 15 :

BLO (5 sc; inc)*6 (42)

Round 16 :

3 sc; inc; (6 sc; inc)*5; 3 sc (48)

Round 17 :

(7 sc; inc)*6 (54)

Round 18 :

4 sc; inc; (8 sc; inc)*5; 4 sc (60)

Round 19 :

(9 sc; inc)*6 (66)

Round 20 :

5 sc; inc; (10 sc; inc)*5; 5 sc (72)

Round 21 :

BLO 72 sc (72)

Round 22-24 :

72 sc (72)

Round 25 :

BLO 5 sc; dec; (10 sc; dec)*5; 5 sc (66)

Round 26 :

(9 sc; dec)*6 (60)

Round 27 :

4 sc; dec; (8 sc; dec)*5; 4 sc (54)

Round 28 :

(7 sc; dec)*6 (48)

Round 29 :

3 sc; dec; (6 sc; dec)*5; 3 sc (42)

Round 30 :

(5 sc; dec)*6 (36) fill with stuffing, change to yellow color

Round 31 :

FLO 36 sc (36)

Round 32-38 :

36 sc (36) change to grey color

Round 39 :

FLO (5 sc; inc)*6 (42)

Round 40 :

3 sc; inc; (6 sc; inc)*5; 3 sc (48) cut the yarn, hide a tail, fill with stuffing

Info :

In rounds 21/25 in the front loops make one slip stitch round (72slst) or reverse crochet (crab stitch) round (36 rev)

โ€” ROOF :

Info :

Crochet with grey color

Round 1 :

6 sc in MR (6)

Round 2 :

6 sc (6)

Round 3 :

6 inc (12)

Round 4 :

12 sc (12)

Round 5 :

12 inc (24)

Round 6 :

24 sc (24)

Round 7 :

(1 sc; inc)*6 (36)

Round 8 :

36 sc (36)

Round 9 :

(2 sc; inc)*6 (48)

Round 10-12 :

48 sc (48) connect the roof with the top of lighthouse with one single crochet round (48 sc), fill with stuffing as you go

โ€” DOOR :

Info :

Crochet with grey color

Row 1 :

8 ch (8)

Row 2 :

7 sc (7)

Round 3 :

1 ch, 6 sc; 3 sc in one; 6 sc; turn (15)

Round 4 :

1 ch, 6 sc; 3 inc; 6 sc; turn (18) cut the yarn leave a tail for sewing

โ€” WINDOWS (make 3) :

Info :

Crochet with grey color

Round 1 :

6 sc in MR (6)

Round 2 :

6 inc (12)

Round 3 :

(1 sc; inc)*6 (18) cut the yarn leave a tail for sewing

Info :

Sew the door and windows to the rings (blocks). Your lighthouse is finished. Find a good lighthouse keeper!

Assembly Instructions

  • Sew the pole to one part of the base at round 5 as indicated in the pattern instructions
  • Join the two base parts together by sewing through the back loops of rounds 6 and 11, stuffing firmly as you work
  • After stuffing the base completely, sew the edges of the two base parts together at round 17 to secure
  • For each ring, after stuffing, sew the final round to round 1 to close the opening completely
  • Add decorative edging to the rings using either slip stitch or reverse crochet in the designated front loop rounds
  • Attach the roof to the top section by crocheting them together with a single crochet round while stuffing
  • Sew the door and three windows to the rings at your preferred positions to complete the lighthouse details

Important Notes

  • ๐Ÿ’กPay careful attention to FLO and BLO instructions as they create the decorative ridges that give the rings their dimensional appearance
  • ๐Ÿ’กStuff the base very firmly to ensure the lighthouse remains stable when children stack the rings during play
  • ๐Ÿ’กLeave long tails when cutting yarn for all pieces to make sewing easier and more secure
  • ๐Ÿ’กTurn the work inside out at the specified rounds for the rings to achieve the correct texture on the visible side
  • ๐Ÿ’กUse stitch markers to track your place, especially during the long rounds of the large ring
  • ๐Ÿ’กThe yellow accent band on the top section can be customized to match your color scheme preferences

This delightful lighthouse stacking toy pattern brings coastal charm and educational play together beautifully! Perfect for nursery decor or as a thoughtful handmade gift, this design features sturdy construction that can withstand enthusiastic toddler play while teaching colors and developing fine motor skills. The combination of classic red and white stripes with charming details like tiny windows and a door makes this lighthouse both functional and adorable. Whether displayed on a shelf or used for daily play, this stacking toy will become a treasured part of childhood memories. ๐Ÿงถ Happy crocheting! ๐Ÿงตโœจ

You ask,

we answer.

FAQs

What yarn weight is best for this lighthouse pattern?

The pattern uses Alize Cotton Gold which is a DK weight yarn (light worsted). You can substitute with any DK or light worsted weight cotton or cotton blend yarn, just make sure to maintain consistent tension throughout the project for proper ring sizing.

How do I ensure the rings fit properly on the pole?

The key is maintaining accurate stitch counts throughout each round. Count your stitches at the end of every round, especially during increases and decreases. The rings are designed with specific inner diameters that correspond to the pole width, so accuracy is essential for proper stacking.

Can I make the lighthouse taller or add more rings?

Absolutely! To make the pole taller, simply add more rounds between rounds 5 and 49 where you work 24 sc. For additional rings, follow the middle ring pattern and adjust the size by adding or reducing a few increase/decrease rounds to create graduated sizes.

What's the difference between slip stitch edging and reverse crochet for the rings?

Both techniques create decorative edges on the rings. Slip stitch creates a subtle, smooth ridge while reverse crochet (crab stitch) makes a more textured, rope-like edge. Choose based on your preference - both work equally well and the pattern provides stitch counts for each option.

How much stuffing should I use for the base?

Stuff the base very firmly to create a stable, weighted foundation. The lighthouse needs to stay upright when rings are added and removed. Pack the fiberfill tightly, especially around the pole attachment point, to prevent tipping during play.

Is this toy safe for young children?

Yes, when properly constructed with secure stitching and all ends woven in carefully. Make sure the door and windows are sewn on very securely. Always supervise young children during play and inspect the toy regularly for any loose parts or wear.