About This Leafy Textured Crochet Tote Bag Pattern
This statement accessory is perfect for farmers market trips, beach days, or daily errands, and makes an unforgettable gift for anyone who appreciates handmade style.
Ideal for those with basic crocheting experience, featuring slightly more advanced stitches and techniques to expand your skills.
Takes 5-7 hours, making it an enjoyable project to finish over a couple of days.
An elegant detail to elevate any look, combining traditional techniques with contemporary design sensibilities.
This statement accessory is perfect for farmers market trips, beach days, or daily errands, and makes an unforgettable gift for anyone who appreciates handmade style.
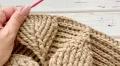
I absolutely fell in love with how the leafy texture grows with every single round! It's one of those magical patterns where you can't wait to finish the next row just to see the 3D details pop. Plus, working with thick cord means it works up surprisingly fast, and the finished bag has this amazing, sturdy weight that feels so premium.
When I first saw a bag like this, I knew I had to make one. There's something so therapeutic about working post stitches once you find your rhythm. The way the leaves slowly emerge from a flat circle into this gorgeous, structured masterpiece is just pure magic. I remember sitting on my porch with a cup of tea, watching the leaf tips form, and feeling that wonderful spark of creative excitement.
To make this project truly your own, I highly recommend experimenting with colors! While a classic sage green or sandy beige highlights the organic nature of the design, a rich mustard yellow or deep forest green looks absolutely stunning for autumn. If you're feeling adventurous, you can even use a multi-colored or tie-dye cord like the sample to give the leaves a beautiful, shifting depth.
If you decide to go with the crocheted handles, try running a thin cotton clothesline cord inside the handles as you crochet over them. It's a simple little trick I use to keep handles from stretching out over years of use!
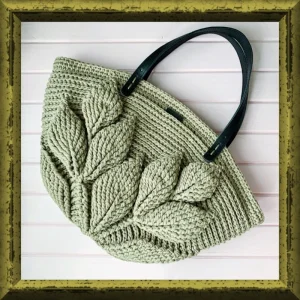
Get ready to turn heads with this gorgeous, textured leaf-motif tote bag! If you love projects that combine stunning three-dimensional textures with practical style, this bag is going to be your new favorite make. The beautiful relief leaves cascade down the sides, creating an organic, eye-catching design that looks high-end but is incredibly satisfying to crochet. Grab your favorite sturdy cord and let's craft something beautiful together!
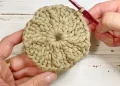
Start by making a ch of 6, then join with a sl st into the first ch to form a starting loop.
ch 2, work 16 dc into the center of the loop, then join the round with a sl st. Secure and weave in your starting tail along these stitches.
For the following rounds, you will repeat the given pattern sequence exactly 4 times to complete the full round. Each round is joined with a sl st.
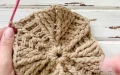
ch 2, then repeat [3 dc in the next stitch, 1 fpdc, ch 1, 1 fpdc, 3 dc in the next stitch, 1 fpdc] 4 times. Join the round with a sl st.
ch 2, then repeat [3 bpdc, 2 fpdc in the next stitch, ch 1, 2 fpdc in the next stitch, 3 bpdc, 1 fpdc] 4 times. Join the round with a sl st.
ch 2, then repeat [2 bpdc in the next stitch, 2 bpdc, 1 fpdc, 2 fpdc in the next stitch, ch 1, 2 fpdc in the next stitch, 1 fpdc, 2 bpdc, 2 bpdc in the next stitch, 1 fpdc] 4 times. Join the round with a sl st.
ch 2, then repeat [2 bpdc in the next stitch, 3 bpdc, 2 fpdc, 2 fpdc in the next stitch, ch 1, 2 fpdc in the next stitch, 2 fpdc, 3 bpdc, 2 bpdc in the next stitch, 1 fpdc] 4 times. Join the round with a sl st.
ch 2, then repeat [5 bpdc, 3 fpdc, 2 fpdc in the next stitch, ch 1, 2 fpdc in the next stitch, 3 fpdc, 5 bpdc, 1 fpdc] 4 times. Join the round with a sl st.
ch 2, then repeat [2 bpdc in the next stitch, 4 bpdc, 4 fpdc, 2 fpdc in the next stitch, ch 1, 2 fpdc in the next stitch, 4 fpdc, 4 bpdc, 2 bpdc in the next stitch, 1 fpdc] 4 times. Join the round with a sl st.
ch 2, then repeat [2 bpdc in the next stitch, 5 bpdc, 5 fpdc, 2 fpdc in the next stitch, ch 1, 2 fpdc in the next stitch, 5 fpdc, 5 bpdc, 2 bpdc in the next stitch, 1 fpdc] 4 times. Join the round with a sl st.
ch 1, then repeat [(1 dc, ch 1, 1 dc) in the next stitch, 7 bpdc, 6 fpdc, 2 fpdc in the next stitch, ch 1, 2 fpdc in the next stitch, 6 fpdc, 7 bpdc, (1 dc, ch 1, 1 dc) in the next stitch, 1 fpdc] 4 times. Join the round with a sl st.
ch 1, then repeat [1 dc, 2 fpdc in the next stitch, ch 1, 2 fpdc in the next stitch, 7 bpdc, fpdc2tog, 12 fpdc, fpdc2tog, 7 bpdc, 2 fpdc in the next stitch, ch 1, 2 fpdc in the next stitch, 1 dc, 1 fpdc] 4 times. Join the round with a sl st.
ch 1, then repeat [2 bpdc in the next stitch, 1 fpdc, 2 fpdc in the next stitch, ch 1, 2 fpdc in the next stitch, 1 fpdc, 7 bpdc, fpdc2tog, 10 fpdc, fpdc2tog, 7 bpdc, 1 fpdc, 2 fpdc in the next stitch, ch 1, 2 fpdc in the next stitch, 1 fpdc, 2 bpdc in the next stitch, 1 fpdc] 4 times. Join the round with a sl st.
ch 1, then repeat [2 bpdc in the next stitch, 1 bpdc, 2 fpdc, 2 fpdc in the next stitch, ch 1, 2 fpdc in the next stitch, 2 fpdc, 7 bpdc, fpdc2tog, 8 fpdc, fpdc2tog, 7 bpdc, 2 fpdc, 2 fpdc in the next stitch, ch 1, 2 fpdc in the next stitch, 2 fpdc, 1 bpdc, 2 bpdc in the next stitch, 1 fpdc] 4 times. Join the round with a sl st.
ch 1, then repeat [2 bpdc in the next stitch, 2 bpdc, 3 fpdc, 2 fpdc in the next stitch, ch 1, 2 fpdc in the next stitch, 3 fpdc, 7 bpdc, fpdc2tog, 6 fpdc, fpdc2tog, 7 bpdc, 3 fpdc, 2 fpdc in the next stitch, ch 1, 2 fpdc in the next stitch, 3 fpdc, 2 bpdc, 2 bpdc in the next stitch, 1 fpdc] 4 times. Join the round with a sl st.
ch 1, then repeat [2 bpdc in the next stitch, 3 bpdc, 4 fpdc, 2 fpdc in the next stitch, ch 1, 2 fpdc in the next stitch, 4 fpdc, 7 bpdc, fpdc2tog, 4 fpdc, fpdc2tog, 7 bpdc, 4 fpdc, 2 fpdc in the next stitch, ch 1, 2 fpdc in the next stitch, 4 fpdc, 3 bpdc, 2 bpdc in the next stitch, 1 fpdc] 4 times. Join the round with a sl st.
ch 1, then repeat [2 bpdc in the next stitch, 4 bpdc, 5 fpdc, 2 fpdc in the next stitch, ch 1, 2 fpdc in the next stitch, 5 fpdc, 7 bpdc, fpdc2tog, 2 fpdc, fpdc2tog, 7 bpdc, 5 fpdc, 2 fpdc in the next stitch, ch 1, 2 fpdc in the next stitch, 5 fpdc, 4 bpdc, 2 bpdc in the next stitch, 1 fpdc] 4 times. Join the round with a sl st.
ch 1, then repeat [2 bpdc in the next stitch, 5 bpdc, fpdc2tog, 10 fpdc, fpdc2tog, 7 bpdc, fpdc2tog, fpdc2tog, 7 bpdc, fpdc2tog, 10 fpdc, fpdc2tog, 5 bpdc, 2 bpdc in the next stitch, 1 fpdc] 4 times. Join the round with a sl st.
ch 1, then repeat [7 bpdc, fpdc2tog, 8 fpdc, fpdc2tog, 7 bpdc, fpdc2tog, 7 bpdc, fpdc2tog, 8 fpdc, fpdc2tog, 7 bpdc, 2 fpdc in the next stitch] 4 times. Join the round with a sl st.
ch 1, then repeat [7 bpdc, fpdc2tog, 6 fpdc, fpdc2tog, 7 bpdc, 1 dc, 7 bpdc, fpdc2tog, 6 fpdc, fpdc2tog, 7 bpdc, 2 fpdc in the next stitch, ch 1, 2 fpdc in the next stitch] 4 times. Join the round with a sl st.
ch 1, then repeat [7 bpdc, fpdc2tog, 4 fpdc, fpdc2tog, 15 bpdc, fpdc2tog, 4 fpdc, fpdc2tog, 7 bpdc, 1 fpdc, 2 fpdc in the next stitch, ch 1, 2 fpdc in the next stitch, 1 fpdc] 4 times. Join the round with a sl st.
ch 1, then repeat [7 bpdc, fpdc2tog, 2 fpdc, fpdc2tog, 15 bpdc, fpdc2tog, 2 fpdc, fpdc2tog, 7 bpdc, 2 fpdc, 2 fpdc in the next stitch, ch 1, 2 fpdc in the next stitch, 2 fpdc] 4 times. Join the round with a sl st.
ch 1, then repeat [7 bpdc, fpdc2tog, fpdc2tog, 15 bpdc, fpdc2tog, fpdc2tog, 7 bpdc, 3 fpdc, 2 fpdc in the next stitch, ch 1, 2 fpdc in the next stitch, 3 fpdc] 4 times. Join the round with a sl st.
ch 1, then repeat [7 bpdc, fpdc2tog, 15 bpdc, fpdc2tog, 7 bpdc, 4 fpdc, 2 fpdc in the next stitch, ch 1, 2 fpdc in the next stitch, 4 fpdc] 4 times. Join the round with a sl st.
ch 1, then repeat [7 bpdc, 1 dc, 15 bpdc, 1 dc, 7 bpdc, fpdc2tog, 8 fpdc, fpdc2tog] 4 times. Join the round with a sl st.
ch 1, then repeat [31 bpdc, fpdc2tog, 6 fpdc, fpdc2tog] 4 times. Join the round with a sl st.
ch 1, then repeat [31 bpdc, fpdc2tog, 4 fpdc, fpdc2tog] 4 times. Join the round with a sl st.
ch 1, then repeat [31 bpdc, fpdc2tog, 2 fpdc, fpdc2tog] 4 times. Join the round with a sl st.
ch 1, then repeat [31 bpdc, fpdc2tog, fpdc2tog] 4 times. Join the round with a sl st.
ch 1, then repeat [31 bpdc, fpdc2tog] 4 times. Join the round with a sl st.
ch 1, then repeat [32 bpdc] 4 times. Join the round with a sl st.
ch 1, work 128 sc evenly around the entire top edge, then join with a sl st. (Note: If you plan to crochet your handles directly onto the bag, skip to the Crochet Handles section now. If you are sewing on leather handles, proceed to Round 31.)
ch 1, work 128 sc around the top edge, then join with a sl st.
ch 1, work 128 sc around the top edge, then join with a sl st. Fasten off, cut your cord, and carefully weave in the tail along the inside stitches.
To make crocheted handles instead of sewing on pre-made ones, first fold your completed bag flat, matching up the top peaks of the leaf motifs. Count 3 stitches in from the outer edge towards the center on each side and place your 4 stitch markers to mark the handle attachment points.
Begin working sc in the round. When you reach the first stitch marker, create a ch of your desired length (make it shorter for an elbow bag, or longer for a shoulder bag). Skip the space between markers and connect this ch with a sl st at the second marker. Continue working sc until you reach the third marker, then ch the exact same number of stitches. Connect with a sl st at the fourth marker, then sc back to the start.
sc in each stitch around, working 1 sc into each loop of the handle chains as you reach them.
sc in each stitch around for another 2 to 3 rounds to strengthen and thicken the handles.
For a decorative edge, you can work the final round of sc by inserting your hook into the ch loop directly below the handle attachment points.
I hope you absolutely love making and showing off this gorgeous leafy bag! There is nothing quite like the feeling of carrying a beautiful accessory that you made with your own two hands. It's the perfect blend of modern style and classic crochet technique. Don't forget to take a moment to admire those stunning 3D leaves once you're done! Happy crafting, and may your new bag accompany you on many wonderful adventures! 🧶✨
Any sturdy 2-3mm cord will work beautifully! Cotton cord, polyester rope, jute, or even thick raffia are all fantastic substitutes. Just look for something with minimal stretch so your bag keeps its structural shape when loaded with your daily essentials.
Because the pattern uses dense post stitches and thick cord, the fabric is naturally quite solid and shouldn't have large gaps. However, if you plan to carry very small items or want to prevent any stretching over time, adding a simple fabric lining is a wonderful way to finish it.
The easiest way to alter the size is by changing your cord thickness and hook size. Going down to a 1.5mm cord and 3.5mm hook will make a lovely petite version, while using a chunky 4mm cord and 6mm hook will yield a massive, oversized beach tote.
Yes, a little bit of cupping is normal as the textured stitches pull together. However, if it's curling severely, your tension might be too tight. Try relaxing your hands or switching to a half-millimeter larger hook size to give those post stitches more breathing room.
