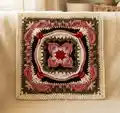
Create a stunning heirloom-quality granny square with the Lauren Rose Square pattern, designed as a heartfelt legacy piece for loved ones. This intermediate-level project features intricate texture work, beautiful colorwork transitions, and elegant post stitches that come together to form an 11x11 inch masterpiece. Perfect for blankets, pillows, or standalone decorative pieces, this pattern combines traditional crochet techniques with modern design elements. Each round builds upon the last, creating dimensional petals and rich visual interest that will showcase your crochet skills beautifully.
Progress Tracker
0% Complete
— RND 1: A, Rosebud – Large/Mini
Info :
Starting in a double magic ring
Instructions :
ch 4 (counts as a 1st dc of rnd, ch 1); [dc, ch 2 as a corner, dc, ch 1] 3 times; dc, ch 2; cut yarn, invisible join to 4th ch of rnd. Counts: 8 dc, 4 ch-1 sps, 4 ch-2 corner sp (12 total/3 per side)
— RND 2: B, Antique Cream – Large/Mini
Info :
Starting in any ch-2 corner sp
Instructions :
*(2 dc, ch 3, 2 dc) in ch-2 corner sp; sk NEXT dc, 2 dc in NEXT ch-1 sp, sk NEXT dc; repeat from * around; cut yarn, invisible join. Counts: 24 dc, 4 ch-3 corner sp (24 total/6 per side)
— RND 3: C, Rosy II – Large/Mini
Info :
Starting in any ch-3 corner sp
Instructions :
*(6 dc, ch 2, 6 dc) in ch-3 corner sp, sk NEXT 2 dc, FPsc2tog around NEXT 2 dc, sk NEXT 2 dc; repeat from * around; cut yarn, invisible join. Counts: 48 dc, 4 FPsc2tog, 4 ch-2 corner sps, (52 total/13 per side)
— RND 4: D, Black – Large/Mini
Info :
Starting around any FPsc2tog
Instructions :
*FPdc around FPsc2tog; working in 3LP, dc in NEXT dc, hdc in NEXT 2 dc, sc in NEXT 3 dc; ch 2, sk NEXT ch-2 corner sp; working in 3LP, sc in NEXT 3 dc, hdc in NEXT 2 dc, dc in NEXT dc; repeat from * around; cut yarn, invisible join. Counts: 8 dc, 16 hdc, 24 sc, 4 FPdc, 4 ch-2 corner sps (52 total/13 per side)
— RND 5: E, Olive – Large/Mini
Info :
Starting in any ch-2 corner sp
Instructions :
*(2 dc, ch 2, 2 dc) in ch-2 corner sp; ch 1, sk NEXT 2 sc; (dc, ch 1, dc) in NEXT sc, ch 1, sk NEXT (2 hdc, dc); (dc, ch 1, dc) in NEXT FPdc, sk (dc, 2 hdc); (dc, ch 1, dc) in NEXT sc; ch 1, sk NEXT 2 sc; repeat from * around; cut yarn, invisible join. Counts: 40 dc, 28 ch 1 sps, 4 ch-2 corner sp, (68 total/17 per side)
— RND 6: F, Ivory – Large/Mini
Info :
Starting in any ch-2 corner sp
Instructions :
*(sc, ch 2, sc) in ch-2 corner sp; sc in NEXT 2 dc, hdc in NEXT ch 1 sp; sk NEXT dc, (2 dc) in NEXT ch-1 sp; sk NEXT dc, (2 tr) in NEXT ch-1 sp; sk NEXT dc, (3 tr) in ch-1 sp; sk NEXT dc, (2 tr) in ch-1 sp; sk NEXT dc, (2 dc) in ch-1 sp; sk NEXT dc, hdc in NEXT ch-1 sp, sc in NEXT 2 dc; repeat from * around; cut yarn, invisible join. Counts: 28 tr, 16 dc, 8 hdc, 24 sc, 4 ch-2 corner sp (76 total/19 per side)
— RND 7: G, Warm Blush – Large/Mini
Info :
Starting in 2nd sc of any side
Instructions :
BPsc around each st across to NEXT ch-2 corner sp; [ch 2, sk NEXT ch-2 corner sp; BPsc around each st across to NEXT ch-2 corner sp] 3 times; ch 2, sk NEXT ch-2 corner, BPsc around NEXT sc; cut yarn, invisible join. Counts: 76 BPsc, 4 ch-2 corner sp (76 total/19 per side)
— RND 8: A, Rosebud – Large/Mini
Info :
Starting in any ch-2 corner sp of rnd 6
Instructions :
*(4 dc) in ch-2 corner sp of rnd 6; working in rnd 7, ch 1, sk ch-2 sp; BPsc around each st across to NEXT ch-2 corner sp, ch 1; repeat from * around; cut yarn, invisible join. Counts: 16 dc, 76 BPsc, 8 ch-1 sp (100 total/25 per side)
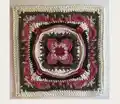
— RND 9: Large - D, Black/Mini – F, Ivory
Info :
Start in 1st BPsc of any side
Instructions :
*working in BPsc only, dc in NEXT 4, hdc in NEXT 3, sc in NEXT 5, hdc in NEXT 3, dc in NEXT 4, ch 6; repeat from * around; cut yarn, invisible join. Counts: 32 dc, 24 hdc, 20 sc, 4 ch-6 corner sp (76 total/19 per side)
— RND 10: Large – F, Ivory/Mini - C, Rosy II
Info :
Starting in any ch-6 sp
Instructions :
*dc in ch-6 sp, FOLD ch-6 away from you, work a shallow BPtr2tog in first 2 corner dcs of rnd 8; (dc, ch 2, dc) in ch-6 sp of rnd 9 just worked, FOLD ch 6 away from you, work a shallow BPtr2tog in last 2 corner dcs of rnd 8; dc in ch-6 sp of rnd 9 just worked; working in NEXT 19 sts, 3 hdc, 13 sc, 3 hdc; repeat from * around; cut yarn, invisible join. Counts: 16 dc, 24 hdc, 52 sc, 8 BPtr2tog, 4 ch-2 corner sp (100 total/25 per side)
— FOR MINI SQUARE ONLY
Info :
C, Rosy II – In any ch-2 corner sp
Instructions :
*(sc, ch 2, sc); sc across each st to NEXT ch-2 corner sp; repeat from * around; cut yarn, invisible join. Mini Square Counts: 108 sc, 4 ch- 2 corner sp (108 total/27 per side)
Info :
To embellish petals, turn to back and surface slst around inside edges of petals
— RND 11: C, Rosy II - Large
Info :
Starting in any ch-2 corner sp
Instructions :
*(sc, ch 2, sc) in ch-2 corner sp; sc in NEXT 2 sts; ch 1, sk NEXT 2 sts; work shell in NEXT st; ch 1, sk NEXT 2 sts; [sc in NEXT 2 sts, ch 1, PC in NEXT sc, ch 1,] 3 times, sc in NEXT 2 sts; ch 1, sk NEXT 2 sts; work shell in NEXT st; ch 1, sk NEXT 2 sts; sc in NEXT 2 sts; repeat from * around; cut yarn, invisible join. Counts: 56 sc, 8 shells, 12 PC, 40 ch-1 sps, 4 ch-2 corner sp (164 total/41 per side)
— RND 12: B, Antique Cream - Large
Info :
Starting in any ch-2 corner sp
Instructions :
*(dc, ch 1, dc; ch 2, dc, ch 1, dc) in ch-2 corner sp; ch 3, sk across each st to NEXT shell; BPsc in 3rd, 4th and 5th tr of shell, ch 3; dc in sc, ch 3; [sk across each st to 2nd sc after PC, dc in sc, ch 3] 3 times; sk across each st to NEXT shell; BPsc in 3rd, 4th and 5th tr; ch 3, sk across each st to NEXT ch-2 corner sp; repeat from * around; cut yarn, invisible join. Counts: 32 dc, 24 BPsc, 28 ch-3 sps, 4 ch-2 corners (140 total/35 per side)
— RND 13: E, Olive - Large
Info :
Starting in any ch-2 corner sp
Instructions :
*(dc, ch 1, dc, ch 2; dc, ch 1, dc) in ch-2 corner sp; sk NEXT dc, (2 dc) in NEXT ch-1 sp, sk NEXT dc; (dc, 2 hdc) in NEXT ch-3 sp; sc in NEXT 3 BPsc; (2 hdc) in NEXT ch-3 sp, sk NEXT dc; [hdc in NEXT ch-3 sp; working in front of ch-3 sp, tr2tog in worked scs of rnd 10 before and after PC of rnd 11; hdc in ch-3 sp of rnd 13 just worked, sk NEXT dc] 3 times; (2 hdc) in NEXT ch-3 sp; sc in NEXT 3 BPsc; (2 hdc, dc) in NEXT ch-3 sp, sk NEXT dc; (2 dc) in NEXT ch-1 sp, sk NEXT dc; repeat from * around; cut yarn, invisible join. Counts: 24 sc, 56 hdc, 40 dc, 12 dc2tog, 8 ch-1 sps, 4 ch-2 corner sp (140 total/35 per side)
— RND 14: F, Ivory - Large
Info :
Starting in any ch-2 corner sp
Instructions :
*(dc, ch 2, dc) in ch-2 corner sp; dc in 3LP of NEXT dc; dc in NEXT ch-1 sp; working in 3LP, dc in NEXT 31 sts; dc in NEXT ch-1 sp; dc in 3LP of NEXT dc; repeat from * around; cut yarn, invisible join. Count: 148 dc, 4 ch-2 corner sps (148 total/37 per side)
— RND 15: F, Ivory - Large
Info :
Starting in any ch 2 corner sp
Instructions :
*(sc, ch 2, sc) in ch-2 corner sp; sc across each st to NEXT ch-2 corner sp; repeat from * around; cut yarn, invisible join and weave in ALL yarn ends. Large square count: 156 sc, 4 ch-2 corner sps (156 total/39 per side)
Info :
Blocking is highly recommended to achieve final shape and size, make stitches even and more defined for a professional appearance
The Lauren Rose Square pattern represents more than just beautiful crochet work - it's a legacy of love stitched into every round. This intermediate-level square combines traditional granny square construction with modern texture techniques to create something truly special. Whether you're making a single square as a decorative piece or combining nine squares into a cherished blanket like the original design, each stitch carries intention and heart. The pattern's thoughtful color transitions and dimensional elements make it a joy to create and a treasure to keep. 🧶 Happy crocheting and creating your own legacy! 🌹✨